Hadoop stepping on the pit (3)
Eclipse configures hadoop development environment
Environmental Science
windows 10
java 1.8
Namenode (Hadoop 1-ali) alicloud (CentOS 7.3) 120.26.173.104
hadoop version 2.8.5
Eclipse installation
Enterprise version needs to be installed. For network reasons, offline installation package is recommended
https://www.eclipse.org/downl...
Of course, you need to install java before that. I won't elaborate here
Configure hadoop plug-in
Extract the downloaded Hadoop to the local directory. Add system environment variable: create new variable name HADOOP_HOME, the value is the decompression path of Hadoop, e.g. D: program files / hadoop-2.7.5
Add to path:% HADOOP_HOME%\bin
Copy the hadoop-eclipse-plugin-2.8.5.jar package to the plugins directory under the Eclipse directory. Restart Eclipse.
Open window - > preferences and you can see that there are more Hadoop Map/Reduce items on the left
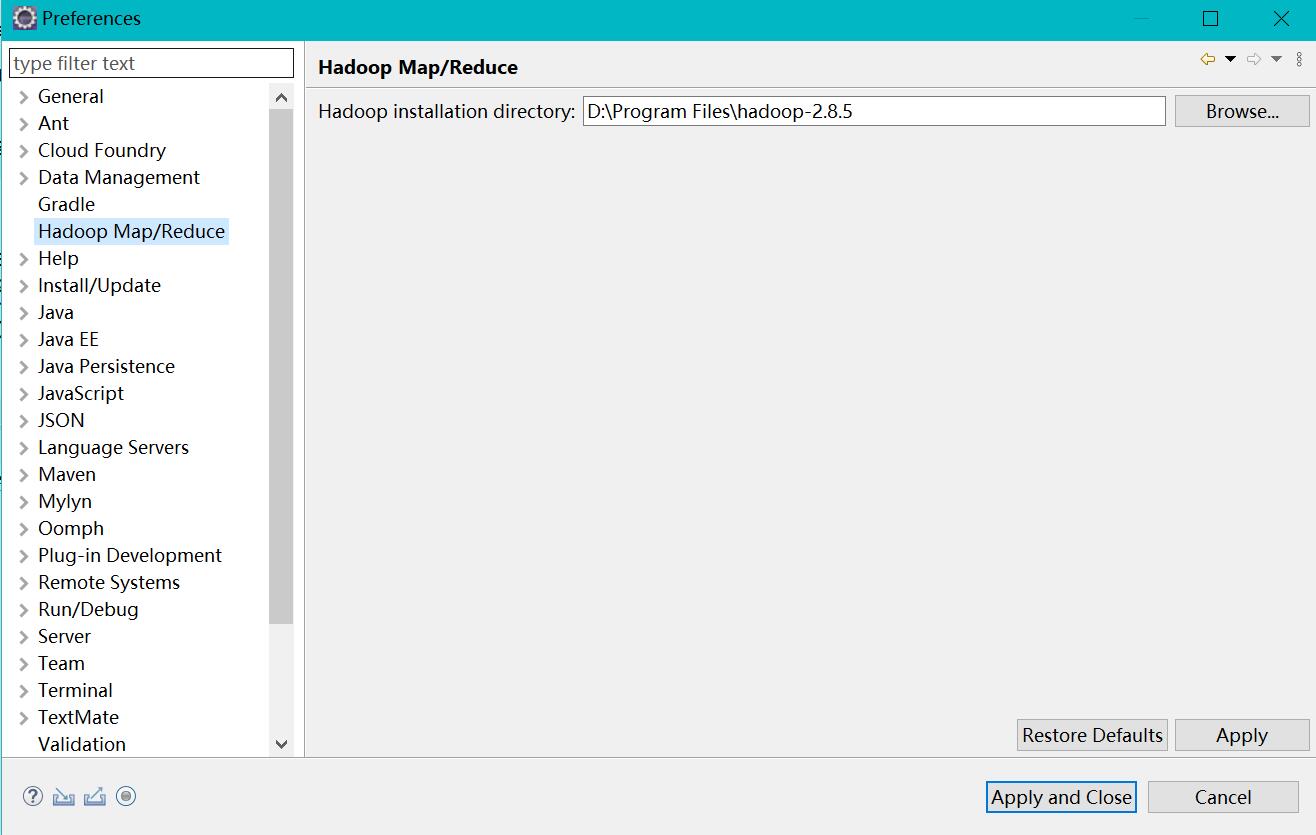
Click the extra Hadoop Map/Reduce item, and add the Hadoop decompression path on the right, such as D:\Program Files\hadoop-2.7.5
Unzip the hadoop-common-2.8.5-bin-master package (I found it directly from github, looking for the corresponding version of the file), and unzip the bin directory hadoop.dll , hadoop.exp , hadoop.lib , winutils.exe These four files are copied to the bin directory of hadoop-2.8.5.
And then hadoop.dll And winutils.exe Copy it to the directory C: Windows / system32
Configure hadoop connection
In Eclipse, click window - > Open Perspective - > map / reduce in turn. The DFS Locations structure appears on the left side of the project.
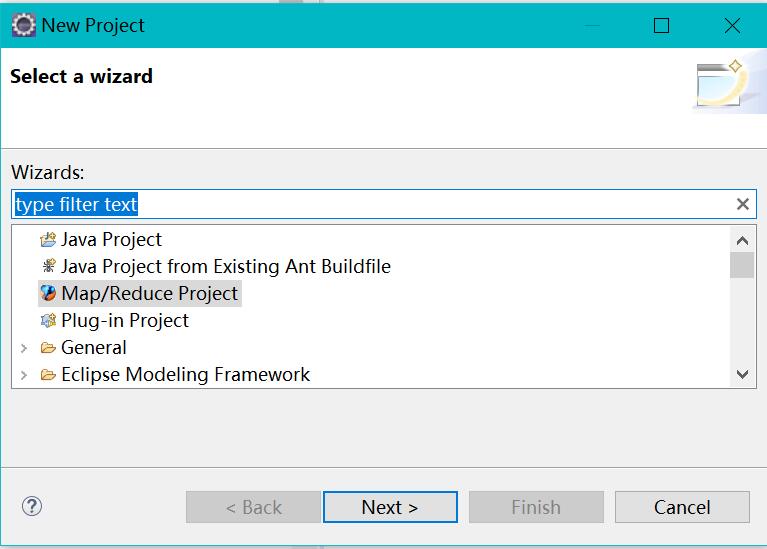
If not, just create a new map/reduce project
In Eclipse, click window - > show view - > other - > MapReduce tools - > map / reduce locations and click OK (open)

Map/Reduce Locations view is added to the console.
Right click the blank space in the Map/Reduce Locations view and select new to define the link of Hadoop cluster.

location name and user name are optional
Map/Reduce(V2) MasterConfigure the hadoop In configurationmapred-site.xmlKeep the content consistent
DFS MasterConfigure thecore-site.xmlConsistent contentclick Finish after
DFS LocationsRelevant connection information will appear underIf the configuration is correct, click open to see hdfs The file content in the file system, that is, the connection is successful
function wordcount Examples
project
srcCreate below Package(This article is called wit),Package Create belowWordCount.javaclassPaste as follows java code
package wit;
import java.io.IOException;
import java.util.StringTokenizer;
import org.apache.hadoop.conf.Configuration;
import org.apache.hadoop.fs.Path;
import org.apache.hadoop.io.IntWritable;
import org.apache.hadoop.io.Text;
import org.apache.hadoop.mapreduce.Job;
import org.apache.hadoop.mapreduce.Mapper;
import org.apache.hadoop.mapreduce.Reducer;
import org.apache.hadoop.mapreduce.lib.input.FileInputFormat;
import org.apache.hadoop.mapreduce.lib.output.FileOutputFormat;
import org.apache.hadoop.util.GenericOptionsParser;
public class WordCount {
    public static class TokenizerMapper extends Mapper<Object, Text, Text, IntWritable> {
        private final static IntWritable one = new IntWritable(1);
        private Text word = new Text();
        public void map(Object key, Text value, Context context) throws IOException, InterruptedException {
            StringTokenizer itr = new StringTokenizer(value.toString());
            while (itr.hasMoreTokens()) {
                word.set(itr.nextToken());
                context.write(word, one);
            }
        }
    }
    public static class IntSumReducer extends Reducer<Text, IntWritable, Text, IntWritable> {
        private IntWritable result = new IntWritable();
        public void reduce(Text key, Iterable<IntWritable> values, Context context)
                throws IOException, InterruptedException {
            int sum = 0;
            for (IntWritable val : values) {
                sum += val.get();
            }
            result.set(sum);
            context.write(key, result);
        }
    }
    public static void main(String[] args) throws Exception {
        Configuration conf = new Configuration();
        String[] otherArgs = new GenericOptionsParser(conf, args).getRemainingArgs();
        if (otherArgs.length != 2) {
            System.err.println("Usage: wordcount <in> <out>");
            System.exit(2);
        }
        @SuppressWarnings("deprecation")
        Job job = new Job(conf, "word count");
        job.setJarByClass(WordCount.class);
        job.setMapperClass(TokenizerMapper.class);
        job.setCombinerClass(IntSumReducer.class);
        job.setReducerClass(IntSumReducer.class);
        job.setOutputKeyClass(Text.class);
        job.setOutputValueClass(IntWritable.class);
        FileInputFormat.addInputPath(job, new Path(otherArgs[0]));
        FileOutputFormat.setOutputPath(job, new Path(otherArgs[1]));
        System.exit(job.waitForCompletion(true) ? 0 : 1);
    }
}

Right click the project, run as - > Run configurations... - > java application
Select Java Application and click New launch application in the upper left corner to configure the Main tag parameters.
Fill in Name, Search... Pull down, find WordCount, OK.

Configure arguments

(this section is from https://blog.csdn.net/u010185...)
Right click WordCount class and select build path - > configure build path to add jar package

Click Add External JARs to add all the relevant jar packages in the hadoop decompression folder
After configuration, click Run to run the WordCount class
The running result will be generated in the specified directory of the previously configured hdfs file system, which can be viewed directly in Eclipse
Original from Chen Xi's blog