LZ-Says: Happy blog sharing, sadness hiding alone. How hard is it for the road ahead?
Preface
In the previous chapter, we introduced a new implementation of the sideslip menu, which is addressed as follows:
Today, we bring you a new way of implementation, that is, as described in the title of the article, through the combination of Drawer Layout + Navigation View to achieve sideslip.
Objective of this paper
Take you to fly, take you to the garbage dump 65
The combination of Drawer Layout and Navigation View makes it easier for you to cope with the sideslip menu next time.
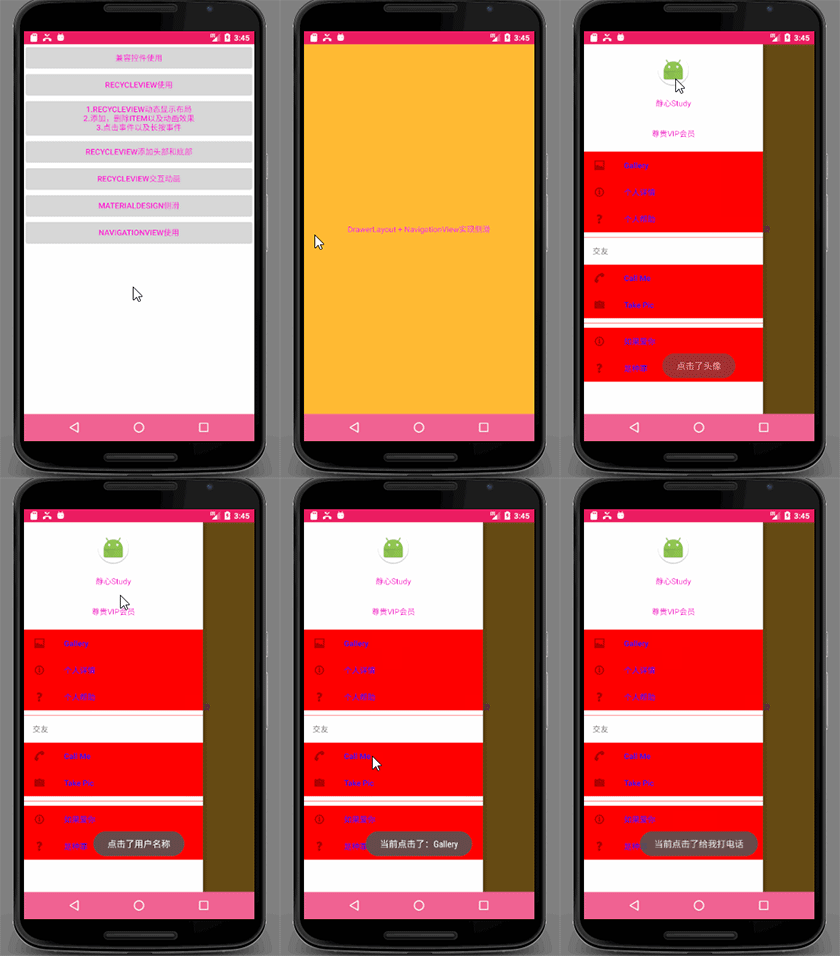
Operation Result Diagram
Or the old rule, lay out the picture:

Brief Introduction to Navigation View
Before we play, let's get to know this thing, which is mainly divided into three steps.
First of all, Navigation View is one of the new things Google includes in Material Design. It re-regulates the use of the side-slip menu, so that we can use it more easily.
Secondly, Navigation View is often used in conjunction with Drawer Layout, which means that men and women are not tired to work together.
-
Finally, through the open api for use, temporarily listed a few, as follows:
-
App: header Layout: Add a header;
-
app:menu: Add menu items;
-
app:itemBackground: Set the background color of item;
-
app:itemTextColor: Set the item font color;
- When there are other API s, they are not introduced here.
-
App: header Layout: Add a header;
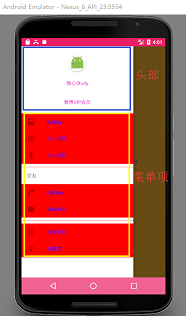
At this point, you will have questions, then what is the difference between the head and the menu item?
Here we have to mention the humanization of Google Baba, LZ does not explain, just put a picture, I believe you will understand, as follows:

Finally, we will expand the following small content:
1. How to add partition lines?
1) The same type of item is wrapped in group, that is, it will be added automatically.
2) The same type of menu can also achieve the corresponding effect;
2. How to achieve similar title classification, such as making friends in examples?
1) item wrapping menu can be achieved, specific view source code;
One hair
1. Define the header layout first, and everything is simple.
<?xml version="1.0" encoding="utf-8"?>
<LinearLayout xmlns:android="http://schemas.android.com/apk/res/android"
    android:layout_width="match_parent"
    android:layout_height="match_parent"
    android:orientation="vertical">

    <ImageView
        android:id="@+id/id_nv_head_img"
        android:layout_width="60dp"
        android:layout_height="60dp"
        android:layout_gravity="center_horizontal"
        android:layout_marginTop="15dp"
        android:background="@mipmap/ic_launcher_round" />

    <TextView
        android:id="@+id/id_nv_head_username"
        android:layout_width="match_parent"
        android:layout_height="wrap_content"
        android:layout_marginTop="5dp"
        android:gravity="center"
        android:padding="15dp"
        android:text="Meditation Study" />

    <TextView
        android:layout_width="match_parent"
        android:layout_height="wrap_content"
        android:layout_marginTop="5dp"
        android:gravity="center"
        android:padding="15dp"
        android:text="Honorable VIP Member" />

</LinearLayout>
2. Next, define the layout of menu items:
<?xml version="1.0" encoding="utf-8"?>
<menu xmlns:android="http://schemas.android.com/apk/res/android">

    <item
        android:id="@+id/action_gallery"
        android:icon="@android:drawable/ic_menu_gallery"
        android:orderInCategory="100"
        android:title="Gallery" />
    <item
        android:id="@+id/action_info_details"
        android:icon="@android:drawable/ic_menu_info_details"
        android:orderInCategory="100"
        android:title="Personal details" />
    <item
        android:id="@+id/action_about"
        android:icon="@android:drawable/ic_menu_help"
        android:orderInCategory="100"
        android:title="Personal help" />

    <item
        android:icon="@android:drawable/ic_dialog_email"
        android:orderInCategory="100"
        android:title="Make friends">
        <menu>
            <item
                android:id="@+id/action_call_me"
                android:icon="@android:drawable/ic_menu_call"
                android:title="Call Me" />
            <item
                android:icon="@android:drawable/ic_menu_camera"
                android:title="Take Pic" />
        </menu>
    </item>

    <group android:id="@+id/id_group1">

        <item
            android:icon="@android:drawable/ic_menu_info_details"
            android:orderInCategory="100"
            android:title="If I love you" />
        <item
            android:icon="@android:drawable/ic_menu_help"
            android:orderInCategory="100"
            android:title="It's a crime." />
    </group>

</menu>
3. The main layout refers to header layout and menu layout, and sets item background and font color:
<?xml version="1.0" encoding="utf-8"?>
<android.support.v4.widget.DrawerLayout xmlns:android="http://schemas.android.com/apk/res/android"
    xmlns:app="http://schemas.android.com/apk/res-auto"
    xmlns:tools="http://schemas.android.com/tools"
    android:layout_width="match_parent"
    android:layout_height="match_parent"
    tools:context="com.materialdesignstudy.navigationview.NavigationActivity">

    <!-- Content part -->
    <FrameLayout
        android:id="@+id/id_nv_frame"
        android:layout_width="match_parent"
        android:layout_height="match_parent"
        android:background="@android:color/holo_orange_light">

        <TextView
            android:layout_width="match_parent"
            android:layout_height="match_parent"
            android:gravity="center"
            android:text="DrawerLayout + NavigationView Sideslip" />

    </FrameLayout>

    <!-- Menu part -->
    <android.support.design.widget.NavigationView
        android:id="@+id/id_nv"
        android:layout_width="wrap_content"
        android:layout_height="match_parent"
        android:layout_gravity="start"
        android:background="#fff"
        app:headerLayout="@layout/navigation_head"
        app:itemBackground="@color/red"
        app:itemTextColor="@color/blue"
        app:menu="@menu/navigation_menu" />

</android.support.v4.widget.DrawerLayout>
4. Initialize and set listeners in Activity:
package com.materialdesignstudy.navigationview;

import android.os.Bundle;
import android.support.design.widget.NavigationView;
import android.support.v7.app.AppCompatActivity;
import android.view.MenuItem;
import android.view.View;
import android.widget.Toast;

import com.materialdesignstudy.R;

public class NavigationActivity extends AppCompatActivity {

    private NavigationView mNavigationView;

    @Override
    protected void onCreate(Bundle savedInstanceState) {
        super.onCreate(savedInstanceState);
        setContentView(R.layout.activity_navugation);
        initView();
    }

    private void initView() {
        mNavigationView = findViewById(R.id.id_nv);
        View headView = mNavigationView.getChildAt(0);
        headView.findViewById(R.id.id_nv_head_img).setOnClickListener(new View.OnClickListener() {
            @Override
            public void onClick(View v) {
                Toast.makeText(NavigationActivity.this, "Click on the Avatar", Toast.LENGTH_SHORT).show();
            }
        });
        headView.findViewById(R.id.id_nv_head_username).setOnClickListener(new View.OnClickListener() {
            @Override
            public void onClick(View v) {
                Toast.makeText(NavigationActivity.this, "Click on the user name", Toast.LENGTH_SHORT).show();
            }
        });
        // Set item selection events
        mNavigationView.setNavigationItemSelectedListener(new NavigationView.OnNavigationItemSelectedListener() {
            @Override
            public boolean onNavigationItemSelected(MenuItem menuItem) {
                if (menuItem.getItemId() == R.id.action_call_me) {
                    Toast.makeText(NavigationActivity.this, "Call me when you click on it.", Toast.LENGTH_SHORT).show();
                }
                Toast.makeText(NavigationActivity.this, "Currently click:" + menuItem.getTitle().toString(), Toast.LENGTH_SHORT).show();
                return true;
            }
        });
    }
}
OK, so far, is it get ting to new skills unconsciously?
GitHub View Address
End
Thank you for checking and refueling.