I. working principle of DR mode
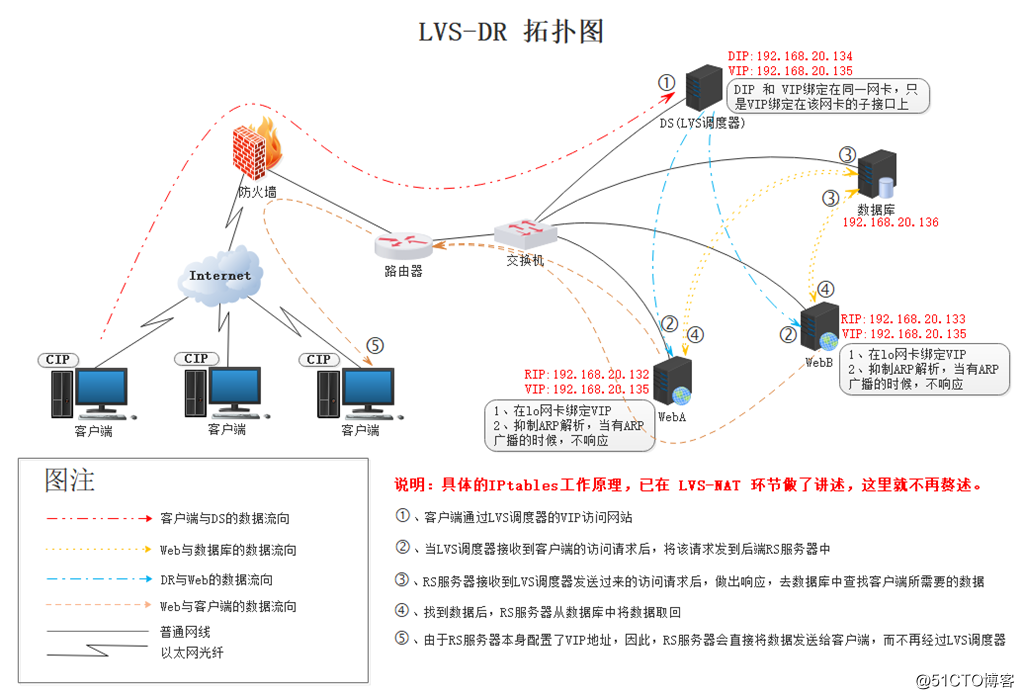
As shown in the figure, the working principle of LVS-DR has been explained in the figure. Let's list the characteristics of LVS-DR mode:
1. RIP can use private address or public network address. If public network address is used, RIP can be accessed directly.
2. All requested packets must pass through Director Server, but all responding packets must not pass through Director Server, which reduces the pressure of Director Server in high load network environment.
3. The gateway of Real Server must not be specified as DIP, because the response packet does not need to pass through Director Server.
4. Real Server and Director Server must be in the same physical network.
5. VIP needs to be bound to the lo network card of Real Server.
II. LVS-DR mode deployment
1. IP address allocation

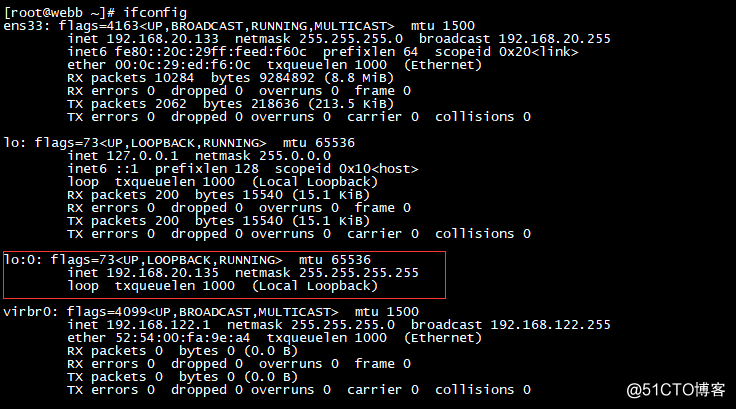
2,Real ServerA Server configuration
a,VIP binding
[root@weba ~]# cd /etc/sysconfig/network-scripts/
[root@weba network-scripts]# cp ifcfg-lo{,:0}
[root@weba network-scripts]# vim ifcfg-lo:0
DEVICE=lo:0
IPADDR=192.168.20.134
NETMASK=255.255.255.255
NETWORK=192.168.20.134
BROADCAST=192.168.20.134
ONBOOT=yes
NAME=lo:0
[root@weba network-scripts]# ifup ifcfg-lo:0
[root@weba network-scripts]# ifconfig
As shown in the picture:
b,Modify the kernel parameters to send the client to VIP Only the scheduling server responds to the request of, Real Server A(web Server) do not respond.
[root@weba ~]# sysctl -a | grep net.ipv4.conf.all.arp_ignore
[root@weba ~]# echo "net.ipv4.conf.all.arp_ignore = 1" >> /etc/sysctl.conf
[root@weba ~]# sysctl -a | grep net.ipv4.conf.lo.arp_ignore
[root@weba ~]# echo "net.ipv4.conf.lo.arp_ignore = 1" >> /etc/sysctl.conf
[root@weba ~]# sysctl -a | grep net.ipv4.conf.all.arp_announce
[root@weba ~]# echo "net.ipv4.conf.all.arp_announce = 2" >> /etc/sysctl.conf
[root@weba ~]# sysctl -a | grep net.ipv4.conf.lo.arp_announce
[root@weba ~]# echo "net.ipv4.conf.lo.arp_announce = 2" >> /etc/sysctl.conf
[root@weba ~]# sysctl –p
As shown in the picture:
3,Real ServerB Server configuration:
a,VIP binding
[root@webb ~]# cd /etc/sysconfig/network-scripts/
[root@webb network-scripts]# cp ifcfg-lo{,:0}
[root@webb network-scripts]# vim ifcfg-lo:0
DEVICE=lo:0
IPADDR=192.168.20.134
NETMASK=255.255.255.255
NETWORK=192.168.20.134
BROADCAST=192.168.20.134
ONBOOT=yes
NAME=lo:0
[root@webb network-scripts]# ifup ifcfg-lo:0
[root@webb network-scripts]# ifconfig
As shown in the picture:
b,Modify the kernel parameters to send the client to VIP Only the scheduling server responds to the request of, Real ServerB (web Server) do not respond.
[root@webb ~]# sysctl -a | grep net.ipv4.conf.all.arp_ignore
[root@webb ~]# echo "net.ipv4.conf.all.arp_ignore = 1" >> /etc/sysctl.conf
[root@webb ~]# sysctl -a | grep net.ipv4.conf.lo.arp_ignore
[root@webb ~]# echo "net.ipv4.conf.lo.arp_ignore = 1" >> /etc/sysctl.conf
[root@webb ~]# sysctl -a | grep net.ipv4.conf.all.arp_announce
[root@webb ~]# echo "net.ipv4.conf.all.arp_announce = 2" >> /etc/sysctl.conf
[root@webb ~]# sysctl -a | grep net.ipv4.conf.lo.arp_announce
[root@webb ~]# echo "net.ipv4.conf.lo.arp_announce = 2" >> /etc/sysctl.conf
[root@weba ~]# sysctl –p
As shown in the picture:
Note: the meanings of the above four kernel parameters are:
arp_ignore It is defined that the target address is local IP Of ARP Different modes of response to queries.
0: Respond to the local machine received on any network card IP Address arp Request (including address on loopback network card), regardless of the purpose IP Whether it is on the receiving network card.
1: Respond to purpose only IP The address is the local address on the receiving network card arp Request.
2: Respond to purpose only IP The address is the local address on the receiving network card arp Request, and arp Source of request IP Must be the same network segment as the receiving network card.
3: If ARP Requested by the request packet IP The local address corresponding to the address and its scope( scope)Host ( host),Do not respond ARP Response packet, if scope is global( global)Or link ( link),Respond to ARP Response packet.
4~7: Reserve.
8: Don't respond to all arp Request.
arp_announce On the network interface ARP Source in request package IP The address is limited accordingly; the host will choose to use it according to the value of this parameter IP Source of packet IP Or of the current network interface card IP Address as ARP Source of request package IP Address.
0: Local ownership IP Address is notified to any interface ARP Message.
1: Try to respond only to the network card that matches the network segment ARP Message.
2: Only respond to the network card that matches the network segment ARP Message.
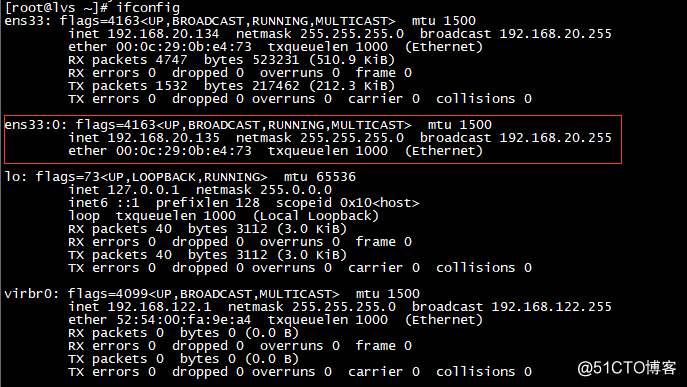
4,Director Server Server configuration:
a,VIP binding
[root@lvs ~]# cd /etc/sysconfig/network-scripts/
[root@lvs network-scripts]# cp ifcfg-ens33{,:0}
[root@lvs network-scripts]# vim ifcfg-ens33:0
TYPE=Ethernet
BOOTPROTO=none
DEFROUTE=yes
NAME=ens33:0
DEVICE=ens33:0
ONBOOT=yes
IPADDR=192.168.20.135
PREFIX=24
[root@lvs network-scripts]# ifup ens33:0
[root@lvs network-scripts]# ifconfig
As shown in the picture:
b,ipvsadm Installation and policy creation
[root@lvs ~]# yum –y install ipvsadm
[root@lvs ~]# ipvsadm -A -t 192.168.20.135:80 -s lc
[root@lvs ~]# ipvsadm -a -t 192.168.20.135:80 -r 192.168.20.132:80 -g -w 1
[root@lvs ~]# ipvsadm -a -t 192.168.20.135:80 -r 192.168.20.133:80 -g -w 2As shown in the picture:
Explain: LVS The default operating mode is DR Pattern, so we can directly write it as [root@lvs ~]#For ipvsadm -a -t 192.168.20.135:80 -r 192.168.20.132:80 -w 1, you can also use the - g parameter to specify DR mode.
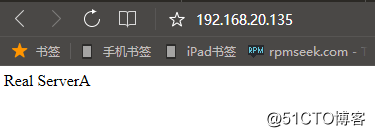
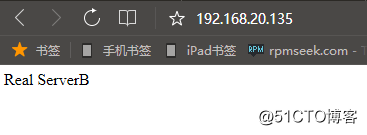
5,Authentication, accessing in browser http://192.168.20.135


III. service configuration
When our LVS server is restarted, the previously configured LVS policy will disappear. Therefore, we need to configure the auto start service here
[root@lvs ~]# touch /etc/sysconfig/ipvsadm
[root@lvs ~]# systemctl enable ipvsadm
[root@lvs ~]# systemctl start ipvsadm
Then add the LVS policy to the / etc/sysconfig/ipvsadm file
[root@lvs ~]# echo "ipvsadm -A -t 192.168.20.135:80 -s lc" > /etc/sysconfig/ipvsadm
[root@lvs ~]# echo "ipvsadm -a -t 192.168.20.135:80 -r 192.168.20.132:80 -g -w 1" > /etc/sysconfig/ipvsadm
[root@lvs ~]# echo "ipvsadm -a -t 192.168.20.135:80 -r 192.168.20.133:80 -g -w 2" > /etc/sysconfig/ipvsadm