catalogue
1, Dockerfile layering principle
1. Preliminary understanding of mirroring
2. Docker image segmentation (based on AUFS)
4. AUFS and overlay / overlay 2 (docker later)
1. dockerfile operation instruction
2. Write dockerfile file to deploy nginx
1. Mirror size before optimization
5. Use a more lightweight Linux distribution
introduction
The following mainly introduces how to create and use custom images, so that you can flexibly build containers, and how to optimize the size of images.
1, Dockerfile layering principle
1. Preliminary understanding of mirroring
Layer ⑥: container layer - readable and writable - running image image - CMD and entrypoint are required for startup (definition: nginx -g daemon off / run.sh)
Layer ⑤: adjust the configuration file - image layer 4 - run sed -i /usr/local/nginx/conf/nginx.conf
Layer ④: configure, compile and install -. / configure & & make & & make install - image layer 3 - run cd /opt/nginx-1.12.0
Layer 3: installation dependent environment - yum install gcc gcc-c++ make -y - image layer 2 - run yum install - Yum install GD devel
Layer ②: unzip nginx software package - image layer 1 - run tar
Layer ①: install centos:7 operating system base image
2. Docker image segmentation (based on AUFS)
The Docker image is located above the bootfs. Each layer of image is the parent image of the next layer. The first layer of image: base image (operating system environment image), the top layer of writable container layer: readable and writable, and readonly below the container layer.
3. Technology involved
(1) bootfs (boot file system) kernel space
It mainly includes bootloader and kernel. Bootloader is mainly used to boot and load the kernel. Bootfs file system will be loaded when Linux starts. Bootfs is at the bottom of Docker image. This layer is the same as our typical Linux/Unix system, including boot loader and kernel. After the boot is loaded, the whole kernel is in memory. At this time, the right to use the memory has been transferred from bootfs to the kernel. At this time, the system will also uninstall bootfs. In the Linux operating system (different versions of Linux distribution), when Linux loads bootfs, rootfs will be set to read-only. After the system self-test, read-only will be changed to read-write, Let us operate in the operating system.
(2) rootfs (root file system) kernel space
bootfs (base images, such as Centos and Ubuntu) contains standard directories and files such as / dev, / proc, / bin and / etc in typical Linux systems. rootfs is a variety of operating system distributions, such as Ubuntu and Centos.
(3) bootfs+rootfs: it is used to load and boot kernel programs + mount some key directory files such as linux operating system (centos ubantu).
(4) For a thin OS, rootfs can be very small. It only needs to include the most basic commands, tools and program libraries. Because the underlying layer directly uses the Host kernel, it only needs to provide rootfs itself. It can be seen that bootfs are basically the same for different Linux distributions, and rootfs will be different, so different distributions can share bootfs.
4. AUFS and overlay / overlay 2 (docker later)
AUFS is a joint file system. It uses multiple directories on the same Linux host and stacks them one by one to present a unified file system. AUFS uses this feature to implement the document layer of docker image, while docker uses overlay / overlay 2 storage driver to support hierarchical structure. Overlay FS combines two directories on a single Linux host into one directory. These directories are called layers, and the unified process is called federated mount.
(1) overlay structure
overlayfs has only two layers on the Linux host. One directory is on the lower layer to save the docker, and the other directory is on the upper layer to store the container information.
① rootfs: base image
② Lower: lower layer information (mirror layer, container)
③ Upper: upper directory (container information, writable)
④ worker: working directory of the run (copy - on - write copy on write: prepare container environment)
⑤ mergod: "view layer" (container view)
(2) docker image hierarchy
① kernel - bootfs+rootfs+aufs+LXC;
② base image - centos, ubantu, suse;
③ image layer - read only;
④ container - readable and writable
2, Written by Dockerfile
1. dockerfile operation instruction
| Serial number | instructions | meaning |
| 1 | FROM image | Specify the image on which the new image is based. Article means that it must be a from instruction. Each time you create an image, you need a from instruction |
| 2 | MAINTAINER name | Describe the maintainer information of the new image |
| 3 | RUN command | Execute the command on the image based on and submit it to the new image; every command executed in docker starts with run |
| 4 | CMD ["program to run", "parameter 1", "parameter 2"] | The command or script to be run when the container is started. Dockerfile can only have one CMD command. If multiple commands are specified, only the last one can be executed |
| 5 | Export port number | Specify the port to open when the new image is loaded into Docker |
| 6 | ENV environment variable value | Setting the value of an environment variable will be used by the following run |
| 7 | ADD source file, directory, target file / directory | Specifically identify the compression format and automatically decompress it. Copy the source file to the target file. The source file should be located in the same directory as the dockerfile, or a URL |
| 8 | COPY source file / directory destination file / directory | Copy the file / directory on the local host to the destination. The source file / directory should be in the same directory as the Dockerfile |
| 9 | VOLUME [directory] | Create a mount point in the container |
| 10 | USER user name / UID | Specifies the user who runs the container |
| 11 | WORKDIR path | Specify the working directory for subsequent RUN, CMD and ENTRYPOINT |
| 12 | ONBUILD command | Specifies the command to run when the generated image is used as a base image |
| 13 | HEALTHCHECK | health examination |
(1) Difference between ADD and copy
① The COPY instruction and ADD instruction in Dockerfile can COPY or ADD the resources on the host to the container image, which are completed in the process of building the image
② copy can only be used for replication (saving resources)
③ ADD can also decompress (consume resources) the copied objects when they are compressed
④ The only difference between the COPY instruction and the ADD instruction is whether it supports obtaining resources from remote URLs. The COPY instruction can only read resources from the host where docker build is executed and COPY them to the image. The ADD instruction also supports reading resources from a remote server through a URL and copying them to the image
⑤ When the same functions are met, the COPY instruction is recommended. The ADD instruction is better at reading local tar files and decompressing them
(2) Difference between CMD and entrypoint
Generally, the bracketed form of entrypoint will be used as the default execution command after the docker container is started. The unchanged part and the variable part are placed in it. For example, the default version of command parameters can be provided in the form of cmd, that is, the default parameters used when there are no parameters in run. If we want to use the default parameters, run directly. Otherwise, if we want to use other parameters, add parameters to run
2. Write dockerfile file to deploy nginx
(1) CMD and ENTRYPOINT
CMD is the command loaded by default when the container environment is started; ENTRYPOINT is the first command program / script init loaded when the container environment starts.
① If ENTRYPOINT uses shell mode, CMD instruction will be ignored;
② If ENTRYPOINT uses exec mode, the content specified by CMD is appended as the parameter of the command specified by ENTRYPOINT;
③ If ENTRYPOINT uses exec mode, CMD should also use exec mode.
(2) How to write nginx image
① Create a corresponding directory (mkdir nginx)
② Write a dockerfile file (the simplest way is to put the nginx deployment script into it, execute each command with run, use ENV as the environment variable, move to the corresponding directory, use workdir, and finally use CMD for startup settings)
③ Upload nginx-1.12.2.tar.gz package and other files in nginx directory
④ docker build creation
⑤ docker run container
⑥ Check
[root@docker /]# mkdir nginx
[root@docker /]# cd nginx/
[root@docker nginx]# vim Dockerfile
FROM centos:7     #Based on basic image (centos needs lowercase)
MAINTAINER this is nginx image     #User information (optional)
RUN yum -y update     #Add environment package
RUN yum install -y pcre-devel zlib-devel gcc gcc-c++ make
RUN useradd -M -s /sbin/nologin nginx
ADD nginx-1.12.2.tar.gz /usr/local/src     #Import and unzip nginx package
VOLUME ["/usr/local/nginx/html"]
WORKDIR /usr/local/src     #assign work directory
WORKDIR nginx-1.12.2
RUN ./configure \
--prefix=/usr/local/nginx \--user=nginx \--group=nginx \--with-http_stub_status_module && make && make install
ENV PATH /usr/local/nginx/sbin:$PATH
EXPOSE 80     #Specify http and https ports
RUN echo "demon off;" >>/usr/local/nginx/conf/nginx.conf
CMD nginx
[root@docker nginx]# ls
Dockerfile  nginx-1.12.2.tar.gz
[root@docker nginx]# docker build -f Dockerfile -t "nginx:v1" .
docker build: be based on dockerfile Build mirror
-f: appoint dockerfile file(If it is not written by default, it refers to the current directory)
-t: (tag) Label--------->nginx : new
 . : Professional statement:It refers to the context in which the image is built, which is easy to understand:Refers to the files in the current directory environment
watch -n 1 docker ps -a
docker ps -a


3, Optimize DOCKERFILE
1. Mirror size before optimization
[root@docker ~]# cd /nginx/nginx_v1
[root@docker nginx_v1]# ls
nginx-1.15.9.tar.gz
[root@docker nginx_v1]# vim Dockerfile
FROM centos:7
RUN yum install -y gcc pcre pcre-devel devel zlib-devel make
ADD nginx-1.15.9.tar.gz /mnt
WORKDIR /mnt/nginx-1.15.9
RUN sed -i 's/CFLAGS="$CFLAGS -g"/#CFLAGS="$CFLAGS -g"/g' auto/cc/gcc
RUN ./configure --prefix=/usr/local/nginx
RUN make
RUN make install
EXPOSE 80
VOLUME ["/usr/local/nginx/html"]
CMD ["/usr/local/nginx/sbin/nginx","-g","daemon off;"]
[root@docker nginx_v1]# docker build -t "nginx:ng1" .
[root@docker nginx_v1]# docker images
REPOSITORY   TAG       IMAGE ID       CREATED         SIZE
nginx        ng1       bc3c678f2d1b   2 minutes ago   430MB
nginx        v1        4bdefa249d8a   23 hours ago    716MB
centos       7         eeb6ee3f44bd   2 months ago    204MB
nginx        1.12.2    4037a5562b03   3 years ago     108MB

docker run -d -P nginx:v1

PS 1 : Don't use it docker run -d -P nginx:v1 /bin/bash
/bin/bash Specified shell Environment, and our dockerfile Specified CMD,That is, the command loaded at startup by default/Executing programs, using/bin/bash such
shell The environment will be overwritten cmd Command that causes the container to run nginx Will not load

PS 2: VOLUME The mount point of the host is available docker insepct see
① By default, it will be placed in var/lib/docker/volumes/container ID/_data in
② have access to docker run -d -P -v /data1:/usr/local/nginx/html To specify
2. Throw the instructions that do not need to be output into / dev/null (you need to make sure that the command is executed correctly)
[root@docker nginx_v1]# cd /nginx/nginx_v2
[root@docker nginx_v2]# ls
nginx-1.15.9.tar.gz
[root@docker nginx_v2]# vim Dockerfile
FROM centos:7
RUN yum install -y gcc pcre pcre-devel devel zlib-devel make &> /dev/null && yum clean all
ADD nginx-1.15.9.tar.gz /mnt
WORKDIR /mnt/nginx-1.15.9
RUN sed -i 's/CFLAGS="$CFLAGS -g"/#CFLAGS="$CFLAGS -g"/g' auto/cc/gcc
RUN ./configure --prefix=/usr/local/nginx &> /dev/null
RUN make &> /dev/null
RUN make install &> /dev/null
RUN rm -rf /mnt/nginx-1.15.9
EXPOSE 80
VOLUME ["/usr/local/nginx/html"]
CMD ["/usr/local/nginx/sbin/nginx""-g","daemon off;"]
[root@docker nginx_v2]# docker build -t "nginx:ng2" .
[root@docker nginx_v2]# docker images
REPOSITORY   TAG       IMAGE ID       CREATED          SIZE
nginx        ng2       93c84582ca65   11 seconds ago   311MB
nginx        ng1       bc3c678f2d1b   9 minutes ago    430MB
nginx        v1        4bdefa249d8a   23 hours ago     716MB
centos       7         eeb6ee3f44bd   2 months ago     204MB
nginx        1.12.2    4037a5562b03   3 years ago      108MB

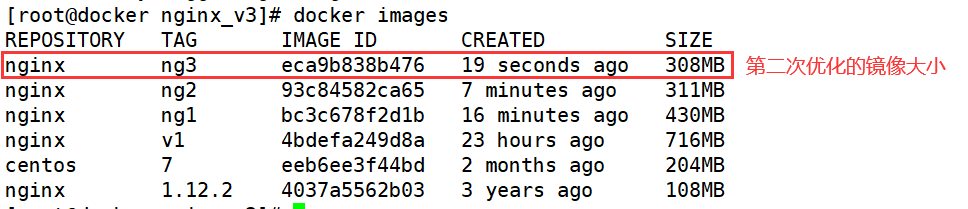
3. Reduce RUN build
[root@docker nginx_v2]# cd /nginx/nginx_v3
[root@docker nginx_v3]# ls
nginx-1.15.9.tar.gz
[root@docker nginx_v3]# vim Dockerfile
FROM centos:7
ADD nginx-1.15.9.tar.gz /mnt
WORKDIR /mnt/nginx-1.15.9
RUN yum install -y gcc pcre pcre-devel devel zlib-devel make &> /dev/null && \
 yum clean all && \
 sed -i 's/CFLAGS="$CFLAGS -g"/#CFLAGS="$CFLAGS -g"/g' auto/cc/gcc && \
 ./configure --prefix=/usr/local/nginx &> /dev/null && \
 make &> /dev/null && make install &> /dev/null &&\
 rm -rf /mnt/nginx-1.15.9
EXPOSE 80
VOLUME ["/usr/local/nginx/html"]
CMD ["/usr/local/nginx/sbin/nginx","-g","daemon off;"]
[root@docker nginx_v3]# docker build -t "nginx:ng3" .
[root@docker nginx_v3]# docker images
REPOSITORY   TAG       IMAGE ID       CREATED          SIZE
nginx        ng3       eca9b838b476   19 seconds ago   308MB
nginx        ng2       93c84582ca65   7 minutes ago    311MB
nginx        ng1       bc3c678f2d1b   16 minutes ago   430MB
nginx        v1        4bdefa249d8a   23 hours ago     716MB
centos       7         eeb6ee3f44bd   2 months ago     204MB
nginx        1.12.2    4037a5562b03   3 years ago      108MB
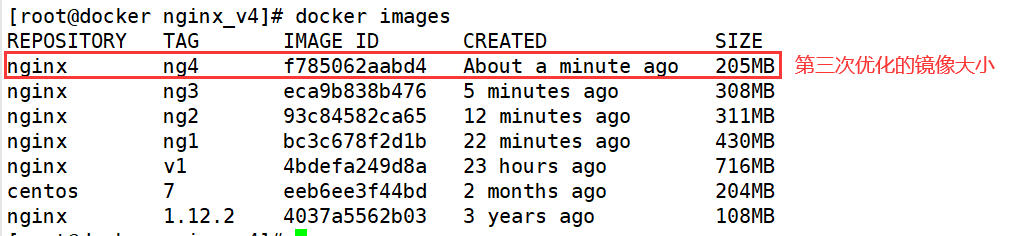
4. Multi phase build (use the FROM command to generate multiple images, and build the specified image as the basic image environment of other images)
[root@docker nginx_v3]# cd /nginx/nginx_v4
[root@docker nginx_v4]# ls
nginx-1.15.9.tar.gz
[root@docker nginx_v4]# vim Dockerfile
FROM centos:7 as build
ADD nginx-1.15.9.tar.gz /mnt
WORKDIR /mnt/nginx-1.15.9
RUN yum install -y gcc pcre pcre-devel devel zlib-devel make &> /dev/null && \
 yum clean all &&\
 sed -i 's/CFLAGS="$CFLAGS -g"/#CFLAGS="$CFLAGS -g"/g' auto/cc/gcc && \
 ./configure --prefix=/usr/local/nginx &> /dev/null && \
 make &>/dev/null && \
 make install &>/dev/null && \
 rm -rf /mnt/nginx-1.15.9

FROM centos:7
EXPOSE 80
VOLUME ["/usr/local/nginx/html"]
COPY --from=build /usr/local/nginx /usr/local/nginx
CMD ["/usr/local/nginx/sbin/nginx","-g","daemon off;"]
[root@docker nginx_v4]# docker build -t "nginx:ng4" .
[root@docker nginx_v4]# docker images
REPOSITORY   TAG       IMAGE ID       CREATED          SIZE
nginx        ng4       f785062aabd4   9 seconds ago    205MB
nginx        ng3       eca9b838b476   4 minutes ago    308MB
nginx        ng2       93c84582ca65   11 minutes ago   311MB
nginx        ng1       bc3c678f2d1b   21 minutes ago   430MB
nginx        v1        4bdefa249d8a   23 hours ago     716MB
centos       7         eeb6ee3f44bd   2 months ago     204MB
nginx        1.12.2    4037a5562b03   3 years ago      108MB
5. Use a more lightweight Linux distribution
debian
alpine
apt add
summary
1. There are three ways to create Docker images: create based on existing images; Create based on local template; Created based on Dockerfile.
2. Optimize Dockerfile: reduce the use of RUN instructions; Throw the cache / unused output after execution into the black hole (reduce cache); Multi-stage construction; Use a smaller linux distribution.