Let's start learning about DockerFile
DcokerFile is a file used to build a docker image. It is a command parameter script
Steps to build a general docker image:
1. Write a dockerfile file
2. docker build builds into an image
3. docker run run image
4. docker push publish image (we can publish it to DockerHub or alicloud)
Let's see how the official image plays
For example, we search ubuntu on DockerHub to see what DockerFile looks like on the official website
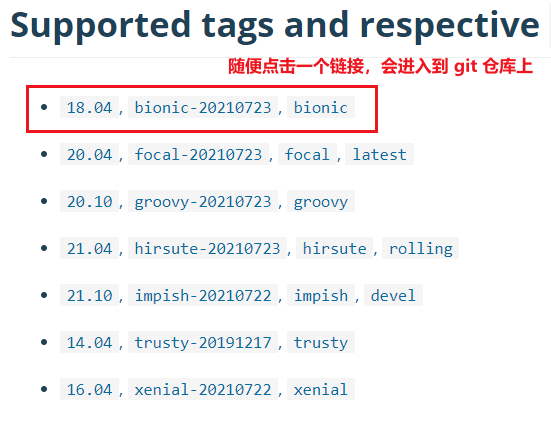
Click the link and we will enter the git warehouse, which is also DockerFile
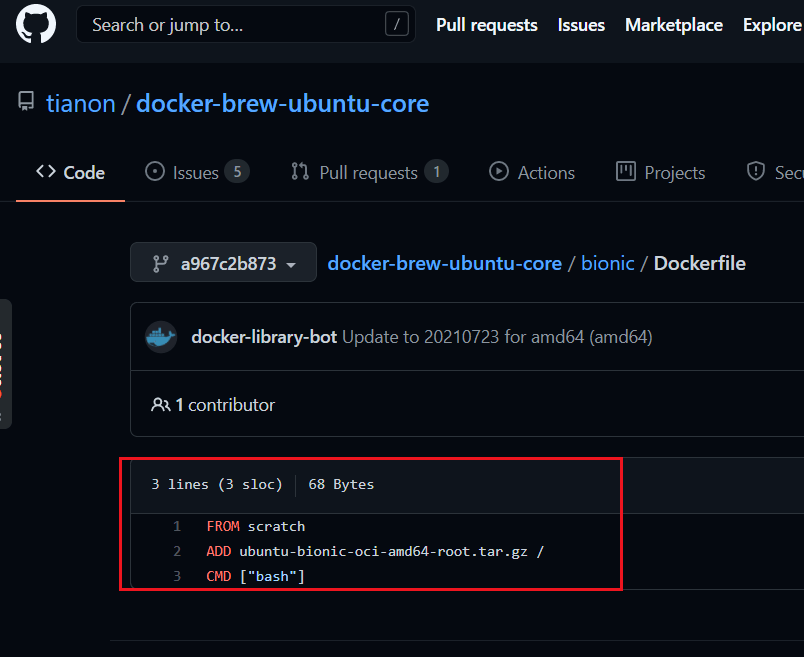
We can see that the three-line Docker command is the DockerFile officially made into an image, so the official ubuntu image is very simple, castrated, not even the clear command or the ll command
Many official image packages are very simple, and many functions are not available. We usually build our own images to meet our various needs
Construction process of DockerFile
Officials can build images, and we can also create our own images
Fundamentals of DockerFile:
- The reserved word (instruction) of each DockerFile must be uppercase
- DockerFile scripts are executed sequentially
- #Indicates a comment
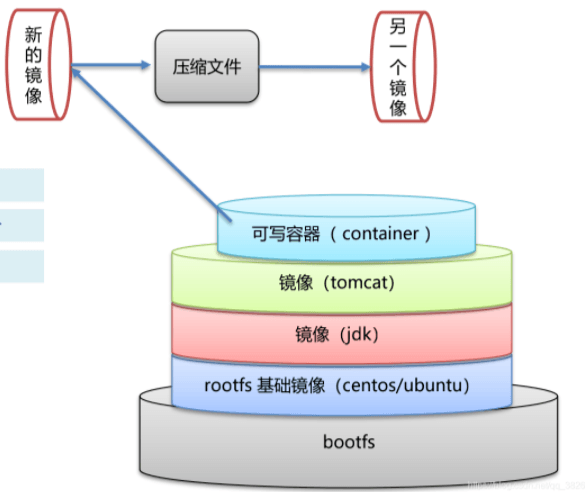
- Each instruction creates and commits a new mirror layer
You can find such pictures on the network. You can see that the image is layer by layer. You can search the instruction explanation in DockerFile on the browser
DockerFile is development oriented. When we do projects in the future, we directly release an image and deliver an image. We need to write a DockerFile file. This file is very simple!
We must master the Docker image, which has gradually become the standard for enterprise delivery.
Our learning process is to use other people's things first, then study how others write, and then we also learn how to write and develop
For example:
Let's learn to use it first,
DockerImages: build production images through DockerFile, and finally release and run products
Docker container: the container service is the server running with the image
Now let's start to learn DockerFIle in detail: build the file, define all the steps, and this is the source code
DockerFile instruction
The pictures come from the Internet. We explain them one by one
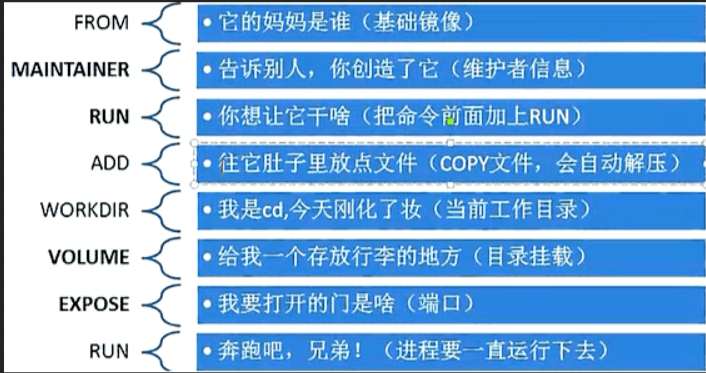
- FROM
The basic image, everything starts from here
- MAINTAINER
Indicate who wrote the image and write down your name and email address
- RUN
Commands to run during image construction
- ADD
Add some configurations, such as adding mysql compressed packages and adding content
- WORKDIR
Mirrored working directory
- VOLUME
Mount directory
- EXPOSE
Exposing ports and - p is an effect
- CMD
Specifies that the command to be executed when the container is started will only be the best instruction to take effect and will be replaced
- ENTRYPOINT
Specifies the command to be executed when the container is started, and can be appended
- ONBUILD
When an inherited DockerFIle is built, the ONBUILD instruction will be run to trigger the corresponding action
- COPY
Similar to ADD, this command copies the file to the image
- ENV
Setting environment variables during construction
At first glance, it seems that the functions of CMD and ENTRYPOINT are similar, but it is still not clear where the specific difference is. There will be a detailed description at the end of the article
actual combat
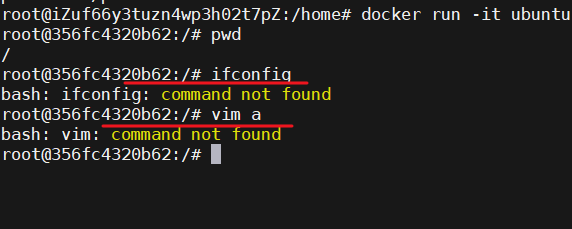
Let's make a customized ubuntu image ourselves
The official ubuntu is a castrated version. Many tools and commands are not supported, so we will add them ourselves and be self-sufficient
Write a DockerFile by yourself
It should be noted here that basically 99% of the images are based on this basic image scratch. We can see that the official DockerFIle is also played based on this image

Then we can customize based on this ubuntu and add some tools we need, such as vim, ifconfig, etc
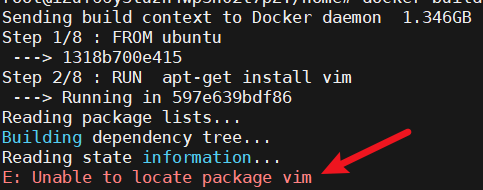
FROM ubuntu

RUN apt-get update                    # Update source

RUN  apt-get install -y vim            # Install vim

RUN  apt-get install -y net-tools    # Installing net tools

ENV MYPATH /usr/local                # Setting environment variables
WORKDIR $MYPATH                        # Set mirror working directory

EXPOSE 8888                            # Exposed port

CMD echo "----- end -----"            # Execute echo command

CMD /bin/bash
Start building
docker build -f dockerfile2 -t xmtubuntu .
If the apt get update update source is not written in DockerFile, the following problem will occur. Please pay attention to this
When you execute the above command, you will see the following print information, and finally you will see successful, that is, the build is successful
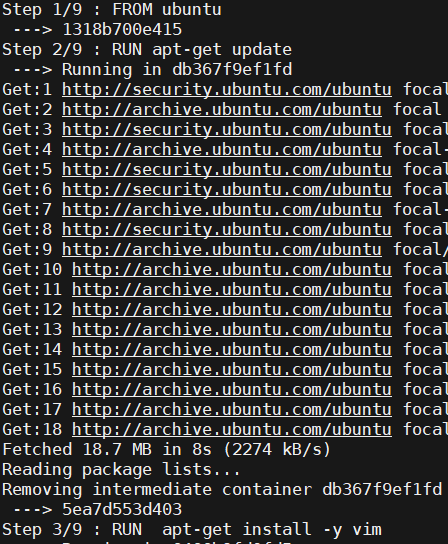
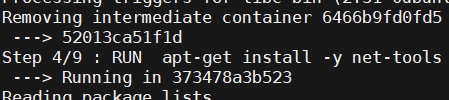
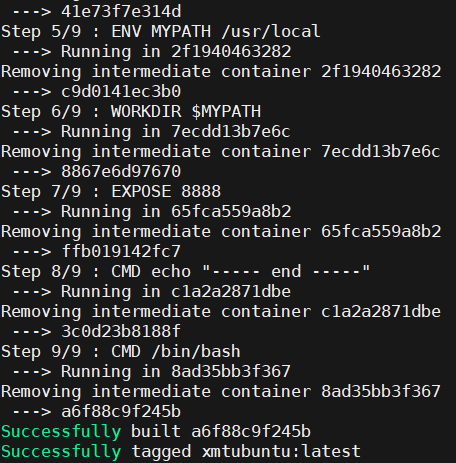
As can be seen from the above figure, there are 9 steps in DokerFile, and the execution is divided into 9 steps. Only when all the steps are successful can it be regarded as success
After the final build is successful, we can see
Successfully built a6f88c9f245b
Successfully tagged xmtubuntu:latest
Verification results
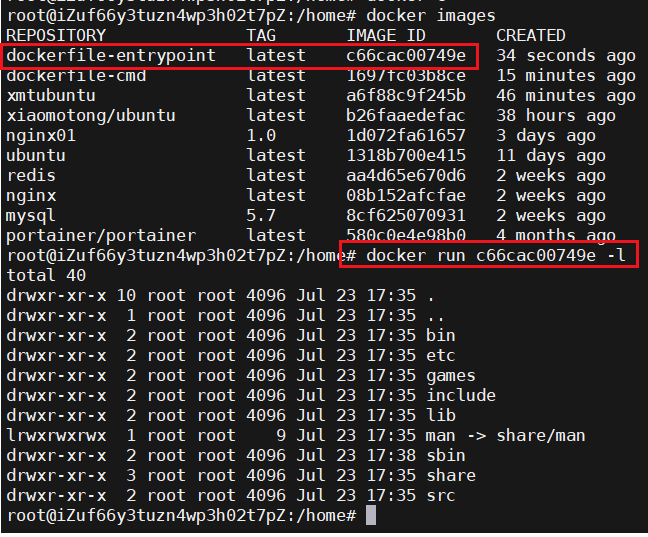
docker images view our images
# docker images
REPOSITORY            TAG       IMAGE ID       CREATED          SIZE
xmtubuntu             latest    a6f88c9f245b   13 minutes ago   172MB
docker inspect a6f88c9f245b view the construction process of our image
# docker history a6f88c9f245b
IMAGE          CREATED          CREATED BY                                      SIZE      COMMENT
a6f88c9f245b   14 minutes ago   /bin/sh -c #(nop)  CMD ["/bin/sh" "-c" "/bin...   0B
3c0d23b8188f   14 minutes ago   /bin/sh -c #(nop)  CMD ["/bin/sh" "-c" "echo...   0B
ffb019142fc7   14 minutes ago   /bin/sh -c #(nop)  EXPOSE 8888                  0B
8867e6d97670   14 minutes ago   /bin/sh -c #(nop) WORKDIR /usr/local            0B
c9d0141ec3b0   14 minutes ago   /bin/sh -c #(nop)  ENV MYPATH=/usr/local        0B
41e73f7e314d   14 minutes ago   /bin/sh -c apt-get install -y net-tools         1.52MB
52013ca51f1d   14 minutes ago   /bin/sh -c apt-get install -y vim               68.2MB
5ea7d553d403   14 minutes ago   /bin/sh -c apt-get update                       29.7MB
1318b700e415   11 days ago      /bin/sh -c #(nop)  CMD ["bash"]                 0B
<missing>      11 days ago      /bin/sh -c #(nop) ADD file:524e8d93ad65f08a0...   72.8MB
In the process of building the image xmtubuntu, we can clearly see what steps have been taken. Of course, in the same way, we can also see how the official image is built. Let's take a look at the official ubuntu image
# docker history ubuntu
IMAGE          CREATED       CREATED BY                                      SIZE      COMMENT
1318b700e415   11 days ago   /bin/sh -c #(nop)  CMD ["bash"]                 0B
<missing>      11 days ago   /bin/sh -c #(nop) ADD file:524e8d93ad65f08a0...   72.8MB
The official is very simple, castrating a lot of things. We can see that the official ubuntu consists of two steps. The first is to add the ubuntu compressed package, and the second is / bin/bash
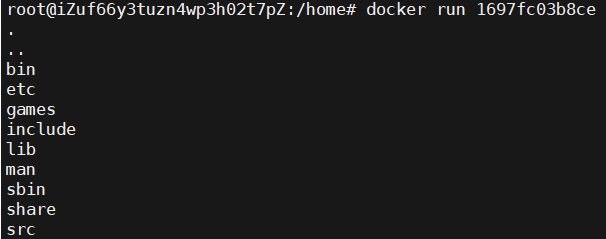
Let's view our custom image xmtubuntu

Sure enough, our custom ubuntu image has vim and ifconfig tools, and the actual combat is successful
Difference between CMD and ENTRYPOINT
- CMD
Specifies that the command to be executed when the container is started will only be the best instruction to take effect and will be replaced
- ENTRYPOINT
Specifies the command to be executed when the container is started, and can be appended
How to understand? Let's do a comparative experiment to better understand the above explanation. There are many commands in docker that have such minor differences. We can draw inferences from one instance and learn more slowly
Example of CMD
Write a simple DockerFile called DockerFile CMD
FROM xmtubuntu
CMD ["ls","-a"]
Build mirror
e# docker build -f dockerfile-cmd -t dockerfile-cmd .
Sending build context to Docker daemon  1.346GB
Step 1/2 : FROM xmtubuntu
 ---> a6f88c9f245b
Step 2/2 : CMD ["ls","-a"]
 ---> Running in 101670af4290
Removing intermediate container 101670af4290
 ---> 1697fc03b8ce
Successfully built 1697fc03b8ce
Successfully tagged dockerfile-cmd:latest
Create and start the container
docker run 101670af4290, you can see the following effects
We try to append commands when we start the container
docker run 101670af4290 -l, the following error will be reported
# docker run 1697fc03b8ce -l
docker: Error response from daemon: OCI runtime create failed: container_linux.go:380: starting container process caused: exec: "-l": executable file not found in $PATH: unknown.
The reasons are as follows:
The CMD instruction is used (for example, our example is ls -a). When we start the container, the command (- l) appended later will replace ls -a. because - l is not a command, an error is reported
Example of ENTRYPOINT
Write a simple DockerFile called DockerFile entrypoint
FROM xmtubuntu
ENTRYPOINT ["ls","-a"]
As like as two peas as like as two peas, the CMD is built and started. The result of our boot container is the same as that of CMD. Let's look at the example of the container and append the parameters directly.
It can be seen that parameters can be appended after using ENTRYPOINT. If parameters are appended after an instruction using CMD, the instruction specified by CMD will be overwritten
Then, we can draw inferences from one instance and do comparative tests for relevant instructions in the future, so that we can understand them more clearly
How to publish our images
1. Log in to dockerhub
xdm without registration can register one, hub.docker.com/
# docker login -u xxxx username
Password:
WARNING! Your password will be stored unencrypted in /root/.docker/config.json.
Configure a credential helper to remove this warning. See
https://docs.docker.com/engine/reference/commandline/login/#credentials-store

Login Succeeded
2. Modify our image tag
docker tag our image id our docker user name / image name: version
3. Push the image to our own warehouse
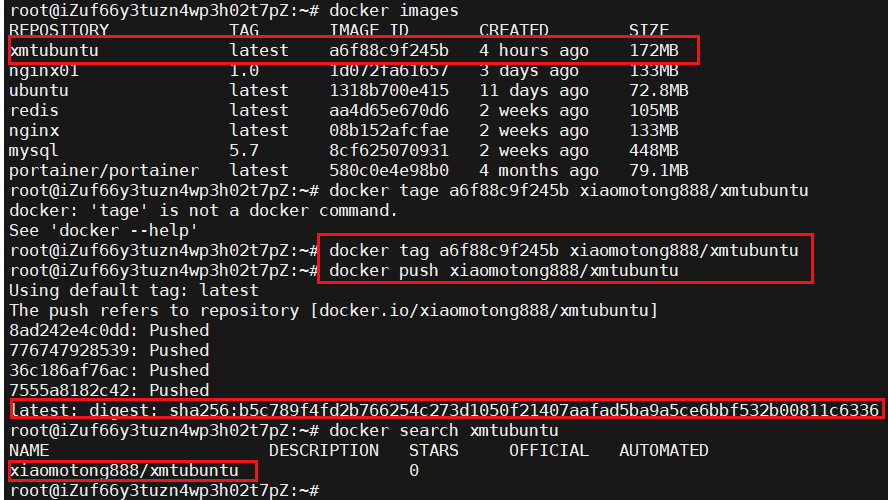
When publishing images, they are submitted layer by layer
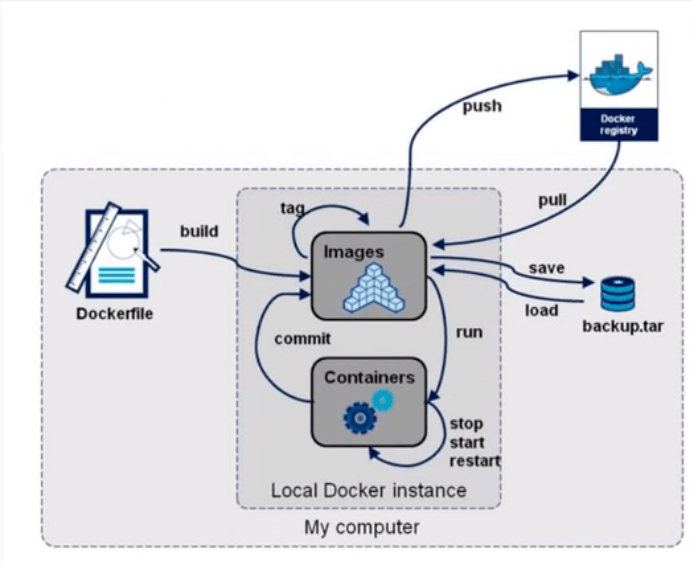
Finally, add a picture found on the network. Now you can see the principle more clearly by looking at this picture
reference material:
Welcome to like, follow and collect
My friends, your support and encouragement are the driving force for me to insist on sharing and improve quality

Well, that's all for this time
Technology is open, and our mentality should be open. Embrace change, live in the sun and strive to move forward.
I'm Nezha, the Little Devil boy. Welcome to praise and pay attention to the collection. See you next time~