Dockerfile
Dockerfile is the build file used to build the docker image. We will talk about dockerfile in detail in the next issue, and use it here first
It is a command script. Through this script, we can generate the image we want. The image is layered, layer by layer. The script is also a command one by one. Each command is a layer
Let's look at a small example
Write a Dockerfile to build your own image. Let's take ubuntu as an example
Write a simple dockerfile1
# vim dockerfile1

FROM ubuntu

VOLUME ["volume1","volume2"]

CMD echo "====successfully===="

CMD /bin/bash
Explain:
- FROM
The source base image is ubuntu
- VOLUME
Mount can be anonymous or named. By default, it will be mounted to the directory specially mounted by docker
- CMD
Specifies that commands can be used
Build our own image
# docker build -f dockerfile1 -t xiaomotong/ubuntu .
Sending build context to Docker daemon  1.346GB
Step 1/4 : FROM ubuntu
 ---> 1318b700e415
Step 2/4 : VOLUME ["volume1","volume2"]
 ---> Running in d7b475cacb22
Removing intermediate container d7b475cacb22
 ---> b8ac33cfbcfd
Step 3/4 : CMD echo "====successfully===="
 ---> Running in 35c98a625a9e
Removing intermediate container 35c98a625a9e
 ---> 67b6faf43370
Step 4/4 : CMD /bin/bash
 ---> Running in b2e1e0ad8d9b
Removing intermediate container b2e1e0ad8d9b
 ---> b26faaedefac
Successfully built b26faaedefac
Successfully tagged xiaomotong/ubuntu:latest
From the above, we can see that docker builds images layer by layer. One command is executed one by one, and one command is one layer
- docker build
Build our own image
- -f
Specifies the file of the dockerfile
- -t
The target is the name of our docker image
Followed by the location where the image was generated
Create and start the container through the image we built
# docker images
REPOSITORY            TAG       IMAGE ID       CREATED         SIZE
xiaomotong/ubuntu     latest    b26faaedefac   6 minutes ago   72.8MB

# docker run -it b26faaedefac
After executing the above command, we can see the following directory in the container:
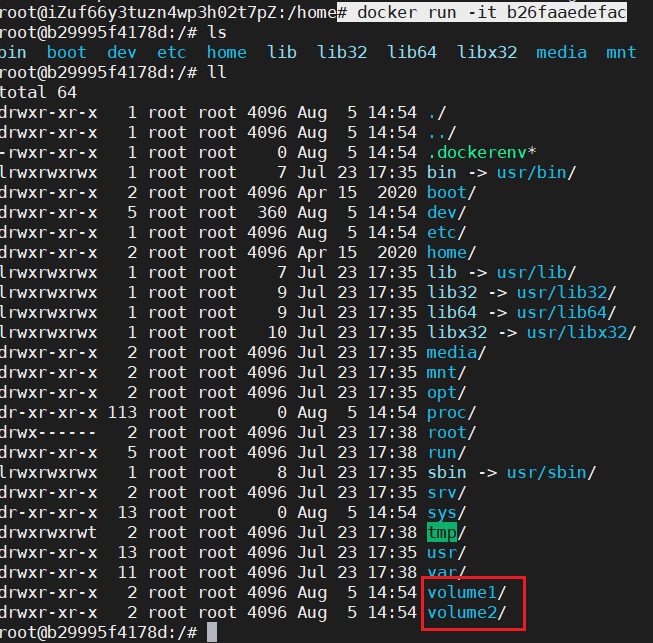
From the figure, we can see volume1 and volume2. This is the anonymous mount we just did when building the container. Then we use the docker inspect command to see where the two mounted volumes are mounted on the host, and test a synchronous data
# docker inspect b29995f4178d
...
 "Mounts": [
            {
                "Type": "volume",
                "Name": "a1fd1edec5784f1153a318003bba4279b86fd2dd71b401be5864ed9b868d7332",
                "Source": "/var/lib/docker/volumes/a1fd1edec5784f1153a318003bba4279b86fd2dd71b401be5864ed9b868d7332/_data",
                "Destination": "volume1",
                "Driver": "local",
                "Mode": "",
                "RW": true,
                "Propagation": ""
            },
            {
                "Type": "volume",
                "Name": "975ae74c8716f5e85ccf784c716291cffda2158baf6b3f9e145ffc1ea353cb7b",
                "Source": "/var/lib/docker/volumes/975ae74c8716f5e85ccf784c716291cffda2158baf6b3f9e145ffc1ea353cb7b/_data",
                "Destination": "volume2",
                "Driver": "local",
                "Mode": "",
                "RW": true,
                "Propagation": ""
            }
        ],
...
It can be seen from docker inspect ion that the directories of volume1 and volume2 mounted to the host are / var/lib/docker/volumes/a1fd1edec5784f1153a318003bba4279b86fd2dd71b401be5864ed9b868d7332/_data, and var/lib/docker/volumes/975ae74c8716f5e85ccf784c716291cffda2158baf6b3f9e145ffc1ea353cb7b/_data
Let's create a file in the container mount to test whether the data can be synchronized
Create a file xiaomotong.txt in volume1 in the container and write the string hello world
root@b29995f4178d:/# cd volume1
root@b29995f4178d:/volume1# echo hello world >> xiaomotong.txt
root@b29995f4178d:/volume1# ll
total 12
drwxr-xr-x 2 root root 4096 Aug  5 15:01 ./
drwxr-xr-x 1 root root 4096 Aug  5 14:54 ../
-rw-r--r-- 1 root root   12 Aug  5 15:01 xiaomotong.txt
Check the mount directory corresponding to the host and confirm whether to synchronize data
root@iZuf66y3tuzn4wp3h02t7pZ:/var/lib/docker/volumes/a1fd1edec5784f1153a318003bba4279b86fd2dd71b401be5864ed9b868d7332/_data# ls
xiaomotong.txt
root@iZuf66y3tuzn4wp3h02t7pZ:/var/lib/docker/volumes/a1fd1edec5784f1153a318003bba4279b86fd2dd71b401be5864ed9b868d7332/_data# cat xiaomotong.txt
hello world
Sure enough, nice
So have we ever thought about how to synchronize data between containers and host computers?
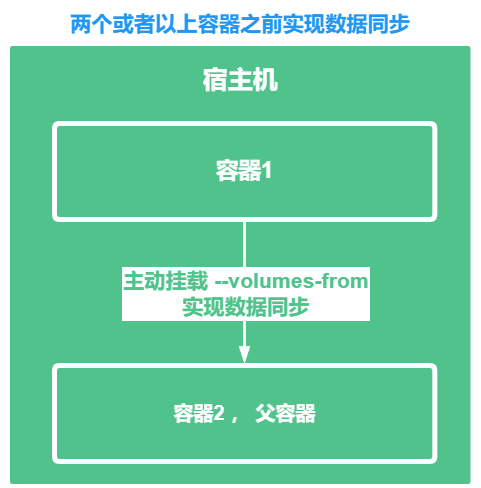
Data volume container
Data volume containers, for example, container 1 is mounted to a directory on container 2 through the instruction - volumes from, so container 2 is the parent container. At this time, data synchronization between the two containers is realized, and container 2 is the data volume container
Let's take a small example:
Using the image we just created, create 2 containers, first create docker2, then create docker1, and mount docker1 on docker2, and create a file, xiaomotong.txt, in Volume 1 in the directory where docker2 is mounted. We verify whether this file also exists in docker1 Volume 1
# docker images
REPOSITORY            TAG       IMAGE ID       CREATED          SIZE
xiaomotong/ubuntu     latest    b26faaedefac   38 minutes ago   72.8MB

# docker run -it --name docker2 b26faaedefac
# docker run -it --name docker1 --volumes-from docker2 b26faaedefac
b26faaedefac is the ID of the image we made ourselves
Mainly using the -- volumes from instruction, we can mount the two containers
docker1
root@3ed3ca51118f:/volume1# ls
root@3ed3ca51118f:/volume1# touch xiaomotong.txt
docker2
root@e9e1a0c46331:/volume1# ls
xiaomotong.txt
Sure enough, the two containers synchronized data with each other
In the above example, not only two containers are mounted to synchronize data, but also multiple containers are mounted. For example, another container docker3 is mounted on docker2, which has the same effect
So how do they synchronize data?
The principle of data synchronization between containers is through copying. For example, a file 2 is created on the mount on docker2. At this time, docker1 mounts docker2, that is, docker2 is the parent container, so docker1 will copy file 2 to its corresponding mount
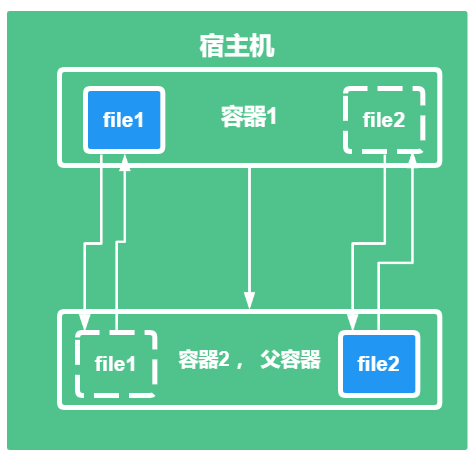
Conversely, if docker1 creates file 1 in its own mount, file 1 will also be copied by docker2 to its own mount
If we delete docker2 at this time, will the files in docker1 mount be lost?
The answer is no, because they copy, not share a copy
Let's review the previous issue when we created mysql containers. If we created multiple containers, would it be easy to synchronize their data and delete one container without losing data
For example:
#docker run  -d -p 8888:3306 -v /etc/mysql/conf.d -v /var/lib/mysql -e MYSQL_ROOT_PASSWORD=123456 --name mysql1 mysql:5.7

#docker run  -d -p 8888:3306 -v /etc/mysql/conf.d -v /var/lib/mysql -e MYSQL_ROOT_PASSWORD=123456 --name mysql2 --volumes-from mysql1 mysql:5.7
Let's summarize
The data volume container will be used to transfer configuration information between containers, and the life cycle of the data volume will continue until no container is used
Even if we do not use the data volume container, the data persisted to the local host will not be deleted
reference material:
Welcome to like, follow and collect
My friends, your support and encouragement are the driving force for me to insist on sharing and improve quality

Well, that's all for this time
Technology is open, and our mentality should be open. Embrace change, live in the sun and strive to move forward.
I'm Nezha, the Little Devil boy. Welcome to praise and pay attention to the collection. See you next time~