
In JetPack, there is a component called Navigation. As the name implies, it is a page Navigation component. Compared with other third-party Navigation, the difference is that it is specially designed for Fragment page management. It is very useful for the App of a single Activity, because the presentation of App pages based on an Activity is displayed by different fragments. So Fragment management is very important. In general, the implementation needs to maintain the stack relationship between fragments and be familiar with the Transaction operation of fragments. In order to reduce the cost of use and maintenance, there is today's leading role in Navigation.
If you are interested in other components of JetPack, I recommend that you read my previous series, which is currently the last in the JetPack series.
Android Architecture Components Part1:Room
Android Architecture Components Part2:LiveData
Android Architecture Components Part3:Lifecycle
Android Architecture Components Part4:ViewModel
Paging's application in RecyclerView, this one is enough
From introduction to practice, this article is enough
For the use of Navigation, I summarize it in the following four points:
- Basic configuration of Navigation
- Jump and data transfer of Navigation
- Page animation for Navigation
- deepLink of Navigation
To configure
Before using, we need to introduce the dependency of Navigation, and then we need to create a configuration file for Navigation, which will be located in res/navigation/nav_graph.xml. In order to understand the code in this article, I wrote a Demo, which you can use Essence of Android See.
Open NAV graph.xml in my Demo, and you will see clearly the relationship between their pages.
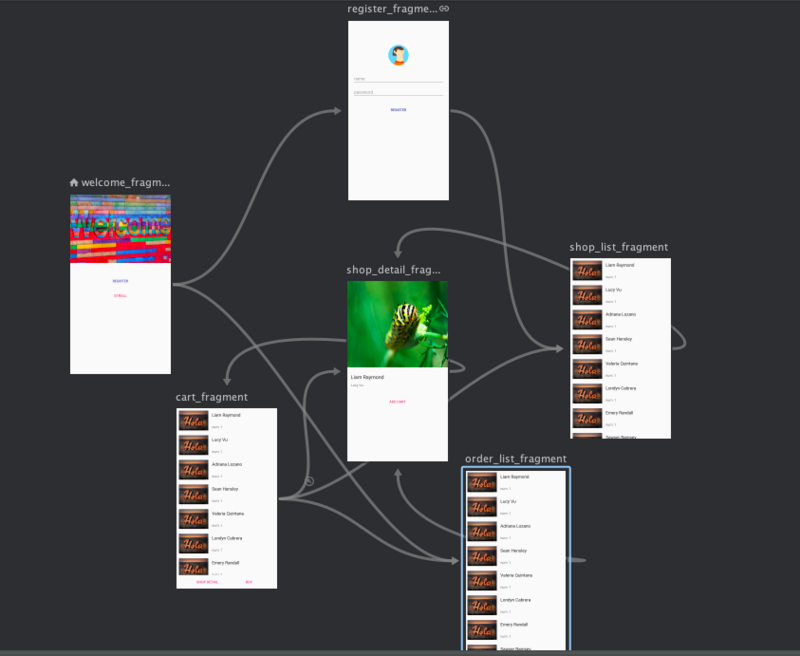
There are 6 pages in total, the leftmost one is the program entry page, and the lines between them point to the direction that they can jump.
Let's take a look at their xm configuration.
<navigation xmlns:android="http://schemas.android.com/apk/res/android"
    xmlns:app="http://schemas.android.com/apk/res-auto"
    xmlns:tools="http://schemas.android.com/tools"
    android:id="@+id/nav_graph"
    app:startDestination="@id/welcome_fragment">

    <fragment
        android:id="@+id/welcome_fragment"
        android:name="com.idisfkj.androidapianalysis.navigation.fragment.WelcomeFragment"
        android:label="welcome_fragment"
        tools:layout="@layout/fragment_welcome">

        <action
            android:id="@+id/action_go_to_register_page"
            app:destination="@id/register_fragment" />

        <action
            android:id="@+id/action_go_to_order_list_page"
            app:destination="@id/order_list_fragment"/>

    </fragment>

    <fragment
        android:id="@+id/register_fragment"
        android:name="com.idisfkj.androidapianalysis.navigation.fragment.RegisterFragment"
        android:label="register_fragment"
        tools:layout="@layout/fragment_register">

        <action
            android:id="@+id/action_go_to_shop_list_page"
            app:destination="@id/shop_list_fragment" />

    </fragment>

    ...
</navigation>
Page tags mainly include navigation, fragment and action
- Navigation: defines the navigation stack, which can be nested. Each navigation is independent of each other. It has a property startDestination to define the root entry fragment of the navigation stack
- Fragment: as the name implies, fragment page. Define the associated fragment through the name attribute
- action: intention, which can be understood as Intent, is the behavior of jump. The destination is used to associate the target fragment to jump.
The above is the basic configuration of NAV graph.xml.
After configuration, we also need to associate it with the Activity. Because all fragments are inseparable from Activity.
Navigation provides us with two configuration parameters: defaultNavHost and navGraph, so the following configuration is required in the Activity's xml.
<?xml version="1.0" encoding="utf-8"?>
<LinearLayout xmlns:android="http://schemas.android.com/apk/res/android"
    xmlns:app="http://schemas.android.com/apk/res-auto"
    xmlns:tools="http://schemas.android.com/tools"
    android:layout_width="match_parent"
    android:layout_height="match_parent"
    android:background="@android:color/background_light"
    android:orientation="vertical"
    tools:context=".navigation.NavigationMainActivity">

    <fragment
        android:id="@+id/nav_host_fragment"
        android:name="androidx.navigation.fragment.NavHostFragment"
        android:layout_width="match_parent"
        android:layout_height="match_parent"
        app:defaultNavHost="true"
        app:navGraph="@navigation/nav_graph" />

</LinearLayout>
- defaultNavHost: intercept the fallback operation of the device and submit it to Navigation for management.
- NAV graph: the configuration file of navigation, that is, the navgraph.xml file we configured above
In addition, the name attribute of the fragment must be NavHostFragment because it will be the manager of all the fragments we have configured. Specifically, the Navigator Abstract instance is obtained through the NavigationProvider in the internal NavController. The specific implementation class is the FragmentNavigator, so the fragment we configured is finally created through its navigation method and added to the FrameLayout root layout of NavHostFragment.
At this point, if we run the program directly and find that we can see the entry page welcome fragment

But click register and other operations, and you will find that click jump is invalid, so next we need to add a jump for it.
Jump
Since we have defined action in nav_graph.xml before, the access of jump is very convenient, and only one line of code is needed for the associated jump of each action.
class WelcomeFragment : Fragment() {

    override fun onCreateView(inflater: LayoutInflater, container: ViewGroup?, savedInstanceState: Bundle?): View? {
        return inflater.inflate(R.layout.fragment_welcome, container, false).apply {
            register_bt.setOnClickListener(Navigation.createNavigateOnClickListener(R.id.action_go_to_register_page))
            stroll_bt.setOnClickListener(Navigation.createNavigateOnClickListener(R.id.action_go_to_order_list_page))
        }
    }
}
The id in the code is the id of the configured action. The internal principle is to obtain the corresponding NavController first, and then traverse through the view to find the outermost parent view. Because the outermost parent view will be associated with the corresponding NavController in the onViewCreated method in NavHostFragment when the configuration file is imported.
    @Override
    public void onViewCreated(@NonNull View view, @Nullable Bundle savedInstanceState) {
        super.onViewCreated(view, savedInstanceState);
        if (!(view instanceof ViewGroup)) {
            throw new IllegalStateException("created host view " + view + " is not a ViewGroup");
        }
        Navigation.setViewNavController(view, mNavController);
        // When added programmatically, we need to set the NavController on the parent - i.e.,
        // the View that has the ID matching this NavHostFragment.
        if (view.getParent() != null) {
            View rootView = (View) view.getParent();
            if (rootView.getId() == getId()) {
                Navigation.setViewNavController(rootView, mNavController);
            }
        }
    }
Then call navigator to jump the page, and finally replace the Fragment with the replacement of Fragment transaction.
    -------------- NavController ------------------

    private void navigate(@NonNull NavDestination node, @Nullable Bundle args,
            @Nullable NavOptions navOptions, @Nullable Navigator.Extras navigatorExtras) {
        boolean popped = false;
        if (navOptions != null) {
            if (navOptions.getPopUpTo() != -1) {
                popped = popBackStackInternal(navOptions.getPopUpTo(),
                        navOptions.isPopUpToInclusive());
            }
        }
        Navigator<NavDestination> navigator = mNavigatorProvider.getNavigator(
                node.getNavigatorName());
        Bundle finalArgs = node.addInDefaultArgs(args);
        # ----Key code-------
        NavDestination newDest = navigator.navigate(node, finalArgs,
                navOptions, navigatorExtras);
        ....
    }

    -------------- FragmentNavigator ------------------

    public NavDestination navigate(@NonNull Destination destination, @Nullable Bundle args,
            @Nullable NavOptions navOptions, @Nullable Navigator.Extras navigatorExtras) {
        if (mFragmentManager.isStateSaved()) {
            Log.i(TAG, "Ignoring navigate() call: FragmentManager has already"
                    + " saved its state");
            return null;
        }
        String className = destination.getClassName();
        if (className.charAt(0) == '.') {
            className = mContext.getPackageName() + className;
        }
        final Fragment frag = instantiateFragment(mContext, mFragmentManager,
                className, args);
        frag.setArguments(args);
        final FragmentTransaction ft = mFragmentManager.beginTransaction();

        int enterAnim = navOptions != null ? navOptions.getEnterAnim() : -1;
        int exitAnim = navOptions != null ? navOptions.getExitAnim() : -1;
        int popEnterAnim = navOptions != null ? navOptions.getPopEnterAnim() : -1;
        int popExitAnim = navOptions != null ? navOptions.getPopExitAnim() : -1;
        if (enterAnim != -1 || exitAnim != -1 || popEnterAnim != -1 || popExitAnim != -1) {
            enterAnim = enterAnim != -1 ? enterAnim : 0;
            exitAnim = exitAnim != -1 ? exitAnim : 0;
            popEnterAnim = popEnterAnim != -1 ? popEnterAnim : 0;
            popExitAnim = popExitAnim != -1 ? popExitAnim : 0;
            ft.setCustomAnimations(enterAnim, exitAnim, popEnterAnim, popExitAnim);
        }

        # ------Key code------
        ft.replace(mContainerId, frag);
        ft.setPrimaryNavigationFragment(frag);
        ...
    }
The source code is analyzed here. If you need to know more about it, it is recommended to read NavHostFragment, NavController, navigator provider and fragment navigator.
Biography
The above is the page Jump without parameters, so what about the jump with parameters?
You should think of bundles, and fill in the transferred data into bundles. Yes, the Navigator provides a navigation method that can pass bundle data.
findNavController().navigate(R.id.action_go_to_shop_detail_page, bundleOf("title" to "I am title"))
This traditional method does not guarantee the consistency of data types. In order to reduce human errors, Navigation provides a Gradle plug-in, which is specially used to ensure the type security of data.
To use it, you need to introduce the plug-in as follows.
buildscript {
    repositories {
        google()
    }
    dependencies {
        def nav_version = "2.1.0"
        classpath "androidx.navigation:navigation-safe-args-gradle-plugin:$nav_version"
    }
}
Finally, the plug-in is introduced into build.gradle under app.
apply plugin: "androidx.navigation.safeargs.kotlin"
And its usage is also very simple. First, the parameters need to be configured in nav graph.xml. A kind of
    <fragment
        android:id="@+id/shop_list_fragment"
        android:name="com.idisfkj.androidapianalysis.navigation.fragment.ShopListFragment"
        android:label="shop_list_fragment"
        tools:layout="@layout/fragment_shop_list">

        <action
            android:id="@+id/action_go_to_shop_detail_page"
            app:destination="@id/shop_detail_fragment">

            <argument
                android:name="title"
                app:argType="string" />

        </action>

    </fragment>

    <fragment
        android:id="@+id/shop_detail_fragment"
        android:name="com.idisfkj.androidapianalysis.navigation.fragment.ShopDetailFragment"
        android:label="shop_detail_fragment"
        tools:layout="@layout/fragment_shop_detail">

        <action
            android:id="@+id/action_go_to_cart_page"
            app:destination="@id/cart_fragment"
            app:popUpTo="@id/cart_fragment"
            app:popUpToInclusive="true" />

        <argument
            android:name="title"
            app:argType="string" />

    </fragment>
Now we jump from ShopListFragment to ShopDetailFragment. We need to add argument in the corresponding action of ShopListFragment, declare the corresponding parameter type and parameter name, or define the default value and nullable value of the parameter to indicate whether it can be null. The same is true for the corresponding ShopDetailFragment receive parameter.
In addition, the popUpTo and popUpToInclusive properties are used to achieve the SingleTop effect when jumping to CartFragment.
Let's take a look at how to use these configuration parameters in the code. First, in ShopListFragment,
holder.item.setOnClickListener(Navigation.createNavigateOnClickListener(ShopListFragmentDirections.actionGoToShopDetailPage(shopList[position])))
Or create a createNavigateOnClickListener, but now it is not the jump action id, but the ShopListFragmentDirections.actionGoToShopDetailPage method that is automatically generated by the plug-in. Once we have configured the argument above, the plug-in will automatically generate a class with [class name] + Directions. The nature of the automatically generated class is to do jump and parameter encapsulation. The source code is as follows.
class ShopListFragmentDirections private constructor() {
    private data class ActionGoToShopDetailPage(val title: String) : NavDirections {
        override fun getActionId(): Int = R.id.action_go_to_shop_detail_page

        override fun getArguments(): Bundle {
            val result = Bundle()
            result.putString("title", this.title)
            return result
        }
    }

    companion object {
        fun actionGoToShopDetailPage(title: String): NavDirections = ActionGoToShopDetailPage(title)
    }
}
The essence is to encapsulate the action id and argument into a NavDirections, and internally obtain the action id and argument by parsing it to perform a jump.
For the receiver ShopDetailFragment, the plug-in page will automatically generate a ShopDetailFragmentArgs with [class name] + Args class. So what we need to do is very simple.
class ShopDetailFragment : Fragment() {

    private val args by navArgs<ShopDetailFragmentArgs>()

    override fun onCreateView(inflater: LayoutInflater, container: ViewGroup?, savedInstanceState: Bundle?): View? {
        return inflater.inflate(R.layout.fragment_shop_detail, container, false).apply {
            title.text = args.title
            add_cart.setOnClickListener(Navigation.createNavigateOnClickListener(ShopDetailFragmentDirections.actionGoToCartPage()))
        }
    }

}
Get the ShopDetailFragmentArgs object through navArgs, which contains the passed page data.
animation
In action, you can not only configure the destination of the jump, but also define the transition animation of the corresponding page.
<?xml version="1.0" encoding="utf-8"?>
<navigation xmlns:android="http://schemas.android.com/apk/res/android"
    xmlns:app="http://schemas.android.com/apk/res-auto"
    xmlns:tools="http://schemas.android.com/tools"
    android:id="@+id/nav_graph"
    app:startDestination="@id/welcome_fragment">

    <fragment
        android:id="@+id/welcome_fragment"
        android:name="com.idisfkj.androidapianalysis.navigation.fragment.WelcomeFragment"
        android:label="welcome_fragment"
        tools:layout="@layout/fragment_welcome">

        <action
            android:id="@+id/action_go_to_register_page"
            app:destination="@id/register_fragment"
            app:enterAnim="@anim/slide_in_right"
            app:exitAnim="@anim/slide_in_left"
            app:popEnterAnim="@anim/slide_out_left"
            app:popExitAnim="@anim/slide_out_right" />

        <action
            android:id="@+id/action_go_to_order_list_page"
            app:destination="@id/order_list_fragment"
            app:enterAnim="@anim/slide_in_right"
            app:exitAnim="@anim/slide_in_left"
            app:popEnterAnim="@anim/slide_out_left"
            app:popExitAnim="@anim/slide_out_right" />

    </fragment>
    ...
</navigation>
Corresponding to four animation configuration parameters
- enterAnim: configure target page animation when entering
- exitAnim: configure the animation of the original page when entering
- popEnterAnim: configure target page animation when fallback pop
- popExitAnim: configure the animation of the original page when the pop is backed off
Through the above configuration, you can see the following effect.

deepLink
Let's recall that for multiple activities, I need to implement the deepLink effect, which should be configured in AndroidManifest.xml, such as scheme, host, etc. For a single Activity, a similar effect needs to be achieved. Navigation also provides a corresponding implementation, and the operation is simpler.
Navigation provides the deepLink tag, which can be configured directly in nav graph.xml, for example.
    <fragment
        android:id="@+id/register_fragment"
        android:name="com.idisfkj.androidapianalysis.navigation.fragment.RegisterFragment"
        android:label="register_fragment"
        tools:layout="@layout/fragment_register">

        <action
            android:id="@+id/action_go_to_shop_list_page"
            app:destination="@id/shop_list_fragment"
            app:enterAnim="@anim/slide_in_right"
            app:exitAnim="@anim/slide_in_left"
            app:popEnterAnim="@anim/slide_out_left"
            app:popExitAnim="@anim/slide_out_right" />

        <deepLink app:uri="api://register/" />

    </fragment>
I have configured a skip to the registration page RegisterFragment through deepLink. The writing method is very simple, just configure the uri directly. At the same time, I can also pass parameters through placeholder configuration, such as 👇
<deepLink app:uri="api://register/{id}" />
At this time, we can get the data with key as id through argument on the registration page.
Of course, to achieve the above effect, we need to configure our deepLink in Android manifest.xml, and use the NAV graph tag in Activity.
    <application
        ...
        android:theme="@style/AppTheme">
        <activity android:name=".navigation.NavigationMainActivity" >
            <intent-filter>
                <action android:name="android.intent.action.VIEW"/>
                <action android:name="android.intent.action.MAIN" />

                <category android:name="android.intent.category.LAUNCHER" />
            </intent-filter>
            <nav-graph android:value="@navigation/nav_graph"/>
        </activity>
        ...
    </application>
Now just install the demo in the article on your mobile phone and click the link below
The App will then launch and navigate to the registration interface. Is it very simple?
Finally, let's see the effect.

This is about Navigation for the moment. Through this article, I hope you can be familiar with the use of Navigation and find the charm of single Activity.
If this article is helpful to you, you can like it and pay attention to it. It's my biggest encouragement!
Project address
Essence of Android
The purpose of this library is to comprehensively analyze Android related knowledge points with detailed Demo, so as to help readers grasp and understand the points described faster.
