Indexes
Rich Text Editor
With rich text editors, website editors can write beautiful, WYSIWYG pages as well as using office. Take tinymce as an example, and the use of other rich text editors is similar.
Install packages in a virtual environment.
pip install django-tinymce
Once the installation is complete, it can be used in Admin administration or in custom forms.
Example
1) Add an editor application to INSTALLED_APPS in settings.py of the project.
INSTALLED_APPS = (
    ...
    'tinymce',
)
2) Add the editor configuration to the settings.py of the project.
TINYMCE_DEFAULT_CONFIG = {
    'theme': 'advanced',
    'width': 600,
    'height': 400,
}
3) Configure the editor url in the urls.py of the project.
urlpatterns = [
    ...
    url(r'^tinymce/', include('tinymce.urls')),
]
Next, we introduce how to use Admin page and custom form page.
1.1 in Admin
1) In booktest/models.py, the attribute of the model is defined as HTMLField() type.
from django.db import models
from tinymce.models import HTMLField

class GoodsInfo(models.Model):
    gcontent=HTMLField()
2) Generate migration files and execute migration.
python manage.py makemigrations
python manage.py migrate
3) Register model class GoodsInfo in booktest/admin.py
from django.contrib import admin
from booktest.models import *
class GoodsInfoAdmin(admin.ModelAdmin):
    list_display = ['id']

admin.site.register(GoodsInfo,GoodsInfoAdmin)
4) Run the server, enter admin background management, click on GoodsInfo to add, the effect is as follows
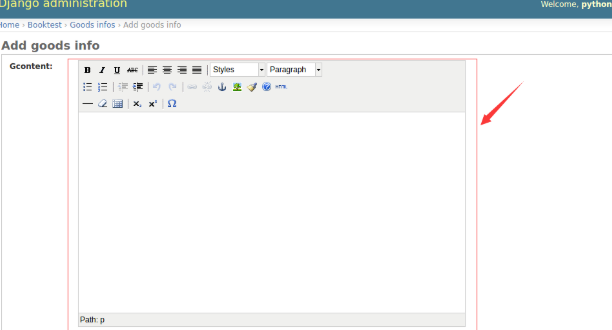
Save the content after editing it in the editor.
1.2 Custom Use
1) Define the view editor in booktest/views.py to display the editor.
def editor(request):
    return render(request, 'booktest/editor.html')
2) Configure url in booktest/urls.py.
url(r'^editor/',views.editor),
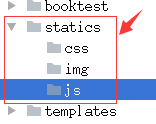
3) Create a static file directory under the project directory as follows:
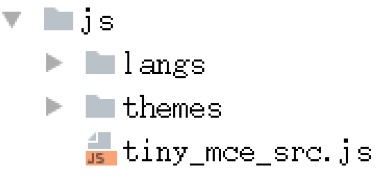
4) Find the directory of tinymce installed.
5) Copy tiny_mce_src.js file, langs folder and themes folder to static/js/directory under project directory.
6) Configure the static file lookup path in the settings.py of the project.
STATICFILES_DIRS=[
    os.path.join(BASE_DIR,'static'),
]
7) Create editor.html template under templates/booktest / directory.
<html>
<head>
    <title>Custom Use tinymce</title>
    <script type="text/javascript" src='/static/js/tiny_mce.js'></script>
    <script type="text/javascript">
        tinyMCE.init({
            'mode':'textareas',
            'theme':'advanced',
            'width':400,
            'height':100
        });
    </script>
</head>
<body>
<form method="post" action="#">
    <textarea name='gcontent'>Haha, what is this?</textarea>
</form>
</body>
</html>
8) Run the server and visit the website. The effect is as follows:

1.3 display
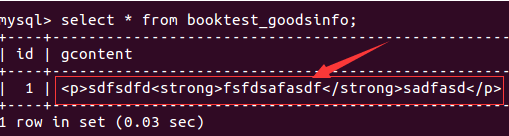
The strings generated through the rich text editor contain html. Query the database as follows:
When displaying strings in templates, html escapes are done by default, and escapes need to be turned off if you want to display them properly.
Close escapes in templates
- Mode 1: filter safe
- Mode 2: Label autoescape off
1) Define the view show in booktest/views.py to display the content of the rich text editor.
from booktest.models import *
...
def show(request):
    goods=GoodsInfo.objects.get(pk=1)
    context={'g':goods}
    return render(request,'booktest/show.html',context)
2) Configure url in booktest/urls.py.
url(r'^show/', views.show),
3) Create a show.html template in the templates/booktest / directory.
<html>
<head>
    <title>Show rich text editor content</title>
</head>
<body>
id:{{g.id}}
<hr>
{%autoescape off%}
{{g.gcontent}}
{%endautoescape%}
<hr>
{{g.gcontent|safe}}
</body>
</html>
4) Run the server and visit the web site in the browser. The effect is as follows:
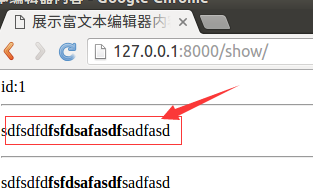
Full-text Retrieval
Full-text retrieval is different from fuzzy query in specific fields. Full-text retrieval is more efficient and can segment Chinese words.
- haystack: a framework for full-text retrieval, which supports four full-text retrieval engines: whoosh, solr, Xapian and Elasticsearc. Click to see Official website.
- Whoosh: Full-text search engine written in pure Python, although not as good as sphinx, xapian, Elastic searc, etc., but no binary package, the program will not inexplicably crash, for small sites, whoosh is enough to use, Click to see whoosh document.
- jieba: a free Chinese word segmentation package, if you feel it is not easy to use, you can use some charging products.
1) Install the required packages sequentially in the environment.
pip install django-haystack
pip install whoosh
pip install jieba
2) Modify the settings.py file of the project and install the application haystack.
INSTALLED_APPS = (
    ...
    'haystack',
)
3) Configure the search engine in the settings.py file of the project.
HAYSTACK_CONNECTIONS = {
    'default': {
        #Use whoosh engine
        'ENGINE': 'haystack.backends.whoosh_cn_backend.WhooshEngine',
        #Index file path
        'PATH': os.path.join(BASE_DIR, 'whoosh_index'),
    }
}

#When adding, modifying and deleting data, automatically generate index
HAYSTACK_SIGNAL_PROCESSOR = 'haystack.signals.RealtimeSignalProcessor'
4) Add a search configuration to the urls.py of the project.
url(r'^search/', include('haystack.urls')),
2.1 Create Engine and Index
1) Create the search_indexes.py file in the booktest directory.
from haystack import indexes
from booktest.models import GoodsInfo
#Specifies that some data of a class is indexed
class GoodsInfoIndex(indexes.SearchIndex, indexes.Indexable):
    text = indexes.CharField(document=True, use_template=True)

    def get_model(self):
        return GoodsInfo

    def index_queryset(self, using=None):
        return self.get_model().objects.all()
2) Create a "search/indexes/booktest/" directory under the templates directory.
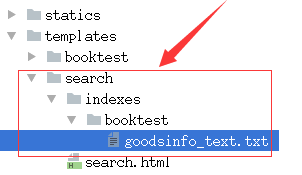
3) Create a "goodsinfo_text.txt" file in the above directory.
#Property of the specified index
{{object.gcontent}}
4) Find the installed haystack directory and create the ChineseAnalyr.py file in the directory.
import jieba
from whoosh.analysis import Tokenizer, Token

class ChineseTokenizer(Tokenizer):
    def __call__(self, value, positions=False, chars=False,
                 keeporiginal=False, removestops=True,
                 start_pos=0, start_char=0, mode='', **kwargs):
        t = Token(positions, chars, removestops=removestops, mode=mode,
                  **kwargs)
        seglist = jieba.cut(value, cut_all=True)
        for w in seglist:
            t.original = t.text = w
            t.boost = 1.0
            if positions:
                t.pos = start_pos + value.find(w)
            if chars:
                t.startchar = start_char + value.find(w)
                t.endchar = start_char + value.find(w) + len(w)
            yield t

def ChineseAnalyzer():
    return ChineseTokenizer()
5) Copy the whoosh_backend.py file and change it to the following name:
Note: There will be a space at the end of the duplicated file name. Remember to delete the space.
whoosh_cn_backend.py
6) Open the copied new file, introduce Chinese analysis class, and use jieba participle internally.
from .ChineseAnalyzer import ChineseAnalyzer
7) Change the word analysis category.
lookup
analyzer=StemmingAnalyzer()
Change to
analyzer=ChineseAnalyzer()
8) Initialize index data.
python manage.py rebuild_index
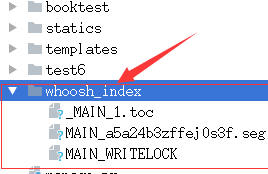
9) Enter y as prompted to generate an index.
10) The directory structure after index generation is as follows:
2.2 use
According to the configuration, after adding data to admin management, it will automatically create an index for the data, which can be searched directly, and some test data can be created first.
1) Define view query in booktest/views.py.
def query(request):
    return render(request,'booktest/query.html')
2) Configuration in booktest/urls.py.
url(r'^query/', views.query),
3) Create the template query.html in the templates/booktest/directory.
The parameter q represents the search content and the data passed to the template is query.
<html>
<head>
    <title>Full text search</title>
</head>
<body>
<form method='get' action="/search/" target="_blank">
    <input type="text" name="q">
    <br>
    <input type="submit" value="query">
</form>
</body>
</html>
4) Custom search result template: Create search.html under templates/search / directory.
Search results are paginated and views are passed to the template in the following context:
- query: search keywords
- Page: the page object of the current page
- paginator: Paging paginator object
The parameters received by the view are as follows:
- The parameter q represents the search content and the data passed to the template is query.
- The parameter page represents the current page number
<html>
<head>
<title>Full text search--Result page</title>
</head>
<body>
<h1>search <b>{{query}}</b> The results are as follows:</h1>
<ul>
{%for item in page%}
<li>{{item.object.id}}--{{item.object.gcontent|safe}}</li>
{%empty%}
<li>Nothing was found.</li>
{%endfor%}
</ul>
<hr>
{%for pindex in page.paginator.page_range%}
{%if pindex == page.number%}
{{pindex}}
{%else%}
<a href="?q={{query}}&page={{pindex}}">{{pindex}}</a>
{%endif%}
{%endfor%}
</body>
</html>
5) Running the server, accessing the web site, and conducting search tests.
Sending mail
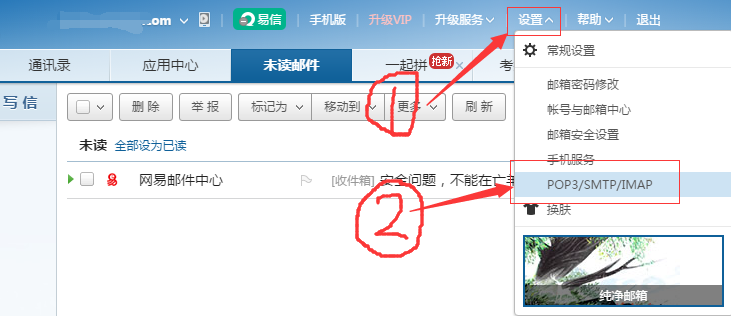
Mail sending function is built in Django, which is defined in django.core.mail module. SMTP servers are needed to send mail. The commonly used free servers are: 163,126,QQ Let's take 163 mail as an example.
1) Login settings.
2) Click "Client Authorization Password" on the new page, check "Open", and pop up a new window to fill in the mobile phone authentication code.
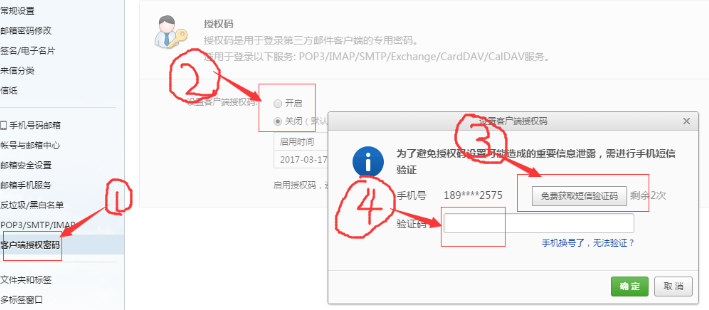
3) Fill in the authorization code.

4) Successful opening.
5) Open the settings.py file of the project and configure it.
EMAIL_BACKEND = 'django.core.mail.backends.smtp.EmailBackend'
EMAIL_HOST = 'smtp.163.com'
EMAIL_PORT = 25
#Mailbox for sending mail
EMAIL_HOST_USER = 'xxxxxx@163.com'
#Client Authorization Password Set in Mailbox
EMAIL_HOST_PASSWORD = 'xxxxxxx'
#The sender whom the addressee sees
EMAIL_FROM = 'python<xxxxxx@163.com>'
6) Create a new view send in the booktest/views.py file.
from django.conf import settings
from django.core.mail import send_mail
from django.http import HttpResponse
...
def send(request):
    msg='<a href="xxxxxxxxx" target="_blank">Click activation</a>'
    send_mail('Registration activation','',settings.EMAIL_FROM,
              ['xxxxxx@163.com'],
              html_message=msg)
    return HttpResponse('ok')
7) Configuration in the booktest/urls.py file.
url(r'^send/$',views.send),
8) Start the server, visit the address in the browser and check the mail in the mailbox.