Indexes
4.2 Upload Pictures in Custom form Form
6. Examples: Provincial and Urban Choice
I. Static files
CSS, images and js in the project are static files. Static files are usually placed in a separate directory for easy management. When calling in html pages, you also need to specify the path of the static file. Django provides an analytical way to configure the path of the static file. Static files can be placed in the project root directory, or in the application directory. Because some static files are common in the project, it is recommended to put them in the project root directory for easy management.
Example
1) Define the physical directory of the static file in the settings.py file of the project.
STATIC_URL = '/static/'
STATICFILES_DIRS = [
    os.path.join(BASE_DIR, 'static'),
]
2) Create a static directory under the project root directory, and then create img, CSS and JS directories.
3) Define view static_test in booktest/views.py.
def static_test(request):
    return render(request,'booktest/static_test.html')
4) Configure url in booktest/urls.py.
url(r'^static_test$',views.static_test),
5) Create static_test.html file under templates/booktest/.
<html>
<head>
    <title>Static file</title>
</head>
<body>
<img src="/static/img/test.png"/>
</body>
</html>
6) Save the picture in the static/img/directory, named test.png.
7) Running the server, you can see the picture in the browser.
Configure static files
Django provides a configuration that hides real paths in html pages.
1) Modify the STATIC_URL entry in the settings.py file of the project.
# STATIC_URL = '/static/'
STATIC_URL = '/abc/'
2) Refresh the browser, the picture can not be found
3) Modify templates/booktest/static_test.html as follows:
<html>
<head>
    <title>Static file</title>
</head>
<body>
//Before amendment:<img src="/static/img/test.png"/>
<hr>
//After amendment:<img src="/abc/img/test.png"/>
</body>
</html>
3) Refresh the browser and display it.
In order to ensure security, we can hide the real image path through configuration items and write it as a fixed path in the template. It is too troublesome to maintain it later. We can use the static tag to generate the static file path according to the configuration items.
1) Modify templates/booktest/static_test.html as follows:
<html>
<head>
    <title>Static file</title>
</head>
<body>
Before amendment:<img src="/static/img/test.png"/>
<hr>
After amendment:<img src="/abc/img/test.png"/>
<hr>
Dynamic configuration:
{%load static from staticfiles%}
<img src="{%static "img/test.png" %}"/>
</body>
</html>
2) Refresh browser, dynamic configuration can be displayed.
II. Middleware
Middleware is a framework-level hook for handling Django requests and responses. It is a lightweight, low-level plug-in system for changing Django input and output globally. Each middleware component is responsible for doing some specific functions.
However, due to its global impact, it needs to be used cautiously, and improper use will affect performance.
To put it bluntly, middleware helps us to do additional operations before and after the view function is executed. It is essentially a custom class with several methods defined in the class. The Django framework will execute these methods at a specific time when the request is made.
Custom Middleware
Middleware can define five methods: process_request and process_response.
- process_request(self,request)
- process_view(self, request, view_func, view_args, view_kwargs)
- process_template_response(self,request,response)
- process_exception(self, request, exception)
- process_response(self, request, response)
The return value of the above method can be None or an HttpResponse object. If it is None, it will continue to execute backwards according to the rules defined by django. If it is an HttpResponse object, it will be returned directly to the user.
Customize a middleware example
from django.utils.deprecation import MiddlewareMixin


class MD1(MiddlewareMixin):

    def process_request(self, request):
        print("MD1 Inside process_request")

    def process_response(self, request, response):
        print("MD1 Inside process_response")
        return response
process_request
The process_request has one parameter, request, which is the same as the request in the view function.
Its return value can be either None or HttpResponse object. If the return value is None, follow the normal process and leave it to the next middleware. If it is a HttpResponse object, Django will not execute the view function, but return the corresponding object to the browser.
Let's look at how Django performs the process_request method in multiple middleware.
from django.utils.deprecation import MiddlewareMixin


class MD1(MiddlewareMixin):

    def process_request(self, request):
        print("MD1 Inside process_request")


class MD2(MiddlewareMixin):
    def process_request(self, request):
        print("MD2 Inside process_request")
        pass
Register the above two custom MIDDLEWARE in the MIDLEWARE configuration item of settings.py:
MIDDLEWARE = [
    'django.middleware.security.SecurityMiddleware',
    'django.contrib.sessions.middleware.SessionMiddleware',
    'django.middleware.common.CommonMiddleware',
    'django.middleware.csrf.CsrfViewMiddleware',
    'django.contrib.auth.middleware.AuthenticationMiddleware',
    'django.contrib.messages.middleware.MessageMiddleware',
    'django.middleware.clickjacking.XFrameOptionsMiddleware',
    'middlewares.MD1',  # Custom Middleware MD1
    'middlewares.MD2'  # Custom Middleware MD2
]
At this point, when we visit a view, we will find that the following contents are printed in the terminal:
process_request in MD1
process_request in MD2
======index======
If you change the position of MD1 and MD2 and visit another view, you will find that the contents printed in the terminal are as follows:
process_request in MD2
process_request in MD1
======index======
Looking at the results, we know that the view function is still the last one to execute, and MD2 executes its own process_request method before MD1.
After printing the request parameters in the process_request method of the two custom middleware, you will find that they are the same object.
In conclusion:
- The process_request method of the middleware is executed before the view function is executed.
- When configuring multiple middleware, it is executed from front to back in the order of registration in MIDDLEWARE, that is, the index value of the list.
- Requests passed between different middleware are the same object
The process_response method in multiple middleware is executed in reverse order according to the registration order in MIDDLEWARE. That is to say, the process_request method of the first middleware is executed first, its process_response method is executed last, and the process_response method of the last middleware is executed first.
process_response
It has two parameters, one is request, the other is response, request is the same object in the above example, response is the HttpResponse object returned by the view function. The return value of this method must also be an HttpResponse object.
Add process_response method to M1 and M2 above:
from django.utils.deprecation import MiddlewareMixin


class MD1(MiddlewareMixin):

    def process_request(self, request):
        print("MD1 Inside process_request")

    def process_response(self, request, response):
        print("MD1 Inside process_response")
        return response


class MD2(MiddlewareMixin):
    def process_request(self, request):
        print("MD2 Inside process_request")
        pass

    def process_response(self, request, response):
        print("MD2 Inside process_response")
        return response
Visit a view to see the output of the terminal:
process_request in MD2
process_request in MD1
======index======
process_response in MD1
process_response in MD2
Looking at the results, we can see that:
The process_response method is executed after the view function in the order that MD1 executes first than MD2. (MD2 in settings.py is registered before MD1)
The process_response method in multiple middleware is executed in reverse order according to the registration order in MIDDLEWARE. That is to say, the process_request method of the first middleware is executed first, its process_response method is executed last, and the process_response method of the last middleware is executed first.
process_view
process_view(self, request, view_func, view_args, view_kwargs)
The method has four parameters
request is the HttpRequest object.
view_func is the view function that Django will use soon. (It's the actual function object, not the name of the function as a string.)
view_args is a list of location parameters passed to the view.
View_kwargs is a dictionary of keyword parameters passed to the view. view_args and view_kwargs do not contain the first view parameter (request).
Django calls the process_view method before calling the view function.
It should return None or an HttpResponse object. If None is returned, Django will continue to process the request, execute the process_view method of any other middleware, and then execute the corresponding view. If it returns an HttpResponse object, Django will not call the appropriate view function. It will execute the middleware process_response method and apply it to the HttpResponse and return the result.
Add process_view method to MD1 and MD2:
from django.utils.deprecation import MiddlewareMixin


class MD1(MiddlewareMixin):

    def process_request(self, request):
        print("MD1 Inside process_request")

    def process_response(self, request, response):
        print("MD1 Inside process_response")
        return response

    def process_view(self, request, view_func, view_args, view_kwargs):
        print("-" * 80)
        print("MD1 Medium process_view")
        print(view_func, view_func.__name__)


class MD2(MiddlewareMixin):
    def process_request(self, request):
        print("MD2 Inside process_request")
        pass

    def process_response(self, request, response):
        print("MD2 Inside process_response")
        return response

    def process_view(self, request, view_func, view_args, view_kwargs):
        print("-" * 80)
        print("MD2 Medium process_view")
        print(view_func, view_func.__name__)
Visit the index view function to see the output:
MD2 Inside process_request
MD1 Inside process_request
--------------------------------------------------------------------------------
MD2 Medium process_view
<function index at 0x000001B973777BF8> index
--------------------------------------------------------------------------------
MD1 Medium process_view
<function index at 0x000001B973777BF8> index
======index======
MD1 Inside process_response
MD2 Inside process_response
The process_view method is executed after the process_request and before the view function. The execution order is in the order of registration in MIDDLEWARE from front to back.
process_exception
process_exception(self, request, exception)
The method has two parameters:
A HttpRequest object
An exception is an Exception object generated by an exception to the view function.
This method is executed only if an exception occurs in the view function, and the value it returns can be either a None or a HttpResponse object. If it is an HttpResponse object, Django calls the process_response method in the template and middleware and returns it to the browser, otherwise the exception will be handled by default. If a None is returned, the process_exception method handed over to the next middleware handles the exception. Its execution order is also in reverse order according to the order of middleware registration.
Add this method to MD1 and MD2:
from django.utils.deprecation import MiddlewareMixin


class MD1(MiddlewareMixin):

    def process_request(self, request):
        print("MD1 Inside process_request")

    def process_response(self, request, response):
        print("MD1 Inside process_response")
        return response

    def process_view(self, request, view_func, view_args, view_kwargs):
        print("-" * 80)
        print("MD1 Medium process_view")
        print(view_func, view_func.__name__)

    def process_exception(self, request, exception):
        print(exception)
        print("MD1 Medium process_exception")


class MD2(MiddlewareMixin):
    def process_request(self, request):
        print("MD2 Inside process_request")
        pass

    def process_response(self, request, response):
        print("MD2 Inside process_response")
        return response

    def process_view(self, request, view_func, view_args, view_kwargs):
        print("-" * 80)
        print("MD2 Medium process_view")
        print(view_func, view_func.__name__)

    def process_exception(self, request, exception):
        print(exception)
        print("MD2 Medium process_exception")
If there are no exceptions in the view function, the process_exception method does not execute.
Find a way to throw an exception in the view function:
def index(request):
    print('======index======')
    raise ValueError("Actively throw an exception")
    return render(request, 'booktest/index.html')
In process_exception of MD1, a response object is returned:
class MD1(MiddlewareMixin):

    def process_request(self, request):
        print("MD1 Inside process_request")

    def process_response(self, request, response):
        print("MD1 Inside process_response")
        return response

    def process_view(self, request, view_func, view_args, view_kwargs):
        print("-" * 80)
        print("MD1 Medium process_view")
        print(view_func, view_func.__name__)

    def process_exception(self, request, exception):
        print(exception)
        print("MD1 Medium process_exception")
        return HttpResponse(str(exception))  # Returns a response object
Look at the output:
process_request in MD2
process_request in MD1
--------------------------------------------------------------------------------
process_view in MD2
<function index at 0x0000019288FB7BF8> index
--------------------------------------------------------------------------------
process_view in MD1
<function index at 0x0000019288FB7BF8> index
======index======
Actively throw an exception
process_exception in MD1
process_response in MD1
process_response in MD2
Note that the process_exception method of MD2 is not executed here, because the process_exception method of MD1 directly returns a response object.
process_template_response (less used)
process_template_response(self, request, response)
Its parameters, an HttpRequest object, and response are TemplateResponse objects (generated by view functions or middleware).
process_template_response is executed immediately after the view function is executed, but it has a prerequisite that the object returned by the view function has a render() method (or indicates that the object is a TemplateResponse object or equivalent method).
class MD1(MiddlewareMixin):

    def process_request(self, request):
        print("MD1 Inside process_request")

    def process_response(self, request, response):
        print("MD1 Inside process_response")
        return response

    def process_view(self, request, view_func, view_args, view_kwargs):
        print("-" * 80)
        print("MD1 Medium process_view")
        print(view_func, view_func.__name__)

    def process_exception(self, request, exception):
        print(exception)
        print("MD1 Medium process_exception")
        return HttpResponse(str(exception))

    def process_template_response(self, request, response):
        print("MD1 Medium process_template_response")
        return response


class MD2(MiddlewareMixin):
    def process_request(self, request):
        print("MD2 Inside process_request")
        pass

    def process_response(self, request, response):
        print("MD2 Inside process_response")
        return response

    def process_view(self, request, view_func, view_args, view_kwargs):
        print("-" * 80)
        print("MD2 Medium process_view")
        print(view_func, view_func.__name__)

    def process_exception(self, request, exception):
        print(exception)
        print("MD2 Medium process_exception")

    def process_template_response(self, request, response):
        print("MD2 Medium process_template_response")
        return response
In view.py:
def index(request):
    print('======index======')

    def render():
        print("in index/render")
        return HttpResponse("OK")

    rep = HttpResponse("OK")
    rep.render = render
    return rep
Access the index view and output the results of the terminal:
MD2 Inside process_request
MD1 Inside process_request
--------------------------------------------------------------------------------
MD2 Medium process_view
<function index at 0x0000020E931A8BF8> index
--------------------------------------------------------------------------------
MD1 Medium process_view
<function index at 0x0000020E931A8BF8> index
======index======
MD1 Medium process_template_response
MD2 Medium process_template_response
in index/render
MD1 Inside process_response
MD2 Inside process_response
The results show that:
After the view function is executed, the process_template_response method of the middleware is executed immediately, in reverse order, MD1 is executed first, MD2 is executed, then the render method of the HttpResponse object returned by the view function is executed, a new HttpResponse object is returned, and then the process_response method of the middleware is executed.
Execution flow of Middleware

The original quotation: https://www.cnblogs.com/liwenzhou/p/8761803.html
3. Admin Site
The content publishing part is responsible for viewing, adding, modifying and deleting data by the administrator of the website. Developing these duplicate functions is tedious and lack of creativity. To this end, Django can automatically generate management modules according to the defined model classes.
In the first part, the management site is briefly introduced, and now it is explained in detail. Admin management site is enabled by default in Django project.
1) Preparations: Create administrator's username and password.
python manage.py createsuperuser
Fill in the user name, mailbox and password as prompted.
2) Use: Register model classes in admin.py of applications
Example: Open the booktest/admin.py file and register the region model.
from django.contrib import admin
from booktest.models import *

admin.site.register(AreaInfo)
3) Login in the background, after successful login, you can see AreaInfos, which can be added, modified, deleted, query management.

The display effect of the list page is as follows:
Control Management Page Display
Class ModelAdmin can control the way the model is displayed in the Admin interface, mainly including the way the list page is displayed and the way the modified page is displayed.
1) In booktest/admin.py, the management class AreaAdmin is defined before registering the model class.
class AreaAdmin(admin.ModelAdmin):
    pass
There are two ways to use the management class:
- Registration parameter
- Decorator
Registration parameters: Open the booktest/admin.py file and register the model class code as follows:
admin.site.register(AreaInfo,AreaAdmin)
Decorator: Open the booktest/admin.py file and register the model class on the management class. The code is as follows:
@admin.register(AreaInfo)
class AreaAdmin(admin.ModelAdmin):
    pass
Next, how to control the list page and increase the display effect of the modified page is introduced.
3.1 List Page Options
Page size
How many pieces of data are displayed in each page? By default, 100 pieces of data are displayed in each page. The attributes are as follows:
list_per_page=100
1) Open the booktest/admin.py file and modify the AreaAdmin class as follows:
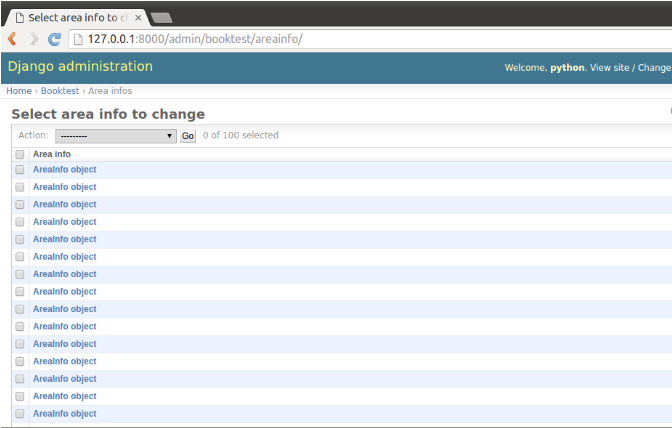
class AreaAdmin(admin.ModelAdmin):
    list_per_page = 10
2) View the list page of regional information in the browser, the effect is as follows:

Location of Operational Options
The attributes displayed at the top are set to True, False is not displayed at the top, and True is the default.
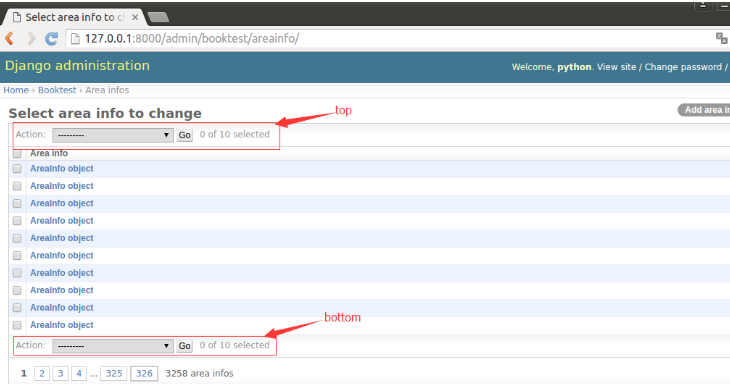
actions_on_top=True
The attributes displayed at the bottom are set to True, False is not displayed at the bottom, and False is the default.
actions_on_bottom=False
1) Open the booktest/admin.py file and modify the AreaAdmin class as follows:
class AreaAdmin(admin.ModelAdmin):
    ...
    actions_on_top = True
    actions_on_bottom = True
2) The refresh effect in the browser is as follows:
Columns in the list
The attributes are as follows:
list_display= [model field 1, model field 2,...]
1) Open the booktest/admin.py file and modify the AreaAdmin class as follows:
class AreaAdmin(admin.ModelAdmin):
    ...
    list_display = ['id','atitle']
2) The refresh effect in the browser is as follows:

Click on the column header to sort in ascending or descending order.
Use methods as columns
Columns can be model fields or model methods, requiring methods to have return values.
1) Open the booktest/models.py file and modify the AreaInfo class as follows:
class AreaInfo(models.Model):
    ...
    def title(self):
        return self.atitle
2) Open the booktest/admin.py file and modify the AreaAdmin class as follows:
class AreaAdmin(admin.ModelAdmin):
    ...
    list_display = ['id','atitle','title']
3) The refresh effect in the browser is as follows:
Method columns cannot be sorted, and if sorting is required, a sorting basis must be specified for the method.
admin_order_field = model class field
1) Open the booktest/models.py file and modify the AreaInfo class as follows:
class AreaInfo(models.Model):
    ...
    def title(self):
        return self.atitle
    title.admin_order_field='atitle'
2) The refresh effect in the browser is as follows:

Column headings
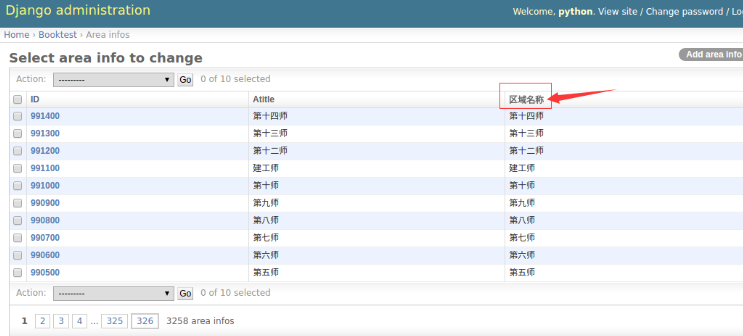
Column headings default to the name of the property or method, which can be set by property. We need to encapsulate the model field as a method first, and then use this attribute for the method. The model field can not use this attribute directly.
short_description='Column headings'
1) Open the booktest/models.py file and modify the AreaInfo class as follows:
class AreaInfo(models.Model):
    ...
    title.short_description='Area name'
2) The refresh effect in the browser is as follows:
Associated objects
There is no direct access to the attributes or methods of the associated objects, and methods can be encapsulated in the model class to access the members of the associated objects.
1) Open the booktest/models.py file and modify the AreaInfo class as follows:
class AreaInfo(models.Model):
    ...
    def parent(self):
        if self.aParent is None:
          return ''
        return self.aParent.atitle
    parent.short_description='Parent Area Name'
2) Open the booktest/admin.py file and modify the AreaAdmin class as follows:
class AreaAdmin(admin.ModelAdmin):
    ...
    list_display = ['id','atitle','title','parent']
3) The refresh effect in the browser is as follows:

Right sidebar filter
Attributes are as follows. Only fields can be received. The values of corresponding fields can be listed for fast filtering. Generally used for fields with duplicate values.
list_filter=[]
1) Open the booktest/admin.py file and modify the AreaAdmin class as follows:
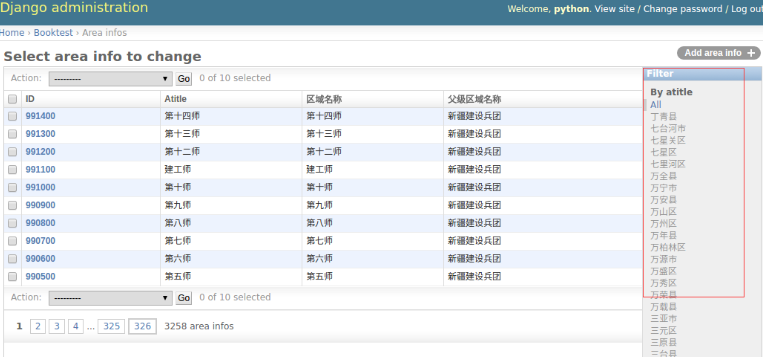
class AreaAdmin(admin.ModelAdmin):
    ...
    list_filter=['atitle']
2) The refresh effect in the browser is as follows:
Search box
Attributes are as follows, which are used to search the value of the specified field and support fuzzy query. List type, indicating search on these fields.
search_fields=[]
1) Open the booktest/admin.py file and modify the AreaAdmin class as follows:
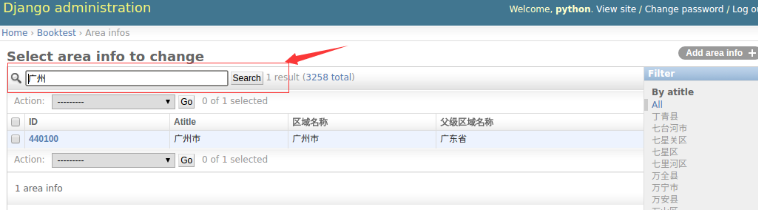
class AreaAdmin(admin.ModelAdmin):
    ...
    search_fields=['atitle']
2) The refresh effect in the browser is as follows:
Chinese title
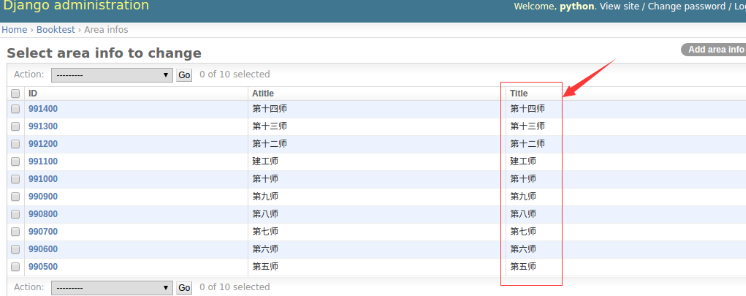
1) Open the booktest/models.py file, modify the model class, and specify the verbose_name parameter for the attribute
class Area(models.Model):
    atitle = models.CharField(max_length=24,verbose_name="Title")
    aparent = models.ForeignKey(to='self', null=True)
2) The refresh effect in the browser is as follows:

3.2 Edit Page Options
Display field order
The attributes are as follows:
fields=[]
1) Click on the link of a line ID to go to the modification page. The default effect is as follows:
2) Open the booktest/admin.py file and modify the AreaAdmin class as follows:
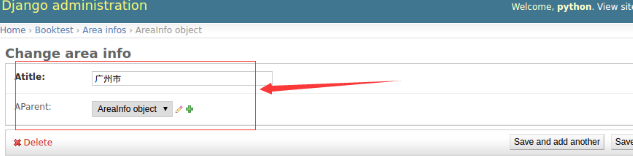
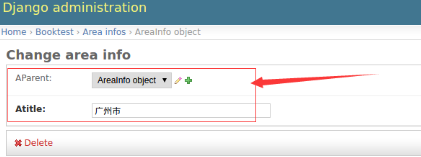
class AreaAdmin(admin.ModelAdmin):
    ...
    fields=['aParent','atitle']
3) Refresh the browser as follows:
The output in the drop-down list is the name of the object, and str methods can be defined in the model class for object conversion strings.
1) Open the booktest/models.py file, modify the AreaInfo class, and add str method.
class AreaInfo(models.Model):
    ...
    def __str__(self):
        return self.atitle
2) Refresh the browser as follows:

Group display
The attributes are as follows:
fieldset=(
    ('Group 1 heading',{'fields':('Field 1','Field 2')}),
    ('Group 2 heading',{'fields':('Field 3','Field 4')}),
)
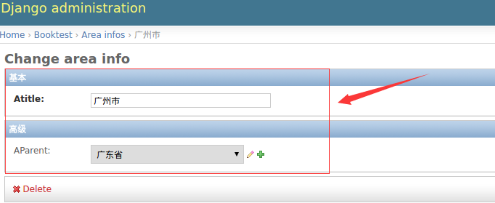
1) Open the booktest/admin.py file and modify the AreaAdmin class as follows:
class AreaAdmin(admin.ModelAdmin):
    ...
    # fields=['aParent','atitle']

    fieldsets = (
        ('basic', {'fields': ['atitle']}),
        ('senior', {'fields': ['aparent']})
    )
2) Refresh the browser as follows:
Note: fields and fieldsets should be selected.
Associated objects
In a one-to-many relationship, multi-end objects can be edited in the editing page at one end. The ways of embedding multi-end objects include tables and blocks. Type InlineModel Admin: Represents the editing of an association model embedded in the editing page of the model. Subclass TabularInline: Embedded in tables. Subclass StackedInline: Embedded in block form.
1) Open the booktest/admin.py file and create the AreaStackedInline class.
class AreaStackedInline(admin.StackedInline):
    model = Area    # Associated subobjects
    extra = 2   # Edit 2 additional subobjects
2) Open the booktest/admin.py file and modify the AreaAdmin class as follows:
class AreaAdmin(admin.ModelAdmin):
    ...
    inlines = [AreaStackedInline]
3) Refresh the browser as follows:

It can be embedded in tables.
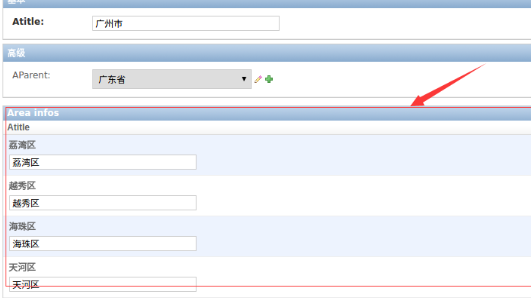
1) Open the booktest/admin.py file and create the AreaTabularInline class.
class AreaTabularInline(admin.TabularInline):
    model = Area#Associated subobjects
    extra = 2#Additional editing of 2 sub-objects
2) Open the booktest/admin.py file and modify the AreaAdmin class as follows:
class AreaAdmin(admin.ModelAdmin):
    ...
    inlines = [AreaTabularInline]
3) Refresh the browser as follows:
3.3 Rewrite Template
1) Create admin directory under templates / directory
2) Open the Django directory in the current environment and find the admin template downward
3) Create base_site.html in admin folder
Edit the base_site.html file:
{% extends "admin/base.html" %}
{% block title %}{{ title }} | {{ site_title|default:_('Django site admin') }}{% endblock %}
{% block branding %}
<h1 id="site-name"><a href="{% url 'admin:index' %}">{{ site_header|default:_('Django administration') }}</a></h1>
<hr>
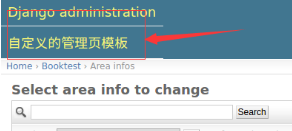
<h1>Customized Management Page Template</h1>
<hr>
{% endblock %}
{% block nav-global %}{% endblock %}
4) Go to the list page in the browser and refresh it as follows:
Other background templates can be modified in the same way.
IV. Uploading Pictures
There are two ways to upload pictures in Django:
- Upload pictures in admin
- Upload pictures in custom form form
After uploading the picture, the picture is stored on the server, and then the path of the picture is stored in the table.
Create model classes containing images
The attributes of the model class are defined as models.ImageField type.
1) Open the booktest/models.py file and define the model class PicTest.
class PicTest(models.Model):
    pic = models.ImageField(upload_to='booktest/')
2) Generate migration and execute migration.
python manage.py makemigrations
python manage.py migrate
3) Open the settings.py file of the project and set up the path to save the picture.
Because the picture is also a static file, it is saved in the static directory.
MEDIA_ROOT=os.path.join(BASE_DIR,"static/media")
4) Create the media directory under the static directory, and then create the directory of the application name. This example is booktest.

4.1 Upload pictures in admin
1) Open the booktest/admin.py file and register PicTest.
from django.contrib import admin
from booktest.models import *

admin.site.register(PicTest)
2) Run the server, enter the background management, click the Add button to add data
3) Select the picture and click the "save" button to upload the picture.
4) Go back to the database command line and query the data in the table pictest as follows:

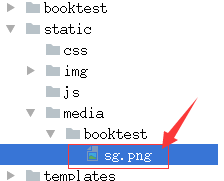
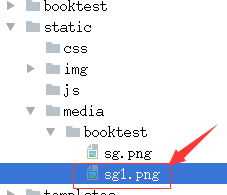
5) Pictures are saved to the directory static/media/booktest/, as follows:
4.2 Upload Pictures in Custom form Form
1) Open the booktest/views.py file and create the view pic_upload.
def pic_upload(request):
    return render(request,'booktest/pic_upload.html')
2) Open the booktest/urls.py file and configure the url.
url(r'^pic_upload/$', views.pic_upload),
3) Create the template pic_upload.html in the templates/booktest/directory.
Define the upload form in the template as follows:
- enctype="multipart/form-data"
- The method of form is post
- The type of input is file
    <form method="post" action="/pic_handle/" enctype="multipart/form-data">
        {%csrf_token%}
        <input type="file" name="pic"/><br>
        <input type="submit" value="upload">
    </form>
4) Open the booktest/views.py file and create the view pic_handle to receive the form and save the picture.
The FILES attribute of the request object is used to receive the requested file, including the picture.
from django.conf import settings
from django.http import HttpResponse
...
def file_handler(request):
    # 1.Get the file object
    photo = request.FILES["photo"]
    # 2.Create a file
    file_path = "%s/booktest/%s"%(settings.MEDIA_ROOT, photo.name)
    with open(file_path, 'wb') as f:
        # 3.Save the picture to a file
        for content in photo.chunks():
            f.write(content)
    # 4.Synchronize files to the database
    Picture.objects.create(photo="booktest/%s"%photo.name)

    return HttpResponse("Ok")
5) Open the booktest/urls.py file and configure the url.
url(r'^pic_handle/$', views.pic_handle),
6) Run the server and upload pictures in the browser.
7) The picture upload catalogue is as follows:
4.3 Display Pictures
1) Open the booktest/views.py file and create the view pic_show.
from booktest.models import PicTest
...
def pic_show(request):
    pic=PicTest.objects.get(pk=1)
    context={'pic':pic}
    return render(request,'booktest/pic_show.html',context)
2) Open the booktest/urls.py file and configure the url.
url(r'^pic_show/$', views.pic_show),
3) Create the template pic_show.html in the templates/booktest/directory.
<img src="/static/media/{{pic.pic}}"/>
4) Run the server and view pictures in the browser
Five, paging
Django provides data paging classes defined in django/core/paginator.py. Class Paginator is used to paginate a column with n pieces of data on a page. Class Page is used to represent the data on page m.
Paginator class instance object
-
Method _init_ (list, int): Returns the paging object, with the first parameter being list data and the second parameter being the number of entries per page.
-
Attribute count: Returns the total number of objects.
-
Attribute num_pages: Returns the total number of pages.
-
Property page_range: Returns a list of page numbers starting from 1, such as [1, 2, 3, 4].
-
Method page(m): Returns an instance object of the Page class, representing the data on page m, starting with subscript 1.
Page class instance object
-
Calling the page() method of the Paginator object returns the Page object without manual construction.
-
Property object_list: Returns a list of current page objects.
-
Attribute number: Return to the current page, starting from 1.
-
Attribute paginator: Paginator object corresponding to the current page.
-
Method has_next(): If there is a next page, return to True.
-
Method has_previous(): If the previous page returns True.
-
Method len(): Returns the number of objects on the current page.
Example
1) Create the view page_test in the booktest/views.py file.
from django.core.paginator import Paginator
from booktest.models import AreaInfo
...
#parameter pIndex Representation: The current page number to display
def page_test(request,pIndex):
    #Search for all regional information
    list1 = AreaInfo.objects.filter(aParent__isnull=True)
    #Pagination of regional information by 10 items per page
    p = Paginator(list1, 10)
    #If the page number information is not currently transmitted, it is considered the first page, which is written to request the first page without writing the page number.
    if pIndex == '':
        pIndex = '1'
    #adopt url The matching parameters are all string types, converted to int type
    pIndex = int(pIndex)
    #Get the first pIndex Page data
    list2 = p.page(pIndex)
    #Get all the page number information
    plist = p.page_range
    #Pass the current page number, data of the current page, and page number information to the template
    return render(request, 'booktest/page_test.html', {'list': list2, 'plist': plist, 'pIndex': pIndex})
2) Configure url in booktest/urls.py file.
url(r'^page(?P<pIndex>[0-9]*)/$', views.page_test),
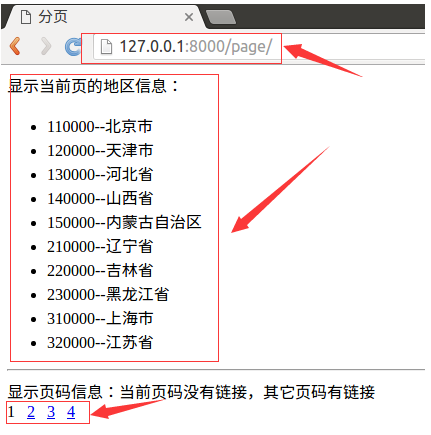
3) Create a page_test.html template file in the templates/booktest/directory.
<body> Display the current page's location information:<br> <ul> {%for area in list%} <li>{{area.id}}--{{area.atitle}}</li> {%endfor%} </ul> <hr> Display page number information: Current page number is not linked, other pages are linked.<br> {%for pindex in plist%} {%if pIndex == pindex%} {{pindex}} {%else%} <a href="/page{{pindex}}/">{{pindex}}</a> {%endif%} {%endfor%} </body>
4) Run the server and visit the website:
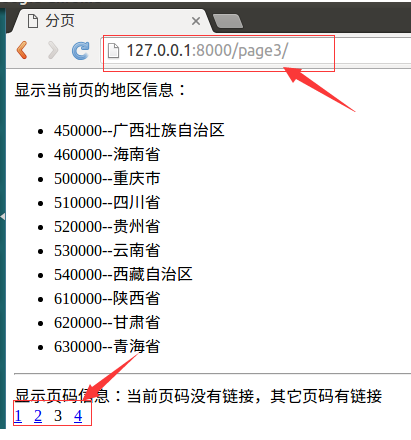
5) Click on the number of pages. The effect is as follows:
6. Examples: Provincial and Urban Choice
1) Open the booktest/views.py file and define view area1 to display the drop-down list.
#Provides controls that display drop-down lists for users to manipulate
def area1(request):
    return render(request,'booktest/area1.html')
2) Open the booktest/urls.py file and configure the url.
url(r'^area1/$', views.area1),
3) Create area1.html in the templates/booktest/directory.
<html>
<head>
    <title>List of provinces and municipalities</title>
    <script type="text/javascript" src="/static/js/jquery-1.12.4.min.js"></script>
    <script type="text/javascript">
        $(function(){
            //After the page is loaded, the saved information is obtained and added to the saved information. select
            $.get('/area2/',function(dic) {
                pro=$('#pro')
                $.each(dic.data,function(index,item){
                    pro.append('<option value='+item[0]+'>'+item[1]+'</option>');
                })
            });
            //Province select binding change Events, get city information, and add it to the market select
            $('#pro').change(function(){
                $.get('/area3_'+$(this).val()+'/',function(dic){
                    city=$('#city');
                    city.empty().append('<option value="">Please select the city.</option>');
                    dis=$('#dis');
                    dis.empty().append('<option value="">Please select districts and counties</option>');
                    $.each(dic.data,function(index,item){
                        city.append('<option value='+item[0]+'>'+item[1]+'</option>');
                    })
                });
            });
            //Market select binding change Event, get district and county information, and add it to district and county select
            $('#city').change(function(){
                $.get('/area3_'+$(this).val()+'/',function(dic){
                    dis=$('#dis');
                    dis.empty().append('<option value="">Please select districts and counties</option>');
                    $.each(dic.data,function(index,item){
                        dis.append('<option value='+item[0]+'>'+item[1]+'</option>');
                    })
                })
            });

        });
    </script>
</head>
<body>
<select id="pro">
    <option value="">Please choose Province</option>
</select>
<select id="city">
    <option value="">Please select the city.</option>
</select>
<select id="dis">
    <option value="">Please select districts and counties</option>
</select>
</body>
</html>
4) Open the booktest/views.py file and define view area2 for saving information.
from django.http import JsonResponse
...
#Access to provincial information
def area2(request):
    list = AreaInfo.objects.filter(aParent__isnull=True)
    list2 = []
    for item in list:
        list2.append([item.id, item.atitle])
    return JsonResponse({'data': list2})
5) Open the booktest/urls.py file and configure the url.
url(r'^area2/$', views.area2),
6) Open the booktest/views.py file and define the view area3, which is used to obtain the corresponding sub-level information according to the number, the city information if the provincial number is transmitted, and the district and county information if the city number is transmitted.
#according to pid Query sub-region information
def area3(request, pid):
    list = AreaInfo.objects.filter(aParent_id=pid)
    list2 = []
    for item in list:
        list2.append([item.id, item.atitle])
    return JsonResponse({'data': list2})
7) Open the booktest/urls.py file and configure the url.
url(r'^area3_(\d+)/$', views.area3),