Identityserver4
Client Credentials
Client credential mode
1. Preparation
dotnet CLI quick install template Identityserver template
dotnet new -i IdentityServer4.Templates
2. Create ASP. Net core application
Create an IdentityServery project
md quickstart
cd quickstart

md src
cd src

dotnet new is4empty -n IdentityServer
This will create the following files:
- IdentityServer.csproj - the project file and a Properties\launchSettings.json file
- Program.cs and Startup.cs - main application entry points
- Config.cs - IdentityServer resource and client profile
Create a Quickstart solution to better obtain the support of visual studio
PS D:\quickstart\src> cd ..
PS D:\quickstart> dotnet new sln -n Quickstart
The template "Solution File" was created successfully.
Add the identity server project to the solution
dotnet sln add .\src\IdentityServer\IdentityServer.csproj
note
The protocol used in this template is https. When running on Kestrel, the port is set to 5001 or when running on IISExpress, it is set to random port. You can change it in the Properties\launchSettings.json file. For production scenarios, you should always use https
Defining an API Scope
API is the resource to be protected in the system. Resource definitions can be loaded in many ways, and the template you used to create the above project shows how to use the code as configuration method.
Config.cs has been created for you. Open it and update the code as follows:
public static class Config
{
    ///Define API scope
    public static IEnumerable<ApiScope> ApiScopes =>
        new List<ApiScope>
    {
        new ApiScope("api1", "My API")
    };
}
Defining the client
///Define client
public static IEnumerable<Client> Clients =>
    new List<Client>
{
    new Client
    {
        ClientId = "client",///Application login
        // no interactive user, use the clientid/secret for authentication
        AllowedGrantTypes = GrantTypes.ClientCredentials,

        // secret for authentication
        ClientSecrets =
        {
            new Secret("secret".Sha256())///Application password
        },

        // scopes that client has access to
        AllowedScopes = { "api1" }
    }
};
Configure identity server
Loading resources and client definitions occurs in [Startup.cs]
public void ConfigureServices(IServiceCollection services)
{
    var builder = services.AddIdentityServer()
        .AddDeveloperSigningCredential()        //This is for dev only scenarios when you don't have a certificate to use.
        .AddInMemoryApiScopes(Config.ApiScopes)
        .AddInMemoryClients(Config.Clients);

    // omitted for brevity
}
test
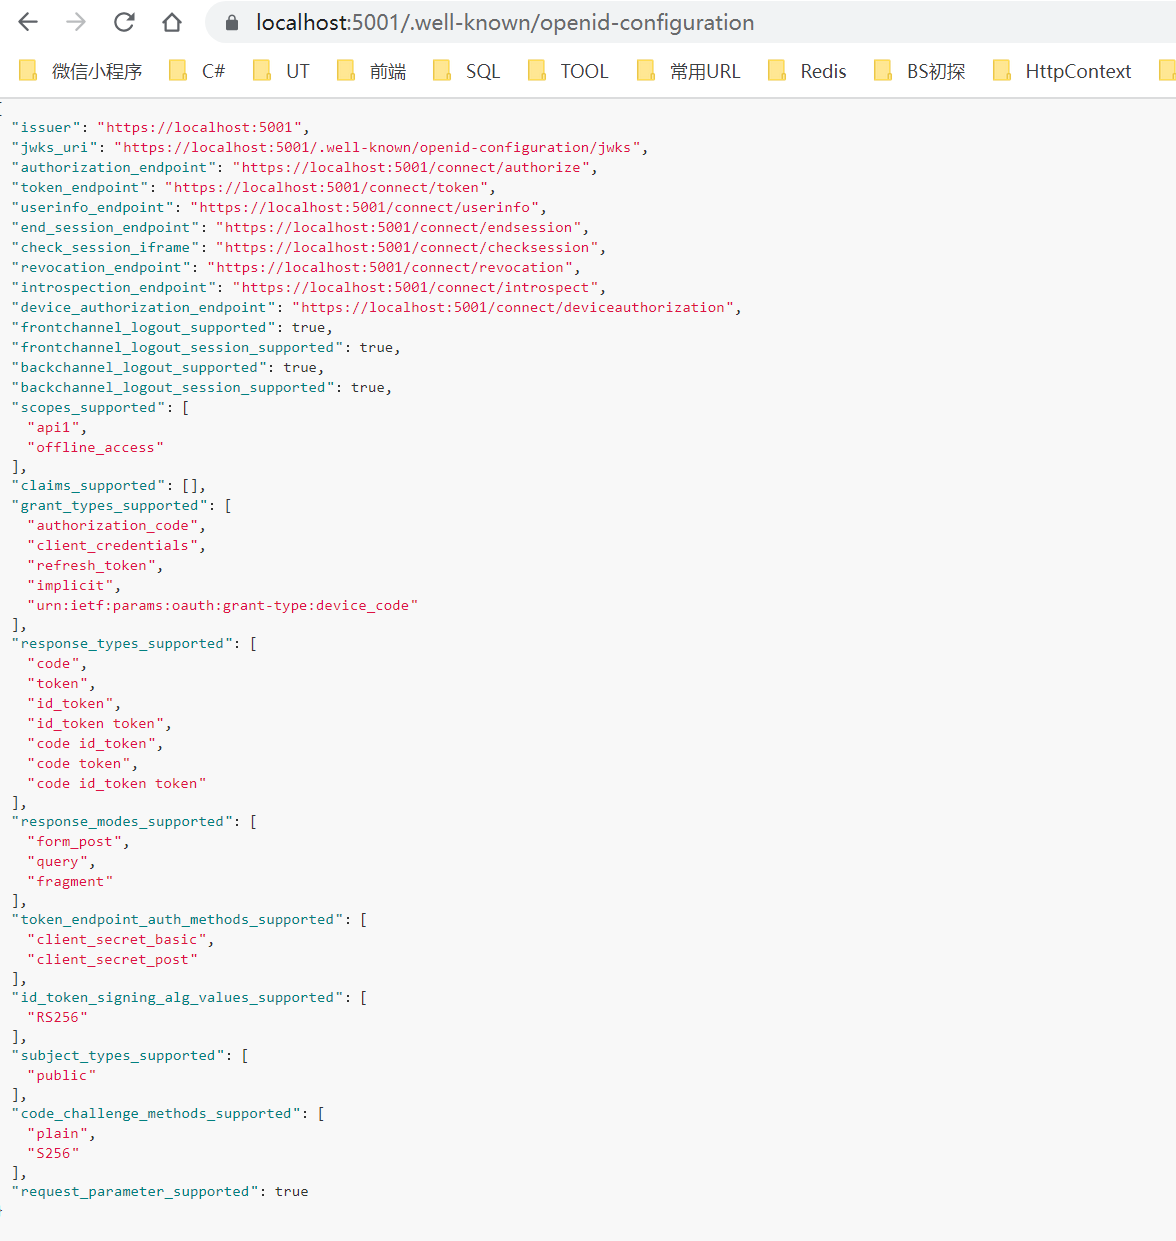
Browser Test
If you run the server and navigate the browser to https://localhost:5001/.well -Know / openid configuration, you should see the so-called discovery document. The discovery document is a standard endpoint in the identity server. Your client and API will use the discovery document to download the necessary configuration data.
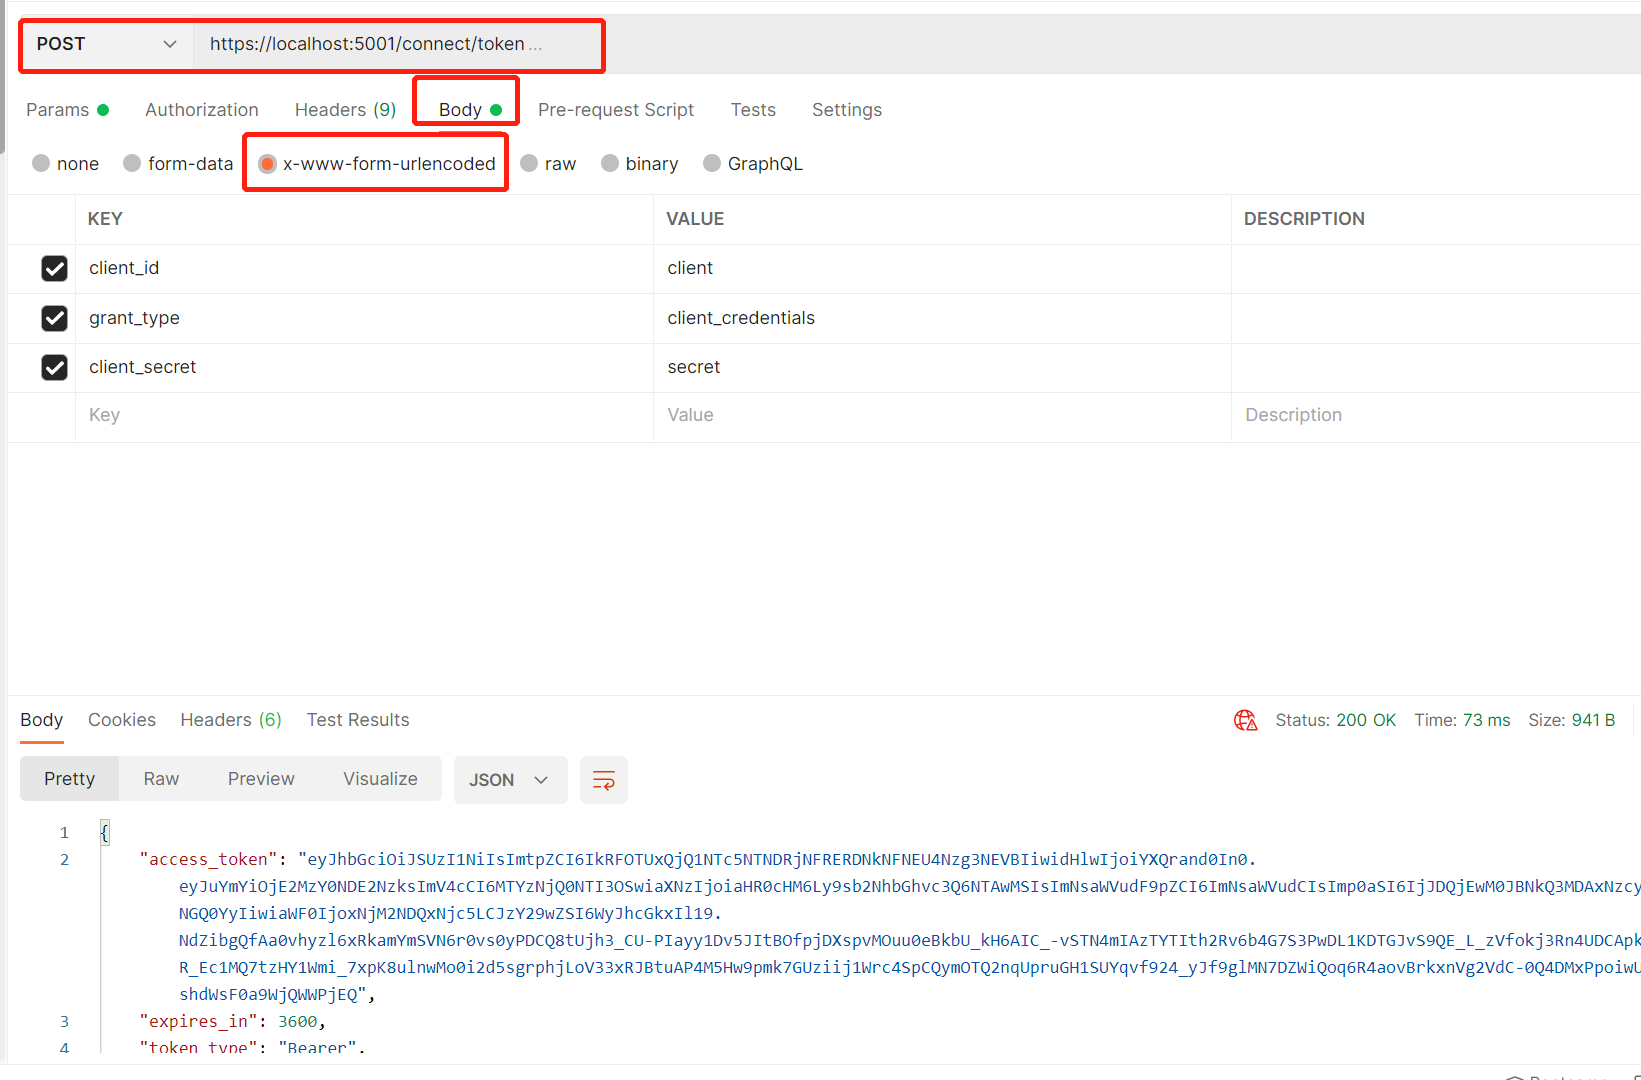
Call via Postman
3. Create WebAPI
Add API to solution
Run the command under src folder
dotnet new webapi -n Api
Add it to the solution
cd ..
dotnet sln add .\src\Api\Api.csproj
Configure the API Application to https://localhost:6001 Run only on it. You can edit the Properties in the Properties folder launchSettings.json File to do this. Change the application URL setting to:
"applicationUrl": "https://localhost:6001"
controller
Add a new class named IdentityController:
[Route("identity")]
[Authorize]
public class IdentityController : ControllerBase
{
    [HttpGet]
    public IActionResult Get()
    {
        return new JsonResult(from c in User.Claims select new { c.Type, c.Value });
    }
}
This controller will later be used to test authorization requirements and declare identity visually through the eyes of the API.
Add Nuget dependency
In order for the configuration step to work, you must add nuget package dependencies. Run the following command in the root directory:
dotnet add .\\src\\api\\Api.csproj package Microsoft.AspNetCore.Authentication.JwtBearer
Because the package is incompatible with the project framework, an error will be reported during execution. You need to select the corresponding version of Microsoft.AspNetCore.Authentication.JwtBearer

to configure
The final step is to add the authentication service to DI (dependency injection) and the authentication middleware to the pipeline. These will:
- Validate the incoming token to ensure that it comes from a trusted publisher
- Verify that the token is valid for use with this API (aka audience)
Update the startup to the following:
public class Startup
{
    public void ConfigureServices(IServiceCollection services)
    {
        services.AddControllers();

        services.AddAuthentication("Bearer")
            .AddJwtBearer("Bearer", options =>
                          {
                              options.Authority = "https://localhost:5001";

                              options.TokenValidationParameters = new TokenValidationParameters
                              {
                                  ValidateAudience = false
                              };
                          });
    }

    public void Configure(IApplicationBuilder app)
    {
        app.UseRouting();

        app.UseAuthentication();
        app.UseAuthorization();

        app.UseEndpoints(endpoints =>
                         {
                             endpoints.MapControllers();
                         });
    }
}
- AddAuthentication adds the authentication service to DI and configures Bearer as the default scheme.
- Use authentication adds authentication middleware to the pipeline so that authentication is performed automatically each time the host is invoked.
- UseAuthorization adds authorization middleware to ensure that anonymous clients cannot access our API endpoints.
https://localhost:6001/identity Navigating to the controller on the browser should return a 401 status code. This means that your API requires credentials and is now protected by identity server.
4.Creating the client
Create client under src directory
dotnet new console -n Client
Add to your solution
cd ..
dotnet sln add .\src\Client\Client.csproj
Add the IdentityModel NuGet package to your client.
cd src
cd client
dotnet add package IdentityModel
The identity model includes a client library for use with discovery endpoints
Add the following to the main method
// discover endpoints from metadata
var client = new HttpClient();
var disco = await client.GetDiscoveryDocumentAsync("https://localhost:5001");
if (disco.IsError)
{
    Console.WriteLine(disco.Error);
    return;
}
If you encounter an error while connecting, you may be running HTTPS and its development certificate localhost is not trusted. You can run to trust the development certificate. This only needs to be done once. dotnet dev-certs https --trust
Next, you can use the information in the discovery document to request a token from identity server to access api1:
// request token
var tokenResponse = await client.RequestClientCredentialsTokenAsync(new ClientCredentialsTokenRequest
{
Address = disco.TokenEndpoint,
ClientId = "client",
ClientSecret = "secret",
Scope = "api1"
});
if (tokenResponse.IsError)
{
Console.WriteLine(tokenResponse.Error);
return;
}
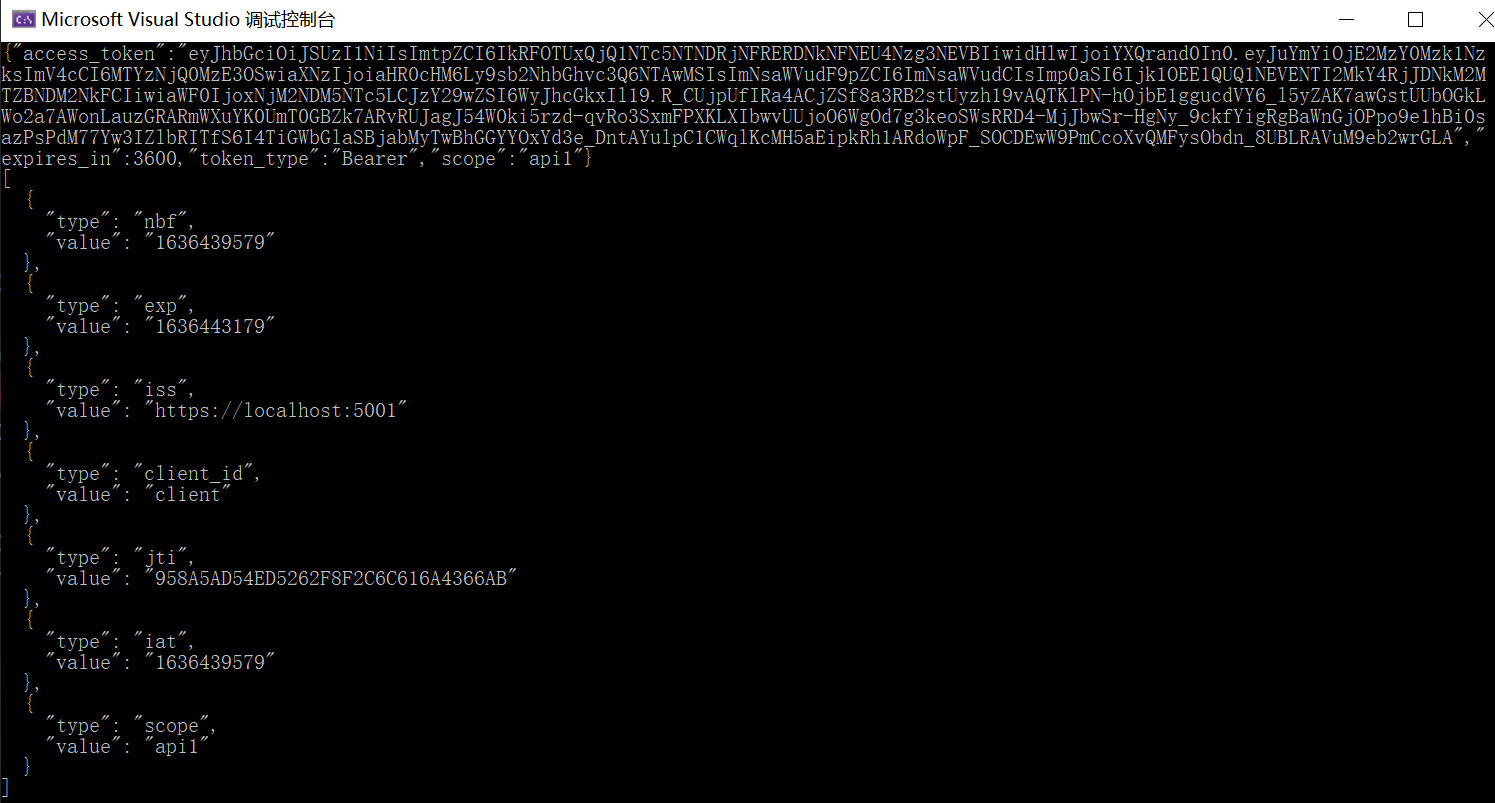
Console.WriteLine(tokenResponse.Json);
Copy and paste the access token from the console into the jwt.ms To check the original token.
Console output [jwt.ms]
QsImV4cCI6MTYzNjQ0MjkyNCwiaXNzIjoiaHR0cHM6Ly9sb2NhbGhvc3Q6NTAwMSIsImNsaWVudF9pZCI6ImNsaWVudCIsImp0aSI6IkY5ODEyOTZDODczMTkyOEJERkUyMTlEMzlFODRDMEQxIiwiaWF0IjoxNjM2NDM5MzI0LCJzY29wZSI6WyJhcGkxIl19.AF00jjPL1lrdftbJhfQNKmULL9-0lUyHh3os1KRDusp7s4PA_fvJ5VnIoPohQM266NCXHxKTMs5jXIQWRcyk95zv5iKhufBStqyH3IuG5NHF658bmQDBoVI06_KMNnQERoNmzlNcMERU0-ekyxQefPjKWLoUs7Vn3daJS22PYqz5L9PY5SxM69rQtijEJIZO9MeGxChu6suVZe0JDtn4960J9IbFwG1eOpbqxwdIpKVXDTPV8II29BL8qGk_Us_1AMThJIoUMj96V9CnN7u6uK_SUsQalXz9xEPdsTy3lbix5-uajpGIXYxNAfmSu7wysm487yztruNtshhL133JkQ","expires_in":3600,"token_type":"Bearer","scope":"api1"}
Call API
To send an access token to the API, you typically use the HTTP authorization header. This is done using the SetBearerToken extension method:
// call api
var apiClient = new HttpClient();
apiClient.SetBearerToken(tokenResponse.AccessToken);

var response = await apiClient.GetAsync("https://localhost:6001/identity");
if (!response.IsSuccessStatusCode)
{
    Console.WriteLine(response.StatusCode);
}
else
{
    var content = await response.Content.ReadAsStringAsync();
    Console.WriteLine(JArray.Parse(content));
}
After running, output:
reference material
https://identityserver4.readthedocs.io/en/latest/quickstarts/1_client_credentials.html