Links to the original text: https://blog.kyleduo.com/2017/05/02/digging-translucentstatusbar/
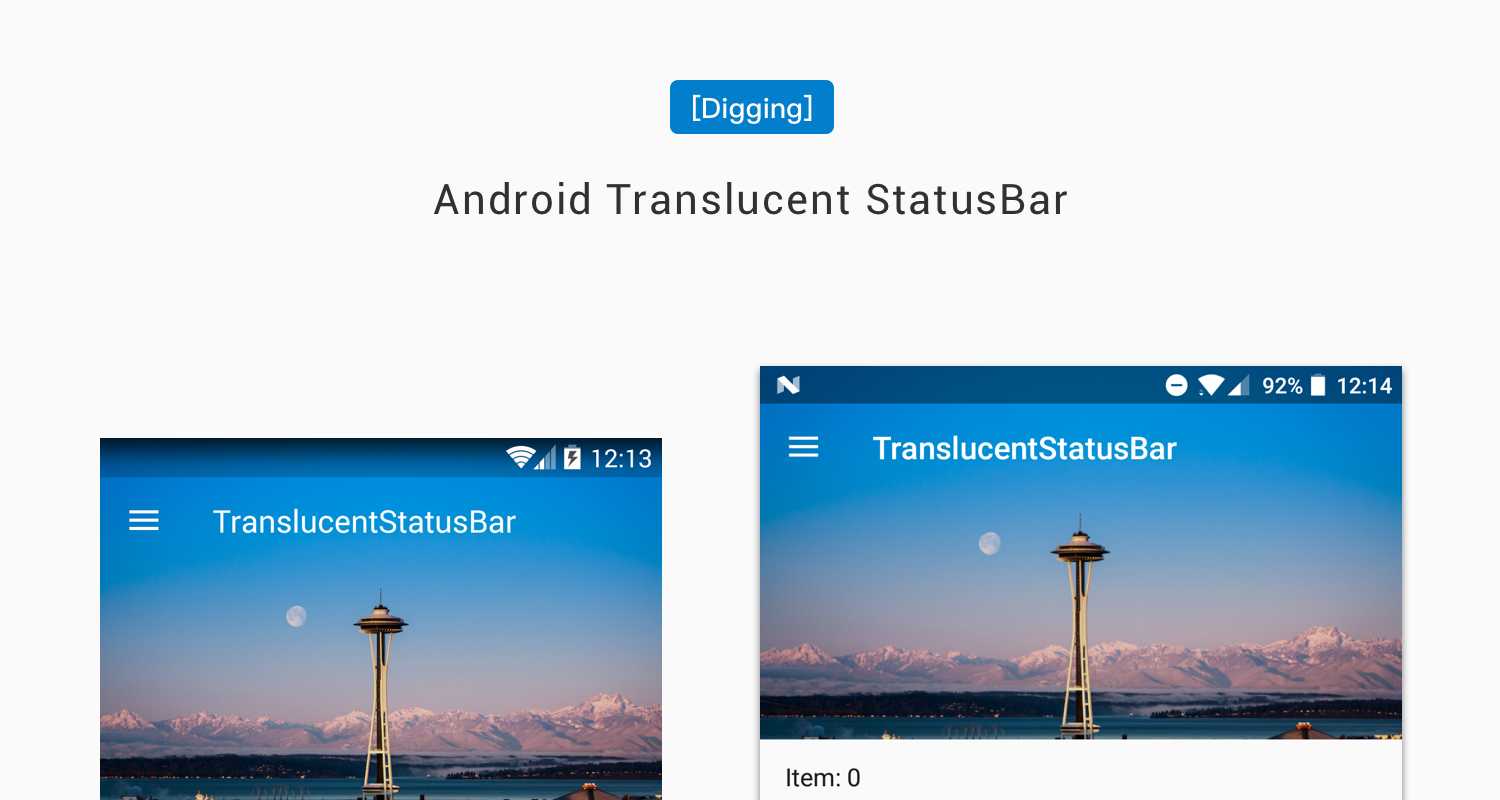
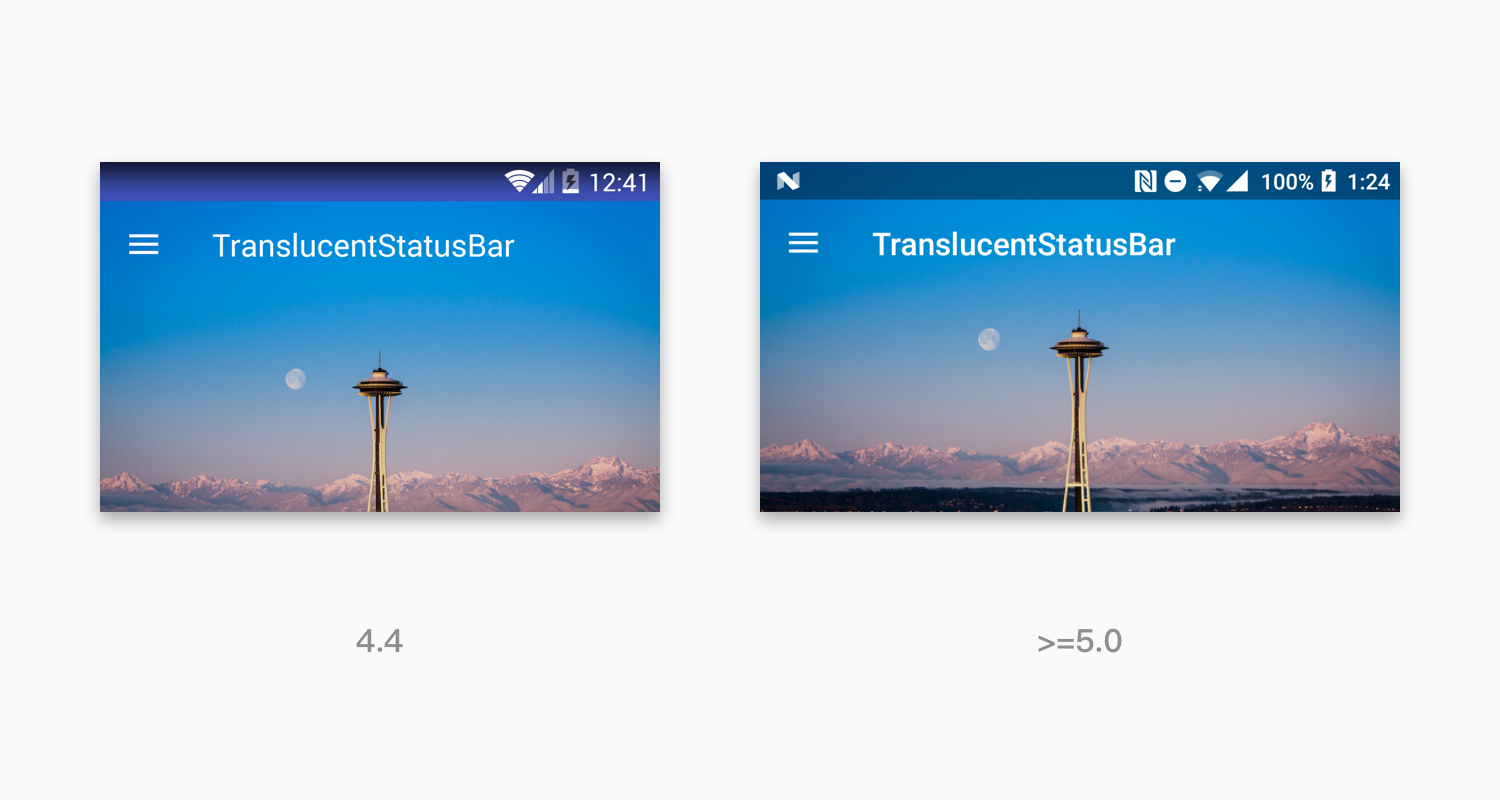
Material Design brings the word Immersive to us. Compared with full-screen immersion, we see more translucent status Bar effects in versions 4.4 and above. As follows:
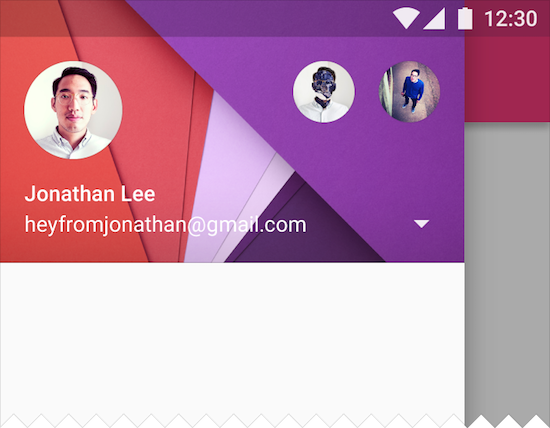
Be careful:
Translucent status bar and status bar shading are two different concepts. The translucent status bar does not manually set the color of the status bar, but by setting the properties of Theme, the content is displayed below the status bar.
There are many references to this effect on the internet, but they really don't make much sense. Now let me take you digging ~
Effectiveness and problems
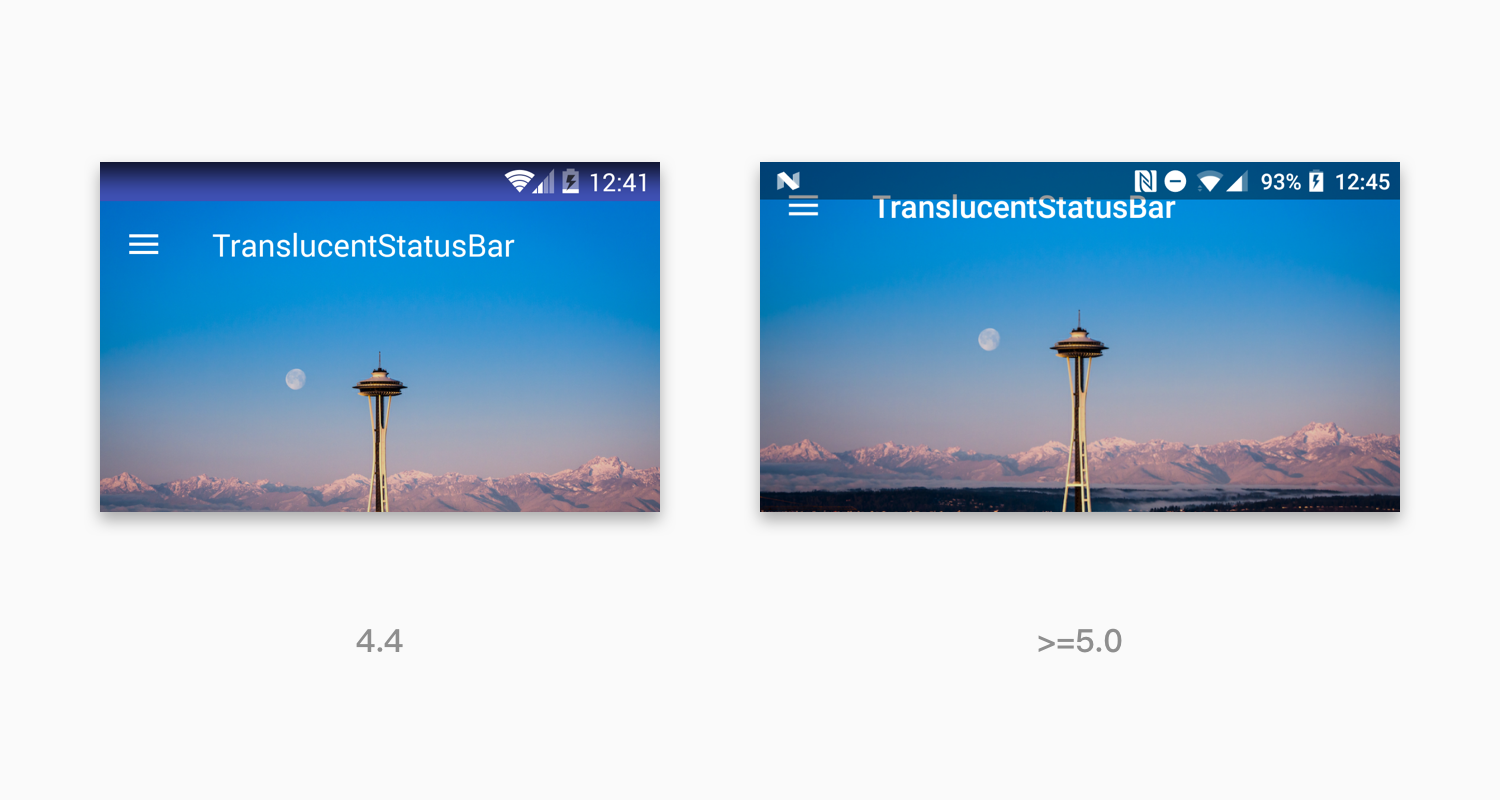
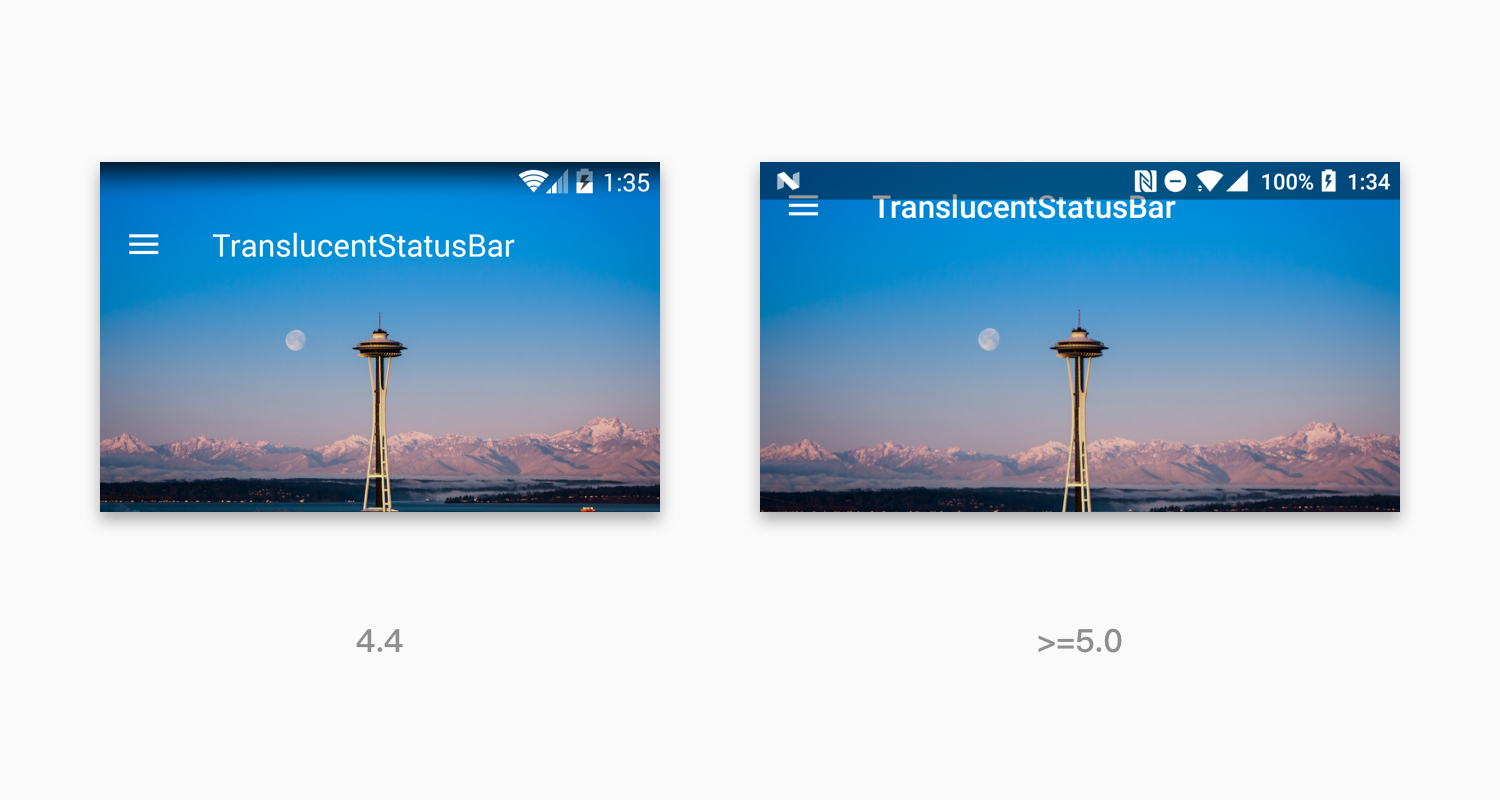
The above illustration illustrates the effect of systems 5.0 and above (API v21), because the Android version of the relationship, on 4.4 (API v19), the same attributes will lead to different effects. The following is a comparison:
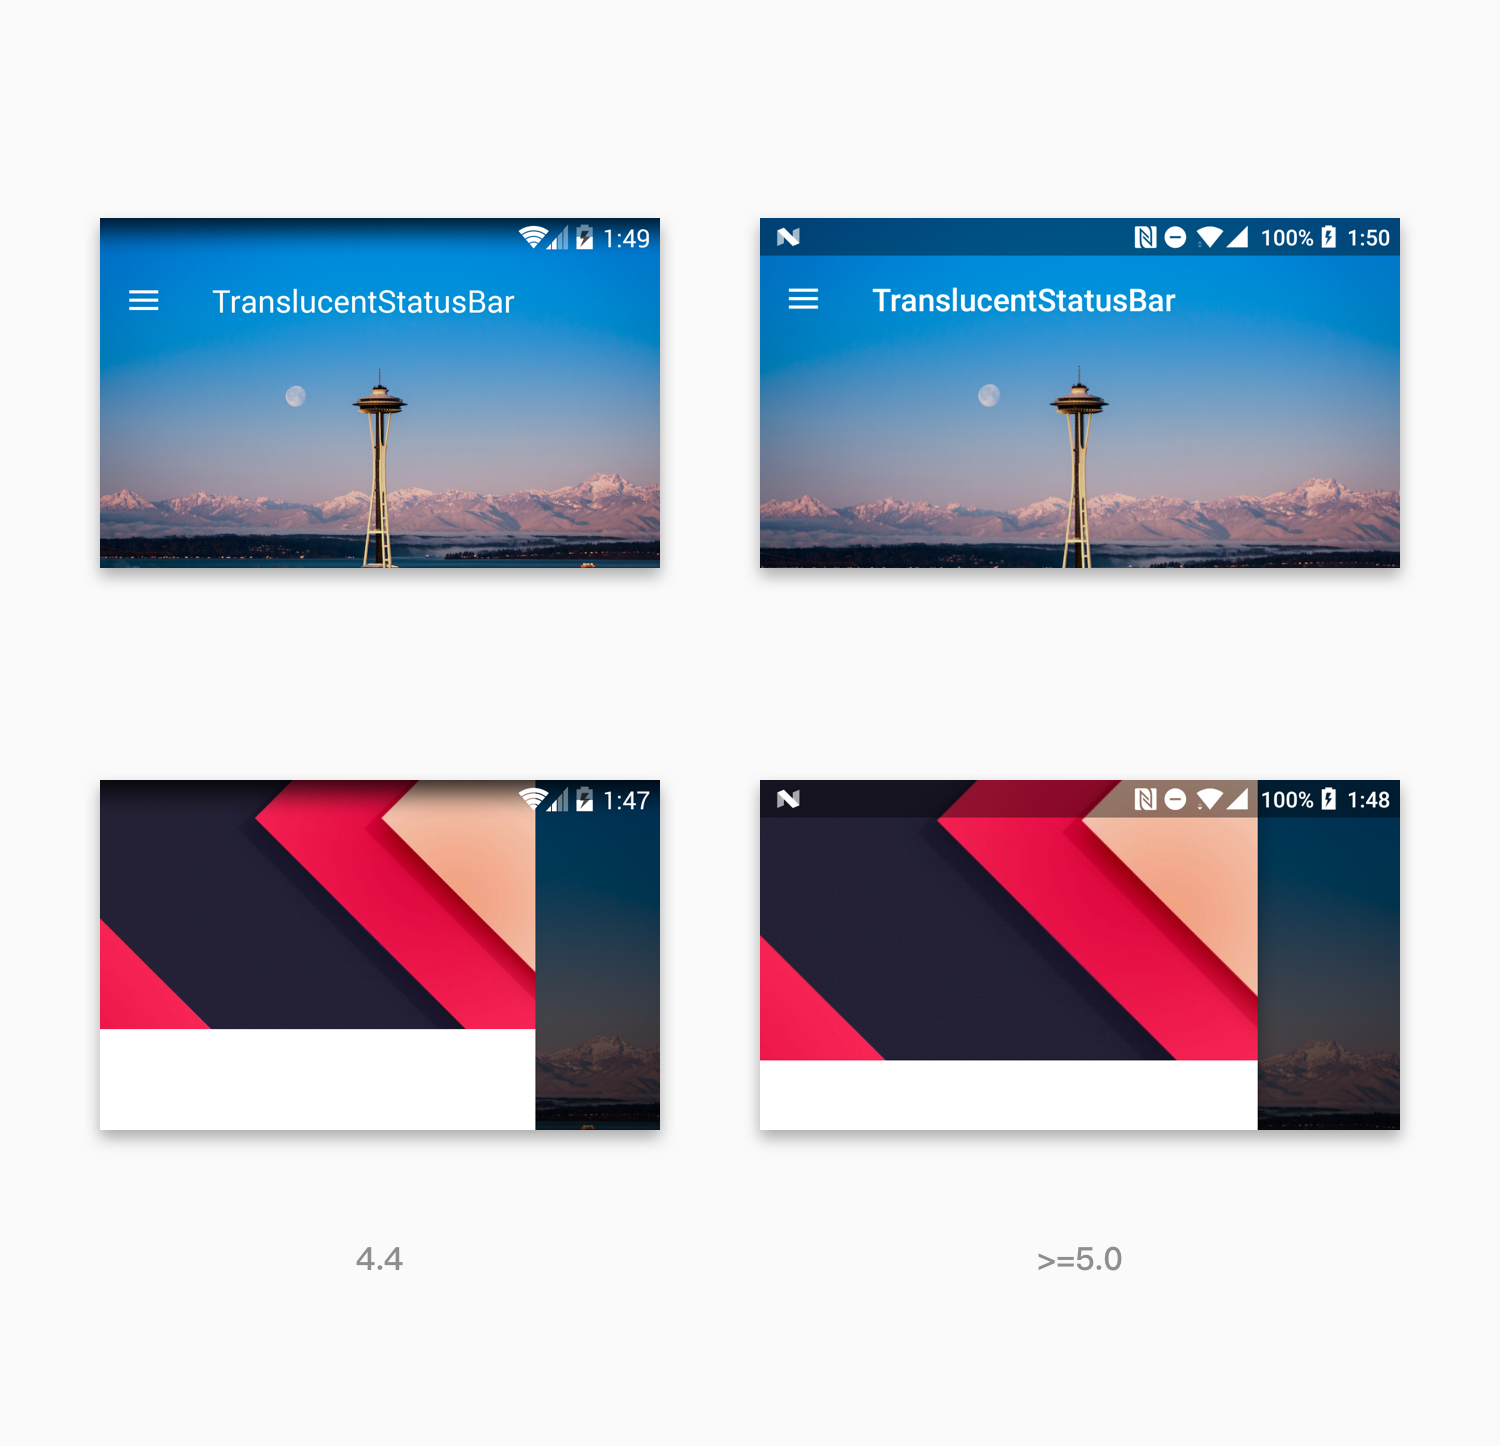
It can be seen that the effect on 4.4 is translucent relative to that on 5.0 or above, and 4.4 is a gradient effect. Instead of discussing the pros and cons, keep this effect in mind for the time being.
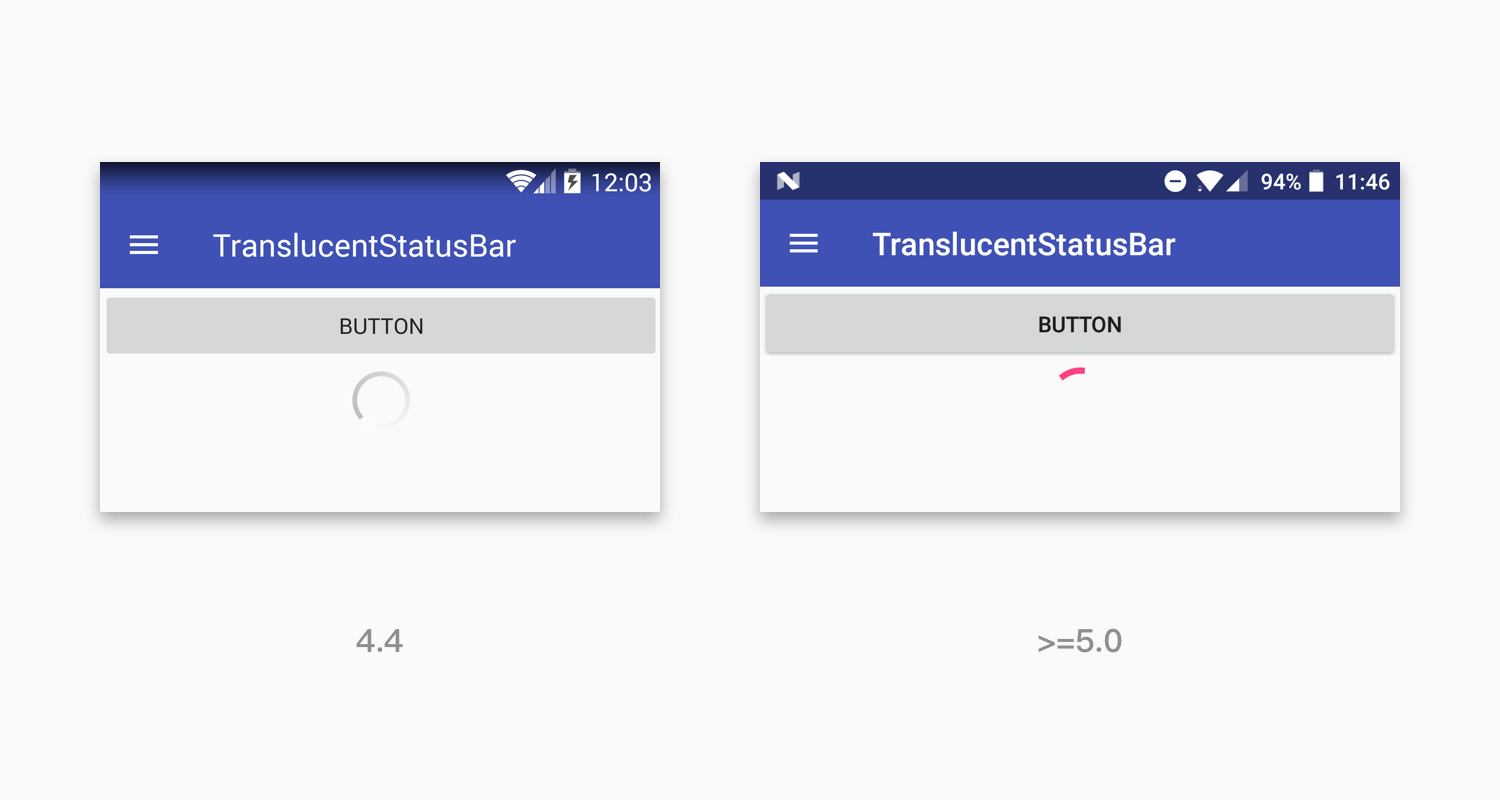
Above is the effect of Demo, Demo has only one page, the level is as follows:

But 4.4 and 5.0 are much different, and the different implementation methods mentioned below will lead to different coding.
Realization and Difference
The translucent status bar was introduced in version 4.4, but the fitsSystem Windows attribute was introduced in API 16 to allow View to respond to Windows Insets by setting padding or offset; not only on the status bar, but also on the View through this tag bit.
Looking back at the implementation methods we usually see:
- Set the android: windows TranslucentStatus property to true in styles.xml.
- Set the Android: fitsSystem Windows property to true in the layout file.
If you really look at these methods and do what you wrote above, chances are that your results are different in 4.4 and 5.0, or you need to adjust and try again.
In the steps mentioned above, the first step is no problem. Add this attribute to styles.xml files of 4.4 and above.
The key is the second step, which / some View s should the fitsSystem Windows property be set to?
This question leads to the key to this blog, the different implementations of fitsSystem Windows attribute parsing in 4.4 and 5.0 systems. I also encounter the problem of setting this attribute, and then I began to analyze the implementation principle, and found that the previous understanding and use is fundamentally wrong.
4.4 KitKat v19
The similarity between the processing logic of the two systems is that they start at the top of the ViewTree, traverse down in depth first, and let the sub-Views at all levels process. The difference lies in the method and logic of distribution.
The method to look at is the View. fitSystem Windows method and the ViewGroup. fitSystem Windows method (v19 SDK), which are explained below.
View.fitSystemWindows
protected boolean fitSystemWindows(Rect insets) {
    if ((mViewFlags & FITS_SYSTEM_WINDOWS) == FITS_SYSTEM_WINDOWS) {
        mUserPaddingStart = UNDEFINED_PADDING;
        mUserPaddingEnd = UNDEFINED_PADDING;
        Rect localInsets = sThreadLocal.get();
            if (localInsets == null) {
            localInsets = new Rect();
            sThreadLocal.set(localInsets);
        }
        boolean res = computeFitSystemWindows(insets, localInsets);
        mUserPaddingLeftInitial = localInsets.left;
        mUserPaddingRightInitial = localInsets.right;
        internalSetPadding(localInsets.left, localInsets.top,
        localInsets.right, localInsets.bottom);
        return res;
    }
    return false;
}
Determine whether to respond to insets based on your markup. If necessary, call the internalSetPadding method to set the padding.
ViewGroup.fitSystemWindows
@Override
protected boolean fitSystemWindows(Rect insets) {
    boolean done = super.fitSystemWindows(insets);
    if (!done) {
        final int count = mChildrenCount;
        final View[] children = mChildren;
        for (int i = 0; i < count; i++) {
            done = children[i].fitSystemWindows(insets);
            if (done) {
                break;
            }
        }
    }
    return done;
}
Deep traversal of the sub-View, call the fitSystem Windows method of the self and sub-View in turn, once the fitSystem Windows method returns true, stop traversal and complete the processing.
To sum up, go deep until you set padding for the first tagged View.
5.0 Lollipop v21
This is v21, in fact, many parts of the source code are based on v20 as a demarcation point, but the logic inside will not be executed (because the outer layer has v21 judgement), so here can be distinguished according to v21.
As we can see in the SDK of v21, the View. fitSystem Windows above is out of date:
This method was deprecated in API level 20.
As of API 20 usedispatchApplyWindowInsets(WindowInsets)to apply insets to views. Views should overrideonApplyWindowInsets(WindowInsets)or usesetOnApplyWindowInsetsListener(android.view.View.OnApplyWindowInsetsListener)to implement handling their own insets.
Still look at ways to achieve:
protected boolean fitSystemWindows(Rect insets) {
    if ((mPrivateFlags3 & PFLAG3_APPLYING_INSETS) == 0) {
        if (insets == null) {
            // Null insets by definition have already been consumed.
            // This call cannot apply insets since there are none to apply,
            // so return false.
            return false;
        }
        // If we're not in the process of dispatching the newer apply insets call,
        // that means we're not in the compatibility path. Dispatch into the newer
        // apply insets path and take things from there.
        try {
            mPrivateFlags3 |= PFLAG3_FITTING_SYSTEM_WINDOWS;
            return dispatchApplyWindowInsets(new WindowInsets(insets)).isConsumed();
        } finally {
            mPrivateFlags3 &= ~PFLAG3_FITTING_SYSTEM_WINDOWS;
        }
    } else {
        // We're being called from the newer apply insets path.
        // Perform the standard fallback behavior.
        return fitSystemWindowsInt(insets);
    }
}
The fitSystem Windows Int method of the else branch is the implementation of v19.
The PFLAG3_APPLYING_INSETS tag indicates that dispatch Apply Windows Insets traversal is being processed.
v21 began to use dispatch/apply logic, similar to TouchEvent event processing. The parent control calls the dispatchApplyWindows Insets method in turn, while the dispatchApplyWindows Insets method of the View class uses the onApplyWindows Insets method or the OnApplyWindows InsetsListener object for processing.
Let's look at the three main approaches.
ViewGroup.dispatchApplyWindowInsets
@Override
public WindowInsets dispatchApplyWindowInsets(WindowInsets insets) {
    insets = super.dispatchApplyWindowInsets(insets);
    if (!insets.isConsumed()) {
        final int count = getChildCount();
        for (int i = 0; i < count; i++) {
            insets = getChildAt(i).dispatchApplyWindowInsets(insets);
            if (insets.isConsumed()) {
                break;
            }
        }
    }
    return insets;
}
If you don't consume and your child View doesn't consume, give it to your parent View.
The end condition of traversal is that the isConsumed of the insets object is marked true, because the same method of the parent View stops traversal and goes up in turn when the insets are returned to the parent View.
View.dispatchApplyWindowInsets
public WindowInsets dispatchApplyWindowInsets(WindowInsets insets) {
    try {
        mPrivateFlags3 |= PFLAG3_APPLYING_INSETS;
        if (mListenerInfo != null && mListenerInfo.mOnApplyWindowInsetsListener != null) {
            return mListenerInfo.mOnApplyWindowInsetsListener.onApplyWindowInsets(this, insets);
        } else {
            return onApplyWindowInsets(insets);
        }
    } finally {
        mPrivateFlags3 &= ~PFLAG3_APPLYING_INSETS;
    }
}
View.onApplyWindowInsets
public WindowInsets onApplyWindowInsets(WindowInsets insets) {
    if ((mPrivateFlags3 & PFLAG3_FITTING_SYSTEM_WINDOWS) == 0) {
        // We weren't called from within a direct call to fitSystemWindows,
        // call into it as a fallback in case we're in a class that overrides it
        // and has logic to perform.
        if (fitSystemWindows(insets.getSystemWindowInsets())) {
            return insets.consumeSystemWindowInsets();
        }
    } else {
        // We were called from within a direct call to fitSystemWindows.
        if (fitSystemWindowsInt(insets.getSystemWindowInsets())) {
            return insets.consumeSystemWindowInsets();
        }
    }
    return insets;
}
The consumeSystem Windows Insets method consumes all Insets and marks isConsumed() as true.
Summary: Deep traversal, from top to bottom, consumes Insets until the isConsumed method of Windows Insets returns true, usually by calling the consumeSystem Windows Insets method.
Analysis and examples
In order to save space and input conveniently, the four key Views: AppBarLayout, Collapsing Toolbar Layout, Toolbar and ImageView (Toolbar equivalent) are abbreviated as ABL, CTL, TB, IV respectively. Then, T and F are used to represent the values of fitsSystem Windows properties.
ABL,CTL etc. Support In bag View,Pass through ViewCompact Set up
OnApplyWindowInsetsListenerThe way to deal with it is usually written as follows:ViewCompat.setOnApplyWindowInsetsListener(this, new android.support.v4.view.OnApplyWindowInsetsListener() { @Override public WindowInsetsCompat onApplyWindowInsets(View v, WindowInsetsCompat insets) { return onWindowInsetChanged(insets); } });
OnWindows InsetChanged is the core method; however, it should be noted that setOn Apply Windows InsetsListener only takes effect at SDK 5.0 and above, which means that onWindows InsetChanged method will not be invoked under 5.0.
AppBarLayout.onWindowInsetChanged()
WindowInsetsCompat onWindowInsetChanged(final WindowInsetsCompat insets) {
    WindowInsetsCompat newInsets = null;

    if (ViewCompat.getFitsSystemWindows(this)) {
        // If we're set to fit system windows, keep the insets
        newInsets = insets;
    }

    // If our insets have changed, keep them and invalidate the scroll ranges...
    if (!objectEquals(mLastInsets, newInsets)) {
        mLastInsets = newInsets;
        invalidateScrollRanges();
    }

    return insets;
}
invalidateScrollRanges resets the markup bit associated with ScrollRange and records the insets'value. Other locations use getTopInset() to get the effect of insets on the top offset (only the top of insets affects the layout).
ABL does not consume Insets.
CollapsingToolbarLayout.onWindowInsetChanged()
WindowInsetsCompat onWindowInsetChanged(final WindowInsetsCompat insets) {
    WindowInsetsCompat newInsets = null;

    if (ViewCompat.getFitsSystemWindows(this)) {
        // If we're set to fit system windows, keep the insets
        newInsets = insets;
    }

    // If our insets have changed, keep them and invalidate the scroll ranges...
    if (!objectEquals(mLastInsets, newInsets)) {
        mLastInsets = newInsets;
        requestLayout();
    }

    // Consume the insets. This is done so that child views with fitSystemWindows=true do not
    // get the default padding functionality from View
    return insets.consumeSystemWindowInsets();
}
As you can see, as long as the CTL is marked as true, Insets will be consumed.
The mLastInsets attribute is used in the onLayout method. The following is the related implementation:
@Override
protected void onLayout(boolean changed, int left, int top, int right, int bottom) {
    super.onLayout(changed, left, top, right, bottom);

    if (mLastInsets != null) {
        // Shift down any views which are not set to fit system windows
        final int insetTop = mLastInsets.getSystemWindowInsetTop();
        for (int i = 0, z = getChildCount(); i < z; i++) {
            final View child = getChildAt(i);
            if (!ViewCompat.getFitsSystemWindows(child)) {
                if (child.getTop() < insetTop) {
                    // If the child isn't set to fit system windows but is drawing within
                    // the inset offset it down
                    ViewCompat.offsetTopAndBottom(child, insetTop);
                }
            }
        }
    }

    ////////////////
      //   Other unrelated implementations
      ////////////////
}
The logic is:
Traversing through all sub-Views, if the sub-View does not set the fitsSystem Windows tag, it is offset to insetTop as long as the value of getTop() is less than insetTop.
In other words: SubViews with tags are drawn under StatusBar, and subViews without tags are pushed down.
At the same time, CTL has an interesting logic:
@Override
protected void onAttachedToWindow() {
    super.onAttachedToWindow();

    // Add an OnOffsetChangedListener if possible
    final ViewParent parent = getParent();
    if (parent instanceof AppBarLayout) {
        // Copy over from the ABL whether we should fit system windows
        ViewCompat.setFitsSystemWindows(this, ViewCompat.getFitsSystemWindows((View) parent));

        if (mOnOffsetChangedListener == null) {
            mOnOffsetChangedListener = new OffsetUpdateListener();
        }
        ((AppBarLayout) parent).addOnOffsetChangedListener(mOnOffsetChangedListener);

        // We're attached, so lets request an inset dispatch
        ViewCompat.requestApplyInsets(this);
    }
}
If the CTL's direct parent View is ABL, the value of ABL's fitsSystem Windows property is synchronized.
Let's start by discussing the different parameters.
All true: ABL = CTL = TB = IV = T
Result:
Reasons for error:
4.4: Deep traversal. The first view you encounter is ABL. Execute the default logic of View and set padding Top. So the background color was revealed, and the sub-Views were squeezed underneath.
5.0: TB and IV are drawn under StatusBar because CTL sets true and sub-View sets true.
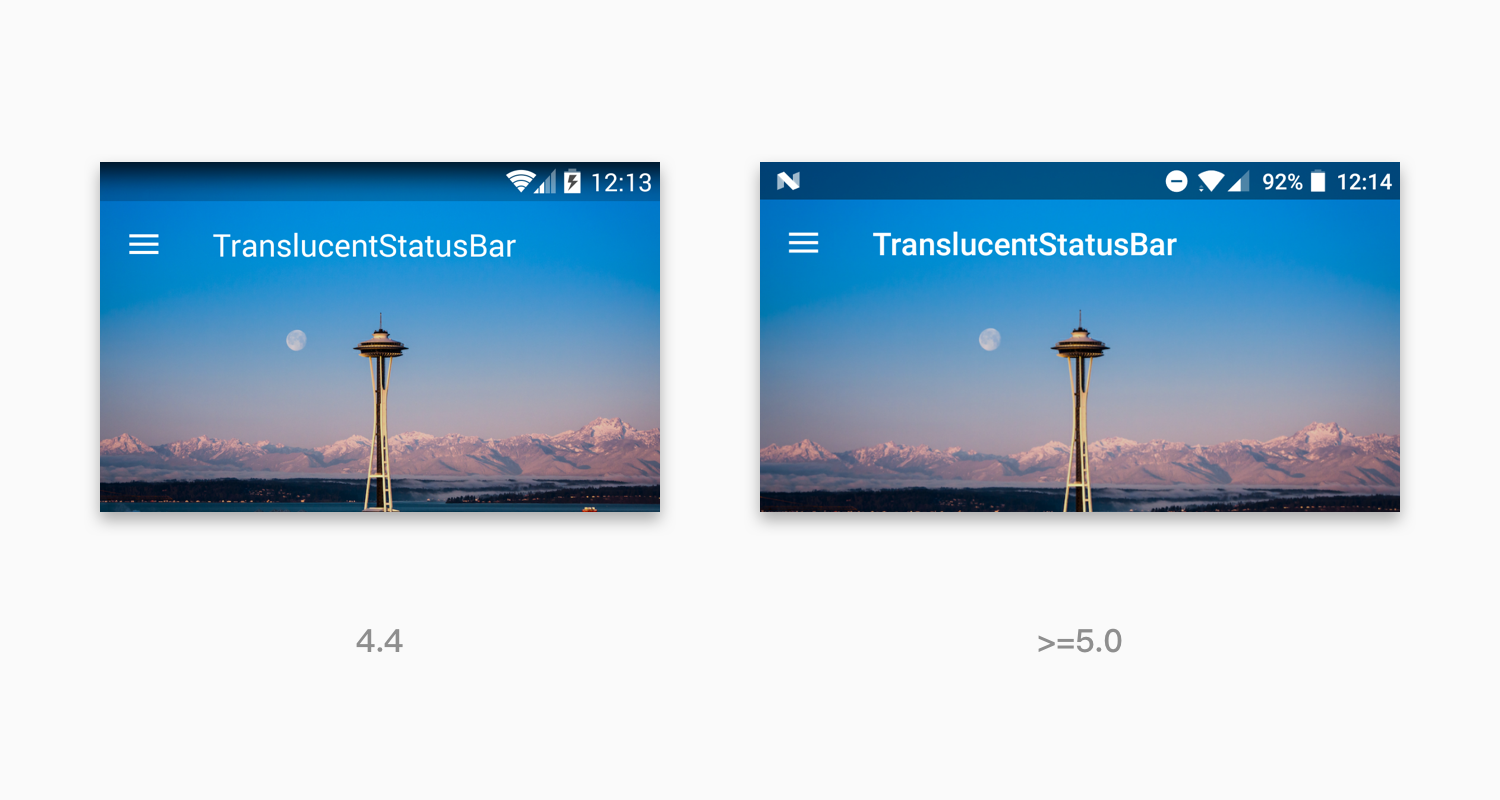
Firstly, make sure that 5.0 can display. According to the above errors, we should set TB to false and IV to true. So 5.0 will show normal, and 4.4, the same as above.
Result:
In line with expectations (4.4 did not change maps, exactly the same, lazy), 5.0 is normal, the reason is actually said above, here is no longer repeated. As long as the principle is clear, the result is obvious.
If you don't understand it here, look at the source code above.
The next round is 4.4. Look back at the hierarchy of ViewTree: ABL - > CTL - > IV, TB. From top to bottom, we expect TB to execute View default logic (set padding), so it should be F - > F - > F, T. (IV should be false, because it appears under StatusBar).
Result:
As expected, 4.4 is correct, but 5.0 is back to the results of the first attempt. The reason is left to you. I'm sure you can explain it.
Correct approach
After several attempts, we found that in order to display 4.4 and 5.0 correctly, we need to set different values for View attributes according to SDK version. We can simplify this operation by styles.xml.
<!-- v19 -->
<?xml version="1.0" encoding="utf-8"?>
<resources>

    <style name="AppTheme" parent="AppBaseTheme">
        <item name="android:windowTranslucentStatus">true</item>
    </style>


    <style name="TSB.ABL" parent="TSB">
        <item name="android:fitsSystemWindows">false</item>
    </style>

    <style name="TSB.CTL" parent="TSB">
        <item name="android:fitsSystemWindows">false</item>
    </style>

    <style name="TSB.IV" parent="TSB">
        <item name="android:fitsSystemWindows">false</item>
    </style>

    <style name="TSB.TB" parent="TSB">
        <item name="android:fitsSystemWindows">true</item>
    </style>

</resources>


<!-- v21 -->
<?xml version="1.0" encoding="utf-8"?>
<resources>

    <style name="AppTheme" parent="AppBaseTheme">
        <item name="android:windowTranslucentStatus">true</item>
    </style>


    <style name="TSB.ABL" parent="TSB">
        <item name="android:fitsSystemWindows">true</item>
    </style>

    <style name="TSB.CTL" parent="TSB">
        <item name="android:fitsSystemWindows">false</item>
    </style>

    <style name="TSB.IV" parent="TSB">
        <item name="android:fitsSystemWindows">true</item>
    </style>

    <style name="TSB.TB" parent="TSB">
        <item name="android:fitsSystemWindows">false</item>
    </style>

</resources>
The CTL of v21 can be set to false because the value of CTL synchronizes the value of ABL, so the value here does not work, and the result of T or F is the same.
layout is long like this (omitting irrelevant attributes)
<?xml version="1.0" encoding="utf-8"?>
<android.support.v4.widget.DrawerLayout>

    <android.support.design.widget.CoordinatorLayout>

        <android.support.design.widget.AppBarLayout style="@style/TSB.ABL">

            <android.support.design.widget.CollapsingToolbarLayout style="@style/TSB.CTL">
                <ImageView style="@style/TSB.IV"/>
                <android.support.v7.widget.Toolbar style="@style/TSB.TB"/>
            </android.support.design.widget.CollapsingToolbarLayout>

        </android.support.design.widget.AppBarLayout>

        <android.support.v7.widget.RecyclerView />

    </android.support.design.widget.CoordinatorLayout>

    <LinearLayout >
        <ImageView />
    </LinearLayout>

</android.support.v4.widget.DrawerLayout>
More
Above all, we can achieve the translucent status bar effect adapted to 4.4 and 5.0, notifying us of the principle. Two scenarios are discussed below:
General layout
The layouts used in the examples above are all in the Support package. Another case is that we use common layouts, such as Linear layout, Relative Layout, etc. How do you implement these layouts?
Ordinary layouts are implemented by default, and depth-first traversals are performed on both 4.4 and 5.0 until Windows Insets are consumed. So for general layout, just set the fitsSystemWindows=true property to ToolBar.
Not only the ToolBar, but any layout directly sets the fitsSystemWindows=true property to the desired View.
4.4 Effect optimization
The gradient effect on 4.4 will show that ToolBar is very high and the visual effect is not good. We can do some optimizations for 4.4, covering and displaying a translucent View to simulate the effect on 5.0. Take the first page as an example:
act_main.xml
<!-- others -->
<android.support.design.widget.CollapsingToolbarLayout>
      <!-- others -->
    <ViewStub
        android:id="@+id/main_status_bar_stub"
        android:layout_width="match_parent"
        android:layout_height="24dp"
        app:layout_collapseMode="pin"
        android:layout="@layout/stub_kitkat_statusbar"/>
</android.support.design.widget.CollapsingToolbarLayout>
<!-- others -->
The @layout/stub_kitkat_statusbar contains only one View with a translucent background.
MainActivity.java
if (Build.VERSION.SDK_INT == Build.VERSION_CODES.KITKAT) {
    mStatusBarStub.inflate();
    mStatusBarOverlay = findViewById(R.id.main_status_bar_overlay);
    mStatusBarOverlay.getViewTreeObserver().addOnGlobalLayoutListener(new ViewTreeObserver.OnGlobalLayoutListener() {
        @Override
        public void onGlobalLayout() {
            mStatusBarOverlay.getViewTreeObserver().removeGlobalOnLayoutListener(this);
            ViewGroup.LayoutParams layoutParams = mStatusBarOverlay.getLayoutParams();
            layoutParams.height = mToolbar.getPaddingTop();
        }
    });
}
Here, get the addingTop of the ToolBar and set it to the height of Overlay.
summary
4.4 and 5.0 deal with the logic of Windows Insets, and the same thing is that they do depth-first traversal. The difference is that 4.4 calls fitSystem Windows method step by step. After the first View processing with fitsSystem Windows attribute, the whole process ends. 5.0 completes the consumption of Windows Insets through dispatch and application logic similar to Touch event. Consumption can be done through onlay Windows Insets method or Listener until the consumption is completed and the process ends.
The fitsSystem Windows property indicates that the View will be adapted to Windows Insets. This "adaptation" generally means setting padding. Collapsing Toolbar Layout's processing method is offset offset for the child View. The common point is that it indicates that the content of the View or the sub-View is to move down the area of the status bar. Normally, you only need to set this property to a View.
In order to achieve the translucent status bar effect, two things need to be done:
- Set android: Windows TranslucentStatus value to true in the theme.
- Set the Android: fitsSystem Windows property to true for the appropriate View.
Take Toolbar as an example, if the Toolbar is in the general layout, it can set the above attributes directly to the Toolbar; if it is the Material Design nested structure in Demo, it needs to be adapted according to the implementation logic of 4.4 and 5.0, the method will not be repeated here.