1. Preface
The last article described how to compile and install MySQL. Although it can be installed by yum install or rpm, there is a feature of yum install and RPM installation. Some parameters are customized according to the needs of the public. If you need to specify your own specific parameters, this is difficult to do. Therefore, people who have a certain Linux foundation are compiled and installed or according to the company. The installation package suitable for the environment is made in the specific environment. In the previous example, we described how to compile, install and configure multiple instances, and in the end we described how to configure master-slave replication configuration.
In the past, open source development often used LAMP, which is Linux+Apache+MySQL+PHP. For some start-up companies, LAMP can satisfy all their fantasies: it can respond to a certain scale of users and has little hardware requirements. Now with the rise of Nginx, LAMP has become LNMP, that is, Linux+Nginx+MySQL+PHP, so this article will describe how to compile and install PHP and use php-fpm to make Nginx support PHP.
2. Prepare
2.1 Download PHP 5.6.3 Source
Considering that many open source PHPs are still using the PHP 5 version, here's an example of compiling and installing the PHP 5.6.3 version:
Download:
wget http://cn2.php.net/distributions/php-5.6.3.tar.gz
2.2 WordPress Chinese Version
WordPress is a very famous personal blog system, which is used here to verify whether our php-fpm configuration is correct or not.
Download:
wget https://cn.wordpress.org/wordpress-4.7.4-zh_CN.zip
2.3 Installation Dependency Library
yum install gcc automake autoconf libtool make –y
yum install gcc gcc-c++ glibc –y
yum install libmcrypt-devel mhash-devel libxslt-devel –y
yum install libjpeg libjpeg-devel libpng libpng-devel freetype freetype-devel libxml2 libxml2-devel –y
yum install zlib zlib-devel glibc glibc-devel glib2 glib2-devel bzip2 bzip2-devel –y
yum install ncurses ncurses-devel curl curl-devel e2fsprogs e2fsprogs-devel -y
yum install krb5 krb5-devel libidn libidn-devel openssl openssl-devel -y
Note: Some of the above dependency libraries have been installed in the last article. For the sake of simplicity, I have listed them here. In the actual installation process, if they have been installed locally, they will not be installed and downloaded again.
3. Compiling and Setting
3.1 Compiler file
Assuming that the downloaded php-5.6.3.tar.gz is located in the / root directory, first decompress the file:
tar zxvf /root/php-5.6.3.tar.gz
Then configure:
cd /root/php-5.6.3
./configure --prefix=/usr/local/php  --enable-fpm --with-mcrypt --enable-mbstring --disable-pdo --with-curl --disable-debug  --disable-rpath --enable-inline-optimization --with-bz2  --with-zlib --enable-sockets --enable-sysvsem --enable-sysvshm --enable-pcntl --enable-mbregex --with-mhash --enable-zip --with-pcre-regex --with-mysql --with-mysqli --with-gd --with-jpeg-dir -with-gettext --enable-xml --enable-freetype
If the dependency libraries are all installed, there will be no error. If you are prompted to lack the dependency libraries, use yum install to install. In the above parameters:
Preix=/usr/local/php: indicates that the program will be installed in the / usr/local/php directory in the future;
enable-fpm: means that you can't forward a PHP page request to a nginx process without enabling the php-fpm module.
Following is the execution of:
make
make install
Because there are a lot of source code, compiling takes a little time, please wait. After success, a new php folder will be created under / usr/local. Its file directory structure is as follows:
[root@localhost ~]# ls -l /usr/local/php
total 0
drwxr-xr-x 2 root root 147 Jun  7 23:38 bin
drwxr-xr-x 2 root root  71 Jun 12 22:13 etc
drwxr-xr-x 3 root root  17 Jun  7 23:12 include
drwxr-xr-x 3 root root  85 Jun 12 22:12 lib
drwxr-xr-x 4 root root  28 Jun  7 23:12 php
drwxr-xr-x 2 root root  21 Jun  7 23:12 sbin
drwxr-xr-x 4 root root  28 Jun  7 23:12 var
3.2 Configuration
3.2.1 php.ini configuration
First, copy php.ini-development into the / usr/local/php/lib directory and name it php.ini:
cp /root/php-5.6.3/php.ini-development /usr/local/php/lib/php.ini
Note: Change php.ini-development to php.ini in the development server. If the production server suggests changing php.ini-production to php.ini, php.ini-production turns off some debugging output compared with php.ini-development, which can reduce the volume and improve the performance of log files in the production environment. In the development environment, it is recommended to open it for debugging. The following explanation is based on the development environment configuration.
Make the following changes to php.ini:
Error_report = E_ALL &~E_NOTICE; output debugging information and notifications
Error_log=/usr/local/php/var/log/error-log.log; error log location
Date.timezone= "Asia/Shanghai"; this sentence was originally "; date.timezone=", which needs to be deleted and set to Chinese time zone.
3.2.2 php-fpm.conf configuration
First, a copy of/usr/local/php/etc/php-fpm.conf.default is copied and named php-fpm.conf:
cd /usr/local/php
cp etc/php-fpm.conf.default etc/php-fpm.conf
Then make the following changes to php-fpm.conf:
The sentence pid = run/php-fpm.pid is cancelled and replaced by: PID = usr/local/php/var/run/php-fpm.pid;
The sentence error_log = log/php-fpm.log is cancelled and replaced by error_log = usr/local/php/var/log/error-log.log
Change user = nobody to: user = nginx
Change group = nobody to: group = nginx
The sentence catch_workers_output = yes is cancelled and replaced by catch_workers_output = yes
The php-fpm executable file can be monitored in the / usr/local/php/sbin directory by / usr/local/php/sbin. The default is to listen on port 9000.
4. Install WordPress
4.1 Database preparation
4.1.1 Start MySQL database
To observe the effect of our Master-slave configuration in the previous article, we will start both database instances this time:
/usr/local/mysql-5.7.18/data/3306/mysql start
/usr/local/mysql-5.7.18/data/3307/mysql start
4.1.2 MySQL database preparation
For information security, a library named wordpress is created on the main database instance and a database account is configured for the wordpress library. The commands are as follows:
create database wordpress;
grant all privileges on wordpress.* to wordpress@localhost identified by 'WordPress';flush privileges;
That is to say, a new WordPress library and a new WordPress database account are created. The password of the account is WordPress, which has all the rights to the WordPress library.
4.2 WordPress Site and Domain Name Resolution Configuration
4.2.1 Decompression of WordPress
Suppose wordpress-4.7.4-zh_CN.zip is in the / root directory and executes the following commands to extract the file:
cd ~
tar zxvf ./wordpress-4.7.4-zh_CN.tar.gz
Put wordpress in the nginx directory:
mv ./wordpress /usr/local/nginx-1.12.0/html
4.2.2 Adding sites to nginx
First, add a file named wordpress.goodapp.net.conf to / usr/local/nginx-1.12.0/conf/vhosts, which reads as follows:
server {
        listen       80;
        server_name  wordpress.goodapp.net;
        access_log  logs/wordpress.access.log  main;
        error_log  logs/wordpress.error.log;
        #root   html;
        #index  index.html index.htm index.jsp index.php;

        location /{
                root html/wordpress;
                index index.htm index.html index.php;
            }

        location ~* \.php$ {
                 root html/wordpress;
                 fastcgi_pass 127.0.0.1:9000;
                 fastcgi_index index.php;
                 fastcgi_param SCRIPT_FILENAME $document_root$fastcgi_script_name;
                 include fastcgi_params;
            }
    }
Then include the file in / usr/local/nginx-1.12.0/conf/nginx.conf, which reads as follows: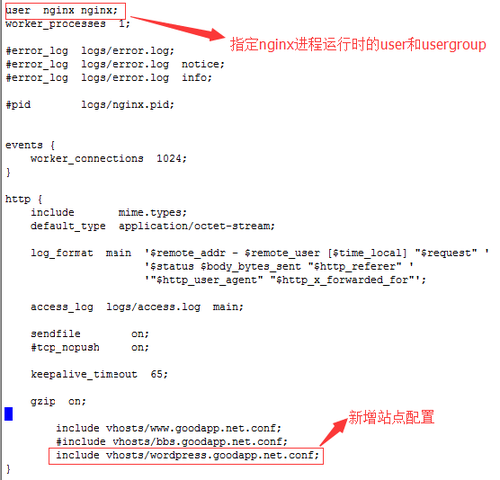
Next, check the configuration for grammatical errors and reload the configuration if there are no grammatical errors:
/usr/local/nginx-1.12.0/sbin/nginx –t
4.2.3 Start Application
Start nginx first:
systemctl reload nginx.service
Note: See previous chapters in this series. Since nginx is configured to start with the system, it can be restarted with the above commands.
Then start php-fpm:
/usr/local/php/sbin/php-fpm
This is to observe the startup state of php-fpm:
[root@localhost ~]# netstat -lntp | grep 9000
tcp        0      0 127.0.0.1:9000          0.0.0.0:*               LISTEN      5498/php-fpm: maste
If the result is not the above, you can view the error log:
tail /usr/local/php/var/log/error-log.log
4.2.4 Configuration Detection
We can create a test PHP page in / usr/local/nginx-1.12.0/html/wordpress with the file name test.php, which reads as follows:
<?php
    phpinfo();
?>
In order to observe the results through domain names in Windows hosts, it is necessary to modify the hosts file, which is located in the C: Windows System32 drivers etc directory. The modified contents are as follows:
# Copyright (c) 1993-2009 Microsoft Corp.
#
# This is a sample HOSTS file used by Microsoft TCP/IP for Windows.
#
# This file contains the mappings of IP addresses to host names. Each
# entry should be kept on an individual line. The IP address should
# be placed in the first column followed by the corresponding host name.
# The IP address and the host name should be separated by at least one
# space.
#
# Additionally, comments (such as these) may be inserted on individual
# lines or following the machine name denoted by a '#' symbol.
#
# For example:
#
#      102.54.94.97     rhino.acme.com          # source server
#       38.25.63.10     x.acme.com              # x client host
# localhost name resolution is handled within DNS itself.
#    127.0.0.1       localhost
#    ::1             localhost
192.168.60.198       www.goodapp.net
192.168.60.198       bbs.goodapp.net
192.168.60.198       wordpress.goodapp.net
Note: 192.168.60.198 is the IP address of CentOS 7 virtual machine.
Open the http://wordpress.goodapp.net/test.php page in the browser. The effect is as follows: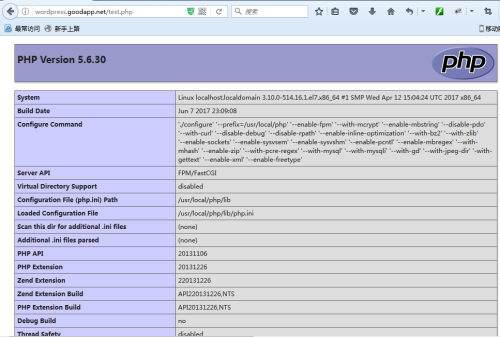
4.3 Installation
Open http://wordpress.goodapp.net/wp-admin/install.php on the host to see the installation interface: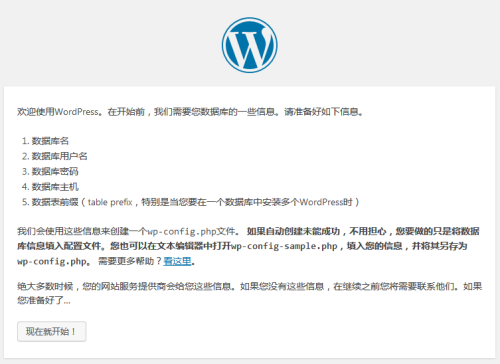
Click "Start now!" Enter the installation interface as follows:
In this article, "4.1.2 MySQL database preparation", we have created the WordPress library and WordPress users, whose password is WordPress, and completed the installation of WordPress by filling in and submitting the above information.
The effect of the wordpress background management homepage after installation is as follows:
As for how wordpress is used, it is not detailed here. If you are interested, you can go to its official website to read the manual. Here, we mainly use wordpress to check whether nginx+php-fpm is configured correctly.
5.MySQL Master-Slave Effect Check
Interested friends can see if the master-slave configuration of MySQL mentioned in our last article is correct. Here is the interface of master-slave database that I saw with HeidiSQL, an open source database management tool: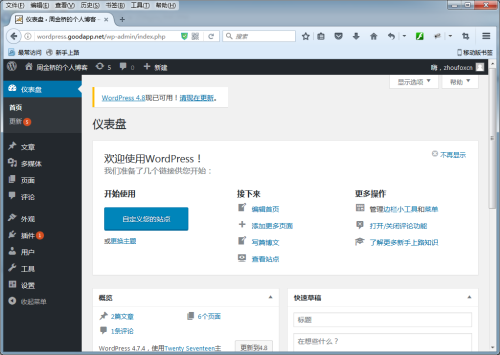
Note: HeiDiSQL official website: https://www.heidisql.com, which can be downloaded and used free of charge, supports PostgreSQL, MySQL and SQL Server.
6. Summary
This article describes how to compile PHP and how to configure Nginx to support PHP applications with the help of php-fpm. Finally, it checks whether nginx+php-fpm is configured correctly by installing and configuring a PHP application wordpress, and also checks whether the master-slave replication of MySQL described in the previous article works properly.