Substrate is a rapid development framework for developing application specific block chain. Compared with DApp based on public chains such as ETF, the application of specific block chains is a special block chain built around a single application, so it has the greatest flexibility and the least restrictions. This article describes in detail how to use the Substrate framework to quickly implement a simple game application dedicated block chain.
This article will complete this simple game-specific block chain in the following order:
- Download and install substrate
- Configure a brand new substrate-node-template and substrate-ui
- Developing new runtime for game block chains
- Real-time upgrade runtime without bifurcation using substrate-ui
- Upgrading the substrate-ui demonstrates the features and functions of the new runtime
If you want to quickly grasp the development of block chain applications, we recommend Hui Zhi's. A series of tutorials on block chain application and development It covers many block chains such as Bitcoin, ETF, eos, Super Account fabric and tendermint, as well as java, c, go, nodejs, python, php, dart and other development languages.
Preorder link
Before starting this tutorial, first install the following software in your computer:
Next, we need to clone these two software repositories and configure them accordingly.
STEP 1: Start Block Chain
If the installation is OK, now you can start a substrate development chain! Run the generated executable file in the substrate-node-template directory:
./target/release/substrate-node-template --dev
If you encounter any errors when starting the node, you may need to clean up the block chain data file with the following commands:
./target/release/substrate-node-template purge-chain --dev
If everything is all right, you can see it coming out!
To interact with the block chain, you need to start the Substrate UI. Enter the substrate-ui directory and run:
yarn run dev
Finally, visit http://localhost:8000 in your browser, and you should be able to access your block chain!
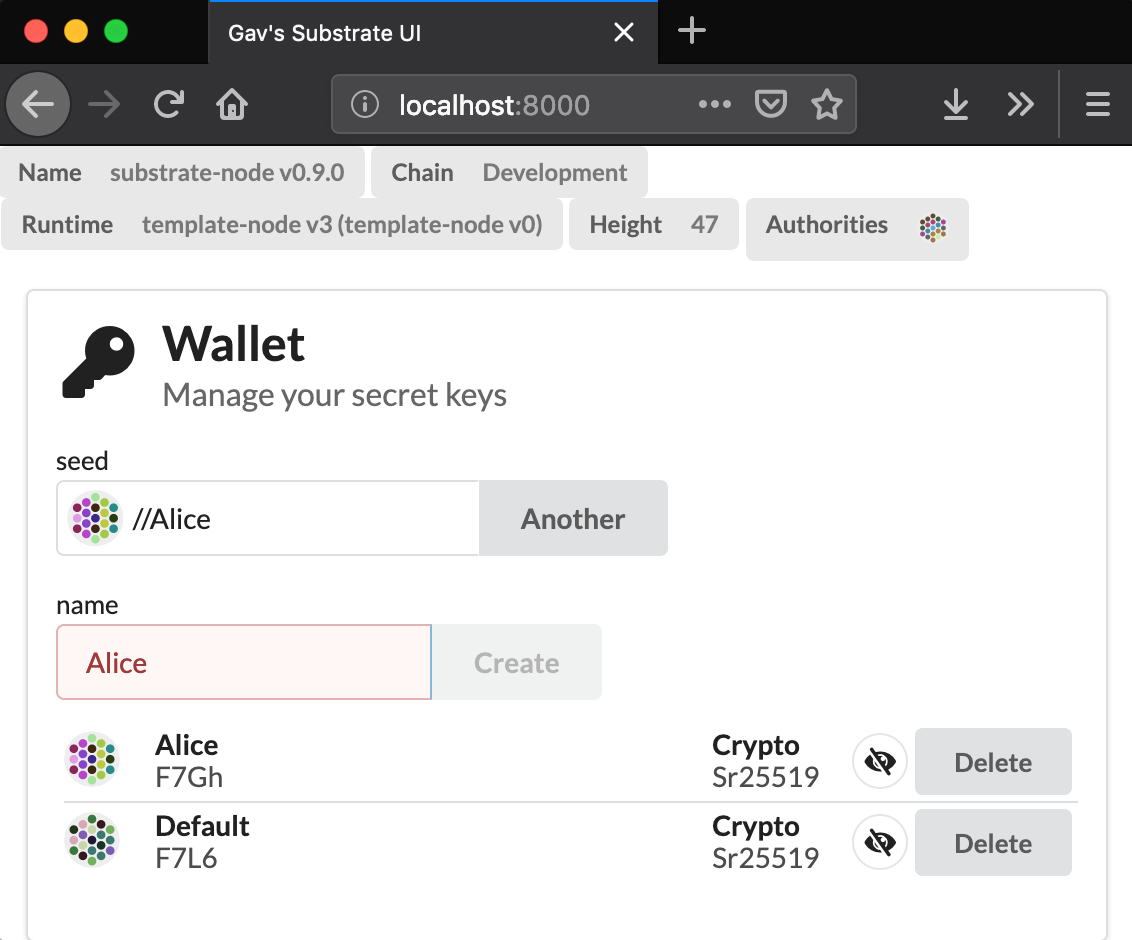
STEP 2: Adding Alice to the Network
Alice is a hard-coded account in your Block Chain Creation Block configuration, which is pre-charged and is a superuser responsible for block chain upgrades.
To access the Alice account, enter Wallet in Substrate UI and fill in the Seed input field: //Alice:
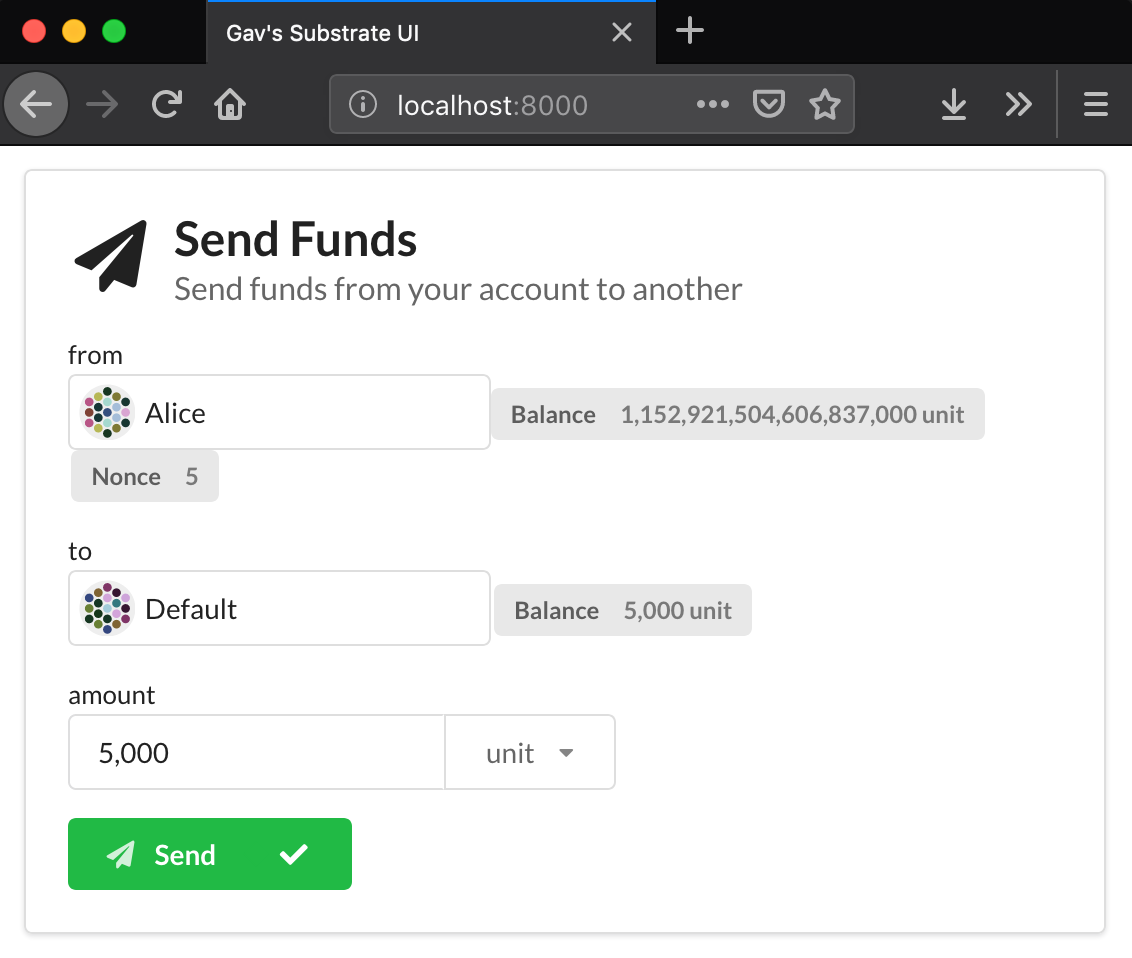
If all goes well, you can now enter the Send Funds function area and transfer money from Alice to Default account. You can see that the Alice account has been pre-charged, so transfer 5000 to the Default account, then wait for the green check to appear and display the balance of Default after the transfer:
STEP 3: Create a new runtime module
If you want to quickly grasp the development of block chain applications, we recommend Hui Zhi's. A series of tutorials on block chain application and development It covers many block chains such as Bitcoin, ETF, eos, Super Account fabric and tendermint, as well as java, c, go, nodejs, python, php, dart and other development languages.
It's time to create our own Runtime module.
Open the substrate-node-template folder and create a new file:
./runtime/src/demo.rs
First, you need to introduce some libraries at the beginning of the file:
// Encoding library
use parity_codec::Encode;

// Enables access to store a value in runtime storage
// Imports the `Result` type that is returned from runtime functions
// Imports the `decl_module!` and `decl_storage!` macros
use support::{StorageValue, dispatch::Result, decl_module, decl_storage};

// Traits used for interacting with Substrate's Balances module
// `Currency` gives you access to interact with the on-chain currency
// `WithdrawReason` and `ExistenceRequirement` are enums for balance functions
use support::traits::{Currency, WithdrawReason, ExistenceRequirement};

// These are traits which define behavior around math and hashing
use runtime_primitives::traits::{Zero, Hash, Saturating};

// Enables us to verify an call to our module is signed by a user account
use system::ensure_signed;
All modules need to declare a trait called Trait, which defines the unique types required by the module. In this tutorial, our runtime module does not have its own special type, but inherits the type defined in the balances module (for example, Balance):
pub trait Trait: balances::Trait {}
In this example, we will create a simple coin toss game. Users need to pay an entry fee to play the game, that is, toss a coin once, and if they win, they can get the things in the jar. Regardless of the result, the user's entrance fee will be put into the jar after the result is released for subsequent users to win.
We can use macro decl_storage to define storage items that modules need to track:
decl_storage! {
  trait Store for Module<T: Trait> as Demo {
    Payment get(payment): Option<T::Balance>;
    Pot get(pot): T::Balance;
    Nonce get(nonce): u64;
  }
}
Macros in Rust are used to generate other code and belong to metaprogramming. Here we introduce a macro and a custom syntax to simplify the definition of storage and make it easy to understand. This macro is responsible for generating all the actual code that interacts with the Substrate storage database.
You can see that in our storage, there are three entries, two of which track Balance and the other track Nonce. Payment's declaration is an optional value, so it's not a problem whether it's initialized or not.
Next we will need to define distribution functions: those for users to call our block chain system. The game has two functions that users can interact with: one allows us to pay entrance fees, and the other lets us start playing the game:
decl_module! {
    pub struct Module<T: Trait> for enum Call where origin: T::Origin {
        fn set_payment(_origin, value: T::Balance) -> Result {
              // Logic for setting the game payment
        }

        play(origin) -> Result {
              // Logic for playing the game
        }
    }
}
Now that we have built the module structure, we can add the implementation logic of these functions. First, we add the logic for initializing storage entries:
// This function initializes the `payment` storage item
// It also populates the pot with an initial value
fn set_payment(origin, value: T::Balance) -> Result {
  // Ensure that the function call is a signed message (i.e. a transaction)
  let _ = ensure_signed(origin)?;

  // If `payment` is not initialized with some value
  if Self::payment().is_none() {
    // Set the value of `payment`
    <Payment<T>>::put(value);

    // Initialize the `pot` with the same value
    <Pot<T>>::put(value);
  }

  // Return Ok(()) when everything happens successfully
  Ok(())
}
Then we will write the implementation code of the play() function:
// This function is allows a user to play our coin-flip game
fn play(origin) -> Result {
  // Ensure that the function call is a signed message (i.e. a transaction)
  // Additionally, derive the sender address from the signed message
  let sender = ensure_signed(origin)?;

  // Ensure that `payment` storage item has been set
  let payment = Self::payment().ok_or("Must have payment amount set")?;

  // Read our storage values, and place them in memory variables
  let mut nonce = Self::nonce();
  let mut pot = Self::pot();

  // Try to withdraw the payment from the account, making sure that it will not kill the account
  let _ = <balances::Module<T> as Currency<_>>::withdraw(&sender, payment, WithdrawReason::Reserve, ExistenceRequirement::KeepAlive)?;

  // Generate a random hash between 0-255 using a csRNG algorithm
  if (<system::Module<T>>::random_seed(), &sender, nonce)
    .using_encoded(<T as system::Trait>::Hashing::hash)
    .using_encoded(|e| e[0] < 128)
    {
      // If the user won the coin flip, deposit the pot winnings; cannot fail
      let _ = <balances::Module<T> as Currency<_>>::deposit_into_existing(&sender, pot)
        .expect("`sender` must exist since a transaction is being made and withdraw will keep alive; qed.");

      // Reduce the pot to zero
      pot = Zero::zero();
  }

  // No matter the outcome, increase the pot by the payment amount
  pot = pot.saturating_add(payment);

  // Increment the nonce
  nonce = nonce.wrapping_add(1);

  // Store the updated values for our module
  <Pot<T>>::put(pot);
  <Nonce<T>>::put(nonce);

  // Return Ok(()) when everything happens successfully
  Ok(())
}
Okay! You can see how easy it is to build a new runtime module with Substrate. As a reference, you can go with the above code. Full version Contrast.
STEP 4: Integrating new modules into the Substrate runtime
To apply the module we developed above, we also need to tell the runtime that the module exists, which needs to be modified. / runtime/src/lib.rs file.
First, we need to include the module files we created in the project:
...
/// Index of an account's extrinsic in the chain.
pub type Nonce = u64;

mod demo;     // Add this line
Next, we need to tell the Trait exposed by the runtime demo module:
...
impl sudo::Trait for Runtime {
  /// The uniquitous event type.
  type Event = Event;
  type Proposal = Call;
}

impl demo::Trait for Runtime {}      //Add this line
Finally, we need to include demo modules in the runtime constructor:
construct_runtime!(
  pub enum Runtime with Log(InternalLog: DigestItem<Hash, Ed25519AuthorityId>) where
    Block = Block,
    NodeBlock = opaque::Block,
    UncheckedExtrinsic = UncheckedExtrinsic
  {
    System: system::{default, Log(ChangesTrieRoot)},
    Timestamp: timestamp::{Module, Call, Storage, Config<T>, Inherent},
    Consensus: consensus::{Module, Call, Storage, Config<T>, Log(AuthoritiesChange), Inherent},
    Aura: aura::{Module},
    Indices: indices,
    Balances: balances,
    Sudo: sudo,
    Demo: demo::{Module, Call, Storage},    // Add this line
  }
);
In order to make it easier to observe when the upgrade is successful, we can upgrade the runtime specification and the name of the implementation at the same time:
/// This runtime version.\npub const VERSION: RuntimeVersion = RuntimeVersion {
  spec_name: create_runtime_str!("demo"),      // Update this name
  impl_name: create_runtime_str!("demo-node"), // Update this name
  authoring_version: 3,
  spec_version: 3,
  impl_version: 0,
  apis: RUNTIME_API_VERSIONS,
};
Again, you can refer to this Complete implementation code.
STEP 5: Upgrade Block Chain
Now that we have created a new runtime module, it is time to upgrade our block chain.
To do this, we first need to compile the new runtime into Wasm binaries. Enter the substrate-node-template and run:
./scripts/build.sh
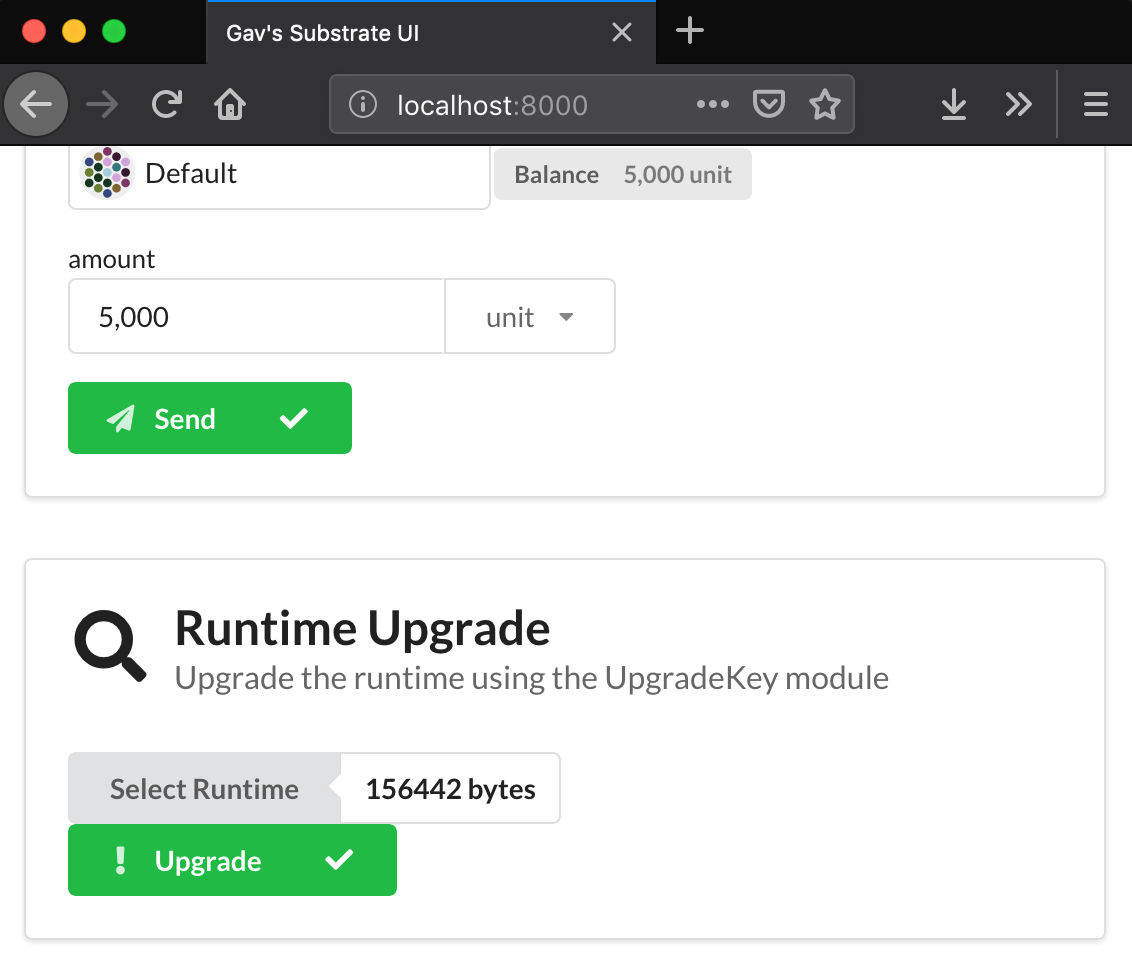
If the above command is executed successfully, it will update the file. / runtime/wasm/target/wasm32-unknown-unknown/release/node_runtime.compact.wasm. You can go back to the Substrate UI, then the Runtime Upgrade function area, select the file, and then click the upgrade button:
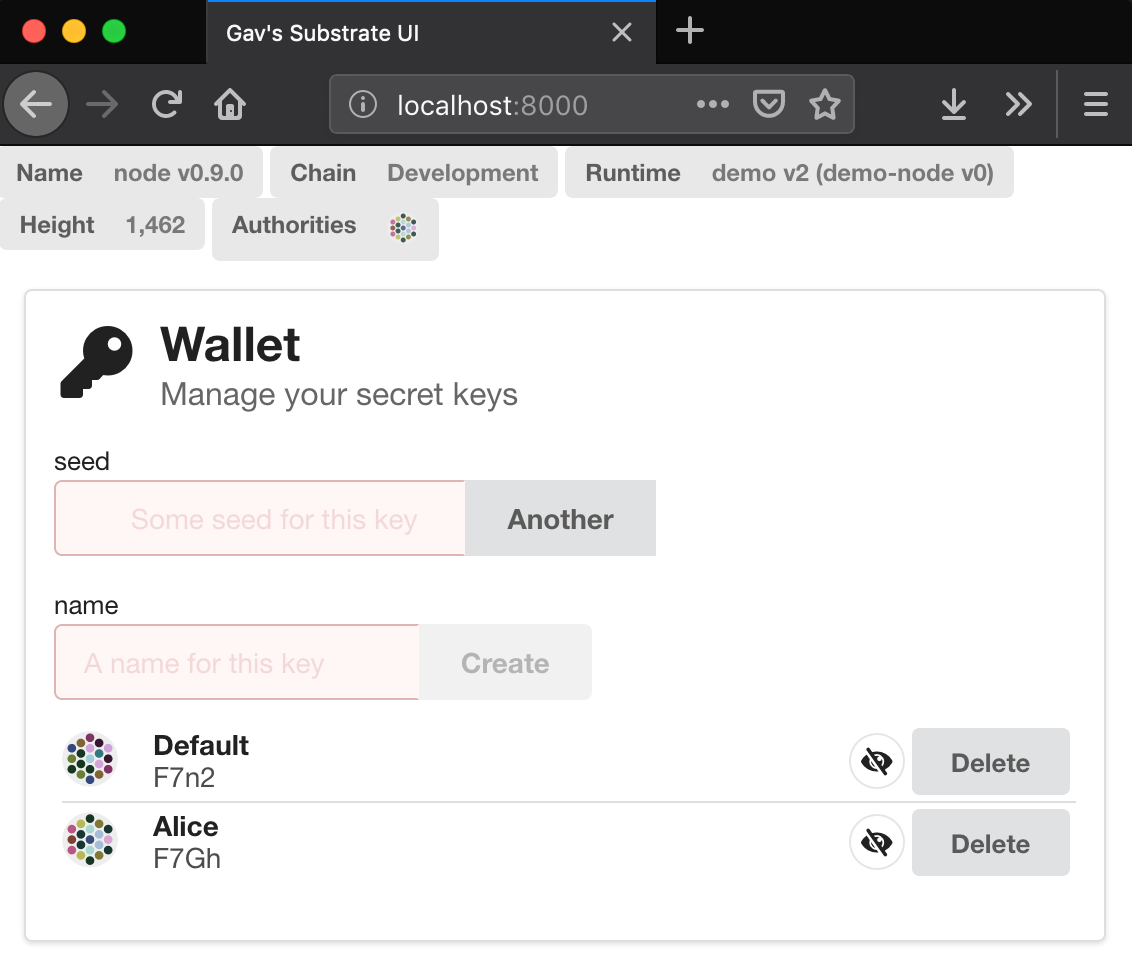
If all goes well, you can see our new name for runtime at the top of Substrate UI:
STEP 6: Interacting with New Modules
At the end of this tutorial, we can try out the newly created games. Use the browser's console to start the interaction.
On the Susbtrate UI page, press F12 to open the developer console. We need to use some JavaScript libraries loaded on this page.
Before we can play the game, we need to initialize set_payment with an account. We will call this function in the name of Alice. She would use a generous initial money jar with a signature message:
post({
  sender: runtime.indices.ss58Decode('F7Hs'),
  call: calls.demo.setPayment(1000),
}).tie(console.log)
[Img-fxryKGXf-1568030609329 (create-first-base-chain/console-interaction.png)]
When this call is complete, you should see {finalized:"..."} indicating that it has been added to the block chain. This can be confirmed by querying the balance in the money jar:
runtime.demo.pot.then(console.log)
This should return Number {1000}.
STEP 7: Update Substrate UI
Now what we see is running in the background, and now we update the user interface to show these changes. Let's add a user interface so that we can play games. To do this, we need to modify the substrate-ui repository.
Open the. / src/app.jsx file, and in the readyRender() function, you will see the code that generates different UX components. For example, this code snippet controls the Runtime upgrade user interface we just used:
class UpgradeSegment extends React.Component {
  constructor() {
    super()
    this.conditionBond = runtime.metadata.map(m =>
      m.modules && m.modules.some(o => o.name === 'sudo')
      || m.modules.some(o => o.name === 'upgrade_key')
      )
    this.runtime = new Bond
  }

  render() {
    return <If condition={this.conditionBond} then={
      <Segment style={{ margin: '1em' }} padded>
        <Header as='h2'>
          <Icon name='search' />
          <Header.Content>
            Runtime Upgrade
            <Header.Subheader>Upgrade the runtime using the UpgradeKey module</Header.Subheader>
          </Header.Content>
        </Header>
        <div style={{ paddingBottom: '1em' }}></div>
        <FileUploadBond bond={this.runtime} content='Select Runtime' />
        <TransactButton
          content="Upgrade"
          icon='warning'
          tx={{
            sender: runtime.sudo
              ? runtime.sudo.key
              : runtime.upgrade_key.key,
            call: calls.sudo
              ? calls.sudo.sudo(calls.consensus.setCode(this.runtime))
              : calls.upgrade_key.upgrade(this.runtime)
          }}
        />
      </Segment>
    } />
  }
}
We can use this as a template to implement the game interface. Add the following code at the end of the file:
class DemoSegment extends React.Component {
  constructor() {
    super()
    this.player = new Bond
  }

  render() {
    return <Segment style={{ margin: '1em' }} padded>
      <Header as='h2'>
        <Icon name='game' />
        <Header.Content>
          Play the game
          <Header.Subheader>Play the game here!</Header.Subheader>
        </Header.Content>
      </Header>
      <div style={{ paddingBottom: '1em' }}>
        <div style={{ fontSize: 'small' }}>player</div>
        <SignerBond bond={this.player} />
        <If condition={this.player.ready()} then={<span>
          <Label>Balance
            <Label.Detail>
              <Pretty value={runtime.balances.balance(this.player)} />
            </Label.Detail>
          </Label>
        </span>} />
      </div>
      <TransactButton
        content="Play"
        icon='game'
        tx={{
          sender: this.player,
          call: calls.demo.play()
        }}
      />
      <Label>Pot Balance
        <Label.Detail>
          <Pretty value={runtime.demo.pot} />
        </Label.Detail>
      </Label>
    </Segment>
  }
}
this.player represents the game user context. We can use it to get user balance:
runtime.balances.balance(this.player)
Submit the transaction as the user:
tx={{
  sender: this.player,
  call: calls.demo.play()
}}
Similar to the way in the developer console, we can dynamically display the current balance in the coin can:
<Label>Pot Balance
  <Label.Detail>
    <Pretty value={runtime.demo.pot}/>
  </Label.Detail>
</Label>
The only thing we need to do is add this component to the App class at the beginning of the file:
readyRender() {
  return (<div>
    <Heading />
    <WalletSegment />
    <Divider hidden />
    <AddressBookSegment />
    <Divider hidden />
    <FundingSegment />
    <Divider hidden />
    <UpgradeSegment />
    <Divider hidden />
    <PokeSegment />
    <Divider hidden />
    <TransactionsSegment />
    <Divider hidden />
    <DemoSegment />      // Add this line
  </div>)
}
Save the changes and reload the page. You should see the new UI! Now you can use the Default account to play games:
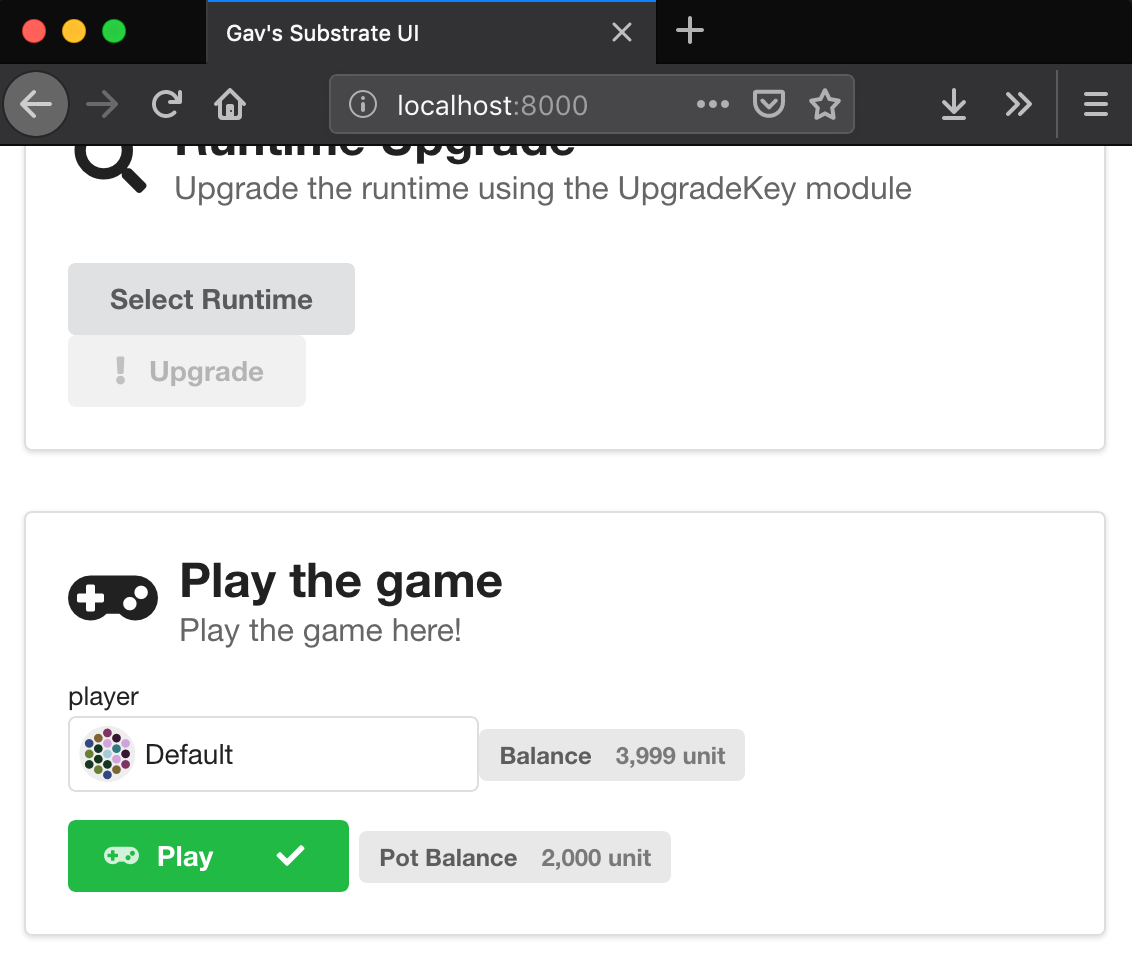
Here you can see that the players lost the game, which means that their 1000 units of money were deposited in the coin jar, while deducting an additional 1 unit of money transaction fee from their account balance.
If we try a few more times, eventually the player will win the game, and the money jar will be restored to the initial amount waiting for the next player:

Links to the original text: Substrate Framework Actual Warfare-Huizhi Network