By Fernando Doglio
Crazy technology house
Original text: https://blog.bitsrc.io/writin...
Forbidden without permission
Game development does not need to be limited to users using Unity or unreal engine 4. JavaScript game development has been around for some time. In fact, the latest versions of the most popular browsers (such as Chrome, Firefox, and Edge) offer advanced graphics rendering (such as WebGL )It's very interesting game development opportunities.
However, game development with WebGL can't cover all its contents in one article (there are complete books specially written for this purpose), and for my personal preference, I prefer to rely on the help of framework before I go deep into specific technology.
That's why after studying, I decided to use MelonJS The reason for writing this quick tutorial.
What is MelonJS?
As you may have guessed, mellonjs is a JavaScript game engine that is fully compatible with all major browsers (from Chrome to Opera, all the way to mobile Chrome and iOS Safari).
It has a series of functions, which are very attractive in my research process:
- For beginners, it is completely independent and can work without external dependence.
- However, it can be integrated with multiple third-party tools to make your work easier, such as Tiled (can help you create maps and game levels), TexturePacker Help you create the texture atlas you need and simplify and optimize sprite management.
- Integrated 2D physics engine. This means you can use realistic 2D motion and collision detection out of the box. It's critical because all of these problems have to be solved, which requires a lot of work (let alone math, which is not my dish).
- Support the sound API, enabling you to add sound effects and background music with excellent simplicity.
There are other amazing features of the engine that you can view on its website, but these are the features we focus on most in this article.
Tips: Using Bit(Github )JS modules and UI components in the project can be easily shared and reused, and it is recommended to update them.

Bit component: easily shared across projects in the team
Design our game
The purpose of typing games is to provide players with the ability to move or perform certain actions by typing (or tapping random keys).
I remember learning how to type (yes, a long time ago) when I was a kid. At that time, in the "Mario teachers typing" game, you have to type a single letter to move forward, jump to a turtle, or hit a box from below. The figure below gives you the idea of how the game looks and how to interact with it.
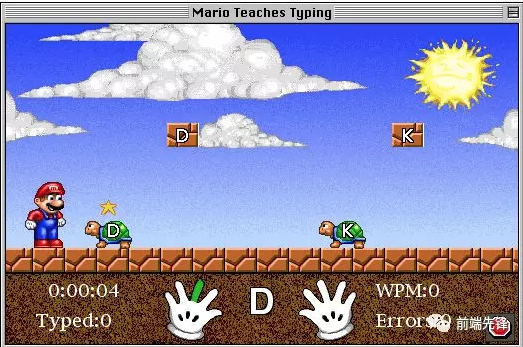
Although it's an interesting little game, it's not a real platform game. Mario's actions always correspond to a key and never fail.
However, for this article, I want to make things more interesting, not to create a simple typing game, such as the above game:
Instead of using a single letter to decide what to do next, the game offers five choices, each with a complete word:
- Forward
- Jump forward
- Jump up
- Backward jump
- Move backward
In other words, you can move a character by typing a word instead of the classic arrow based control.
In addition, the game will be a classic platform game where players can collect gold coins by walking around. For simplicity, we will exclude enemies and other types of entities from this tutorial (although you should be able to infer the code used and create your own based on that code).
To keep the length of this article reasonable, I will focus on only one stage, a full range of actions (in other words, you will be able to perform all five actions), a few enemies, a collection, and a considerable number of steps for you to jump around.
Tools you need
Although melonJS is completely independent, there are some tools to help you in the process. I suggest you use them:
- Texture Packer : with this, you will be able to generate texture atlas automatically, which is another way to express JSON files, in which all images are packed so that the engine can retrieve and use them as needed later. If you don't have this tool, it may take too much time to maintain the atlas manually.
- Tiled: this will be our level editor. Although you can download it for free (you need to find a link to "No thanks, just take me to the downloads"), you can donate a minimum of $1 to the author of the magic tool. If you have a PayPal account or debit card available, it is recommended that you do so. Such software needs to be maintained and requires time and effort.
With these tools, you will be able to continue and complete this tutorial, so let's start coding.
Basic platform games
To start this project, we can use some sample code. When you download the engine, it comes with a set of sample projects by default that you can check out (they are in the example folder).
The sample code is the code we use to quickly start the project. Among them, you will find:
- The data folder, which contains all content unrelated to the code. Here you can find sounds, music, images, map definitions and even fonts.
- js folder, where you will save all game related code.
- index.html and index.css files. These are the contacts your app needs to interact with the outside world.
Understand existing code
Now that we leave the resources in the data folder for the time being, we need to understand what the example provides us.
Execution game
To execute the game, you need to do something:
- A copy of melonJS. If downloaded, make sure you get the contents of the dist folder. Copy it to any folder and make sure it's added to the index.html file like any other JS file.
- Install (if not already installed) the http-server Module, which can quickly provide HTTP services for related folders. If not already installed, do the following:
$ npm install -g http-server
When the installation is complete, run from the project folder:
$ http-server
At this time, you can test the game by visiting http://localhost:8080.
view code
In the game you will find that this is a platform game that can perform basic (very embarrassing) actions, with several different enemies and a collection. Basically, this is similar to our goal, but the control plan is slightly different.
The key files to check here are:
- game.js: this file contains all the initialization code. What's interesting is how to instantiate the game graph and the main control.
- screens/play.js: contains all the code needed to set the level. You'll notice that it's not much. Because the level definition is done using other tools (that is, Tiled), this code simply enables this feature.
- entities/player.js: obviously that's your main goal. This file contains your character's mobile code, collision reactions, and control key bindings. Although it's not big, it's where you want to spend the most time.
- entities/enemies.js: next to player code, it's important because you'll see how to set up automatic behavior based on predefined coordinates.
The rest of the files are also useful, but not so important, and we use them when we need them.
Know where everything comes from
If you've done your homework in advance, you may have noticed that there's not a single line of code that instantiates players or enemies. Their coordinates are nowhere to be found. So, how to understand the game?
This is what the level editor does. If you download Tiled, you can open the file named map1.tmx in the data/map folder, and then you will see something like this:

The center part of the screen shows you the level you are designing. If you look closely, you will see images and rectangular shapes, some of which have different colors and names. These objects represent things in the game, depending on their name and the layer they belong to.
On the right side of the screen, you will see a list of layers (at the top right). There are different types of layers:
- Image layer: for background or foreground images
- Object layer: used to collide with objects, entities, and any objects you want to instantiate in your map.
- Tile layer: where you will place tiles to create the actual level.
The bottom right corner contains blocks for this map. Tiles can also be created by Tiled and can be found in the same folder with the tsx extension.
Finally, on the left side of the screen, you'll see the Properties section, where you'll see details about the selected object or layer you clicked. You'll be able to change common attributes (such as the color of a layer to better understand its object's location) and add custom attributes (later passed as parameters to the constructor of the entity in the game).
Change motion scheme
Now that we're ready to code, let's focus on the main purpose of this article, let's take the working version of the example as an example and try to modify it to make it available as a typing game.
This means that the first thing to change is the motion scheme, or in other words, change control.
Go to entities/player.js and check the init method. You'll notice a lot of bindKey and bindGamepad calls. These codes essentially bind specific keys to logical operations. In short, it ensures that whether you press the right arrow key, D key or move the analog rocker to the right, the same "right" action is triggered in the code.
All of this needs to be removed, which is of no use to us. At the same time, create a new file, name it wordServices.js, and create an object in this file. The object will return words in each round, which can help us understand which action the player chooses.
/**
 * Shuffles array in place.
 * @param {Array} a items An array containing the items.
 */
function shuffle(a) {
    var j, x, i;
    for (i = a.length - 1; i > 0; i--) {
        j = Math.floor(Math.random() * (i + 1));
        x = a[i];
        a[i] = a[j];
        a[j] = x;
    }
    return a;
}


ActionWordsService = {

    init: function(totalActions) {
        //load words...
        this.words = [
            "test", "hello", "auto", "bye", "mother", "son", "yellow", "perfect", "game"
        ]
        this.totalActions = totalActions
        this.currentWordSet = []
    },

    reshuffle: function() {
        this.words = shuffle(this.words)
    },

    getRegionPostfix: function(word) {
        let ws = this.currentWordSet.find( ws => {
            return ws.word == word
        })
        if(ws) return ws.regionPostfix
        return false
    },

    getAction: function(word) {
        let match = this.getWords().find( am => {
            return am.word == word
        })
        if(match) return match.action
        return false
    },

    getWords: function() {
        let actions = [ { action: "right", coords: [1, 0], regionPostfix: "right"},
                        { action: "left", coords: [-1, 0], regionPostfix: "left"},
                        { action: "jump-ahead", coords: [1,-0.5], regionPostfix: "upper-right"},
                        { action: "jump-back", coords:[-1, -0.5], regionPostfix: "upper-left"},
                        { action: "up", coords: [0, -1], regionPostfix: "up"}
                    ]

       this.currentWordSet = this.words.slice(0, this.totalActions).map( w => {
            let obj = actions.shift()
            obj.word = w
            return obj
       })
       return this.currentWordSet
    }
}
In essence, the service contains a list of words, which are then randomly arranged, and each time the list is requested (using the getWords method), a set of words is randomly obtained and assigned to one of the operations mentioned above. There are other properties associated with each operation:
- Based on the action HUD, the coords attribute is used to place the text in the correct coordinates (more on that later)
- The regionPostfix property is used to select the correct framework for HUD operations.
Now, let's see how to request user input during the game.
Note: before moving on, remember that in order for the new service to work with the rest of the code, you must include it in the index.html file, just like other JS libraries:
<script type="text/javascript" src="js/wordServices.js"></script>
How to capture user input
You can potentially use key bound combinations to mimic the behavior of input fields that use game elements, but consider all possible combinations and behaviors that input fields provide by default (for example, paste text, select, move without deleting characters, etc.), and all programs must be programmed to make them available.
Instead, we can simply add a text field to the HTML main page and use CSS to style it above the Canvas element, which will become part of the game.
You just need the code in < body >.
<input type="text" id="current-word" />
Although it's entirely up to you, I suggest you use jQuery To simplify the code needed to attach callbacks to keypress events. You can do this using native JS, of course, but I prefer the syntax sugar provided by this library.
The following code is located in the load method of game.js file, which is responsible for capturing the user's input:
me.$input = $("#current-word")

let lastWord = ''
me.$input.keydown( (evnt) => {

    if(evnt.which == 13) {
        console.log("Last word: ", lastWord)
        StateManager.set("lastWord", lastWord)
        lastWord = ''
        me.$input.val("")
    } else {
        if(evnt.which > 20) {
            let validChars = /[a-z0-9]+/gi
            if(!String.fromCharCode(evnt.which).match(validChars)) return false
          }

        setTimeout(_ => {
            lastWord = me.$input.val() //String.fromCharCode(evnt.which)
            console.log("Partial: ", lastWord)
        }, 1)
    }
    setTimeout(() => {
        StateManager.set("partialWord", me.$input.val())
    }, 1);
})
Essentially, we capture the input elements and store them in the global object me. This global variable contains everything the game needs.
In this way, we can set the event handler for any key pressed. As you can see, I'm checking key 13 (on behalf of the ENTER key) to identify when players have finished typing, otherwise I'll make sure they're typing valid characters (I just avoid using special characters, which will prevent problems with the default fonts provided by melonJS).
Finally, I set two different states on the StateManager object. lastWord understands the last word entered by the player, and partialWord understands what is being entered now. These two states are important.
Data sharing between components
How to share data among components is a common problem in many frameworks. We will capture the input as part of the game component, so how can we share this input with others?
My solution is to create a event emitter Global components of:
const StateManager = {

    on: function(k, cb) {
        console.log("Adding observer for: ", k)
        if(!this.observers) {
            this.observers = {}
        }

        if(!this.observers[k]) {
            this.observers[k] = []
        }
        this.observers[k].push(cb)
    },
    clearObserver: function(k) {
        console.log("Removing observers for: ", k)
        this.observers[k] = []
    },
    trigger: function(k) {
        this.observers[k].forEach( cb => {
            cb(this.get(k))
        })
    },
    set: function(k, v) {
        this[k] = v
        this.trigger(k)
    },
    get: function(k) {
        return this[k]
    }

}
The code is very simple, you can set multiple "observers" (they are callback functions) for a specific state, and once the state is set (i.e. changed), all these callbacks are called with the new value.
Add UI
The last step before creating the level is to display some basic UI. Because we need to show the direction that players can move and the words that need to be entered.
Two different UI elements will be used for this:
- One for graphics, which will have several different frames, essentially one for normal images, then one for each direction as "selected" (associated with the regionPostfix attribute on ActionWordsService)
- One is used to output text around the image. By the way, this is also associated with the coords property on the ActionWordsService.
We can add the existing HUD.js file in the JS folder. Add two new components to it.
The first is the ActionControl component, as shown below:
game.HUD.ActionControl = me.GUI_Object.extend({
    init: function(x, y, settings) {
        game.HUD.actionControlCoords.x = x //me.game.viewport.width - (me.game.viewport.width / 2)
        game.HUD.actionControlCoords.y = me.game.viewport.height - (me.game.viewport.height / 2) + y

        settings.image = game.texture;

        this._super(me.GUI_Object, "init", [
            game.HUD.actionControlCoords.x,
            game.HUD.actionControlCoords.y,
            settings
        ])

        //update the selected word as we type
        StateManager.on('partialWord', w => {
            let postfix = ActionWordsService.getRegionPostfix(w)
            if(postfix) {
                this.setRegion(game.texture.getRegion("action-wheel-" + postfix))
            } else {
                this.setRegion(game.texture.getRegion("action-wheel")
            }
            this.anchorPoint.set(0.5,1)
        })

        //react to the final word
        StateManager.on('lastWord', w => {
            let act = ActionWordsService.getAction(w)
            if(!act) {

                me.audio.play("error", false);
                me.game.viewport.shake(100, 200, me.game.viewport.AXIS.X)
                me.game.viewport.fadeOut("#f00", 150, function(){})
           } else {
               game.data.score += Constants.SCORES.CORRECT_WORD
           }
        })
    }
})
It looks like a lot, but it just does one thing:
- It extracts its coordinates from the settings property, and after setting the map on Tiled, we will check it.
- Add code that responds to words that are part of the input. We use the postfix property for the currently written word.
- And added code to respond to the complete word. If an action is associated with the word (that is, the correct word), it will give the player a bonus. Otherwise, the screen will shake and the wrong sound will play.
The second graphic part, the words to be entered, is as follows:
game.HUD.ActionWords = me.Renderable.extend({
    init: function(x, y) {
        this.relative = new me.Vector2d(x, y);

        this._super(me.Renderable, "init", [
            me.game.viewport.width + x,
            me.game.viewport.height + y,
            10, //x & y coordinates
            10
        ]);

         // Use screen coordinates
        this.floating = true;

        // make sure our object is always draw first
        this.z = Infinity;
        // create a font
        this.font = new me.BitmapText(0, 0, {
            font : "PressStart2P",
            size: 0.5,
            textAlign : "right",
            textBaseline : "bottom"
        });

        // recalculate the object position if the canvas is resize
        me.event.subscribe(me.event.CANVAS_ONRESIZE, (function(w, h){
            this.pos.set(w, h, 0).add(this.relative);
        }).bind(this));

        this.actionMapping = ActionWordsService.getWords()
    },

    update: function() {
        this.actionMapping = ActionWordsService.getWords()
        return true
    },
    draw: function(renderer) {
        this.actionMapping.forEach( am => {
            if(am.coords[0] == 0 && am.coords[1] == 1) return
            let x = game.HUD.actionControlCoords.x + (am.coords[0]*80) + 30
            let y = game.HUD.actionControlCoords.y + (am.coords[1]*80) - 30
            this.font.draw(renderer, am.word, x, y)
        })
    }
})
The heavy work of this component is accomplished by drawing method. The init method just initializes variables. In the process of calling draw, we will iterate over the selected words, and use the coordinates related to them and a set of fixed numbers to locate the words around the coordinates of the ActionControl component.
This is what the proposed motion control design looks like (and how coordinates relate to it):

Of course, it should have a transparent background.
Just make sure you save the images in the / data/img/assets/UI folder so that when you open TexturePacker, it will recognize the new images and add them to the atlas in the texture.

The figure above shows how to add a new image of action wheel. You can then click Publish sprite sheet and accept all the default options. It will overwrite the existing atlas, so you don't need to do anything with your code. This step is critical because the texture atlas will be loaded as a resource (detailed in a minute), and multiple entities will use it for things like animation. Remember to do this when adding or updating graphics on a game.
Put everything with Tiled
OK, now that we have introduced the basic knowledge, let's play games together. The first thing to notice is the map.
By using the default tile included in tiled and melonJS, I created this map (25x16 tiles map, where tile is 32 x 32px):

These are the layers I'm using:
- HUD: it contains only one element called HUD.ActionControl (it's important to keep the name the same, you'll see why later). The following image shows the properties of this element (note the custom properties)

- Collision: by default, mellonjs assumes that all layers starting with collision are collision layers, which means that any shape in them is not traversable. Here you will define all the shapes of the floor and platform.
- Player: this layer contains only the mainPlayer element (a shape that will let melonJS know where to place the player at the beginning of the game).
- entities: in this layer, I added coins again. Their names are very important. Please keep consistent, because they need to match the names you registered in the code.
- In the last three layers, you can add images of map and background.
When we are ready, we can go to the game.js file and add the following lines in the loaded method:
// register our objects entity in the object pool
me.pool.register("mainPlayer", game.PlayerEntity);
me.pool.register("CoinEntity", game.CoinEntity);
me.pool.register("HUD.ActionControl", game.HUD.ActionControl);
These codes are used to register your entities (entities that you want to place directly on the map using Tiled). The first parameter provides the name that you need to match with Tiled.
In addition, in this file, the onLoad method should look like this:
  onload: function() {

        // init the video
        if (!me.video.init(965, 512, {wrapper : "screen", scale : "auto", scaleMethod : "fit", renderer : me.video.AUTO, subPixel : false })) {
            alert("Your browser does not support HTML5 canvas.");
            return;
        }

        // initialize the "sound engine"
        me.audio.init("mp3,ogg");

        // set all ressources to be loaded
        me.loader.preload(game.resources, this.loaded.bind(this));
        ActionWordsService.init(5)
    },
Our basic requirement is a resolution of 965x512 (I found that it works well when the height of the screen is the same as that of the map. After 16 * 32 = 512 in our example, the ActionWordsService will be initialized with five words (these are the five directions you can move on).
Another interesting code in the onLoad method is:
me.loader.preload(game.resources, this.loaded.bind(this));
resource file
All types of resources required by the game (i.e. image, sound, background music, JSON configuration file, etc.) need to be added to the resources.js file.
This is the content of your resource file:
game.resources = [

    { name: "tileset",     type:"image", src: "data/img/tileset.png" },
    { name: "background",  type:"image", src: "data/img/background.png" },
    { name: "clouds",      type:"image", src: "data/img/clouds.png" },


    { name: "screen01", type: "tmx", src: "data/map/screen01.tmx" },

    { name: "tileset",  type: "tsx", src: "data/map/tileset.json" },

    { name: "action-wheel", type:"image", src: "data/img/assets/UI/action-wheel.png" },
    { name: "action-wheel-right", type:"image", src: "data/img/assets/UI/action-wheel-right.png" },
    { name: "action-wheel-upper-right",type:"image", src: "data/img/assets/UI/action-wheel-upper-right.png" },
    { name: "action-wheel-up", type:"image", src: "data/img/assets/UI/action-wheel-up.png" },
    { name: "action-wheel-upper-left", type:"image", src: "data/img/assets/UI/action-wheel-upper-left.png" },
    { name: "action-wheel-left", type:"image", src: "data/img/assets/UI/action-wheel-left.png" },

    { name: "dst-gameforest", type: "audio", src: "data/bgm/" },

    { name: "cling",     type: "audio", src: "data/sfx/" },
    { name: "die",       type: "audio", src: "data/sfx/" },
    { name: "enemykill", type: "audio", src: "data/sfx/" },
    { name: "jump",      type: "audio", src: "data/sfx/" },

    { name: "texture",   type: "json",  src: "data/img/texture.json" },
    { name: "texture",   type: "image", src: "data/img/texture.png" },

    { name: "PressStart2P", type:"image", src: "data/fnt/PressStart2P.png" },
    { name: "PressStart2P", type:"binary", src: "data/fnt/PressStart2P.fnt"}
];
You can use things like block sets, screen maps, etc. (note that the name is always a filename without an extension, which is a mandatory requirement, or the resource will not be found).
Coin
The coins in the game are very simple, but when you collide with them, something needs to happen. Their codes are as follows:
game.CoinEntity = me.CollectableEntity.extend({

    /**
     * constructor
     */
    init: function (x, y, settings) {
        // call the super constructor
        this._super(me.CollectableEntity, "init", [
            x, y ,
            Object.assign({
                image: game.texture,
                region : "coin.png"
            }, settings)
        ]);

    },

    /**
     * collision handling
     */
    onCollision : function (/*response*/) {

        // do something when collide
        me.audio.play("cling", false);
        // give some score
        game.data.score += Constants.SCORES.COIN

        //avoid further collision and delete it
        this.body.setCollisionMask(me.collision.types.NO_OBJECT);

        me.game.world.removeChild(this);

        return false;
    }
});
Please note that the coin entity actually extends the CollectibleEntity (this provides it with a special collision type to the entity, so mellonjs knows that when the player moves it, it will call the collision handler). All you have to do is call its parent's constructor, and then when you pick it up, the sound will play on the onCollision method, add 1 to the global score, and finally Remove objects from the world.
finished product
Put all the content together, there is a game that can work normally. The game allows you to move in five different directions according to the words you enter.
It should look like this:

And because this tutorial is too long, you can Github View the complete code for the game on.
Wechat public account: the pioneer
Welcome to scan QR code and pay attention to the public number, and push you fresh front-end technical articles every day.

Welcome to other great articles in this column:
- Deep understanding of Shadow DOM v1
- Step by step to teach you how to use WebVR to realize virtual reality games
- 13 modern CSS frameworks to improve your development efficiency
- Get started bootstrap Vue
- How does the JavaScript engine work? Everything you need to know from call stack to Promise
- WebSocket practice: real time communication between Node and React
- 20 interview questions about Git
- In depth analysis of console.log of Node.js
- What is Node.js?
- Build an API server with Node.js in 30 minutes
- Object copy of Javascript
- Programmers can't earn 30K a month before they are 30 years old. Where to go
- 14 best JavaScript data visualization Libraries
- 8 top level VS Code extensions for the front end
- Node.js multithreading full guide
- Four schemes and implementation of transforming HTML into PDF