Preface
Some time ago, when I was doing project development, I encountered several small problems in Fragment management. I always felt that the encapsulated Fragment manager was not elegant at this stage. This has become the Navigation library that I am determined to learn from Jetpack, which was launched a long time ago. This library was born to be able to manage fragments more gracefully. When learning new knowledge, I prefer to write the knowledge points and difficulties I encounter on paper. But sometimes, due to the tight time, the things written on paper are not so detailed and specific. So I decided to summarize my knowledge in the way of blogging in the future, and I hope to help you who are reading this blog. Let's improve the knowledge system of Android!

Conditions of use
If you want to use the Navigation component in Android Studio, you must use Android Studio 3.3 or later.
Add dependency
To add Navigation support to your project, add the following dependencies to the build.gradle file of the application:
dependencies {
    //...
    implementation "androidx.navigation:navigation-fragment-ktx:2.2.1"
    implementation "androidx.navigation:navigation-ui-ktx:2.2.1"
}
How to use Navigation
Project demonstration

Three new Framgnet
Before configuring Navigation, we created three framgnets for testing. The code is as follows:
//First Fragment
class Page1Fragment : Fragment() {
    override fun onCreateView(inflater: LayoutInflater,container: ViewGroup?,savedInstanceState: Bundle?): View?
    {
        return inflater.inflate(R.layout.fragment_page_1, container, false)
    }
}
//The second Framgnet
class Page2Fragment : Fragment() {
    override fun onCreateView(inflater: LayoutInflater,container: ViewGroup?,savedInstanceState: Bundle?): View?
    {
        return inflater.inflate(R.layout.fragment_page_2, container, false)
    }
}
//Third Fragment
class Page3Fragment : Fragment() {
    override fun onCreateView(inflater: LayoutInflater,container: ViewGroup?,savedInstanceState: Bundle?): View?
    {
        return inflater.inflate(R.layout.fragment_page_3, container, false)
    }
}
Configuration navigation
- We need to create a new Navigator folder under the res folder.
- Create a navigation resource file under the navigation folder.
- We call it mobile_navigation.xml.
As shown in the figure below: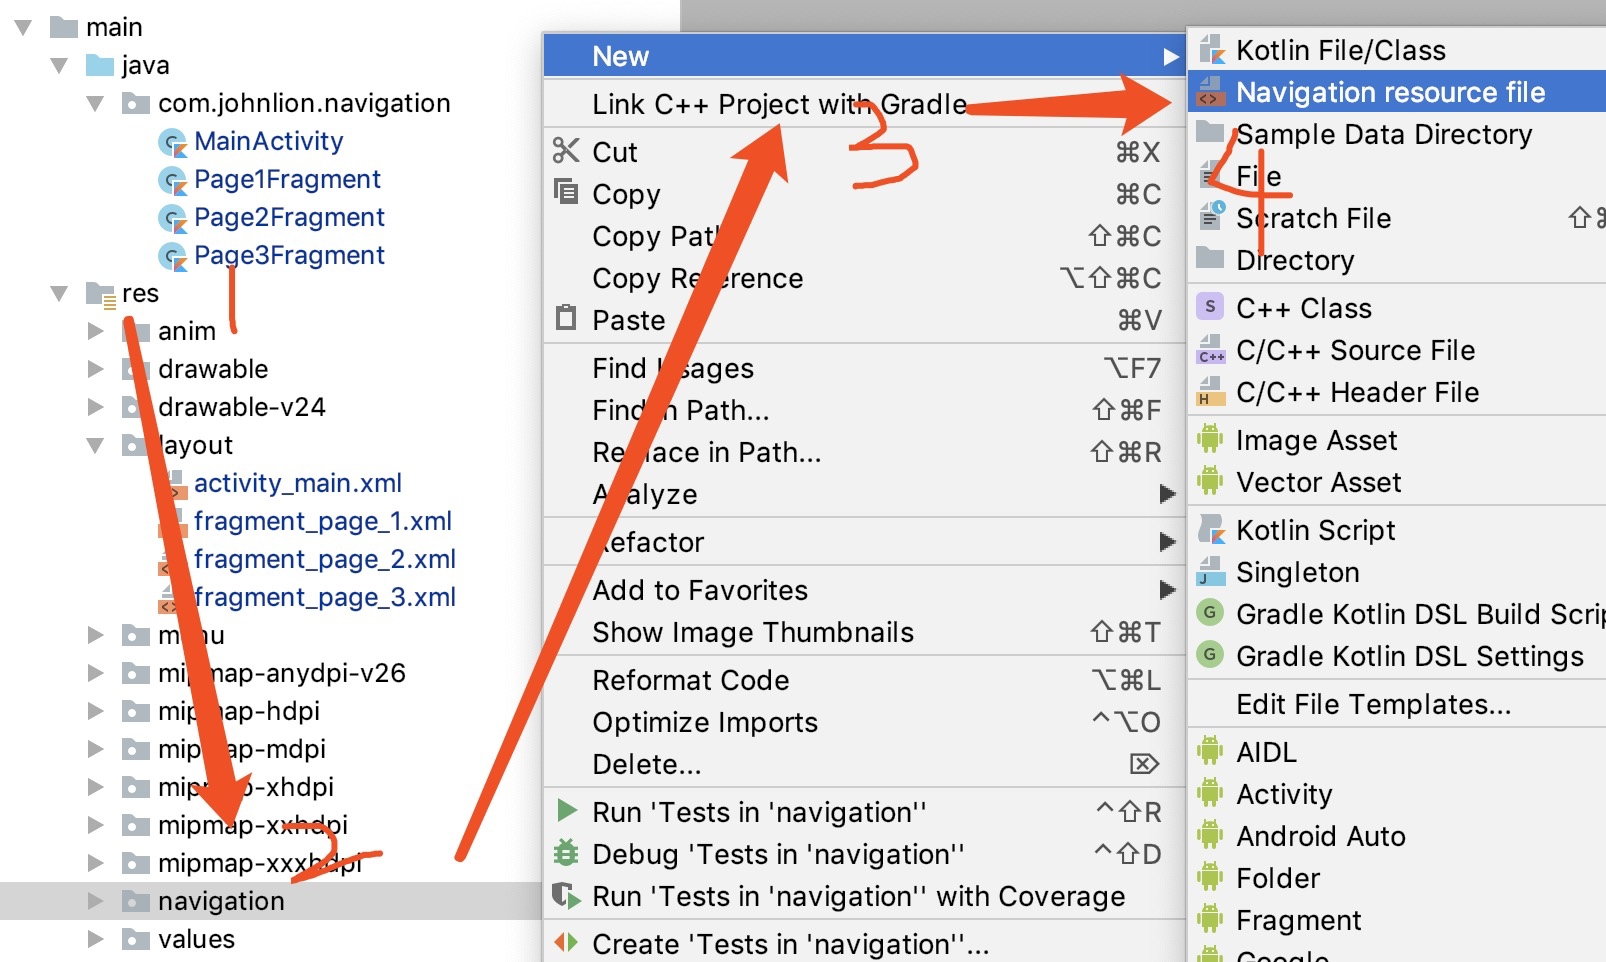
You can nest another < Navigation > tag in the < Navigation > tag, or you can create a new navigation xml file and introduce it through < include >.
Add the three fragments we just created to mobile_navigation.xml.
Under the < fragment > tag, there must be id, name, label and layout. These four attributes must be complete! The code is as follows:
<?xml version="1.0" encoding="utf-8"?>
<navigation xmlns:android="http://schemas.android.com/apk/res/android"
    xmlns:app="http://schemas.android.com/apk/res-auto"
    xmlns:tools="http://schemas.android.com/tools"
    android:id="@+id/mobile_navigation">

    <fragment
        android:id="@+id/fragment_page_1_id"
        android:name="com.johnlion.navigation.Page1Fragment"
        android:label="fragment_page_1_label"
        tools:layout="@layout/fragment_page_1" />

    <fragment
        android:id="@+id/fragment_page_2_id"
        android:name="com.johnlion.navigation.Page2Fragment"
        android:label="fragment_page_2_label"
        tools:layout="@layout/fragment_page_2" />

    <fragment
        android:id="@+id/fragment_page_3_id"
        android:name="com.johnlion.navigation.Page3Fragment"
        android:label="fragment_page_1_label"
        tools:layout="@layout/fragment_page_3" />

</navigation>
At this time, we have just added the mobile_navigation.xml of Fragment, the < Navigation > tag will give a red warning in the android studio compiler, because we did not add the NavHostFragment in the Activity layout file.
We open the Activity layout file and add a NavHostFragment to the layout file. The code is as follows:
<?xml version="1.0" encoding="utf-8"?>
<androidx.constraintlayout.widget.ConstraintLayout
    xmlns:android="http://schemas.android.com/apk/res/android"
    xmlns:app="http://schemas.android.com/apk/res-auto"
    xmlns:tools="http://schemas.android.com/tools"
    android:layout_width="match_parent"
    android:layout_height="match_parent"
    tools:context=".MainActivity">

    <fragment
        android:id="@+id/nav_host_fragment"
        android:name="androidx.navigation.fragment.NavHostFragment"
        android:layout_width="0dp"
        android:layout_height="0dp"
        app:defaultNavHost="true"
        app:layout_constraintBottom_toBottomOf="parent"
        app:layout_constraintLeft_toLeftOf="parent"
        app:layout_constraintRight_toRightOf="parent"
        app:layout_constraintTop_toTopOf="parent"
        app:navGraph="@navigation/mobile_navigation" />

</androidx.constraintlayout.widget.ConstraintLayout>
Please note the following:
When adding NavHostFragment, the compiler does not give an intelligent prompt for the file path, defaultNavHost and navGraph properties of NavHostFragment. Please do not panic, do not doubt whether there are these attributes or values, firmly and accurately knock it out or copy and paste it successfully!
- The android:name property contains the class name of the NavHost implementation.
- The app:navGraph property associates NavHostFragment with the navigation graph. The navigation map specifies all destinations that the user can navigate to in this NavHostFragment.
- The app:defaultNavHost="true" property ensures that your NavHostFragment intercepts the system return button. Note that there can only be one default NavHost. If there are multiple hosts in the same layout (for example, a two pane layout), be sure to specify only one default navhost.
Navhost Fragment is simply a navigation interface container, which is used to display a series of fragments in navigation.
After NavHostFragment is successfully added to the Activity layout file, the red warning of the navigation tag in mobile_navigation.xml disappears, instead of a yellow warning, because we did not add a "start destination" to the navigation tag! That is, we open the first page of the application. In the < Navigation > tab, add:
app:startDestination="@id/fragment_page_1_id"
In Navigation Edit, there will be a small house at the top of the Fragment as the starting destination. As shown in the figure below:

In this way, the Page1Fragment we created will become the first screen for us to open the application display.
After the start destination is configured, we need to configure its destination for each fragment. There are two ways to configure "destination". One is to drag the arrow of visual fragment to point to its "destination" in Navigation Edit; the other is to directly add the < action > tag to each fragment in xml and configure its "destination". The code is as follows:
<?xml version="1.0" encoding="utf-8"?>
<navigation xmlns:android="http://schemas.android.com/apk/res/android"
    xmlns:app="http://schemas.android.com/apk/res-auto"
    xmlns:tools="http://schemas.android.com/tools"
    android:id="@+id/mobile_navigation"
    app:startDestination="@id/fragment_page_1_id">

    <fragment
        android:id="@+id/fragment_page_1_id"
        android:name="com.johnlion.navigation.Page1Fragment"
        android:label="fragment_page_1_label"
        tools:layout="@layout/fragment_page_1">
        <action
            android:id="@+id/action_page_1_to_page_2"
            app:destination="@id/fragment_page_2_id" />
    </fragment>

    <fragment
        android:id="@+id/fragment_page_2_id"
        android:name="com.johnlion.navigation.Page2Fragment"
        android:label="fragment_page_2_label"
        tools:layout="@layout/fragment_page_2">
        <action
            android:id="@+id/action_page_2_to_page_3"
            app:destination="@id/fragment_page_3_id" />
        <action
            android:id="@+id/action_page_2_to_page_1"
            app:popUpTo="@id/fragment_page_1_id" />
    </fragment>

    <fragment
        android:id="@+id/fragment_page_3_id"
        android:name="com.johnlion.navigation.Page3Fragment"
        android:label="fragment_page_1_label"
        tools:layout="@layout/fragment_page_3">
        <action
            android:id="@+id/action_page_3_to_page_2"
            app:popUpTo="@id/fragment_page_2_id" />
    </fragment>

</navigation>
The application navigation diagram is as follows:

Achieve jump
Next, we configure the corresponding jump events for each Fragment. The code is as follows:
//First Fragment
class Page1Fragment : Fragment() {
    override fun onCreateView(inflater: LayoutInflater,container: ViewGroup?,savedInstanceState: Bundle?): View?
    {
        return inflater.inflate(R.layout.fragment_page_1, container, false)
    }
    override fun onViewCreated(view: View, savedInstanceState: Bundle?) {
        super.onViewCreated(view, savedInstanceState)
        btn_page1.setOnClickListener {
            Navigation.findNavController(it).navigate(R.id.action_page_1_to_page_2)
        }
    }
}
//Second Fragment
class Page2Fragment : Fragment() {
    override fun onCreateView(inflater: LayoutInflater,container: ViewGroup?,savedInstanceState: Bundle?): View?
    {
        return inflater.inflate(R.layout.fragment_page_2, container, false)
    }
    override fun onViewCreated(view: View, savedInstanceState: Bundle?) {
        super.onViewCreated(view, savedInstanceState)
        btn_page2_1.setOnClickListener {
            Navigation.findNavController(it).navigateUp()
        }
        btn_page2_2.setOnClickListener {
            Navigation.findNavController(it).navigate(R.id.action_page_2_to_page_3)
        }
    }
}
//Third Fragment
class Page3Fragment : Fragment() {
    override fun onCreateView(inflater: LayoutInflater,container: ViewGroup?,savedInstanceState: Bundle?): View?
    {
        return inflater.inflate(R.layout.fragment_page_3, container, false)
    }
    override fun onViewCreated(view: View, savedInstanceState: Bundle?) {
        super.onViewCreated(view, savedInstanceState)
        btn_page3.setOnClickListener {
            Navigation.findNavController(it).navigate(R.id.action_page_3_to_page_2)
        }
    }
}
From this, we can see that the API used for jump between fragments is:
- Navigation.findNavController(view).navigate(actionID).
- Navigation.findNavController(view).navigateUp().
Passing parameters with Bundle
The code is as follows:
btn_bundle.setOnClickListener {
            val bundle = Bundle()
            bundle.putString("key", "value")
            Navigation.findNavController(it).navigate(R.id.action_page_1_to_page_2, bundle)
        }
By creating a Bundle() object, put the key: value to be passed into the bundle, and then we pass the bundle in the navigation (...) method of, so that we can pass the parameters through the bundle.
Interface switching animation
We can add the transition effect of animation between destinations, so that the transition between Fragment and Fragment is not rigid. So let's try to do a right in left out animation.
First, we create the required XML file, create an anim folder under the res directory to store the XML file for implementing the animation, and then create two new animation resource files, named slide_in_right.xml and slide_out_left.xml. The code is as follows:
//slide_in_right.xml
<?xml version="1.0" encoding="utf-8"?>
<set xmlns:android="http://schemas.android.com/apk/res/android">
    <translate
        android:duration="@android:integer/config_mediumAnimTime"
        android:fromXDelta="100%"
        android:interpolator="@android:anim/accelerate_interpolator"
        android:toXDelta="0" />
</set>

//slide_out_left
<?xml version="1.0" encoding="utf-8"?>
<set xmlns:android="http://schemas.android.com/apk/res/android">
    <translate
        android:duration="@android:integer/config_mediumAnimTime"
        android:fromXDelta="0"
        android:interpolator="@android:anim/accelerate_interpolator"
        android:toXDelta="-100%"/>
</set>
After adding the animation file, we can configure the animation transition between Fragment and Fragment through two methods: one is under the < action > tab in the navigation, and the other is through the navOptions method in the code. The animation configuration code is as follows:
//Let's animate one Fragment to the second
//First: xml static configuration
    <action
        android:id="@+id/action_page_1_to_page_2"
        app:destination="@id/fragment_page_2_id"
        app:enterAnim="@anim/slide_in_right"
        app:exitAnim="@anim/slide_out_left" />

//Second: dynamic code configuration
    val option = navOptions {
        anim {
            enter = R.anim.slide_in_right
            exit = R.anim.slide_out_left
            }
    }
    btn_page1.setOnClickListener {
        Navigation.findNavController(it).navigate(R.id.action_page_1_to_page_2, null, option)
    }
To configure in the code, please note that the first parameter of navigate(...) is passed in actionID, and the second parameter is passed in bundle object. Since we haven't created a new bundle, we choose to pass in null, and the third parameter is navOptions.
In this way, the transition animation between our destination and destination is added~

So far, by running the preview, it's basically the same as the example
Using Safe Args to pass safe data
Official document original words:
The Navigation component has a Gradle plug-in called Safe Args, which can generate simple object and builder classes to browse and access any associated parameters in a type safe manner. We strongly recommend that you use Safe Args for Navigation and data transfer because it ensures type safety.
Configure the security plug-in first.
//Top build.gradle
    buildscript {
        repositories {
            //...
            google()
        }
        dependencies {
            //...
            def nav_version = "2.1.0"
            classpath "androidx.navigation:navigation-safe-args-gradle-plugin:$nav_version"
        }
    }
//Application or module level build.gradle
    //...
    apply plugin: 'com.android.application'
    apply plugin: "androidx.navigation.safeargs.kotlin"
    android{
        //...
        kotlinOptions {
            jvmTarget = JavaVersion.VERSION_1_8
        }
    }
After the security plug-in is added, it will automatically generate a class with Directions at the end. The name of this class is to add "Directions" after the name of the source destination, which contains the method of the original destination action.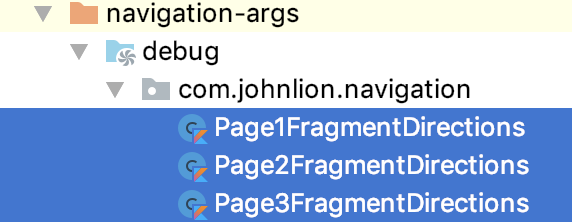
In the official document, the Navigation library supports the following parameter types:
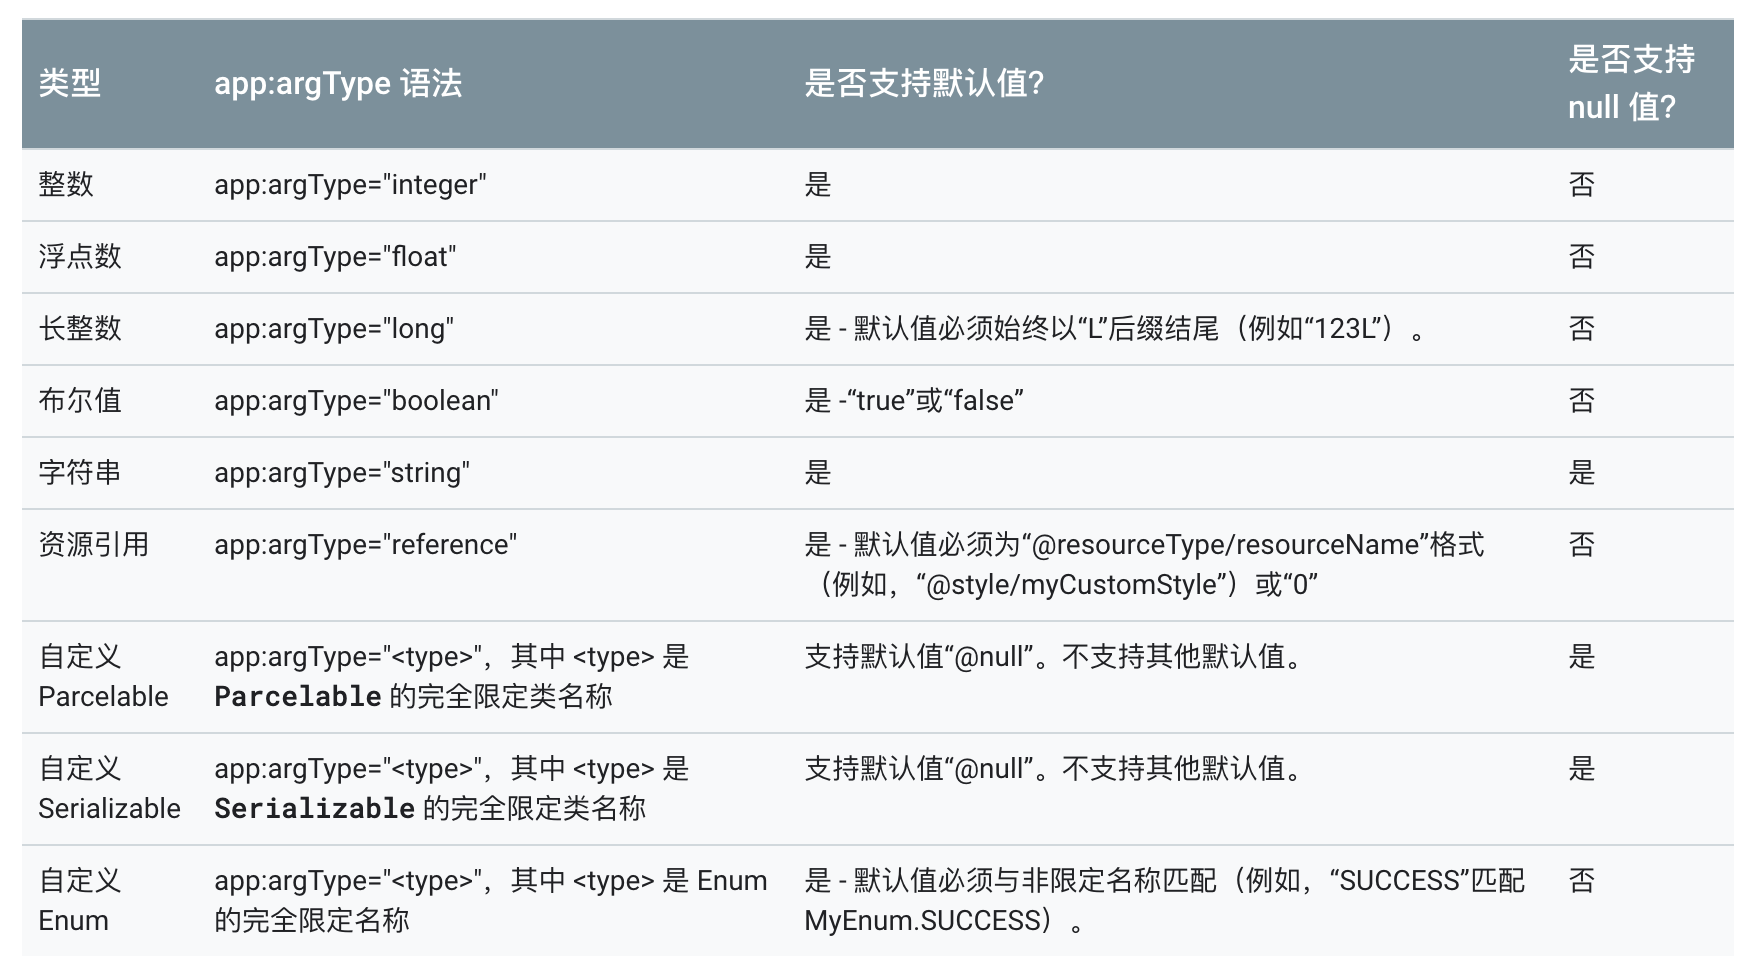
Let's try several types.
First of all, we need to add our custom parameters to mobile_navigation.xml. If we want to pass the parameters from Page1 to Page2, then we need to add the < argument > tag under the < fragment > tag of Page2 (receiving destination) and add three attributes: name, default value and type. The code is as follows:
<fragment
        android:id="@+id/fragment_page_2_id"
        android:name="com.johnlion.navigation.Page2Fragment"
        android:label="fragment_page_2_label"
        tools:layout="@layout/fragment_page_2">
        <!--
            ...
        -->
        <argument
            android:name="myInteger"
            android:defaultValue="0"
            app:argType="integer" />
        <argument
            android:name="myString"
            android:defaultValue="value"
            app:argType="string" />
        <argument
            android:name="myBoolean"
            android:defaultValue="false"
            app:argType="boolean" />
    </fragment>
After adding, we must reBuild the project. In this way, the security plug-in will generate a class with "Args" at the end for us. There is a method for us to receive the parameter destination, Page2, to get the parameter.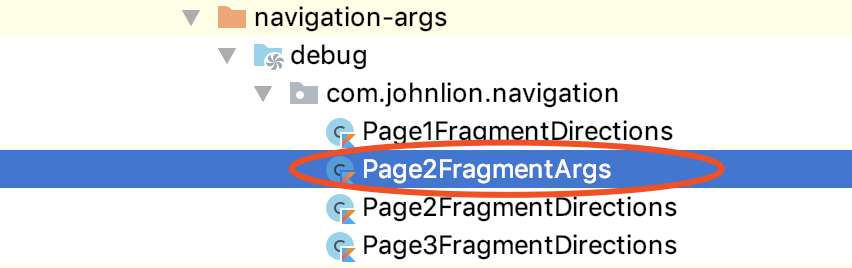
Moreover, in the Page1FragemntDirections class, the method used to implement action will be updated to pass three default parameters to Page2 to receive after rebuilds. The code is as follows:
class Page1FragmentDirections private constructor() {
    //...
    companion object {
        fun actionPage1ToPage2(
            myInteger: Int = 0,
            myString: String = "value",
            myBoolean: Boolean = false
        ): NavDirections = ActionPage1ToPage2(myInteger, myString, myBoolean)
    }
}
Next let's look at how to pass safe data through your code. The code is as follows:
//Page1fragment (passing security data)
class Page1Fragment : Fragment() {
    //...
    override fun onViewCreated(view: View, savedInstanceState: Bundle?) {
        super.onViewCreated(view, savedInstanceState)
        btn_page1.setOnClickListener {
            val action = Page1FragmentDirections.actionPage1ToPage2(1, "hello", true)
            Navigation.findNavController(it).navigate(action)
        }
}
//Page2fragment (receive security data)
class Page2Fragment : Fragment() {
    val args: Page2FragmentArgs by navArgs()
    override fun onViewCreated(view: View, savedInstanceState: Bundle?) {
        //...
        //The parameter name obtained is the name configured in < argument >
        Log.d("data", "integer:" + args.myInteger)
        Log.d("data", "string:" + args.myString)
        Log.d("data", "boolean:" + args.myBoolean)
    }
}
If we don't add anything in the actionPage1ToPage2(...) method, we will pass the android:defaultValue set in xml.
The parameter requirement for passing Page2 from Page1 cannot be null, but if the parameter type supports null value, you can use android:defaultValue="@null" and app:nullable="true" to declare the default value null in < argument >.
Generally speaking, safe args gives me the feeling that it is used to transfer data to avoid null pointer exception when receiving data!
Update interface components with NavigationUI
The navigation schema component contains the NavigationUI class. This class contains static methods for managing navigation using the top application bar, drawer navigation bar, and bottom navigation bar.
NavigationUI supports the following types of controls:
- Toolbar
- CollapsingToolbarLayout
- ActionBar
- DrawerLayout
- BottomNavigationView
We choose BottomNavigationView and Navigation to do an example:
- Create a new menu folder in the res directory.
- Create a menu resource file in the menu folder named: menu.xml.
- Add the following code to this file:
Note: the id in the item must be the same as the Fragment id you want to display in mobile_navigation.xml
<?xml version="1.0" encoding="utf-8"?>
<menu xmlns:android="http://schemas.android.com/apk/res/android">
    <item
        android:id="@+id/fragment_page_1_id"
        android:icon="@drawable/message"
        android:title="Page1" />
    <item
        android:id="@+id/fragment_page_2_id"
        android:icon="@drawable/search"
        android:title="Page2" />
    <item
        android:id="@+id/fragment_page_3_id"
        android:icon="@drawable/setting"
        android:title="Page3" />
</menu>
Then we add the BottomNavigationView control to the Activity layout file and associate the newly created menu file with it. The code is as follows:
<?xml version="1.0" encoding="utf-8"?>
<androidx.constraintlayout.widget.ConstraintLayout
    ...>
    <fragment
        android:id="@+id/nav_host_fragment"
        ... />
    <com.google.android.material.bottomnavigation.BottomNavigationView
        android:id="@+id/bottom_navigation"
        android:layout_width="match_parent"
        android:layout_height="wrap_content"
        app:layout_constraintBottom_toBottomOf="parent"
        app:menu="@menu/menu" />
</androidx.constraintlayout.widget.ConstraintLayout>
Finally, in the activity code, we need to take out the NavController first, and then pass it to the setupWithNavController(...) method in the BottomNavigationView, and the NavController is to take it from the NavHostFragment, so the first step is to find out the NavHostFragment first, then take out the NavController, and finally pass it to the setupWithNavController(...) method The Navigation and BottomNavigationView are bound. The code is as follows:
class MainActivity : AppCompatActivity() {
    override fun onCreate(savedInstanceState: Bundle?) {
        super.onCreate(savedInstanceState)
        setContentView(R.layout.activity_main)
        val host: NavHostFragment = supportFragmentManager
            .findFragmentById(R.id.nav_host_fragment) as NavHostFragment? ?: return
        val navController = host.navController
        setupBottomNavMenu(navController)
    }
    private fun setupBottomNavMenu(navController: NavController) {
        val bottomNav = findViewById<BottomNavigationView>(R.id.bottom_navigation)
        bottomNav?.setupWithNavController(navController)
    }
}
The demonstration effect is as follows:

But! Looking at the effect of the demonstration, we can see that we click the item on the bottom Navigation view in turn, page 2 - > Page3, then stay in Page3 and click the back button on the real machine to jump back to Page1 first, then click once to exit the application, and then try several times to find that as long as you do not stay in Page1 and click the back button, you will first return to Page1, and then click the back button to exit the application.
The effect we want is: just click the Fragment selected by the button navigation, return to the stack and leave only one Fragment, and then click the back button to exit the application.

Positioning issues:
- Enter the bottomnav?. setupwithnavcontroller method.
- Find that there is only one NavigationUI.setupWithNavController(this, navController) method in it, and enter the method.
- There is a listener implemented for BottomNavigationView. The setOnNavigationItemSelectedListener returns an onNavDestinationSelected(item, navController); this method is used to associate the MenuItem of Navigation and BottomNavigationView.
- The problem is that the source code of setPopUpTo(int destinationId, boolean inclusive) in this method is as follows:
 public static boolean onNavDestinationSelected(@NonNull MenuItem item,@NonNull NavController navController) {
        NavOptions.Builder builder = new NavOptions.Builder()
        //...
        if ((item.getOrder() & Menu.CATEGORY_SECONDARY) == 0) {
            builder.setPopUpTo(findStartDestination(navController.getGraph()).getId(), false);
        }
        NavOptions options = builder.build();
        try {
            navController.navigate(item.getItemId(), null, options);
            return true;
        } catch (IllegalArgumentException e) {
            return false;
        }
    }
When we click the Item of the buttomnaviationview, we will use the setPopUpTo(...) method. Because only the id of the "initial destination" is specified in the method, the destination above it will pop up every time, and include = "false". Thus, the "initial destination" will be reserved in the stack and not removed!
That's why: as long as you don't stay in Page1 and click the back button, you will return to Page1 first!

solve the problem:
- The problem comes from a method called onNavDestinationSelected(item, navController).
- In this method, only the navigation jump destination, the in and out animation and the start mode of the destination are realized.
- This method is in the setOnNavigationItemSelectedListener of the BottomNavigationView.
- This listener only implements one method of onNavDestinationSelected(item, navController)!
Then we can try to rewrite the setOnNavigationItemSelectedListener of the buttomnaviationview, and modify it to the effect we need according to the content in the onNavDestinationSelected(...) method!
The activity code is as follows:
class MainActivity : AppCompatActivity() {
    //...
    private fun setupBottomNavMenu(navController: NavController) {
        val bottomNav = findViewById<BottomNavigationView>(R.id.bottom_navigation)
        bottomNav?.setupWithNavController(navController)
        //Overwrite listening
        bottomNav.setOnNavigationItemSelectedListener { item: MenuItem ->
            val options = NavOptions.Builder()
                //Remove the specified destination from the put back stack
                .setPopUpTo(navController.currentDestination!!.id, true)
                .setLaunchSingleTop(true)
                .build()
            try {
                //TODO provide proper API instead of using Exceptions as Control-Flow.
                navController.navigate(item.itemId, null, options)
                true
            } catch (e: IllegalArgumentException) {
                false
            }
        }
    }
}
The demonstration effect is as follows:

Finish! The test results are consistent with the results we want!
Dynamic loading Navigation
Remove the app: navgraph = "@ navigation / mobile" from the Activity layout file first. The code is as follows:
<?xml version="1.0" encoding="utf-8"?>
<androidx.constraintlayout.widget.ConstraintLayout
    ...>
    <fragment
        android:id="@+id/nav_host_fragment"
        android:name="androidx.navigation.fragment.NavHostFragment"
        android:layout_width="0dp"
        android:layout_height="0dp"
        app:defaultNavHost="true"
        app:layout_constraintBottom_toBottomOf="parent"
        app:layout_constraintLeft_toLeftOf="parent"
        app:layout_constraintRight_toRightOf="parent"
        app:layout_constraintTop_toTopOf="parent"
    />
</androidx.constraintlayout.widget.ConstraintLayout>
Then, in the Activity file, the xml file of Navigation is sent to the inflater through the navController and set into the graph of the navController. The code is as follows:
class MainActivity : AppCompatActivity() {

    override fun onCreate(savedInstanceState: Bundle?) {
        super.onCreate(savedInstanceState)
        setContentView(R.layout.activity_main)
        val host: NavHostFragment = supportFragmentManager
            .findFragmentById(R.id.nav_host_fragment) as NavHostFragment? ?: return
        val navController = host.navController
        val navGraph: NavGraph =
            navController.navInflater.inflate(R.navigation.mobile_navigation)
        navController.graph = navGraph
        //...
    }
    //...
}
Test once, dynamic loading succeeded!
Empty return stack
If we plan to skip from Page2 to Page3, clear the return stack first, and then jump to Page3. At this time, there should be only one instance of Page3 in the return stack. When we click the "back" button, we can directly exit the application instead of putting Page2 back.
This is me. stackoverflow Found the Method.
The implementation code is as follows:
<?xml version="1.0" encoding="utf-8"?>
<navigation xmlns:android="http://schemas.android.com/apk/res/android"
    ...>
        <!--
            ...
        -->
    <fragment
        android:id="@+id/fragment_page_2_id"
        ...>
        <action
            android:id="@+id/action_page_2_to_page_3"
            app:destination="@id/fragment_page_3_id"
            app:launchSingleTop="true"
            app:popUpTo="@+id/mobile_navigation"
            app:popUpToInclusive="true" />
        <!--
            ...
        -->
    </fragment>
</navigation>
Add app:launchSingleTop="true", app:popUpTo= "@+id/mobile navigation" and app:popUpToInclusive="true" under the <action> tag of Page2 to Page3 to clear and put it back to the stack and then jump.
We try to implement it in the code based on these attributes added in xml. The code is as follows:
class Page2Fragment : Fragment() {
    //...
    override fun onViewCreated(view: View, savedInstanceState: Bundle?) {
        //...
        btn_page2_2.setOnClickListener {
            val navOption = NavOptions.Builder()
                //By setting three attributes in xml, you can clear the stack first and then jump
                .setLaunchSingleTop(true)
                .setPopUpTo(R.id.mobile_navigation, true)
                .build()
            Navigation.findNavController(it).navigate(R.id.action_page_2_to_page_3, null, navOption)
        }
    }
}
Finally, a global stack clearing function is implemented in Activity.
The code is very simple, take out NavController, and then call navController.popBackStack(R.id.mobile_navigation, true) method before calling navController.navigate(xxx) method to achieve clear stack. The code is as follows:
class MainActivity : AppCompatActivity() {
    override fun onCreate(savedInstanceState: Bundle?) {
        super.onCreate(savedInstanceState)
        setContentView(R.layout.activity_main)
        val host: NavHostFragment = supportFragmentManager
            .findFragmentById(R.id.nav_host_fragment) as NavHostFragment? ?: return
        val navController = host.navController
        setupBottomNavMenu(navController)
    }
    private fun clearStack(navController: NavController) {
        navController.popBackStack(R.id.mobile_navigation, true)
    }
    //...
}
Of course, the jump between "destinations" should be managed in the activity, which will not be explained in detail here.
Once you get the navController, you can call navController.navigate(xxx) to jump to "destination".
summary
The Navigation architecture component introduced by Android JetPack is used as the framework for building the internal application interface. Its focus is to make single Activity application the preferred architecture. This control handles the complexity of FragmentTransaction and provides a helper to associate Navigation with appropriate UI widgets, such as the drawer Navigation bar and bottom Navigation.


