Beginning with nonsense:
Just returned to work after the holidays, the company has no special assignments. Having nothing to do at leisure, I inexplicably began my first blog journey in my life. . I didn't want to write what I got on my blog.
First, I worry about my lack of experience and write about my fear of misleading my children.
Second, they can freely write what they understand on cloud notes, without spending a lot of time thinking about words and sentences, worrying about omissions.
Well, now that I have decided to write, I will share it carefully (so as not to make a mistake). I will consolidate what I have learned and help others unintentionally. Why not?
Returning to the topic, for react-native, I began to understand a little last year and tried to write some demo s, but because of my laziness, I did not try to continue to study the following, mainly because the company has not used it, I want to lazy. It happened that yesterday I saw the article about react-native which was pushed by Hongshen, so I decided to start to pick it up again. Let's start with my personal experience of integrating rn into android project yesterday. I hope you can give me your opinions.
The premise rn environment is configured (the following copy is a file in the project after react-native init)
Step one:
The second step:
Download the source file using NPM install-save react-native in the root directory of the android project, and eventually generate a node_modules folder (or copy the original, of course)
The third step:
Copy or download the. flow config file (download link) https://raw.githubusercontent.com/facebook/react-native/master/.flowconfig It's mainly for folw. It's used for static code checking. After downloading, it can be placed in the root directory of android.
The fourth step:
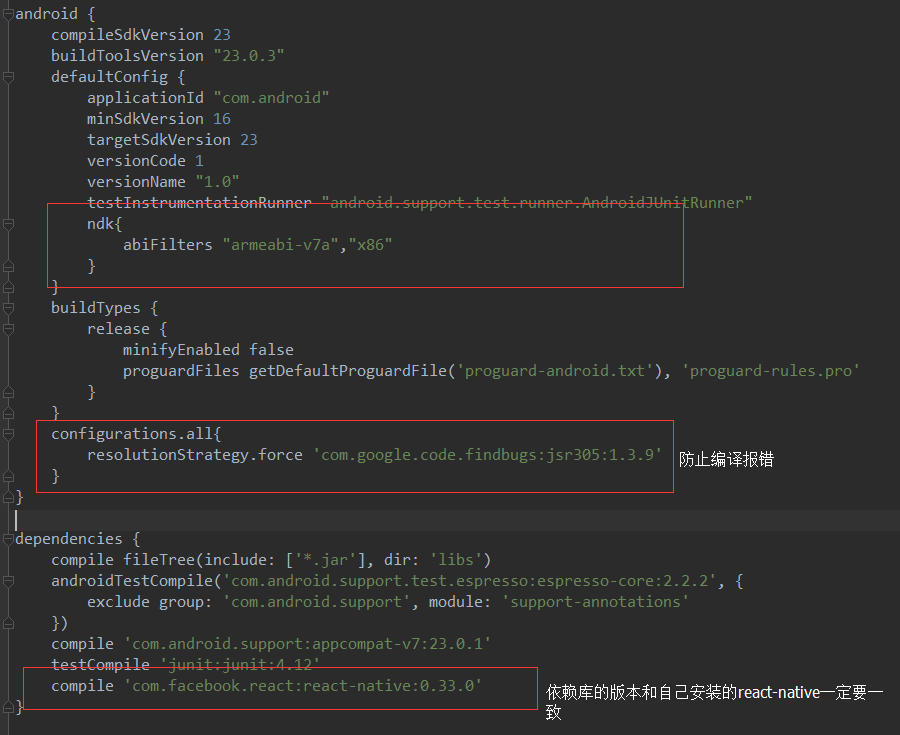
Configure the Android project react-native dependency library, and the version number must be the same as the local rn version.
The fifth step:
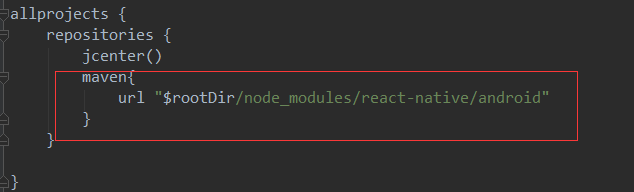
Configuring the react-native local code path, this step is to develop Android-studio to compile react-native using the code under the formulated path, roughly this meaning. This addition is modified in build.gradle under the root directory and placed under the allprojects node. The screenshots are as follows:
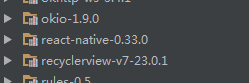 Synchronization works in External Libraries to see this matching version of the dependency package is a success.
The sixth step:
Modify the package.json file with the following information:
{
"name": "myapplication",
"version": "1.0.0",
"description": "",
"main": "index.js",
"scripts": {
"start": "node node_modules/react-native/local-cli/cli.js start",
"bundle-android":"react-native bundle --platform android --dev false --entry-file index.android.js --bundle-output MyApplication/app/src/main/assets/index.android.bundle --sourcemap-output MyApplication/app/src/main/assets/index.android.map --assets-dest MyApplication/app/src/main/res/"
},
"author": "0",
"license": "ISC",
"dependencies": {
"react": "^15.3.1",
"react-native": "^0.33.0"
}
}
name is lowercase for all project names, scripts must be configured according to their actual configuration or errors will be reported. dependencies should be modified according to their own version (preferably referring to native react-native package.json)
The seventh step:
Create native Android classes as loading RN containers, and then put index.android.js (the core code file of rn) files directly in the root directory of the Android project, or create and add the following code yourself:
import React,{Component} from 'react';
import {
  AppRegistry,
  StyleSheet,
  Text,
  View
} from 'react-native';

class HelloWorld extends React.Component {
  render() {
    return (
      <View style={styles.container}>
        <Text style={styles.hello}>This is React-Native assembly</Text>
      </View>
    )
  }
}
var styles = StyleSheet.create({
  container: {
    flex: 1,
    justifyContent: 'center',
    backgroundColor:'#ccc',
  },
  hello: {
    fontSize: 20,
    color: '#fff',
    textAlign: 'center',
    margin: 10,
  },
});
//Notice the reactdemo here.
AppRegistry.registerComponent('reactdemo', () => HelloWorld);
Create a ReactActivity
public class ReactActivity extends Activity implements DefaultHardwareBackBtnHandler {

    private ReactRootView mReactRootView;
    private ReactInstanceManager mReactInstanceManager;
    private LinearLayout ll;
    @Override
    protected void onCreate(Bundle savedInstanceState) {
        super.onCreate(savedInstanceState);

        setContentView(R.layout.myreactdemo);
        mReactRootView = new ReactRootView(this);
        mReactInstanceManager = ReactInstanceManager.builder()
                .setApplication(getApplication())
                .setBundleAssetName("index.android.bundle")
                .setJSMainModuleName("index.android")
                .addPackage(new MainReactPackage())
                .setUseDeveloperSupport(BuildConfig.DEBUG)
                .setInitialLifecycleState(LifecycleState.RESUMED)
                .build();
        //The name reactdemo should be the same as package.json and the project name in index.android.js in react-native, otherwise errors will occur.
        mReactRootView.startReactApplication(mReactInstanceManager, "reactdemo", null);
        ll= (LinearLayout) findViewById(R.id.ll);
        ll.addView(mReactRootView);

    }
    @Override
    public void invokeDefaultOnBackPressed() {
        super.onBackPressed();
    }

    @Override
    protected void onResume() {
        super.onResume();
        if (mReactInstanceManager != null) {
            mReactInstanceManager.onHostResume(this, this);
        }
    }

    @Override
    protected void onPause() {
        super.onPause();
        if (mReactInstanceManager != null) {
            mReactInstanceManager.onHostPause(MyReactActivity.this);
        }
    }

    @Override
    protected void onDestroy() {
        super.onDestroy();
        if (mReactInstanceManager != null) {
            mReactInstanceManager.onHostDestroy(MyReactActivity.this);
        }
    }

    @Override
    public void onBackPressed() {
        if (mReactInstanceManager != null) {
            mReactInstanceManager.onBackPressed();
        } else {
            super.onBackPressed();
        }
    }

    @Override
    public boolean onKeyUp(int keyCode, KeyEvent event) {
        if (keyCode == KeyEvent.KEYCODE_MENU && mReactInstanceManager != null) {
            mReactInstanceManager.showDevOptionsDialog();
            return true;
        }
        return super.onKeyUp(keyCode, event);
    }
} findViewById(R.id.tv).setOnClickListener(new View.OnClickListener() {
@Override
public void onClick(View view) {
if (Build.VERSION.SDK_INT>=23){
if (!Settings.canDrawOverlays(MainActivity.this)){
startActivity(new Intent(Settings.ACTION_MANAGE_OVERLAY_PERMISSION));
return;
}else{
}
}else{
//Draw UI code, where the system below Android 6.0 can be drawn directly.
}
startActivity(new Intent(MainActivity.this,ReactActivity.class));
}
});The eighth step:
Modify the AndroidManifest.xml configuration file as follows:
<uses-permission android:name="android.permission.INTERNET"/>
<uses-permission android:name="android.permission.SYSTEM_ALERT_WINDOW"/>
<uses-permission android:name="android.permission.SYSTEM_OVERLAY_WINDOW"/>
<activity android:name=".MyReactActivity"/>
<activity android:name="com.facebook.react.devsupport.DevSettingsActivity"/>The ninth step:
Open cmd and enter the directory of android. Run react-native start, start the service, and then run the Android project. You can see that part of the original Android control and part of the rn control.
Common mistakes
java.lang.IllegalAccessError: Method 'void android.support.v4.net.ConnectivityManagerCompat.()' is inaccessible to class 'com.f
acebook.react.modules.netinfo.NetInfoModule' (declaration of 'com.facebook.react.modules.netinfo.NetInfoModule' appears in
/data/app/package.name-2/base.apk)Solution: (foreigners also encountered such problems https://github.com/facebook/react-native/issues/6152#issuecomment-200759453). Modify the following file contents under the project:gitignore (add exclusions, node_modules/ and npm-debug.log to this file)app/build.gradle (change'com.android.support:appcompat-v7:24.2.1'to'com.android.support:appcompat-v7:23.0.1')gradle.properties (add at the end of the file, android.useDeprecatedNdk=true)
Red screen problem "Can not get BatchedBridge, make sure your bundle is packaged correctly"Solution: This problem is the only one encountered. Changing ip and port has not been solved. Later, "bundle-android" was added to "scripts" in package.json: "react-native bundle--platform android--dev false--entry-file index.android.js--bundle-output project name/app/src/main/assets/index.android.bundle--rcemap-output project name/app/src/main/assets/index.a. Ndroid.map--assets-dest project name/app/src/main/res/". If there is no assets directory, add it manually, but it does not work at runtime. If you execute it manually in cmd (remove the project name of the command if you execute the command in the root path), there will be several more files in the assets directory, which can solve this problem.
How to Embedd React Native into Native android Applications
React Native Integration into Existing Projects
