System environment: CentOS 7.5
192.168.204.128
192.168.204.129
192.168.204.130
JDK:1.8
1. Configure the JAVA environment, extract JDK 1.8 into / usr/local/jdk / directory, and add it to / etc/profile
JAVA_HOME=/usr/local/jdk/jdk1.8
CLASSPATH=.:$JAVA_HOME/lib/tools.jar:$JAVA_HOME/lib/dt.jar
PATH=$JAVA_HOME/bin:$HOME/bin:$HOME/.local/bin:$PATH

2. Create a folder and extract the downloaded Elasticsearch zip package into that directory
sudo mkdir /ES
take elasticsearch-7.1.1 Compressed package uploaded to ES directory
cd /ES
sudo tar -zxvf elasticsearch-7.1.1-linux-x86_64.tar.gz
Configure the elasticsearch.yum file
sudo vim /ES/elasticsearch-7.1.1/config/elasticsearch.yml
Here select 192.168.204.130 as Master, and add the following configuration at the bottom
---------------------------------------------------------------------------------------------------------------------------------------------------------------
http.cors.enabled: true
http.cors.allow-origin: "*"
bootstrap.memory_lock: false
bootstrap.system_call_filter: false
##Cluster name, each node is configured with the same name to form the correct cluster
cluster.name: wang
##Node name, each node is configured with a different name
node.name: master
##Whether or not the primary node
node.master: true
##Node name of cluster master node
cluster.initial_master_nodes: ["master"]
##Is it a data node?
node.data: true
##Maximum number of nodes per machine
node.max_local_storage_nodes: 1
##Storage Path of Index Data
path.data: /usr/local/es1
##Storage path of log file
path.logs: /usr/local/es1
##Binding ip address, external network can also access
network.host: 0.0.0.0
##Set the http port for external service, default 9200
http.port: 9200
## Setting tcp ports for interaction between nodes
transport.tcp.port: 9302
transport.tcp.compress: true
## Set up the initial list of nodes in the cluster, through which new nodes can be found automatically
discovery.zen.ping.unicast.hosts: ["192.168.204.128:9300", "192.168.204.129:9301","192.168.209.128:9302"]
discovery.zen.minimum_master_nodes: 1
##Prevent the main copy of the same shard from being on the same physical machine
cluster.routing.allocation.same_shard.host: true
------------------------------------------------------------------------------------------------------------------------------------------------------
192.168.204.128 Configuration
http.cors.enabled: true
http.cors.allow-origin: "*"
bootstrap.memory_lock: false
bootstrap.system_call_filter: false
##Cluster name, each node is configured with the same name to form the correct cluster
cluster.name: wang
##Node name, each node is configured with a different name
node.name: node1
##Whether or not the primary node
node.master: false
##Node name of cluster master node
cluster.initial_master_nodes: ["master"]
##Is it a data node?
node.data: true
##Maximum number of nodes per machine
node.max_local_storage_nodes: 1
##Storage Path of Index Data
path.data: /usr/local/es1
##Storage path of log file
path.logs: /usr/local/es1
##Binding ip address, external network can also access
network.host: 0.0.0.0
##Set the http port for external service, default 9200
http.port: 9200
## Set the tcp port for interaction between nodes, default is 9300
transport.tcp.port: 9300
transport.tcp.compress: true
## Set up the initial list of nodes in the cluster, through which new nodes can be found automatically
discovery.zen.ping.unicast.hosts: ["192.168.204.128:9300", "192.168.204.129:9301","192.168.209.130:9302"]
discovery.zen.minimum_master_nodes: 1
##Prevent the main copy of the same shard from being on the same physical machine
cluster.routing.allocation.same_shard.host: true
192.168.204.129 Configuration
http.cors.enabled: true
http.cors.allow-origin: "*"
bootstrap.memory_lock: false
bootstrap.system_call_filter: false
##Cluster name, each node is configured with the same name to form the correct cluster
cluster.name: wang
##Node name, each node is configured with a different name
node.name: node2
##Whether or not the primary node
node.master: false
##Node name of cluster master node
cluster.initial_master_nodes: ["master"]
##Is it a data node?
node.data: true
##Maximum number of nodes per machine
node.max_local_storage_nodes: 1
##Storage Path of Index Data
path.data: /usr/local/es1
##Storage path of log file
path.logs: /usr/local/es1
##Binding ip address, external network can also access
network.host: 0.0.0.0
##Set the http port for external service, default 9200
http.port: 9200
## Setting the tcp port for interaction between nodes
transport.tcp.port: 9301
transport.tcp.compress: true
## Set up the initial list of nodes in the cluster, through which new nodes can be found automatically
discovery.zen.ping.unicast.hosts: ["192.168.204.128:9300", "192.168.204.129:9301","192.168.204.130:9302"]
discovery.zen.minimum_master_nodes: 1
##Prevent the main copy of the same shard from being on the same physical machine
cluster.routing.allocation.same_shard.host: true
Because elastic search cannot be started with root users, users need to be created
sudo useradd wang
sudo passwd wang
Sudo chown-R username: username folder name (giving users ES folder permission)
Create a data catalog
mkdir /usr/local/es1
Sudo chown-R username: username es1
3. Switch the created user and start elastic search
su wang
sh /ES/elasticsearch-7.1.1/bin/elasticsearch
Found an error
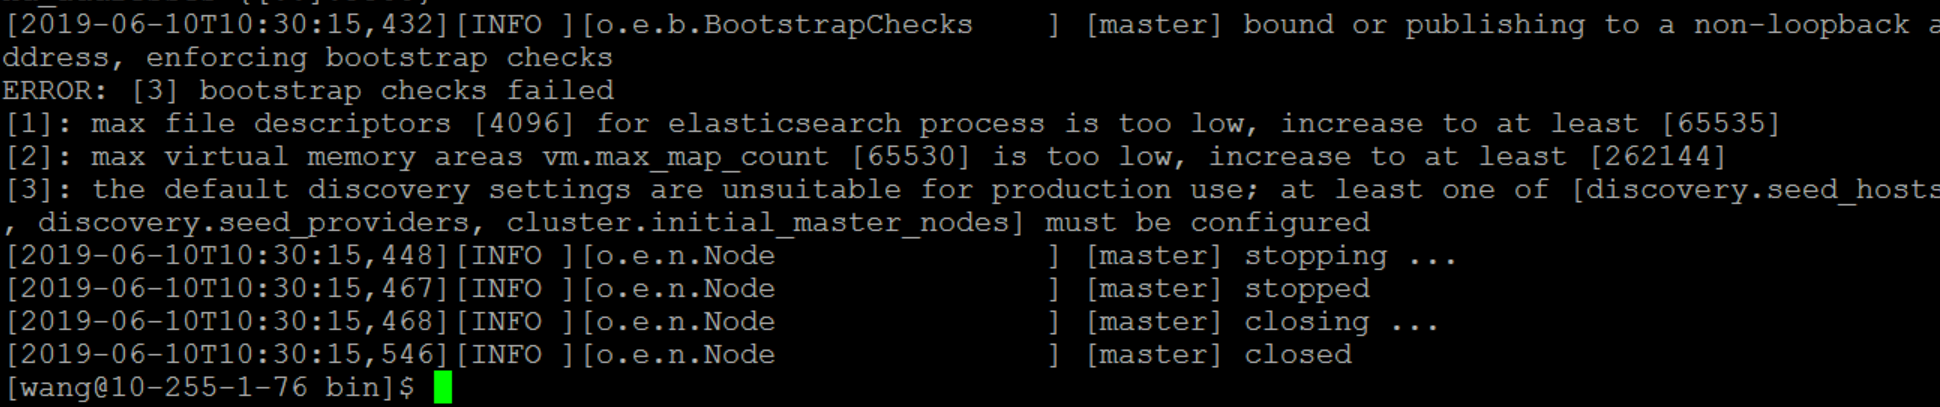
Switch to root and edit limits.conf to add something like this
vi /etc/security/limits.conf
Add the following:
* soft nofile 65536
* hard nofile 131072
* soft nproc 2048
* hard nproc 4096
Modify memory size
sudo sysctl -w vm.max_map_count=262144
Reboot
Sh/ES/elastic search-7.1.1/bin/elastic search-d (background start)
Enter Ip:9200 in the browser for viewing
5. Then we need to install the head plug-in. First, we need to install Nodejs.
sudo mkdir /node
sudo wget https://nodejs.org/dist/v10.16.0/node-v10.16.0-linux-x64.tar.xz
sudo tar -xvf node-v10.16.0-linux-x64.tar.xz
Rename
sudo mv node-v10.16.0-linux-x64 nodejs
Add Soft Connection
sudo ln -s /node/nodejs/bin/node /usr/local/bin
sudo ln -s /node/nodejs/bin/npm /usr/local/npm
Enter node-v to see if the configuration is successful

6. Download elastic search-head-master.zip
sudo mkdir/head
cd /head
wget https://github.com/mobz/elasticsearch-head/archive/master.zip
sudo unzip elasticsearch-head-master.zip
Configure npm Ali Source, otherwise the download will be very slow. Add the following configuration under / etc/profile
export PATH=$PATH:/node/nodejs/bin
alias cnpm="npm --registry=https://registryexport
--cache=$HOME/.npm/.cache/cnpm \
--disturl=https://npm.taobao.org/dist \
--userconfig=$HOME/.cnpmrc"
Enter the elastic search-head-master installation npm
cd elasticsearch-head-master
curl --silent --location https://rpm.nodesource.com/setup_10.x | bash -
yum install -y nodejs
npm config set registry https://registry.npm.taobao.org
sudo npm install
npm -v
After installation, under the elastic search-head-master directory, execute the following commands to start the head plug-in
sudo npm run start
Enter ip:9100 in browser
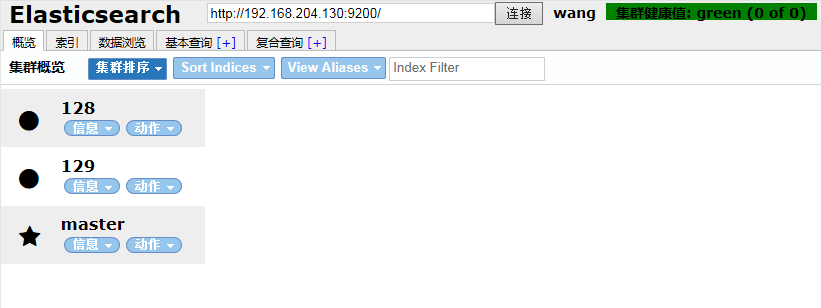
Remember to close the firewall, or you may not be able to form a cluster.
centos6 Close Firewall Command
service iptables stop
centos7 Close Firewall Command
systemctl stop firewalld.service
(Annex)
View process commands
ps -ef | grep elastic