With the increase of application complexity, we need to consider how to manage the state of the application, separate the business logic from the interface interaction, and discuss in detail with reference to the author's. 2016 - My Front-end Road: Tooling and Engineering . Vue provides us with a convenient mechanism for state management within components. The following example is a common way to get list data and then render it into the interface:
import axios from 'axios'
export default {
  name: 'projects',
  data: function () {
    return {
      projects: []
    }
  },
  methods: {
    loadProjects: function () {
      axios.get('/secured/projects').then((response) => {
        this.projects = response.data
      }, (err) => {
        console.log(err)
      })
    }
  },
  mounted: function () {
    this.loadProjects()
  }
}
</script>
In template, we can easily access the list of items and perform filtering, sorting and other operations, but if we need to show the same data information in another list, we have to reload the data if we continue to implement in this way. More troubling is how to synchronize the list information in two components if the user modifies a list data locally. Vue official recommendation Vuex A centralized state management tool similar to Redux helps solve this problem.
What is Vuex?
According to Vuex According to the description in the document, Vuex is a state management library for Vue.js application, which provides centralized state storage and operation for all components in the application and ensures that all States are modified in a predictable way.
The template definition of Store in Vuex is as follows:
import Vue from 'vue'
import Vuex from 'vuex'
Vue.use(Vuex)
const store = new Vuex.Store({
  state: {
  },
  actions: {
  },
  mutations: {
  },
  getters: {
  },
  modules: {

  }
})
export default store
The above code contains five key attributes when defining Vuex Store:
-
state: state defines the data structure of the application state, where the default initial state can also be set.
state: {
  projects: [],
  userProfile: {}
}
-
actions:Actions are descriptions that define the submission of trigger change information. Common examples include retrieving data from the server and calling store.commit() to change the state in the Store when the data is retrieved. Actions can be emitted using dispatch in components.
actions: {
    LOAD_PROJECT_LIST: function ({ commit }) {
      axios.get('/secured/projects').then((response) => {
        commit('SET_PROJECT_LIST', { list: response.data })
      }, (err) => {
        console.log(err)
      })
    }
  }
-
Mutations: Calling mutations is the only place where application status is allowed to be updated.
mutations: {
    SET_PROJECT_LIST: (state, { list }) => {
      state.projects = list
    }
  }
-
getters: Getters allow components to retrieve data from Stores. For example, we can filter the list of completed projects from the projectList in Stores:
getters: {
 completedProjects: state => {
  return state.projects.filter(project => project.completed).length
 }
}
-
modules: modules objects allow a single Store to be split into multiple Stores and stored in a single state tree. As application complexity increases, this decomposition can better organize the code and refer to more details. Here.
Example
After understanding the basic concepts of Vuex, we will create a real application to familiarize ourselves with the whole process. The application takes over from This blog After getting ready for the basic project, we need to introduce vuex into the project:
$ yarn add vuex
After this step is completed, we need to create a directory named store under the src directory to store the state management related code. First, we create index.js:
import Vue from 'vue'
import Vuex from 'vuex'
import axios from 'axios'
Vue.use(Vuex)
const store = new Vuex.Store({
  state: {

  },
  actions: {

  },
  mutations: {

  },
  getters: {

  }
})
export default store
Then in the main.js file we need to add the Store instance to the constructed Vue instance:
import store from './store'
/* eslint-disable no-new */
new Vue({
  template: `
  <div>
    <navbar />
    <section class="section">
      <div class="container is-fluid">
        <router-view></router-view>
      </div>
    </section>
  </div>
  `,
  router,
  store,
  components: {
    navbar
  }
}).$mount('#app')
Then we need to refine the definition of Store:
import Vue from 'vue'
import Vuex from 'vuex'
import axios from 'axios'
Vue.use(Vuex)
const store = new Vuex.Store({
  state: {
    projects: []
  },
  actions: {
    LOAD_PROJECT_LIST: function ({ commit }) {
      axios.get('/secured/projects').then((response) => {
        commit('SET_PROJECT_LIST', { list: response.data })
      }, (err) => {
        console.log(err)
      })
    }
  },
  mutations: {
    SET_PROJECT_LIST: (state, { list }) => {
      state.projects = list
    }
  },
  getters: {
    openProjects: state => {
      return state.projects.filter(project => !project.completed)
    }
  }
})
export default store
In this project, we move an array of items originally stored in components to Store, and make all state changes through Action instead of directly modifying them:
// /src/components/projectList.vue
<template lang="html">
  <div class="">
    <table class="table">
      <thead>
        <tr>
          <th>Project Name</th>
          <th>Assigned To</th>
          <th>Priority</th>
          <th>Completed</th>
        </tr>
      </thead>
      <tbody>
        <tr v-for="item in projects">
          <td>{{item.name}}</td>
          <td>{{item.assignedTo}}</td>
          <td>{{item.priority}}</td>
          <td><i v-if="item.completed" class="fa fa-check"></i></td>
        </tr>
      </tbody>
    </table>
  </div>
</template>
<script>
import { mapState } from 'vuex'
export default {
  name: 'projectList',
  computed: mapState([
    'projects'
  ])
}
</script>
<style lang="css">
</style>
This template is still very intuitive, we access the state information in Store through the computed object. It is worth mentioning that the mapState function here, which is abbreviated here, can directly access the Store object if complete:
computed: {
  projects () {
    return this.$store.state.projects
  }
}
mapState is an auxiliary function provided by Vuex to simplify data access. We look back at the project.vue container component, where we call this.$store.dispatch('LOAD_PROJECT_LIST) to trigger loading of the project list from the server:
<template lang="html">
  <div id="projects">
    <div class="columns">
      <div class="column is-half">
        <div class="notification">
          Project List
        </div>
        <project-list />
      </div>
    </div>
  </div>
</template>
<script>
import projectList from '../components/projectList'
export default {
  name: 'projects',
  components: {
    projectList
  },
  mounted: function () {
    this.$store.dispatch('LOAD_PROJECT_LIST')
  }
}
</script>
When we start the application, the Vuex state management container automatically renders the entire project list after data acquisition. Now we need to add new actions and Mutation s to create new projects:
// under actions:
ADD_NEW_PROJECT: function ({ commit }) {
  axios.post('/secured/projects').then((response) => {
    commit('ADD_PROJECT', { project: response.data })
  }, (err) => {
    console.log(err)
  })
}
// under mutations:
ADD_PROJECT: (state, { project }) => {
  state.projects.push(project)
}
Then we create a simple component addProject.vue for adding new projects:
<template lang="html">
  <button type="button" class="button" @click="addProject()">Add New Project</button>
</template>
<script>
export default {
  name: 'addProject',
  methods: {
    addProject () {
      this.$store.dispatch('ADD_NEW_PROJECT')
    }
  }
}
</script>
This component dispatches an Action to add a component, which we need to introduce into projects.vue:
<template lang="html">
  <div id="projects">
    <div class="columns">
      <div class="column is-half">
        <div class="notification">
          Project List
        </div>
        <project-list />
        <add-project />
      </div>
    </div>
  </div>
</template>
<script>
import projectList from '../components/projectList'
import addProject from '../components/addProject'
export default {
  name: 'projects',
  components: {
    projectList,
    addProject
  },
  mounted: function () {
    this.$store.dispatch('LOAD_PROJECT_LIST')
  }
}
</script>
When you run the application again, you will see the successful creation prompt returned by the server. Now we add another function, which allows the user to set a project to be completed. We now add a new component completeToggle.vue:
<template lang="html">
  <button type="button" class="button"  @click="toggle(item)">
    <i class="fa fa-undo" v-if="item.completed"></i>
    <i class="fa fa-check-circle" v-else></i>
  </button>
</template>
<script>
export default {
  name: 'completeToggle',
  props: ['item'],
  methods: {
    toggle (item) {
      this.$store.dispatch('TOGGLE_COMPLETED', { item: item })
    }
  }
}
</script>
This component displays a button for switching whether a project is completed or not. We pass in specific project information through Props and then trigger TOGLE_COMPLETED Action to update the server accordingly:
// actions
TOGGLE_COMPLETED: function ({ commit, state }, { item }) {
  axios.put('/secured/projects/' + item.id, item).then((response) => {
    commit('UPDATE_PROJECT', { item: response.data })
  }, (err) => {
    console.log(err)
  })
}
// mutations
UPDATE_PROJECT: (state, { item }) => {
  let idx = state.projects.map(p => p.id).indexOf(item.id)
  state.projects.splice(idx, 1, item)
}
UPDATE_PROJECT triggers the list of items to remove the corresponding items and add the data returned by the server back to the array:
app.put('/secured/projects/:id', function (req, res) {
  let project = data.filter(function (p) { return p.id == req.params.id })
  if (project.length > 0) {
    project[0].completed = !project[0].completed
    res.status(201).json(project[0])
  } else {
    res.sendStatus(404)
  }
})
The last step is to introduce the completeToggle component into the projectList component, and then add it to the list:
// new column in table
<td><complete-toggle :item="item" /></td>
// be sure import and add to the components object
On the Significance of Introducing State Management
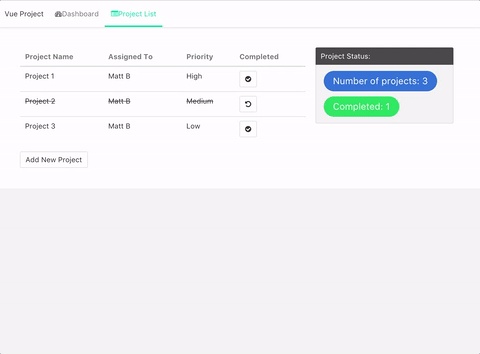
Now that our applications have the basic features, let's review the discussion at the beginning of this article again. Why do we need to take a lot of time to introduce external state management and divide business logic out of components? For example, here we need another component to display project statistics, such as the total number of projects or the number of completed projects. We definitely want to avoid duplicating data fetching from the server, instead of the so-called Single Source Of Truth. Here we add a new projectStatus.vue component to show project statistics:
<template lang="html">
  <article class="message">
    <div class="message-header">
      <p>Project Status:</p>
    </div>
    <div class="message-body">
      <div class="control">
        <span class="tag is-info">Number of projects: {{projectCount}}</span>
      </div>
      <div class="control">
        <span class="tag is-success">Completed: {{completedProjects}}</span>
      </div>
    </div>
  </article>
</template>
<script>
import { mapGetters } from 'vuex'
export default {
  name: 'projectStatus',
  computed: {
    ...mapGetters([
      'completedProjects',
      'projectCount'
    ])
  }
}
</script>
This component shows the total number of projects and the total number of completed projects. Above, we use the maoGetters auxiliary function to reduce redundant code:
getters: {
  completedProjects: state => {
    return state.projects.filter(project =>project.completed).length
  },
  projectCount: state => {
    return state.projects.length
  }
}
Finally, we add the statistics to the list of projects. The effect is shown as follows: