Detailed explanation of Vue Foundation

Keywords: Javascript Vue Vue.js Webpack

1.1 concept (based on vue2)

1.2 vue/cli scaffold

1.2.1 create project startup service

1.2.2 explanation of project directory (can be omitted)

1.2.3 custom configuration

1.2.4 eslint

1.2.5 single vue document

1.3 interpolation expression

1.4 MVVM design pattern

1.5 Vue instruction (key points, remember with a small book)

1.5.1 concept

1.5.2 v-bind

1.5.3 v-on binding events

1.5.4 v-on event modifiers

1.5.5 v-on key modifier  

1.5.6 v-model

1.5.7   v-text and v-html

1.5.8 v-show and v-if

1.5.9 v-for

1.1 concept (based on vue2)

         vue: vue is a progressive framework for JavaScript (progressive is gradually used to integrate more functions)

What's the difference between a library and a framework?

         A library is a collection of methods, while a framework is a set of syntax with its own rules

1.2 vue/cli scaffold

Why do you need this scaffold?

         As the name suggests, scaffolding is like a scaffold for building a house. What are you doing? It's convenient to build a structure. It's troublesome for webpack to configure its own environment. Download the @ vue/cli package and use the vue command to create a scaffolding project.

        @ vue/cli is a global module package officially provided by Vue (with Vue command). This package is used to create scaffold projects. Scaffold is a working platform set up to ensure the smooth progress of each construction process

Benefits:

  • Use out of the box and eat immediately after opening the bag
  • 0 configure webpack packaging tools (babel support, css and less support, development server support)

Global install command:

  • yarn global add @vue/cli 
  • npm install -g @vue/cli

Sometimes the installation is a little slow. It is recommended to use the image. When the card is almost finished, it will be really stuck. Download it again!!!

  1.2.1 create project startup service

Note: the project name cannot contain capital letters, Chinese and special symbols

To create a vue project:

1. Create project: Vue create vuecli demo (terminal operation)

vue and create are commands, vuecli demo is the folder name vue create vue demo

2. Select template:

  • Use the up and down arrows to select the vue version. If you make a mistake, ctrl+c will start again
  • Choose how to download all the dependent packages of the scaffold project (someone has downloaded other terminals, which needs to be selected here)

3. Press enter to wait for the project folder + file + download the necessary third-party package

4. Enter the scaffolding project and start the built-in hot update local server

  1. CD vuecil demo (you will also be prompted after creating it on the terminal)
  2. npm run serve or yarn serve

    Figure 1 above shows selecting the version and Figure 2 shows selecting the terminal  ;

        Hot update: the simple understanding is to load in real time, the code in the workspace changes, and the server re renders the page

5. Terminal hot update local server successful picture
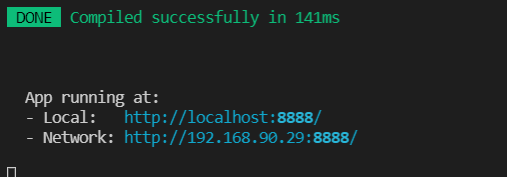
The port number here is 8888, and the default port number is 8080, which can be changed.  

  1.2.2 explanation of project directory (can be omitted)

  
  1. vuecil-demo // Project directory
  2. ├── node_modules // Third party packages on which the project depends
  3. ├── public // Static file directory
  4. ├── favicon. ico // Browser small icon
  5. └── index. html // Single page html file (it's what the web page is browsing)
  6. ├── src // Business folder
  7. ├── assets // Static resources
  8. └── logo. png // vue's logo image
  9. ├── components // Component directory
  10. └── HelloWorld. vue // Welcome page vue code file
  11. ├── App. vue // Root component of the entire application
  12. └── main. js // Entry js file
  13. ├── . gitignore // git submit ignore configuration
  14. ├── babel. config. js // babel configuration
  15. ├── package. json // Dependent package list
  16. ├── README. md // Project description
  17. └── yarn. lock // Package version locking and cache address

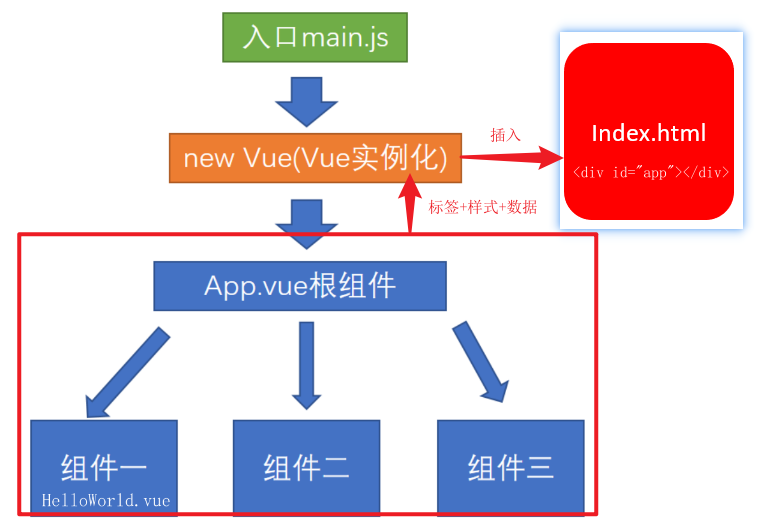
Important documents:

  • node_modules are downloaded third-party packages
  • public/index.html – the web page where the browser runs
  • src/main.js – webpack packaged entry file
  • src/App.vue – Vue project entry page
  • package.json – dependent package list file

  Project framework operation diagram
  1.2.3 custom configuration

Create vue.config.js at src side by side

  
  1. /* Overwrite configuration of webpack */
  2. module. exports = {
  3. devServer: { // Custom service configuration
  4. open: true, // Open browser automatically
  5. port: 3000 //Port number (modifiable)
  6. }
  7. }

 1.2.4 eslint

         eslint is a code checking tool (it is recommended that novices close this tool in the early stage, otherwise there will be a lot of errors. Why? Your code is not wrong, it thinks you have not followed its specifications, ah, it is wrong)

Turn off eslint (optional, personal needs)

  
  1. /* Overwrite configuration of webpack */
  2. module. exports = {
  3. devServer: { // Custom service configuration
  4. open: true, // Open browser automatically
  5. port: 3000 //Port number (modifiable)
  6. },
  7. lintOnSave: false //Close exlint check
  8. }

1.2.5 single vue document

          Benefits of a single vue file: independent scopes do not affect each other

 
  1. <!-- template must, There can only be one root label, Affects the label structure rendered to the page -->
  2. <template>
  3. <div>Welcome vue </div> <!--Other labels can only be placed div in-->
  4. </template>
  5. <!-- js relevant -->
  6. <script>
  7. export default {
  8. name: 'App'
  9. }
  10. </script>
  11. <!-- Of the current component style style, set up scoped, You can ensure that the style is only valid for the current page -->
  12. <style scoped>
  13. </style>

         vue files are packaged together with webpack, inserted into index.html, and then run in the browser (remember to clear the unwanted code, that is, vue publicity code, etc.)

  1.3 interpolation expression

         In the dom tag, the content is inserted directly, and the text interpolation is rendered explicitly.

 
  1. <template>
  2. <div>
  3. <h1>{{ msg }} </h1>
  4. <h2>{{ obj.name }} </h2>
  5. <h3>{{ obj.age > 17 ? 'adult' : 'under age' }} </h3> //You can't use an if statement, {}} there can only be expressions in it
  6. </div>
  7. </template>
  8. <script>
  9. export default {
  10. data( ) { // Function, fixed format, where vue data is defined
  11. return { // An object needs to be returned, and the key is equivalent to the variable name
  12. msg: "Introduction to Zhang San",
  13. obj: {
  14. name: "Junior three",
  15. age: 3
  16. }
  17. }
  18. }
  19. }
  20. </script>
  21. <style> </style>

Note: for the assignment of interpolation expression in dom, the variable of vue must be declared in data (here data is a function, not an object, but an object is returned)

1.4 MVVM design pattern

         Note: data driven view change and dom operation are done in the vue source code

         Benefits: greatly reduce DOM operations and improve development efficiency

MVVM, a software architecture pattern, determines the idea and level of writing code

  • M:   Model data model           (defined in data)     
  • V:     View view                   (html page)
  • VM: ViewModel view model   (vue.js source code)

  MVVM enables automatic two-way data synchronization through two-way data binding   You no longer need to manipulate the DOM

  • V (modify view) - > m (automatic data synchronization)
  • M (modify data) - > V (view auto synchronization)

be careful:  

  1. In vue, direct manual operation of DOM is not recommended!!!  
  2. In vue, through data-driven view, don't think about how to operate DOM, but how to operate data!! (change of thought)

1.5 Vue instruction (key points, remember with a small book)

1.5.1 concept

         Setting the value of vue variable for tag attribute is actually a special html tag attribute. The characteristics are as follows:   v-start.

         Summary: assigning the value of vue variable to dom attribute will affect the label display effect.

         Note: this in the event represents the component object behind export default (subordinate has the attribute return ed in data)

 1.5.2 v-bind

Syntax: v-bind: attribute name = "vue variable"

Abbreviation: attribute name = "vue variable"

  
  1. <!-- vue instructions-v-bind Attribute dynamic assignment -->
  2. <a v-bind:href="url">I am a label </a>
  3. <!--or-->
  4. <img :src="imgSrc">
  
  1. <template>
  2. <div>
  3. <a v-bind:href="hrefUrl">Baidu </a>
  4. <img :src="imgUrl">
  5. </div>
  6. </template>
  7. <script>
  8. export default {
  9. //data is followed by a function, not an object
  10. data( ){
  11. return {
  12. hrefUrl: 'http://www.baidu.com',
  13. imgUrl: 'https://webpack.docschina.org/site-logo.1fcab817090e78435061.svg'
  14. }
  15. }
  16. }
  17. </script>
  18. <style>
  19. </style>

1.5.3 v-on binding events

Syntax:

  1. v-on: event name = "a small amount of code to execute"
  2. v-on: event name = "function in methods"
  3. v-on: event name = "function (argument) in methods"  

Abbreviation: @ event name = "function in methods"

  
  1. <template>
  2. <div>
  3. <p>Quantity of goods:{{count}} </p>
  4. <button v-on:click="count=count+1">Add 1 </button>
  5. <button v-on:click="addFn">Add 1 </button>
  6. <button v-on:click="se_addFn(5)">Add 5 </button>
  7. <button @click="count=0">Clear </button>
  8. </div>
  9. </template>
  10. <script>
  11. export default {
  12. data( ){
  13. return {
  14. count: 1
  15. }
  16. },
  17. methods: { //methods and data are juxtaposed
  18. addFn( ){
  19. this. count++;
  20. },
  21. se_addFn( number){
  22. this. count += number;
  23. }
  24. },
  25. }
  26. </script>
  27. <style>
  28. </style>

         Common @ event names bind events to dom tags

Event object: get the event object in vue event handling function

         No parameters are passed. The parameters are directly received through formal parameters, and passed to the event handler through $event

  
  1. <template>
  2. <div>
  3. <a @click="one" href="http://Www.baidu.com "> stop Baidu </a>
  4. <hr>
  5. <!--If other parameters are passed in, the parameters to get the event object must be $event-->
  6. <a @click="two(10, $event)" href="http://Www.baidu.com "> stop going to Baidu </a>
  7. </div>
  8. </template>
  9. <script>
  10. export default {
  11. methods: {
  12. one( e){
  13. e. preventDefault()
  14. },
  15. two( num, e){
  16. e. preventDefault()
  17. }
  18. }
  19. }
  20. </script>

Here quietly Mimi tells you that there are actually abbreviations, ha ha ha!!!

  1.5.4 v-on event modifiers

After the event. Modifier Name: modifier extends additional functionality to the event

Syntax: @ event name. Modifier = "function in methods"

Modifier category:

  1. . stop - prevent event bubbling
  2. . prevent - block default behavior
  3. . once - the event handler is triggered only once during program operation
  
  1. <template>
  2. <div @click="fatherFn">
  3. <!-- vue The modifier is set for the event, After the event.Modifier names can be used for more functions -->
  4. <button @click.stop="btn">.stop Prevent event bubbling </button>
  5. <a href="http://Www.baidu.com "@ click. Prevent =" BTN ">. Prevent block default behavior </a>
  6. <button @click.once="btn">.once During program operation, The event handler is triggered only once </button>
  7. </div>
  8. </template>
  9. <script>
  10. export default {
  11. methods: {
  12. fatherFn( ){
  13. console. log( "father Triggered");
  14. },
  15. btn( ){
  16. console. log( 1);
  17. }
  18. }
  19. }
  20. </script>

1.5.5 v-on key modifier  

Add modifiers to keyboard events to enhance capabilities

Syntax: (not only the following)

  1. @keyup.enter  -   Monitor enter key
  2. @keyup.esc     -   Monitor return key
  
  1. <template>
  2. <div>
  3. <input type="text" @keydown.enter="enterFn">
  4. <hr>
  5. <input type="text" @keydown.esc="escFn">
  6. </div>
  7. </template>
  8. <script>
  9. export default {
  10. methods: {
  11. enterFn( ){
  12. console. log( "enter Press enter");
  13. },
  14. escFn( ){
  15. console. log( "esc Press the button");
  16. }
  17. }
  18. }
  19. </script>

built-in:  

  • .enter
  • .tab
  • . delete (capture delete and backspace keys)
  • .esc
  • .space
  • .up
  • .down
  • .left
  • .right

         Some keys (. esc and all direction keys) have different key values in IE9. To support IE9, these built-in aliases are preferred

  You can also customize the modifier alias through the global config.keyCodes object:

Vue.config.keyCodes.f1 = 112
  

New system modifier:  

  • .ctrl
  • .alt
  • .shift
  • .meta

If there are too many, I won't list them one by one. I don't know. Find Du Niang, ha ha!!!!

1.5.6 v-model

Bind the value attribute and vue data variable together in both directions

  • Data change - > view Auto sync
  • View change - > automatic data synchronization

Syntax: v-model="vue data variable"

Modifier syntax: v-model. Modifier = "vue data variable"

  • . number is converted to numeric type with parseFloat
  • . trim removes leading and trailing white space characters
  • . lazy is triggered on change instead of inupt
  
  1. <template>
  2. <div>
  3. <input type="text" placeholder="user name" value="" v-model.trim="user" />
  4. <input type="password" placeholder="password" value="" v-model.number.trim="password" />
  5. <hr>
  6. <textarea name="" cols="30" rows="10" v-model.lazy="motto"> </textarea>
  7. </div>
  8. </template>
  9. <script>
  10. export default {
  11. data( ) {
  12. return {
  13. user: '',
  14. password: '',
  15. motto: ""
  16. }
  17. },
  18. };
  19. </script>
  20. <style>
  21. </style>

1.5.7   v-text and v-html

Syntax:

  • v-text="vue data variable"    
  • v-html="vue data variable"
 
  1. <template>
  2. <div>
  3. <p v-text="str"> </p>
  4. <p v-html="str"> </p>
  5. </div>
  6. </template>
  7. <script>
  8. export default {
  9. data( ) {
  10. return {
  11. str: "<span>Text type</span>"
  12. }
  13. },
  14. }
  15. </script>
  16. <style>
  17. </style>

The operation results are as follows:

  1.5.8 v-show and v-if

Syntax:

  • v-show="vue variable"            
  • v-if="vue variable"  

Principle (difference):

  • display:none hidden for v-show   (frequently switched)
  • v-if   Remove directly from the DOM tree
  
  1. <template>
  2. <div>
  3. <p v-show="isOk1">Rush </p>
  4. <p v-if="isOk2">Rush </p>
  5. <div>
  6. <p v-if="age>18">ok </p>
  7. <p v-else>no </p>
  8. </div>
  9. </div>
  10. </template>
  11. <script>
  12. export default {
  13. data( ) {
  14. return {
  15. isOk1: false,
  16. isOk2: false,
  17. age: 19,
  18. }
  19. },
  20. }
  21. </script>
  22. <style>
  23. </style>

V-else uses: v-if to execute v-else if the judgment fails

1.5.9 v-for

Syntax:

  • v-for = "(value, index) in target structure"
  • v-for = "value in target structure"
 
  1. <template>
  2. <div>
  3. <li v-for="(value, index) in arr" :key="index">
  4. {{ value }}-------{{ index }}
  5. </li>
  6. <hr />
  7. <li v-for="(value, index) in tObj" :key="index">
  8. {{ index }}------{{ value }}
  9. </li>
  10. <hr />
  11. <li v-for="obj in stuArr" :key="obj.id">
  12. <span>{{ obj.name }} </span>
  13. <span>{{ obj.sex }} </span>
  14. <span>{{ obj.hobby }} </span>
  15. </li>
  16. </div>
  17. </template>
  18. <script>
  19. export default {
  20. data( ) {
  21. return {
  22. arr: [ "Xiao Ming", "Xiao Huanhuan", "chinese rhubarb"],
  23. stuArr: [
  24. {
  25. id: 1001,
  26. name: "Sun WuKong",
  27. sex: "male",
  28. hobby: "Eat peaches",
  29. },
  30. {
  31. id: 1002,
  32. name: "Zhu Bajie",
  33. sex: "male",
  34. hobby: "Back daughter-in-law",
  35. },
  36. ],
  37. tObj: {
  38. name: "Xiao Hei",
  39. age: 18,
  40. class: "1 stage",
  41. },
  42. count: 10,
  43. };
  44. },
  45. };
  46. </script>
  47. <style> </style>

         v-for has a fun, some will update the page, some will not:

  • Changing the array method will lead to v-for update and page update;
  • If the array is not changed, returning a new array will not cause v-for update. You can overwrite the array or this.$set()

Changed array method:

  • push()
  • pop()
  • shift()
  • unshift()
  • splice()
  • sort()
  • reverse()

Non change method:

  • slice()
  • filter()
  • concat() 

Posted by thinsoldier on Wed, 27 Oct 2021 05:53:46 -0700