Cold and hot backup of database
Data export is not exactly equal to data backup:
- Data export refers to the data in the database is conversed into SQL statements for export, so the export is SQL files. Often used to migrate data from one system to another in order to mask differences between systems
- Data backup refers to copying the relevant files stored in the database to save all the physical data of a database, so the data after backup is completely consistent with the original data in details and status. Unlike SQL, when some functions are used, different results may be generated at different points in time or on different systems
Cold and hot backup:
- Cold backup: when the database has been shut down, the backup of data is called cold backup
- Hot backup: in contrast to cold backup, a backup that takes place when the database node is not down is called hot backup
Limitations of cold backup:
- The database must be shut down for backup, which is unacceptable for some online databases
- The backed up data file takes up a lot of storage space and does not support incremental backup
- Cold backup is to back up all data files and log files, so a logical database and data table cannot be backed up separately
Online cold backup:
A single node database needs to be shut down during cold backup, which will have an impact on the business system. To solve this problem, we can build a cluster and then select a node in the cluster for cold backup. Because there are other nodes running in the cluster, you don't have to worry about affecting the running system. Start the node after the backup is completed, so as to solve the impact of downtime backup
Limitations of hot backup:
- During the hot backup, the database will be globally read locked. During the backup, the node can only read data and cannot write data
Online hot backup:
In the same way, in order to avoid global locking, we can select one node in the cluster to perform hot backup after the data synchronization relationship with other nodes is removed. Wait for the backup to complete before restoring the data synchronization relationship with other nodes in the cluster. In this way, during the backup process, only this node will add a read lock, and other nodes will not be affected
How to select online hot backup and online cold backup:
It is recommended to choose online hot backup, because hot backup can choose full backup or incremental backup. However, cold backup can only choose full backup. When the amount of data in the later period is large, cold backup takes a lot of time, and because full backup also needs to occupy more storage space. Hot backup only needs to select full backup at the first backup, and subsequent backup only needs incremental backup of new data. Therefore, the hot backup is better than the cold backup in the storage space occupation and backup time consumption
Practice online cold backup
Recognize data related files in MySQL
As mentioned in the previous section, data backup refers to copying the relevant files of data storage in the database. There are many of these files, so let's briefly understand the data related files in MySQL.
First, the files that make up the logical library. In MySQL, a logical library is actually composed of multiple files. Its structure is as follows: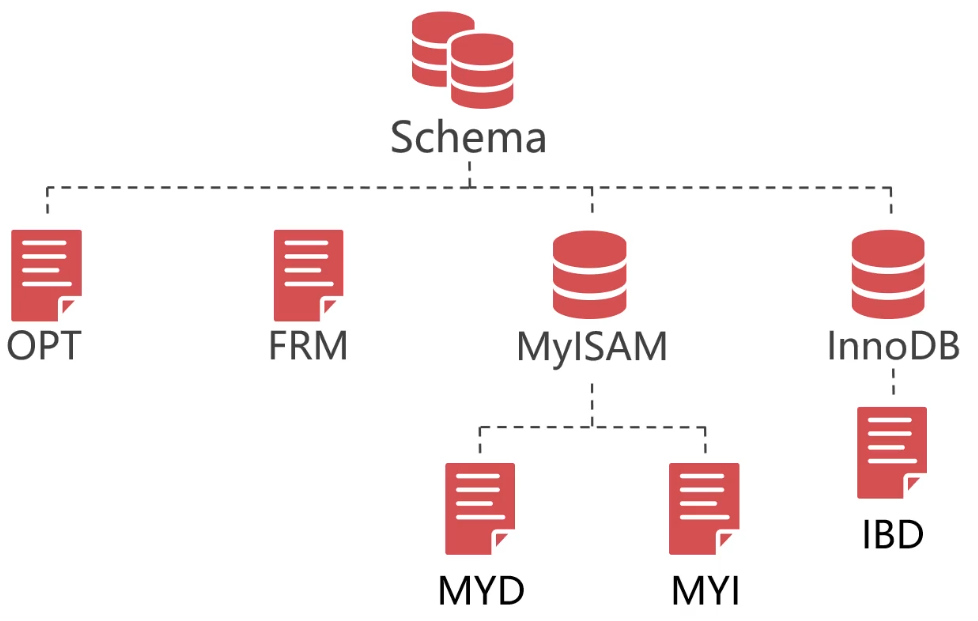
- OPT file: defines the collation of character set and character set, which is a text file
- FRM file: This is the definition file of the data table, which contains the structure information of the data table. No matter what storage engine the data table uses, the definition file of each data table must be FRM file
- ISL file: this file will only appear if a table partition is created. It stores the path of the table partition data file
- MyISAM:
- MYD file: data file of MyISAM
- MYI file: index file of MyISAM
- InnoDB:
- IBD file: index and data file of InnoDB, which is a binary file
FRM files are used in many cases. For example, before a database executes an SQL statement, it checks whether some fields used in the SQL statement are defined in the FRM file. Or when the database optimizes the SQL statement, the FRM file can be used to determine whether the fields in the where clause are primary key columns or index columns. Because FRM files are often used, they are binary files
Other files in MySQL:
- auto.cnf file: this file stores the UUID of MySQL instance, that is, server UUID, which can be used as the unique identification of nodes in the cluster
- grastate.dat file: this file saves PXC synchronization information
- gvwstate.dat file: this file stores information about other nodes in the PXC cluster
- . pem: this file stores the certificate and key information for encryption and decryption
- . sock: socket file, used to connect MySQL locally
- . err: error log file, in which all MySQL error information will be saved
- . pid: MySQL process id file
- IB buffer pool: InnoDB cache file
- IB? Logfile: InnoDB transaction log (redo)
- ibdata: InnoDB shared tablespace file
- logbin: log file (binlog)
- Index: log index file
- ibtmp: temporary tablespace file
Defragmentation of data files
What are the fragments in the data file:
- We all know that when we write data to a data table, the size of the data file increases. However, when deleting the data in the data file, the volume of the data file does not decrease, and the blank left after the data is deleted is called as fragment
There has always been a problem of data file fragmentation in MySQL. The reason why MySQL does not automatically defragment and reduce the volume of data files is that the defragmentation process locks tables. If every data is deleted and the table is locked for defragmentation, the reading and writing of the data table will be greatly affected. However, when MySQL writes new data, it will write it to the debris space first, so the debris space in the data file has no impact on daily operation.
But for the scenario of database backup, if there are a large number of fragments in the data file, there will be little meaningful data, and the volume of the data file is very large. This takes up a lot of storage space and transmission bandwidth for backup, so before backup, you need to organize the data file fragments to reduce the volume of the data file as much as possible.
The SQL statements for defragmenting data files in MySQL are as follows:
alter table ${table_name} engine=InnoDB;It should be noted that before executing the SQL, you should first turn off the binlog of the database node used for backup. Avoid that the SQL is recorded in binlog, which results in the situation that other nodes synchronize the SQL to lock the whole cluster after the node backup is completed and restored to the cluster. Therefore, you need to comment out the following two parameters in the MySQL configuration file and open it after the backup is completed:
# log_bin
# log_slave_updates
Cold backup
After introducing some previous knowledge, this section will gradually demonstrate how to practice online cold backup. I have prepared a three node system PXC cluster: 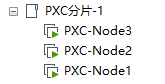
First select any node in the cluster as the backup node, and then stop the node:
[root@PXC-Node3 ~]# systemctl stop mysqld
Edit the configuration file and comment the binlog related parameters:
[root@PXC-Node3 ~]# vim /etc/percona-xtradb-cluster.conf.d/mysqld.cnf
[mysqld]
...

#log-bin
#log_slave_updates
Then note the PXC cluster related parameters:
[root@PXC-Node3 ~]# vim /etc/percona-xtradb-cluster.conf.d/wsrep.cnf
[mysqld]
#wsrep_provider=/usr/lib64/galera3/libgalera_smm.so
#wsrep_cluster_address=gcomm://192.168.190.132,192.168.190.133,192.168.190.134
#wsrep_slave_threads=8
#wsrep_log_conflicts
#wsrep_cluster_name=pxc-cluster
#wsrep_node_name=pxc-node-03
#pxc_strict_mode=DISABLED
#wsrep_sst_method=xtrabackup-v2
#wsrep_node_address=192.168.190.134
#wsrep_sst_auth=admin:Abc_123456
After modification, start MySQL service, and the node exits PXC cluster:
[root@PXC-Node3 ~]# systemctl start mysqld
The data file of this node has 1.1 G:
[root@PXC-Node3 ~]# du -h /var/lib/* |grep /var/lib/mysql$
1.1G    /var/lib/mysql
[root@PXC-Node3 ~]#
In this example, the test library is backed up, so before the backup, all the tables under the test library need to be defragmented. Because there are many tables, I have written a simple Java program to implement:
import com.mysql.jdbc.Driver;

import java.sql.*;
import java.util.ArrayList;

/**
 * Data table defragmentation
 *
 * @author 01
 * @date 2020-01-25
 **/
public class CleanFragments {

    public static void main(String[] args) throws SQLException {
        DriverManager.registerDriver(new Driver());
        String url = "jdbc:mysql://192.168.190.134:3306/test?useSSL=false";
        String username = "admin";
        String password = "Abc_123456";

        try (Connection connection = DriverManager.getConnection(url, username, password);
             PreparedStatement pst = connection.prepareStatement("show tables;")) {
            ResultSet resultSet = pst.executeQuery();

            ArrayList<String> tableNames = new ArrayList<>();
            while (resultSet.next()) {
                tableNames.add(resultSet.getString(1));
            }

            for (String tableName : tableNames) {
                if ("t_range_1".equals(tableName)) {
                    continue;
                }
                System.out.println("Arrangement " + tableName + " Table fragments...");
                pst.execute("alter table " + tableName + " engine=InnoDB;");
            }
        }
        System.out.println("Finishing...");
    }
}
After defragmentation, stop the MySQL service, because the cold backup needs to be stopped:
[root@PXC-Node3 ~]# systemctl stop mysqld
Then you can start the backup. In fact, the process of backup is very simple. No special technology is used. Just use the tar command to make a MySQL data directory into a compressed package. For example, the data directory here is / var/lib/mysql, so the executed command is as follows:
# First in / var/lib /
[root@PXC-Node3 ~]# cd /var/lib/
# Then package the data directory. mysql.tar.gz is the file name after package, which is stored in / home directory
[root@PXC-Node3 /var/lib]# tar -zcvf /home/mysql.tar.gz ./mysql
- Tips: the data directory is defined by the datadir parameter in the configuration file
If you create a table partition and map it to another directory, you also need to package the table partition. For example, I have two table partitions mapped to the directory / mnt/p0/data / and / mnt/p1/data / respectively, so the executed commands are as follows:
[root@PXC-Node3 ~]# cd /mnt/
[root@PXC-Node3 /mnt]# tar -zcvf /home/p0.tar.gz ./p0/data/
[root@PXC-Node3 /mnt]# tar -zcvf /home/p1.tar.gz ./p1/data/
After this backup, restore the configuration items noted in the configuration file, and then restart the node to rejoin the PXC cluster. There is nothing special to explain, so we won't show it here.
Cold reduction
After demonstrating how to cold back up, the next step is to demonstrate how to cold restore the backup files to other PXC nodes. First, transfer the backup file to the node to be restored. You can use the scp or rsync command to transfer files between Linux systems, as shown in the following example:
[root@PXC-Node3 /home]# scp ./mysql.tar.gz 192.168.190.133:/home/mysql.tar.gz
[root@PXC-Node3 /home]# scp ./p0.tar.gz 192.168.190.133:/home/p0.tar.gz
[root@PXC-Node3 /home]# scp ./p1.tar.gz 192.168.190.133:/home/p1.tar.gz
The backup files received by the restore node are as follows:
[root@PXC-Node2 ~]# cd /home/
[root@PXC-Node2 /home]# ls
mysql.tar.gz  p0.tar.gz  p1.tar.gz
[root@PXC-Node2 /home]#
In addition, some preparations need to be done, because the backup node has table partition, and the corresponding data directory is mapped. If the restore node does not exist, it needs to be created. Here is an example:
[root@PXC-Node2 ~]# mkdir /mnt/p0/
[root@PXC-Node2 ~]# mkdir /mnt/p1/
Because it is a cold restore, you need to stop the restore node as well as a cold backup:
[root@PXC-Node2 ~]# systemctl stop mysqld
Restore the MySQL data directory with the following commands:
# Back up the original data directory in case
[root@PXC-Node2 ~]# mv /var/lib/mysql /var/lib/mysql-backup
# Extract the compressed file to / var/lib /
[root@PXC-Node2 /home]# tar -zxvf mysql.tar.gz -C /var/lib/
Then restore the table partition data directory:
[root@PXC-Node2 /home]# tar -zxvf p0.tar.gz -C /mnt/
[root@PXC-Node2 /home]# tar -zxvf p1.tar.gz -C /mnt/
Delete the auto.cnf file. Otherwise, if uuid is repeated, the node cannot be started:
[root@PXC-Node2 ~]# rm -rf /var/lib/mysql/auto.cnf
If you use the first node in the PXC cluster as the backup node, you need to change the safe_to_bootstrap parameter in the grestate.dat file to 0, which is not required for normal nodes. Here is an example:
[root@PXC-Node2 ~]# vim /var/lib/mysql/grastate.dat
...

safe_to_bootstrap: 0
Even after the restore is completed, start the MySQL service:
[root@PXC-Node2 ~]# systemctl start mysqld
The rest is to verify whether the data of this node is restored correctly and whether it can synchronize with other nodes in the cluster. And finally clean up the old data directory that was backed up before:
[root@PXC-Node2 ~]# rm -rf /var/lib/mysql-backup
Practical use of cold backup:
- When the PXC cluster needs to add new nodes, cold backup can be used to back up the data of existing nodes, and then restore to the new PXC nodes. Let the new online nodes have initial data, avoid full data synchronization with the nodes in the cluster after online, and then trigger the flow control mechanism of PXC cluster, which will affect the performance of the whole cluster
Common hot backup solutions
After the above sections, now that we have learned about cold backup and cold restore, let's learn about hot backup from this section. Hot backup is not only the backup of data in the running state of database, but also the most difficult backup. There are two common hot backup schemes for PXC cluster, LVM and XtraBackup.
LVM scheme
Using LVM technology of Linux to realize hot backup, put MySQL data directory on LVM logical volume, and then backup the content of logical volume through LVM snapshot technology. The first backup is a full backup, and the subsequent backups are incremental backups. When restoring, restore the data directory in the snapshot to the data directory of ySQL.
LVM can not only back up MySQL, but also other databases such as MongoDB. However, it is also troublesome to use LVM as a hot backup scheme. Because it is necessary to manually create logical volumes, migrate data directories, create snapshots and lock databases, LVM is not a commonly used hot backup scheme.
XtraBackup solution
Because of LVM's troubles, people want to use professional tools to do hot backup, which is XtraBackup. XtraBackup is a free database hot backup tool open-source by Percona. It can backup InnoDB database and xtrabb storage engine database non blocking. Because XtraBackup does not interrupt the executing transaction during the backup process, and the transaction log records which data is written before the backup and which is written after the backup, there is no need to lock.
In addition, XtraBackup provides the compression function of backup data, which can save the disk space and network bandwidth occupied by backup files. However, XtraBackup will add a read lock when backing up a table using MyISAM as the storage engine, that is, the data in the table is readable but not writable, but this is not a problem. As mentioned before, online hot backup can be used to solve the problem of adding a read lock. Similarly, XtraBackup supports full backup and incremental backup. Because of the convenience of XtraBackup, XtraBackup is generally used for hot backup.
- For the installation and use of XtraBackup, please refer to another article: Database hot backup artifact - XtraBackup , we won't repeat it here.
Scheduled full hot backup
There are always full backup and incremental backup in the system at the same time to prevent one backup from having problems and another backup can be used. Because full hot backup is time-consuming, it will not be performed frequently and only once in a while. For example, it is executed at zero on the first day of every month or at zero on the first day of every week.
In Linux, there is a crontab command that can execute specified system instructions or shell scripts at fixed intervals. Using crontab command and shell script can realize scheduled full hot backup.
Here is an example. First, write a shell script to perform full hot backup as follows:
[root@PXC-Node3 ~]# vim full-backup.sh
#!/bin/bash

time=`date "+%Y-%m-%d %H:%M:%S"`
echo 'Perform full hot backup '$time

innobackupex --defaults-file=/etc/my.cnf --host=192.168.190.134 --user=admin --password=Abc_123456 --port=3306 --no-timestamp --stream=xbstream --encrypt=AES256 --encrypt-threads=10 --encrypt-chunk-size 512 --encrypt-key='1K!cNoq&RUfQsY&&LAczTjco' -> /home/backup/fullBackupOfMysql.xbstream
Give the script permission to execute:
[root@PXC-Node3 ~]# chmod -R 777 full-backup.sh
Finally, configure crontab. For example, I define to execute at one o'clock every week, so as to realize scheduled full hot backup:
[root@PXC-Node3 ~]# crontab -e
# Executed at one o'clock every week
0 0 * * 1 /root/full-backup.sh > /home/backup/full-backup.log 2>&1
XtraBackup full cold restore
After the introduction of full hot backup, let's take a look at how to restore the files backed up by XtraBackup. In restore, only cold restore can be used, and there is no hot restore. Because online restore operation is carried out for a running database, and users are reading and writing data at the same time, it may lead to data coverage and data confusion.
Therefore, restoring can only be a cold restore, which has been introduced before. However, using XtraBackup for cold restore will be simpler and not as troublesome as restoring a cold backup.
First, shut down the MySQL service:
[root@PXC-Node3 ~]# systemctl stop mysqld
Clear the data directory of data directory and table partition:
[root@PXC-Node3 ~]# rm -rf /var/lib/mysql/*
[root@PXC-Node3 ~]# rm -rf /mnt/p0/data/*
[root@PXC-Node3 ~]# rm -rf /mnt/p1/data/*
- Tips: as an example, rm is directly used to delete. If it is the actual running environment, it is recommended to rename the directory to be deleted by mv first, restore the backup file and verify that there is no problem, then rm is used to delete, so as to avoid the tragedy of deleting the library and running
The backup files are compressed, so you need to create a temporary directory to store the extracted files:
[root@PXC-Node3 ~]# mkdir /home/backup/temp
Then use the xbstream command to extract the backup file to the directory:
[root@PXC-Node3 ~]# xbstream -x < /home/backup/fullBackupOfMysql.xbstream -C /home/backup/temp/
Because the files are encrypted when they are backed up, the extracted files are encrypted, and the backup files need to be decrypted:
[root@PXC-Node3 ~]# innobackupex --decrypt=AES256 --encrypt-key='1K!cNoq\&RUfQsY\&\&LAczTjco' /home/backup/temp
- Tips: because & is a special character, you need to use \ escape
Because it is a hot backup, there may be some unfinished transactions in the transaction log, which requires rolling back the uncommitted transactions and synchronizing the committed transactions to the data file. Execute the following command:
[root@PXC-Node3 ~]# innobackupex --apply-log /home/backup/temp
After completing the above steps, you can restore the backup file using the following command:
[root@PXC-Node3 ~]# innobackupex --defaults-file=/etc/my.cnf --copy-back /home/backup/temp
Then give mysql user permission to the restored directory file:
[root@PXC-Node3 ~]# chown -R mysql:mysql /var/lib/mysql/*
So far, the cold restore is completed. Finally, start the MySQL service and verify whether the following data is normal:
[root@PXC-Node3 ~]# systemctl start mysqld
Incremental hot backup
Incremental hot backup must be based on full hot backup, so after understanding the full hot backup and full cold restore of XtraBackup, you can practice the incremental hot backup of XtraBackup.
matters needing attention:
- Whether full hot backup uses streaming compression or content encryption, it must be decompressed or decrypted into a normal backup directory
- Incremental hot backup can also use streaming compression and content encryption
In the previous demonstration of cold restore, the full backup files have been compressed and decrypted, so take / home/backup/temp / backup directory as an example, and the incremental hot backup command is as follows:
[root@PXC-Node3 ~]# innobackupex --defaults-file=/etc/my.cnf --host=192.168.190.134 --user=admin --password=Abc_123456 --port=3306 --incremental-basedir=/home/backup/temp/ --incremental /home/backup/increment
- --Incremental basedir: Specifies the directory where full backup files are stored, i.e. which full backup is used for incremental backup
- --Incremental: specify incremental backup
- /home/backup/increment: directory where incremental backup files are stored
The file directory for incremental backup is as follows:
[root@PXC-Node3 ~]# ls /home/backup/increment/
2020-01-26_17-02-21
[root@PXC-Node3 ~]# ls /home/backup/increment/2020-01-26_17-32-41/
backup-my.cnf   ibdata1.delta  mysql               sys   tpcc                    xtrabackup_checkpoints  xtrabackup_logfile
ib_buffer_pool  ibdata1.meta   performance_schema  test  xtrabackup_binlog_info  xtrabackup_info
[root@PXC-Node3 ~]#
You can use the du command to compare the directory sizes of full hot backup and incremental hot backup:
[root@PXC-Node3 ~]# du -sh /home/backup/temp/
1.6G    /home/backup/temp/   # Directory size for full hot backup
[root@PXC-Node3 ~]# du -sh /home/backup/increment/2020-01-26_17-32-41/
92M /home/backup/increment/2020-01-26_17-32-41/  # Directory size for incremental hot backup
[root@PXC-Node3 ~]#
After that, the second incremental backup can be based on the first incremental backup instead of full backup, as shown in the following example:
[root@PXC-Node3 ~]# innobackupex --defaults-file=/etc/my.cnf --user=admin --password=Abc_123456 --incremental-basedir=/home/backup/increment/2020-01-26_17-32-41/ --incremental /home/backup/increment
If you need to use streaming compression and content encryption for incremental backups, add the relevant parameters. Here is an example:
[root@PXC-Node3 ~]# innobackupex --defaults-file=/etc/my.cnf --user=admin --password=Abc_123456 --incremental-basedir=/home/backup/increment/2020-01-26_17-32-41/ --incremental --stream=xbstream --encrypt=AES256 --encrypt-threads=10 --encrypt-chunk-size 512 --encrypt-key='1K!cNoq&RUfQsY&&LAczTjco' ./ > /home/backup/increment
- Tips: the. / here means that all the contents of the incremental backup are written to the streaming compressed file, and the compressed file is stored in the / home/backup/increment directory
Regular incremental hot backup database of Java program
Generally, we will make incremental hot backup automatically as a scheduled task, so as to avoid manual fixed-point operation and save unnecessary workload. In full hot backup, the crontab command of Linux is used to realize the timing execution of shell script, and some mainstream programming languages also have the framework or class library to realize the timing task.
Take Java as an example. In the Java ecosystem, there are Quartz and Spring frameworks that can implement timed tasks, and also use Cron expression syntax. But Java's Cron expression can be accurate to seconds, which is different from Linux's Cron expression.
Because Quartz is a little more complex, Spring is the example for simplicity. First, create a Spring Boot project. The dependencies in pom.xml are as follows:
<dependencies>
    <dependency>
        <groupId>org.springframework.boot</groupId>
        <artifactId>spring-boot-starter</artifactId>
    </dependency>

    <dependency>
        <groupId>org.projectlombok</groupId>
        <artifactId>lombok</artifactId>
        <optional>true</optional>
    </dependency>
</dependencies>
Add @ EnableScheduling annotation on the boot class to enable scheduled scheduling:
@EnableScheduling
@SpringBootApplication
public class IncrementBackupApplication {
    ...
}
Create a file on Linux to record which directory to back up based on each incremental hot backup. For example, the first incremental hot backup is based on the directory of full hot backup, and the subsequent incremental hot backup is based on the directory of the last incremental hot backup:
[root@PXC-Node3 ~]# echo '/home/backup/temp/' > /home/backup/increment-backup.cnf
Then write a Java class to implement incremental hot backup on a regular basis:
package com.example.incrementbackup.task;

import lombok.extern.slf4j.Slf4j;
import org.springframework.scheduling.annotation.Scheduled;
import org.springframework.stereotype.Component;

import java.io.*;
import java.time.LocalDateTime;
import java.time.format.DateTimeFormatter;

/**
 * Incremental hot backup timing task
 *
 * @author 01
 * @date 2020-01-26
 **/
@Slf4j
@Component
public class IncrementBackupTask {

    /**
     * Perform an incremental hot backup every minute
     * Of course, the actual situation will not set such a short interval
     */
    @Scheduled(cron = "0 */1 * * * *")
    public void backup() {
        DateTimeFormatter formatter = DateTimeFormatter.ofPattern("yyyy-MM-dd_HH_mm_ss");
        String folderName = LocalDateTime.now().format(formatter);
        String configPath = "/home/backup/increment-backup.cnf";

        try (FileReader fileReader = new FileReader(configPath);
             BufferedReader bufferedReader = new BufferedReader(fileReader)) {

            String basedir = bufferedReader.readLine();
            String cmd = getCmd(basedir, folderName);
            log.info("Start incremental hot backup. Command executed:{}", cmd);
            // Execute incremental hot backup command
            Process process = Runtime.getRuntime().exec(cmd);
            // Wait for command execution to complete
            process.waitFor();

            try (FileWriter fileWriter = new FileWriter(configPath);
                 BufferedWriter bufferedWriter = new BufferedWriter(fileWriter)) {
                // Update basedir path used for next incremental backup
                bufferedWriter.write("/home/backup/increment/" + folderName);
                log.info("End of incremental hot backup");
            }
        } catch (IOException | InterruptedException e) {
            log.error("", e);
        }
    }

    /**
     * Assemble innobackupex command parameters
     */
    private String getCmd(String basedir, String folderName) {
        String cmd = "innobackupex --defaults-file=/etc/my.cnf " +
                "--user=admin --password=Abc_123456 " +
                "--incremental-basedir=%s --no-timestamp " +
                "--incremental /home/backup/increment/%s";

        return String.format(cmd, basedir, folderName);
    }
}
After the above code is written, use maven to print the project into a jar package, then upload the jar package to Linux, and execute it with the Java jar command. As follows:
[root@PXC-Node3 ~]# java -jar increment-backup-0.0.1-SNAPSHOT.jar
The log information output during execution is as follows: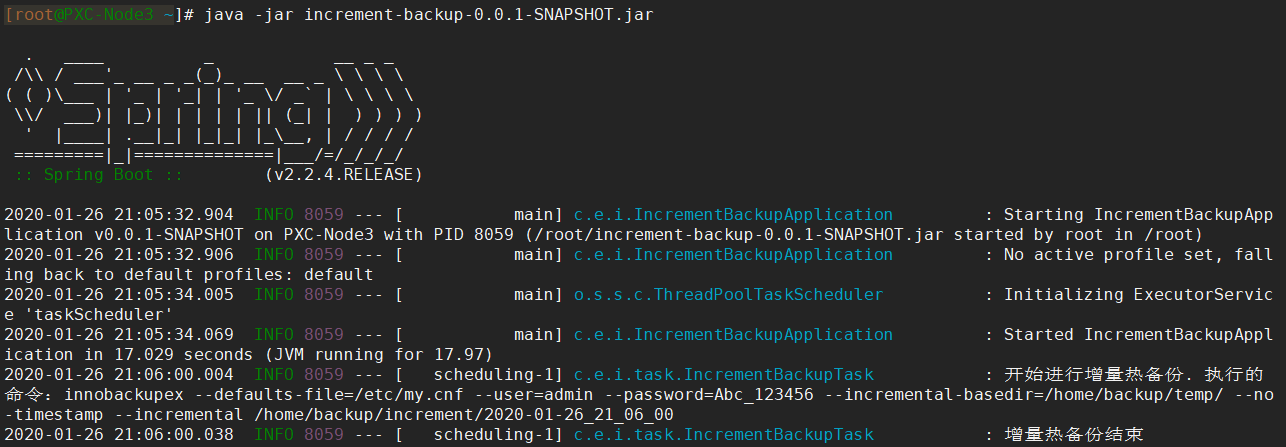
After the backup, you can see that the content of the increment-backup.cnf file has also been updated:
[root@PXC-Node3 ~]# cat /home/backup/increment-backup.cnf
/home/backup/increment/2020-01-26_21_06_00
[root@PXC-Node3 ~]#
The generated backup directory structure is also normal:
[root@PXC-Node3 ~]# ls /home/backup/increment/2020-01-26_21_12_00
backup-my.cnf   ibdata1.delta  mysql  sys  tpcc  xtrabackup_checkpoints  xtrabackup_logfile
ib_buffer_pool  ibdata1.meta   performance_schema  test  xtrabackup_binlog_info  xtrabackup_info
[root@PXC-Node3 ~]#
So far, we have implemented the timed incremental hot backup database using Java language. The reason why this paper introduces how to use programming language is that there may be some more complex or personalized requirements in actual enterprise applications, which can not be realized by using shell script alone. For example, it is required to send an email or SMS to inform relevant personnel after the backup is completed, or it is required to control the interval time of scheduled execution on the UI, etc. This kind of requirement can only be realized by using programming language to customize development.
Incremental cold reduction
After the above sections, we can know that incremental hot backup only backs up new data, and the volume of the generated backup directory is much smaller than that of full hot backup. How does XtraBackup restore the incremental backup data to the database? In fact, it is also very simple, that is to merge the incremental hot backup data with the full hot backup data, and then restore based on the combined backup data.
There can be many backup points for incremental hot backup, because except for the first incremental hot backup, the rest of the incremental hot backup is based on the last incremental hot backup. So you can choose any backup point to restore, but the processing steps of transaction log are different from full cold restore.
In the previous demonstration of full cold restore, there was a step to process transaction logs, and the same step was used for incremental cold restore, but there were some differences. As mentioned above, incremental hot backup can have multiple backup points, so when restoring a backup point, you need to process the transaction logs of the backup point and its previous backup points, otherwise data confusion will occur. As shown in the figure below, there are three backup points: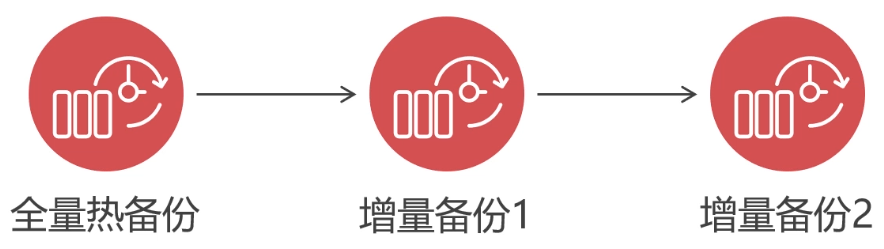
For example, when restoring incremental backup 1, you need to first process the transaction log of its previous backup point, that is, full hot backup in the figure. Then process the transaction log of the backup point "incremental backup 1", and merge the data of "incremental backup 1" into "full hot backup". In this way, it can ensure that the data after multiple backup points are merged into the full backup point is consistent. Finally, restore the data in the "full hot backup".
For example, to restore "incremental backup 2", you must first process "full hot backup", then "incremental backup 1", and then "incremental backup 2". After the transaction logs of the three backup points are processed in the order from the front to the back, you can merge the data of the backup point into the full backup, and finally restore the data in the "full hot backup". And so on for the rest
Next, perform incremental cold restore. Here are three backup point directories corresponding to the above figure:
/home/backup/temp/  # Full hot backup
/home/backup/increment/2020-01-27_10-11-24/  # Incremental backup 1
/home/backup/increment/2020-01-27_10-15-11/  # Incremental backup 2
Because it is a cold restore, you must first shut down the MySQL service:
[root@PXC-Node3 ~]# systemctl stop mysqld
In this example, the data of "incremental backup 2" is to be restored. According to the previous instructions, first process the transaction log of the full backup point, and execute the following command:
[root@PXC-Node3 ~]# innobackupex --apply-log --redo-only /home/backup/temp/
- --Redo only: Specifies that uncommitted transactions will not be rolled back, because uncommitted transactions of the next backup point may be committed in the transaction log. If it is rolled back, the next backup point cannot be submitted normally
Then process the transaction log of "incremental backup 1" and merge the data of "incremental backup 1" to the full backup point:
[root@PXC-Node3 ~]# innobackupex --apply-log --redo-only /home/backup/temp/ --incremental-dir=/home/backup/increment/2020-01-27_10-11-24/
- --Incremental dir: Specifies the incremental backup directory to be merged into the full backup
Then the transaction log of "incremental backup 2" is processed, and the data of "incremental backup 2" is merged into the full backup point. Since only the "incremental backup 2" backup point is restored, you do not need to add the -- redo only parameter, because there is no next backup point:
[root@PXC-Node3 ~]# innobackupex --apply-log /home/backup/temp/ --incremental-dir=/home/backup/increment/2020-01-27_10-15-11/
As with full cold restore, you also need to clear the data directory of data directory and table partition:
[root@PXC-Node3 ~]# rm -rf /var/lib/mysql/*
[root@PXC-Node3 ~]# rm -rf /mnt/p0/data/*
[root@PXC-Node3 ~]# rm -rf /mnt/p1/data/*
After completing the above steps, you can use the following command to restore the backup file:
[root@PXC-Node3 ~]# innobackupex --defaults-file=/etc/my.cnf --copy-back /home/backup/temp/ # Note that the directory of full backup point is specified here
Then give mysql user permission to the restored directory file:
[root@PXC-Node3 ~]# chown -R mysql:mysql /var/lib/mysql/*
[root@PXC-Node3 ~]# chown -R mysql:mysql /mnt/p0/data/*
[root@PXC-Node3 ~]# chown -R mysql:mysql /mnt/p1/data/*
So far, the restore is completed. Finally, start the MySQL service and verify whether the following data is normal:
[root@PXC-Node3 ~]# systemctl start mysqld