In order to understand the running status of the server in real time and solve the problems in time, it is a good choice to use monitoring software, while zabbix monitoring system stands out among many monitoring software.
Zabbix is an enterprise-level open source monitoring software based on web interface. The Zabbix server needs LAMP or LNMP environment to provide distributed system monitoring and network monitoring functions. It has the functions of host performance monitoring, network equipment performance monitoring, database performance monitoring, various police reporting modes, detailed report forms and charts drawing, etc. Monitoring objects can be Linux or Windows servers, routers, switches and other network devices, through SNMP, zabbix Agent, PING, port monitoring and other methods to provide remote network servers such as monitoring, data collection and other functions.
1. zabbix Monitoring Architecture:
In the production environment, zabbix is divided into three architectures according to external factors such as network environment, monitoring scale, etc. as follows: server-client (direct connection), master-node-client (Node architecture), server-proxy-client (proxy architecture). The following figure shows: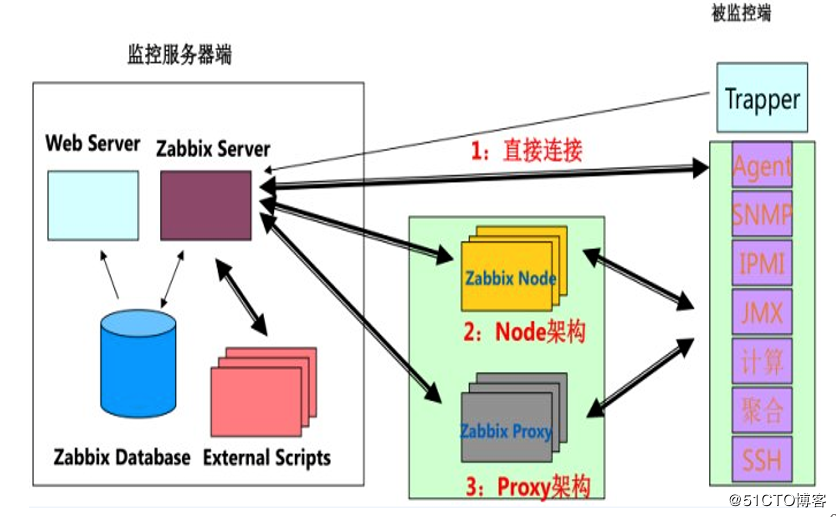
1. server-client architecture:
server-client architecture is the simplest architecture of zabbix. Without any agent between the monitor and the monitored computer, it can interact data directly between the zabbix server (monitoring server) and the zabbix agent (agent: deployed on the monitored end for data collection), which is suitable for the monitoring environment with relatively simple network and fewer devices.
2. master-node-client architecture:
master-node-client architecture is the most complex monitoring architecture of zabbix, which is suitable for large-scale environments with many devices and across networks. Each node is also a server side, under which proxy can be used, or directly connected to the client. Node has its own configuration file and database. All it has to do is synchronize configuration information and monitoring data to master. When the master is down, node can guarantee the integrity of the architecture.
3. server-proxy-client architecture:
Proxy is a bridge between server and client. proxy itself has no front end, and it does not store data itself. It only temporarily stores the data sent by agent d, and then submits it to server. This architecture is often compared with master-node-client architecture, which is generally applicable to the monitoring of medium-sized network architecture across computer rooms and networks.
2. Build Zabbix monitoring server:
Two configurations of server-client architecture:
1. Configure the local yum warehouse and install it (the server does not need to connect to the Internet);
2. Make the Internet a yum warehouse directly and install it. This is the way that the official documents of zabbix are installed.
zabbix4.2 Configuration Documents: https://www.zabbix.com/documentation/4.2/manual/it_services
Installation of zabbix Server Method 1: Build zabbix 3.4 using local yum
Preparation:
1. Download the yum source for zabbix:
https://pan.baidu.com/s/1O5hJ0O2OcKpeBOlzDfcGQQ
Extraction code: buqc
zabbix client software package, including Windows and Linux client programs, as well as the fonts required for web pages
https://pan.baidu.com/s/1UC9lrc0QDUdGEO5NVa1kQQ
Extraction code: vprm
2. Configuration of firewall release flow. For convenience, it is closed directly here.
The environment is as follows: (I'm sorry here, because of the special circumstances, the experimental environment is different, of course, only IP has changed, if you want to do with it, pay attention to it.)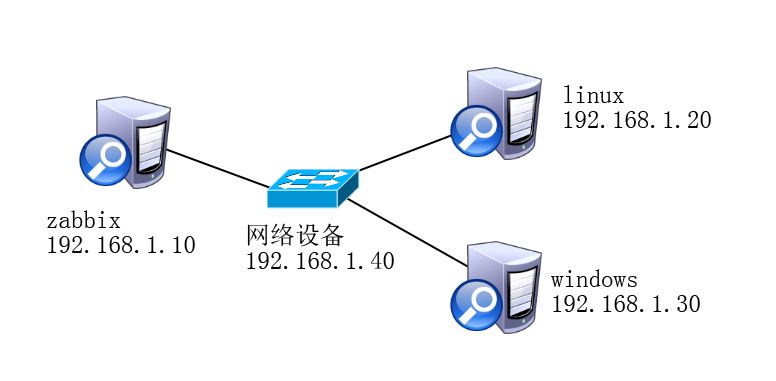
Start building the zabbix server:
[root@zabbix /]# vim /etc/yum.repos.d/a.repo        # Write yum local warehouse
[zabbix]
baseurl=file:///media
gpgcheck=0
[root@zabbix /]# mount /dev/sr0 /media/       # Mount zabbix yum source to local machine
[root@zabbix /]# yum -y install mariadb-server mariadb     # Because zabbix needs a LAMP or LNMP environment, installing a MySQL, also called mariadb, I believe you guys know what it means.
[root@zabbix /]# yum -y install zabbix-server-mysql zabbix-web-mysql zabbix-agent           # There are many dependency packages when installing zabbix, including httpd and php related packages, so installing ZABBIX directly is enough without installing httpd and php separately.
[root@zabbix /]# mysql -u root -p
Enter password:        # Input password
MariaDB [(none)]> create database zabbix character set utf8 collate utf8_bin;            # Create a database of zabbix, specified as utf-8
Query OK, 1 row affected (0.00 sec)
MariaDB [(none)]> grant all privileges on zabbix.* to zabbix@localhost identified by '123123';           # Create zabbix users and give ownership
Query OK, 0 rows affected (0.00 sec)
MariaDB [(none)]> exit
Bye
[root@zabbix /]# zcat /usr/share/doc/zabbix-server-mysql-3.4.1/create.sql.gz | mysql -uzabbix -p zabbix
Enter password:       # Enter the password of the zabbix user
# Import database SQL scripts into zabbix database
[root@zabbix /]# cp /etc/zabbix/zabbix_server.conf /etc/zabbix/zabbix_server.conf.bak       # Back up a master configuration file to avoid errors
[root@zabbix /]# vim /etc/zabbix/zabbix_server.conf    # Modify the following items
..............    // Omit part of content
DBHost=localhost
DBName=zabbix
DBUser=zabbix
DBPassword=123123
To edit the configuration file of zabbix agent, you must specify the IP address of zabbix server and configure it on each host where the agent is installed. Here you specify the IP address of the zabbix server. Now it's on the same server, so you can leave it unchanged:
[root@zabbix /]# cp /etc/zabbix/zabbix_agentd.conf /etc/zabbix/zabbix_agentd.conf.bak
[root@zabbix /]# vim /etc/zabbix/zabbix_agentd.conf
Server=127.0.0.1           // The client passively waits for the specified server to query the data
ServerActive=127.0.0.1      // Client actively submits data to specified server
Hostname=linux-server001     // Modify host name, configuration specification
Configure the zabbix web interface:
[root@zabbix /]# vim /etc/httpd/conf.d/zabbix.conf       # Setting the time zone is consistent with the current system time zone
.....................              // Ellipsis part
       php_value date.timezone Asia/Shanghai
[root@zabbix /]# systemctl start zabbix-server           # Startup service
[root@zabbix /]# systemctl enable zabbix-server          #Boot from boot
[root@zabbix /]# systemctl start zabbix-agent
[root@zabbix /]# systemctl enable zabbix-agent
[root@zabbix /]# systemctl start httpd
# Start related services to make configuration effective
After installing zabbix, when the display language is Chinese, Chinese scrambling may occur, mainly due to font problems. If you want to solve the problem, you need to download the appropriate font and upload it to the ZABBIX server.
[root@zabbix media]# cp simkai.ttf /usr/share/zabbix/fonts/      # Copy font files to the font library of zabbix
[root@zabbix media]# ls /usr/share/zabbix/fonts/
graphfont.ttf  simkai.ttf
[root@zabbix media]# vim /usr/share/zabbix/include/defines.inc.php    # Modify the font file specified in the PHP interface
....................           // Omit part of content
define('ZBX_GRAPH_FONT_NAME',           'simkai'); // font file name
Configure zabbix with a browser: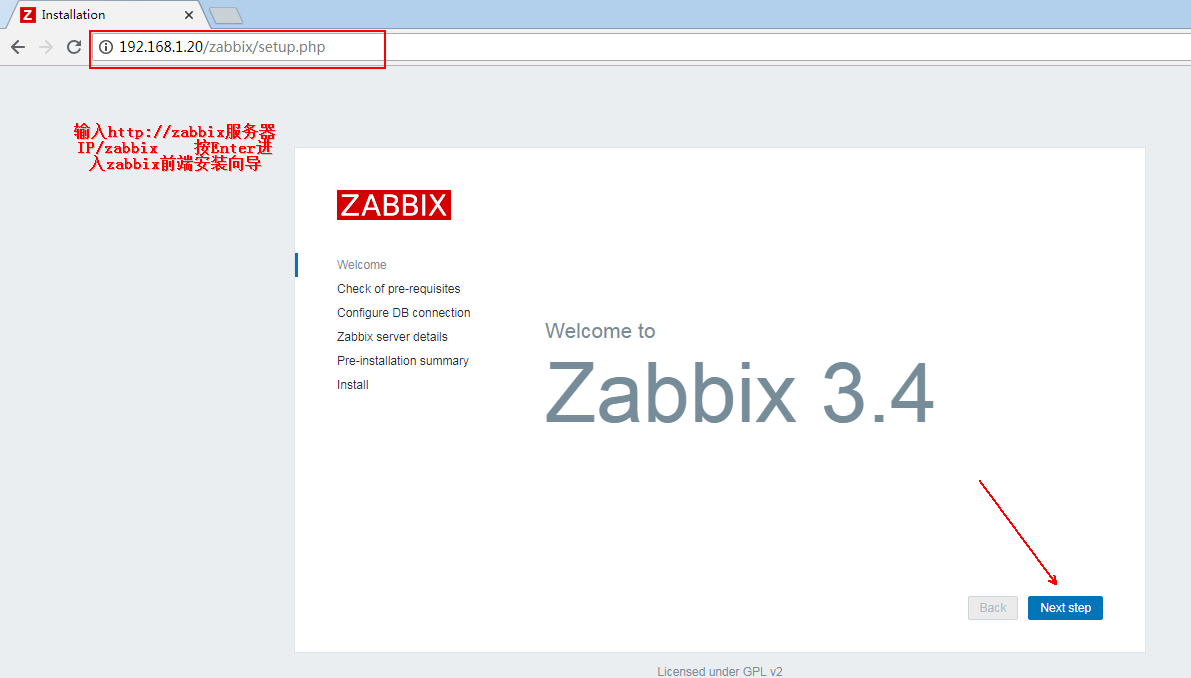

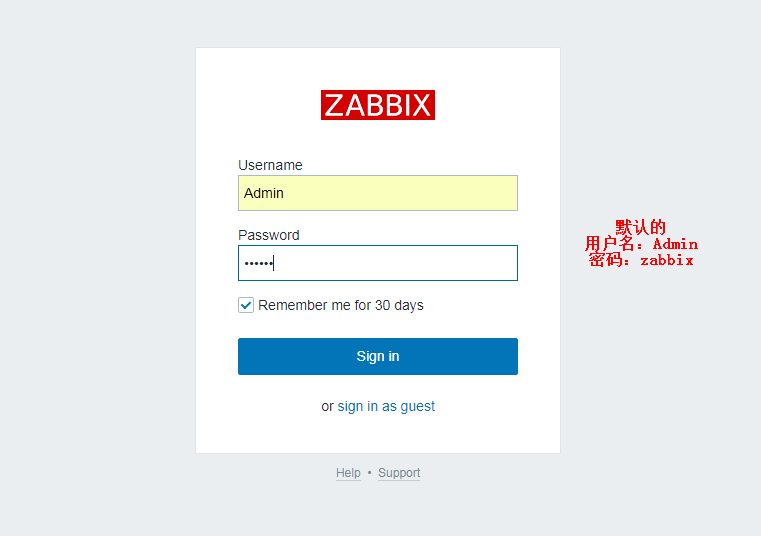
As shown below, for the home page of zabbix, the default is English: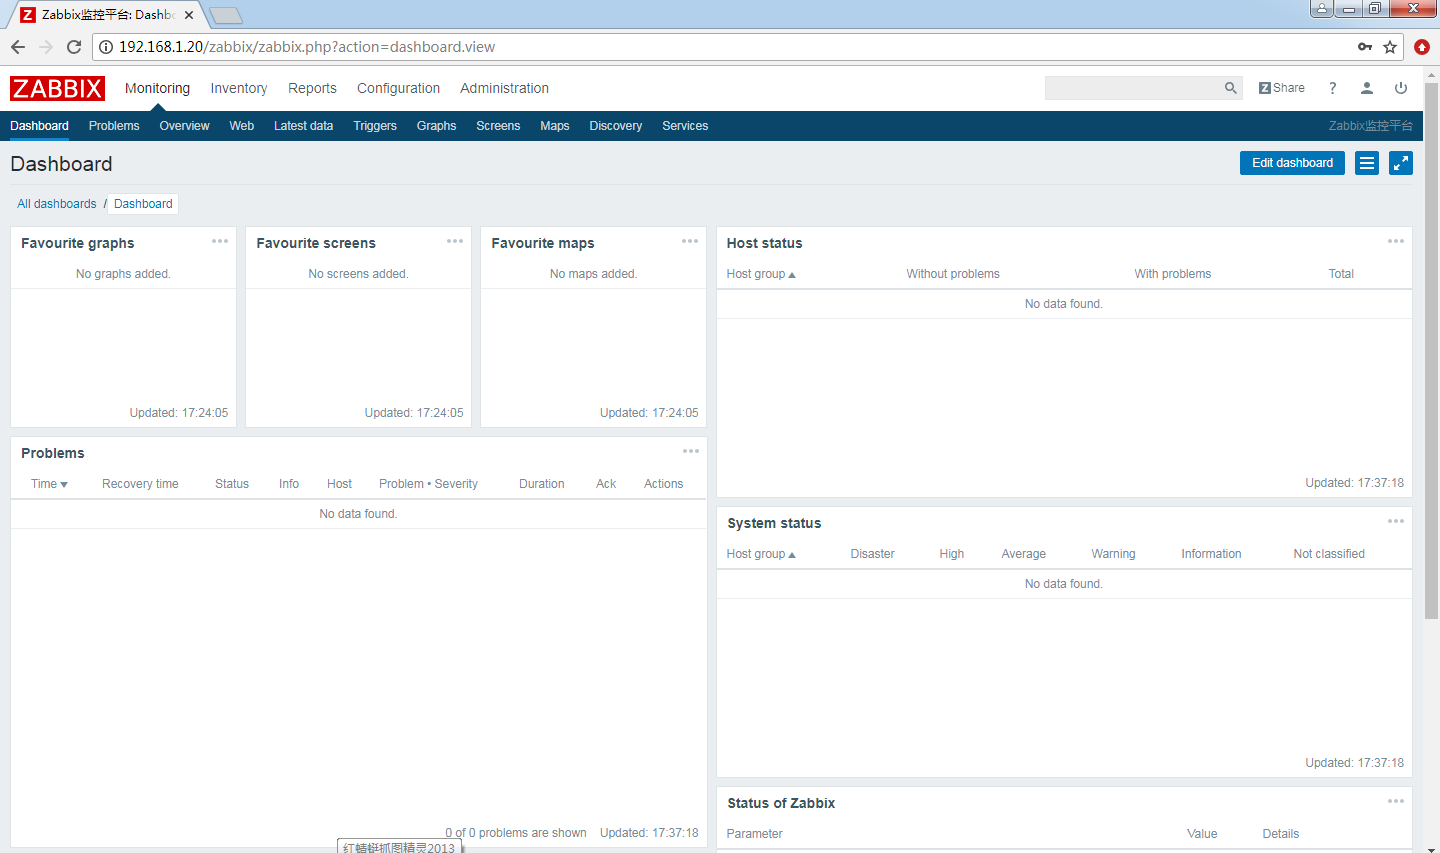
You can modify it to Chinese by doing the following: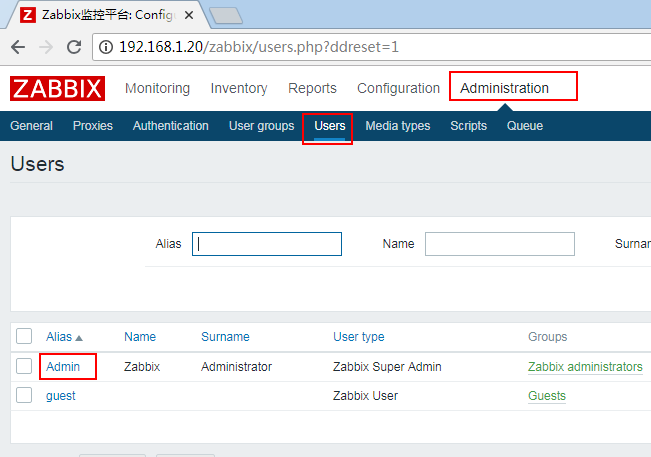
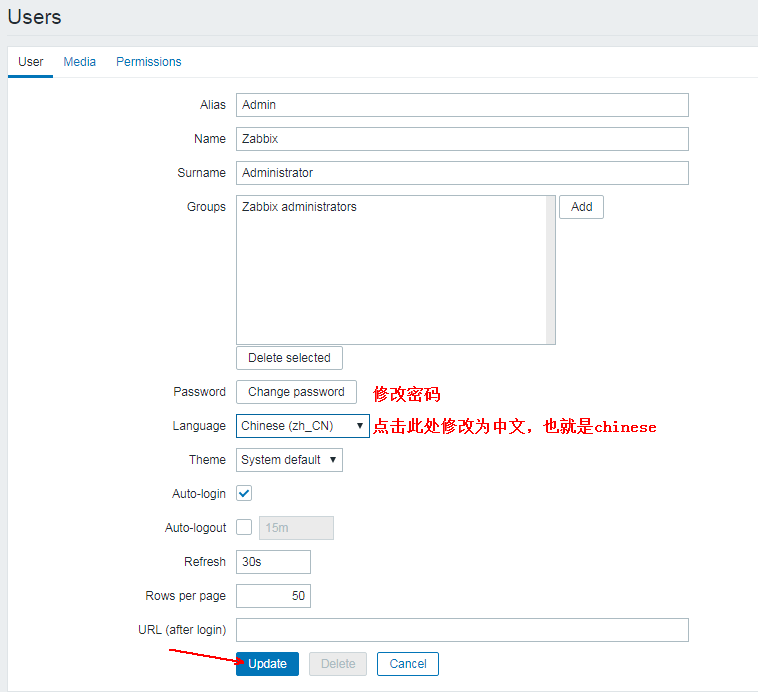
After the modification, refresh the interface and you can modify it into Chinese.
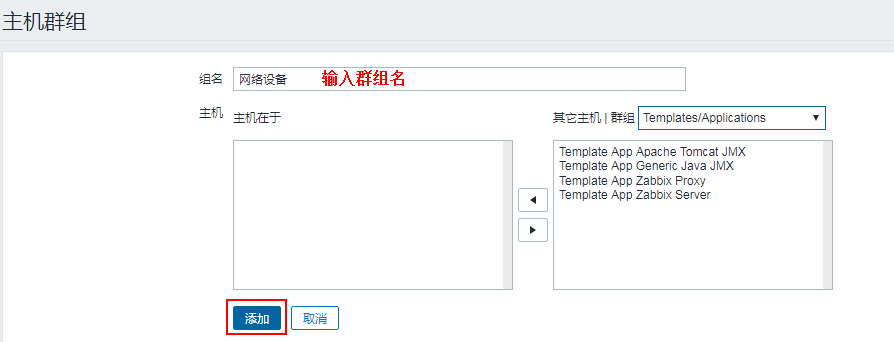
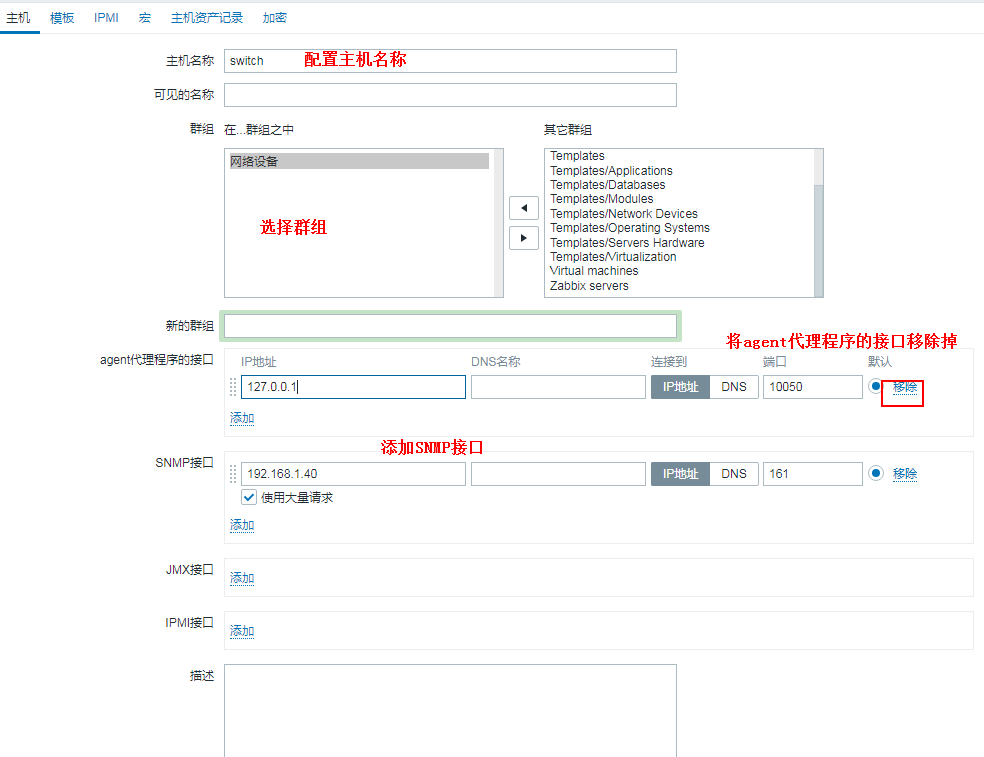
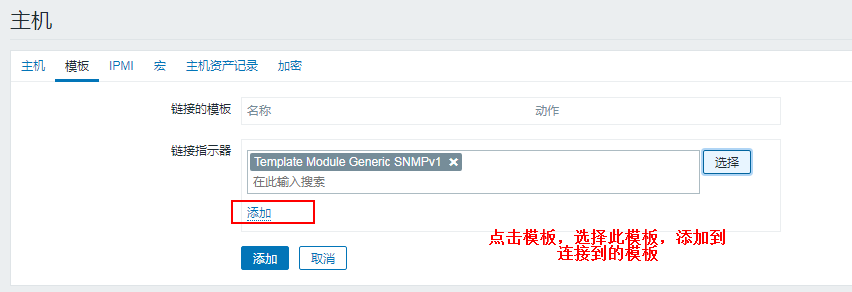
zabbix adds monitored devices:
Configuration switch:
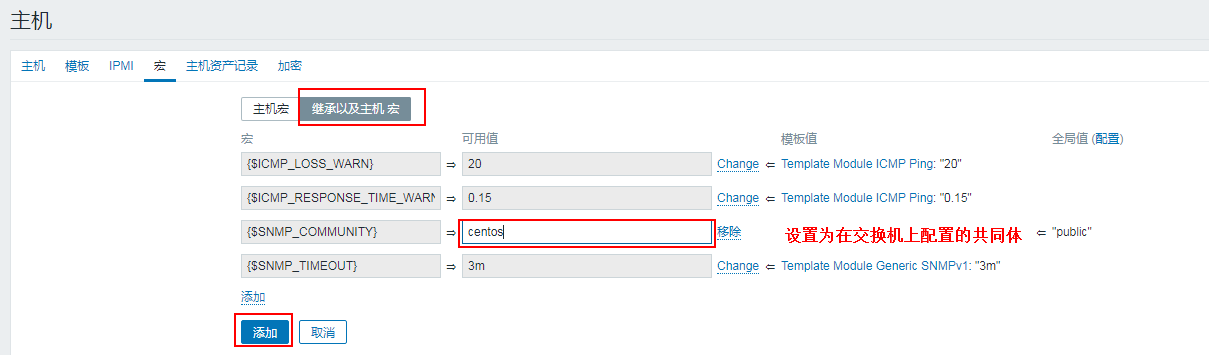
R1#conf t
sw1(config)#int vlan 1
sw1(config-if)#ip address 192.168.1.40 255.255.255.0
sw1(config-if)#no shutdown
sw1(config-if)#exit
sw1(config)#no ip routing
sw1(config)#snmp-server community centos RO // / Set up a read-only community polled by the server
sw1(config)#snmp-server enable traps // / allow the sending of trap messages
% Cannot enable both sham-link state-change interface traps.
% New sham link interface trap not enabled.
sw1(config)#snmp-server host 192.168.1.20 centos // / Setting up a community for sending trap messages
Router configuration is similar to switch configuration, but router configuration IP needs to be configured on the interface.
Linux server configuration:
[root@localhost media]# rpm -ivh zabbix-agent-3.2.6-1.el7.x86_64.rpm
[root@localhost /]# cp /etc/zabbix/zabbix_agentd.conf /etc/zabbix/zabbix_agentd.conf.bak                  # Back up files to avoid errors
[root@localhost /]# vim /etc/zabbix/zabbix_agentd.conf       # Editing configuration files
................
Server=192.168.1.20
ServerActive=192.168.1.20
Hostname=linux-server002
[root@localhost /]# systemctl start zabbix-agent.service         # Startup service
[root@localhost /]# systemctl enable zabbix-agent.service
[root@localhost /]# netstat -anpt | grep agent       # Confirm that the port has been started
tcp        0      0 0.0.0.0:10050           0.0.0.0:*               LISTEN      4114/zabbix_agentd
tcp6       0      0 :::10050                :::*                    LISTEN      4114/zabbix_agentd
Windows Server Configuration:
After decompressing the downloaded agent package, you will see the following two files. There are two subdirectories in the "bin" directory, "win32" and "win64", which correspond to different system versions respectively. According to the version of the system, you can see what you need: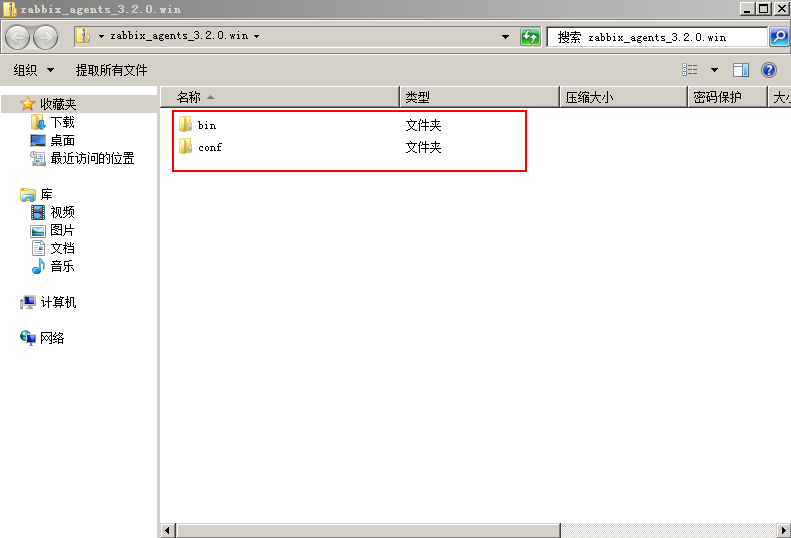
Copy out several files as shown in the following figure, modify the zabbix_agent d.win.conf file: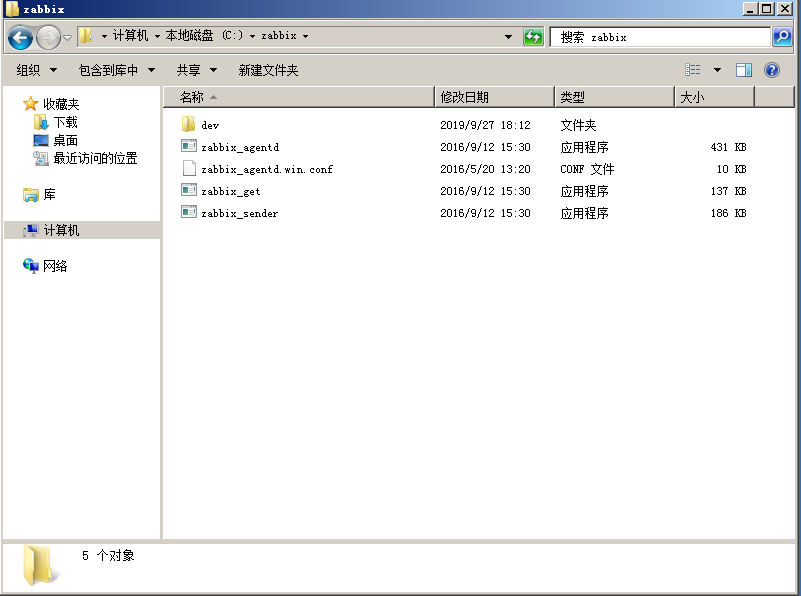
Amend the following three items:
Server=192.168.1.20
ServerActive=192.168.1.20
Hostname=windows-server001
Use the cmd command to install the startup agent (common parameters are - c: specified configuration file; - i: installation; - s: startup; - x: stop; - d: uninstall):
c:\zabbix>zabbix_agentd.exe -c zabbix_agentd.win.conf -i
zabbix_agentd.exe [2576]: service [Zabbix Agent] installed successfully
zabbix_agentd.exe [2576]: event source [Zabbix Agent] installed successfully

c:\zabbix>zabbix_agentd.exe -c zabbix_agentd.win.conf -s
zabbix_agentd.exe [2300]: service [Zabbix Agent] started successfully
Configure the zabbix web end and add monitored devices:
Add switches:

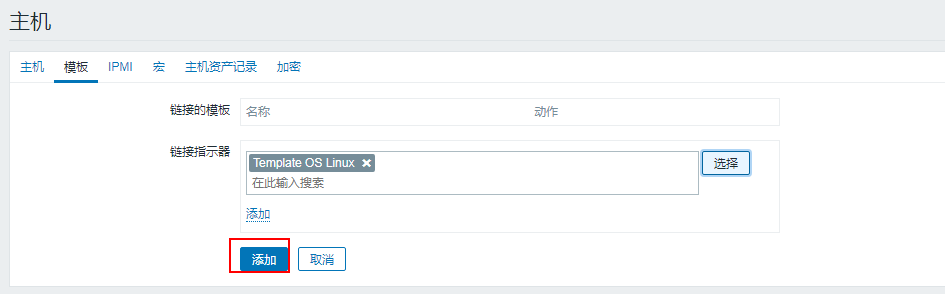
Add a Linux server: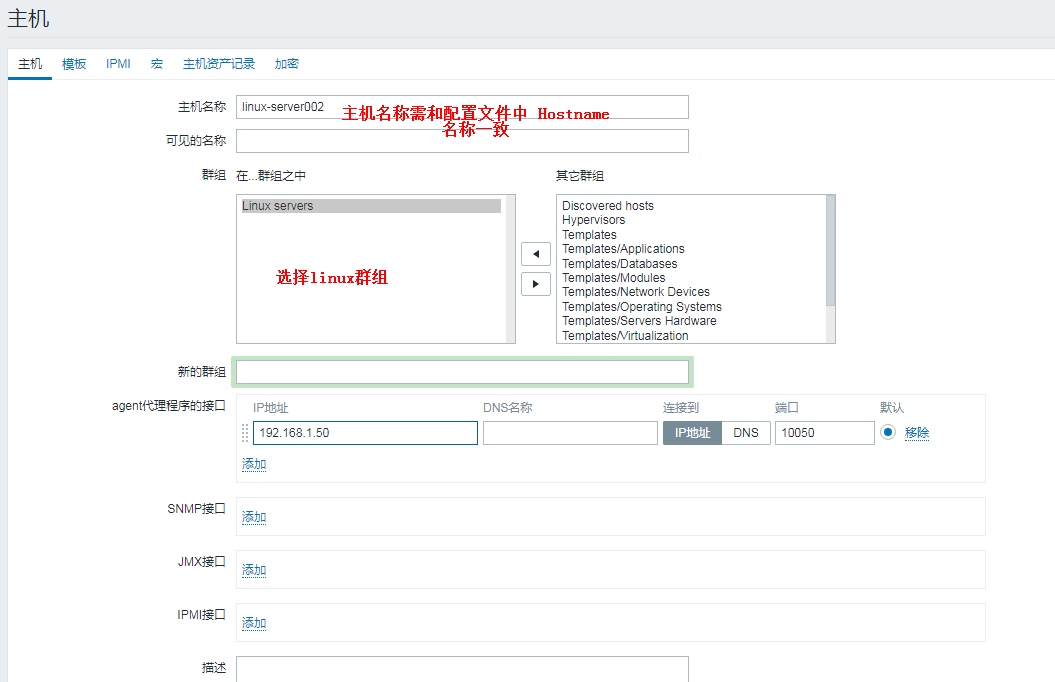
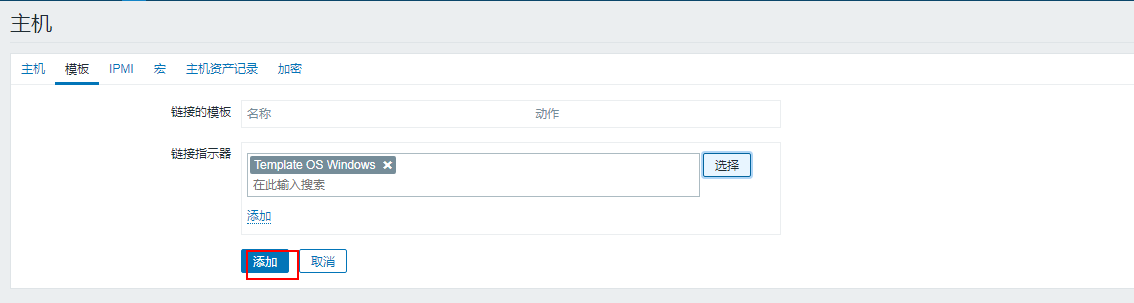
Add Windows Server: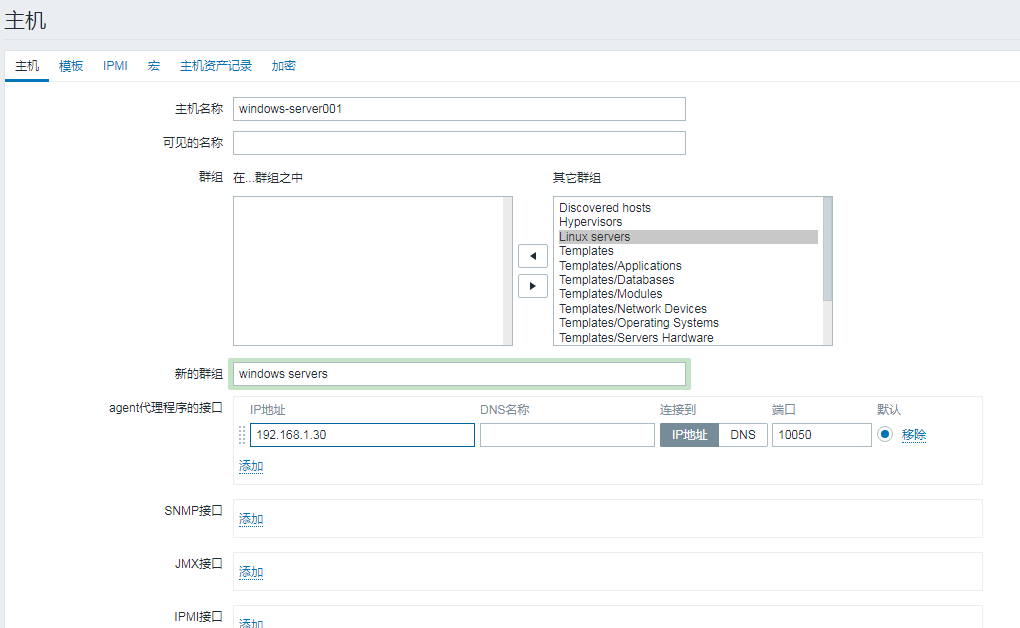
When all monitoring hosts are connected successfully, the following figure shows:
Installation of ZABBIX server method 2: using the Internet as the source of yum, build version 4.2 of zabbix:
1. Pre-configuration preparation:
1. Configure the zabbix server to connect to the Internet.
2. The files in the / etc/yum.repo / directory must be included in the system.
2. Start building:
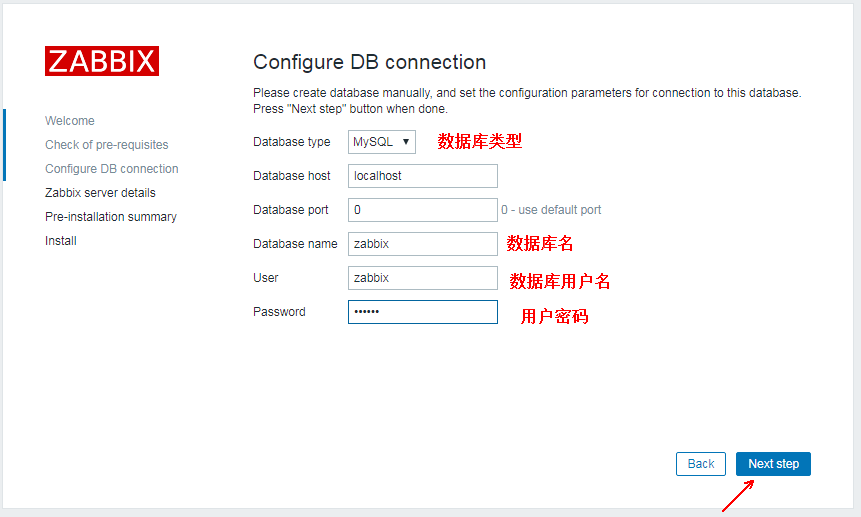
[root@zabbix ~]# rpm -ivh https://repo.zabbix.com/zabbix/4.2/rhel/7/x86_64/zabbix-release-4.2-1.el7.noarch.rpm
#Install repository configuration packages
[root@zabbix ~]# yum-config-manager --enable rhel-7-server-optional-rpms
#Enabling the repository of optional rpms
[root@zabbix ~]# yum -y install mariadb-server mariadb
#Install mariadb database
[root@zabbix ~]# systemctl start mariadb         #Start the database
[root@zabbix ~]# systemctl enable mariadb         #Set to Boot Self-Start
[root@zabbix ~]# mysqladmin -u root password "pwd123"         #Setting the database root user password
[root@zabbix ~]# yum -y install zabbix-server-mysql zabbix-web-mysql zabbix-agent
#Install ZABBIX server and agent agent agent. To use agent, you can install zabbix-proxy-mysql on yum as well.
[root@zabbix ~]# mysql -u root -ppwd123               #Log in to the database
MariaDB [(none)]> create database zabbix character set utf8 collate utf8_bin;
#Create a database
MariaDB [(none)]> grant all privileges on zabbix.* to zabbix@localhost identified by 'pwd456';
#Create the user of the zabbix service to connect to the database and set the password.
MariaDB [(none)]> exit           #Exit the database
[root@zabbix ~]# zcat /usr/share/doc/zabbix-server-mysql-4.2.4/create.sql.gz | mysql -uzabbix -p zabbix
#Import database SQL scripts
Enter password:                          #Enter database user zabbix password
[root@zabbix ~]# vim /etc/zabbix/zabbix_server.conf            #Edit the zabbix server configuration file
#Note the deletion of comment symbols
DBHost=localhost         #Remove comment symbols
DBName=zabbix          #Database name, according to actual modification, default does not need to modify
DBUser=zabbix            #Database username, not modified by default
DBPassword=pwd456          #Database password, modify this line
#After modification, save and exit.
Next, edit the configuration file of the zabbix agent. You must specify the IP address of the zabbix server and configure it on each host where the agent is installed. Here you need to specify the IP address of the zabbix server, which is now on the same server, so you can leave it unmodified:
[root@zabbix ~]# vim /etc/zabbix/zabbix_agentd.conf    #Edit the agent D configuration file
#The purpose of editing this configuration file is to monitor the Zabbix server.
Server=127.0.0.1            #The client passively waits for the specified server to query the data
ServerActive=127.0.0.1           #Client actively submits data to specified server
Hostname=linux-server001         #It is recommended to modify this line to configure the host name of the specification
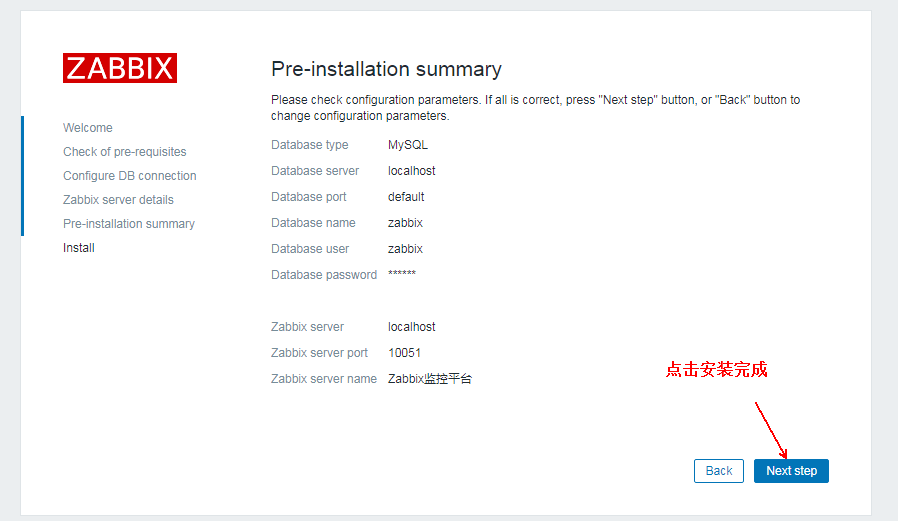
Configure the zabbix web interface and start related services:
[root@zabbix ~]# vim /etc/httpd/conf.d/zabbix.conf           #Edit http configuration file
php_value date.timezone Asia/Shanghai     #Set it to Shanghai Time Zone and delete the comment symbol on this line
[root@zabbix ~]# systemctl start httpd              #service httpd start
[root@zabbix ~]# systemctl enable httpd         #Set up boot-up self-startup
[root@zabbix ~]# systemctl start zabbix-server            #Start the zabbix server
[root@zabbix ~]# systemctl enable zabbix-server          #Set up boot-up self-startup
[root@zabbix ~]# systemctl start zabbix-agent       #Start the agent agent agent
[root@zabbix ~]# systemctl enable zabbix-agent          #Set power on self start
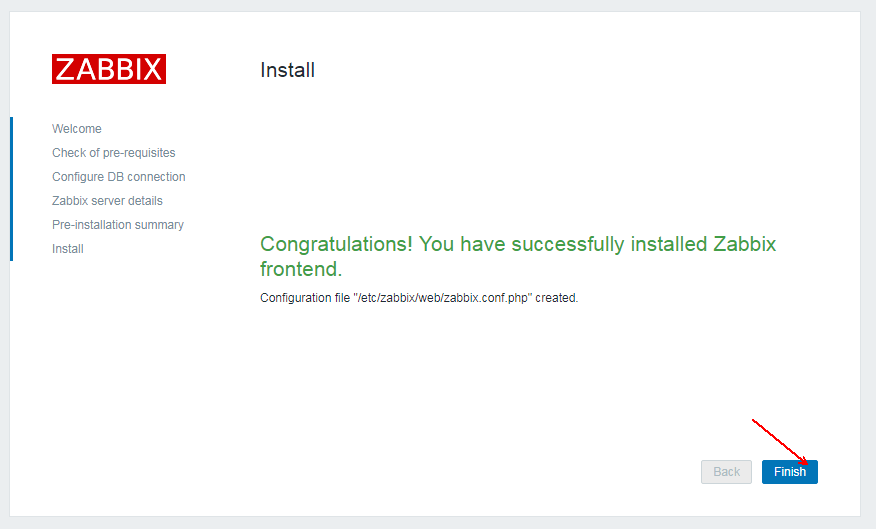
If some Chinese scrambling appears on the web page, you can refer to the installation method above, there are ways to solve Chinese scrambling.