LVM Logical Volume Management
Overview of LVM
LVM is a logical mechanism for managing disk partitions in the Linux operating system. It is a logical layer built on top of hard disks and partitions and under the file system. It shields the underlying partition layout when building a file system, so it can dynamically adjust disk capacity while keeping existing data unchanged.This increases the flexibility of disk management.
To establish the LVM partition management mechanism, first, create a physical volume from an ordinary partition or an entire hard disk; then, make up a logical whole, called a volume group, of the storage space of the physically dispersed physical volumes; and finally, separate different data storage spaces to form logical volumes based on the volume group as a whole.Logical volumes are the storage units that end users can format and mount.
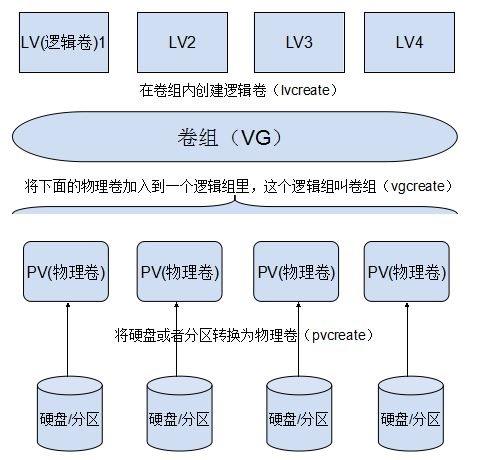
1. PV (Physical Volume)
Physical volumes are the basic storage devices of the LVM mechanism, usually corresponding to a common partition or the entire hard disk.When you create a physical volume, a reserved block is created at the head of the partition or hard disk to record the properties of the LVM and divide the storage space into basic units (Physical Extent, PE) of a default size of 4 MB to make up the physical volume.
For general partitions used to convert to physical volumes, it is recommended that you first change the ID tag number of the partition type to 8e using the fdisk tool.For an entire hard disk, you can divide all disk space into one primary partition and adjust accordingly.
2. VG (Volume Group, Volume Group)
One or more physical volumes form a whole, called a volume group, in which physical volumes can be added or removed dynamically. Many physical volumes can form different volume groups, and the name of the volume group is defined by the user.
3. LV (Logical Volume)
Logical volumes are built on volume groups and have no direct relationship to physical volumes.For logical volumes, each volume group is a whole, from which a small piece of space is "cut out" as the basis for users to create file systems, which is called a logical volume.
Management commands for LVM
There are three main types of LVM management commands: physical volume (PV) management, volume group (VG) management and logical volume (LV) management. The corresponding command program files start with pv, VG and lv.
| function | PV Management Command | VG Management Command | LV Management Commands |
|---|---|---|---|
| Scan (Scan) | pvscan | vgscan | lvscan |
| Create | pvcreate | vgcreate | lvcreate |
| Display (Display) | pvdisplay | vgdisplay | lvdisplay |
| Remove | pvremove | vgremove | lvremove |
| Extend (Extension) | vgextend | lvextend | |
| Reduce | vgreduce | lvreduce |
The following describes the use of this command separately; first, we will now add three hard disks each 20G in the VMware virtual machine and restart the Linux operating system to identify the newly added hard disks; then, we will use the fdisk command to manage the newly added disks (because the created hard disks are small, each hard disk partition will only be one)Partitions) and change the partition number to 8e (Linux LVM).
Physical Volume Management
-
pvcreate command
Used to convert partitions or entire hard disks into physical volumes.
[root@localhost dev]# Pvcreate/dev/sd{b..D}1 //Convert partitions SD B 1, sdc1, SD d 1 to physical volumes
  Physical volume "/dev/sdb1" successfully created.
  Physical volume "/dev/sdc1" successfully created.
Physical volume "/dev/sdd1" successfully created.-
pvscan command
Used to scan all physical volumes in the system and output relevant information.
[root@localhost ~]# pvscan
  PV /dev/sdd1                      lvm2 [<20.00 GiB]
  PV /dev/sdb1                      lvm2 [<20.00 GiB]
  PV /dev/sdc1                      lvm2 [<20.00 GiB]
  Total: 3 [<60.00 GiB] / in use: 0 [0   ] / in no VG: 3 [<60.00 GiB]
-
pvdisplay command
To display the details of a physical volume, you need to use the specified physical volume as a command parameter, and by default, all physical volume information is displayed.
[root@localhost ~]# pvdisplay /dev/sdb1
  "/dev/sdb1" is a new physical volume of "<20.00 GiB"
  --- NEW Physical volume ---
  PV Name               /dev/sdb1
  VG Name
  PV Size               <20.00 GiB
  Allocatable           NO
  PE Size               0
  Total PE              0
  Free PE               0
  Allocated PE          0
  PV UUID               mnXUmC-NyMw-QaKv-Z6Ig-46wX-O8N1-i1gd5d
-
pvremove command
Used to restore physical volumes to normal partitions or disks, no longer used in the LVM system, removed physical volumes will not be recognized by pvscan.
[root@localhost ~]# pvremove /dev/sdb1
  Labels on physical volume "/dev/sdb1" successfully wiped.
[root@localhost ~]# pvscan
  PV /dev/sdd1                      lvm2 [<20.00 GiB]
  PV /dev/sdc1                      lvm2 [<20.00 GiB]
  Total: 2 [<40.00 GiB] / in use: 0 [0   ] / in no VG: 2 [<40.00 GiB]
Volume Group Management
-
vgcreate command
Used to create one or more physical volumes as a volume group. The first command parameter sets the name of the new volume group, followed by specifying the physical volumes that need to be added to the volume group as parameters.
[root@localhost ~]# Vgcreate siti/dev/sd{b..D}1 //Convert physical volumes SD B 1, sdc1, SD d 1 to volume groups
Volume group "siti" successfully created-
vgscan command
Used to scan established LVM volume groups and related information in the system.
[root@localhost ~]# vgscan
  Reading volume groups from cache.
  Found volume group "siti" using metadata type lvm2
-
vgdisplay command
To display the details of each volume group in the system, you need to use the specified volume group name as a command parameter (information for all volume groups is displayed when no volume group is specified).
[root@localhost ~]# vgdisplay siti
  --- Volume group ---
  VG Name               siti
  System ID
  Format                lvm2
  Metadata Areas        3
  Metadata Sequence No  1
  VG Access             read/write
  VG Status             resizable
  MAX LV                0
  Cur LV                0
  Open LV               0
  Max PV                0
  Cur PV                3
  Act PV                3
  VG Size               <59.99 GiB
  PE Size               4.00 MiB
  Total PE              15357
  Alloc PE / Size       0 / 0
  Free  PE / Size       15357 / <59.99 GiB
  VG UUID               30M0xz-z17t-iJE0-vSR8-cj0Y-tTXh-c2kO8E
-
vgremove command
To delete a specified volume group, use the specified volume group name as a parameter.
[root@localhost ~]# vgremove siti
  Volume group "siti" successfully removed
[root@localhost ~]# vgscan
  Reading volume groups from cache.
-
vgextend command
Disk space used to expand volume groups.
[root@localhost ~]# vgdisplay
  --- Volume group ---
  VG Name               siti
  System ID
  Format                lvm2
  Metadata Areas        2
  Metadata Sequence No  1
  ...//...omit some content...
  Free  PE / Size       10238 / 39.99 GiB
  VG UUID               dhPgdF-TJmR-tT6H-u9AO-Oxn2-i2bX-PObnr3
  [root@localhost ~]# Vgextend siti/dev/sdb1 //Add sdb1 physical volume
  Physical volume "/dev/sdb1" successfully created.
  Volume group "siti" successfully extended
[root@localhost ~]# vgdisplay siti
  --- Volume group ---
  VG Name               siti
  System ID
  Format                lvm2
  Metadata Areas        3
  Metadata Sequence No  2
  ...//...omit some content...
  Alloc PE / Size       0 / 0
  Free  PE / Size       15357 / <59.99 GiB
  VG UUID               dhPgdF-TJmR-tT6H-u9AO-Oxn2-i2bX-PObnr3
Logical Volume Management
-
lvcreate command
Used to split space from a specified volume group.
lvcreate - L Capacity Size - n Logical Volume Name Volume Group Name
[root@localhost ~]# lvcreate -L 15G -n si siti
  Logical volume "si" created.
-
lvscan command
Used to scan logical volumes and related information already established in the system.
[root@localhost ~]# lvscan
  ACTIVE            '/dev/siti/si' [15.00 GiB] inherit
-
lvdisplay command
To display the details of a logical volume, you can either specify the device file of the logical volume as a parameter or use the volume group name as a parameter to display information about all the logical volumes in the volume group.
[root@localhost ~]# lvdisplay /dev/siti/si
  --- Logical volume ---
  LV Path                /dev/siti/si
  LV Name                si
  VG Name                siti
  LV UUID                awrGhu-Mq8p-G7uZ-IZkE-mkv3-NezU-KflFbz
  LV Write Access        read/write
  LV Creation host, time localhost.localdomain, 2019-08-23 14:40:59 +0800
  LV Status              available
  # open                 0
  LV Size                15.00 GiB
  Current LE             3840
  Segments               1
  Allocation             inherit
  Read ahead sectors     auto
  - currently set to     8192
  Block device           253:0
-
lvextend command
Makes space for dynamically expanding logical volumes, which can be expanded by splitting additional space from the volume group in which they are currently used when space is insufficient.A prerequisite is that there is still unallocated disk space in the volume group, otherwise the volume group capacity needs to be expanded first.
Lvextend-L +Size/dev/Volume Group Name/Logical Volume Name
[root@localhost ~]# lvextend -L +25G /dev/siti/si
  Size of logical volume siti/si changed from 15.00 GiB (3840 extents) to 40.00 GiB (10240 extents).
  Logical volume siti/si successfully resized.
[root@localhost ~]# lvdisplay
  --- Logical volume ---
  LV Path                /dev/siti/si
  LV Name                si
  VG Name                siti
  LV UUID                awrGhu-Mq8p-G7uZ-IZkE-mkv3-NezU-KflFbz
  LV Write Access        read/write
  LV Creation host, time localhost.localdomain, 2019-08-23 14:40:59 +0800
  LV Status              available
  # open                 0
  LV Size                40.00 GiB
  Current LE             10240
  Segments               3
  Allocation             inherit
  Read ahead sectors     auto
  - currently set to     8192
  Block device           253:0
-
lvremove command
To delete a specified logical volume, use the device file of the logical volume as a parameter directly.
[root@localhost ~]# lvremove /dev/siti/si
Do you really want to remove active logical volume siti/si? [y/n]: y
  Logical volume "si" successfully removed
[root@localhost ~]# lvdisplay
[root@localhost ~]#
-
Once we have created the lvm, we can create a file system for the disk and mount it so that we can use the disk space properly.
1. Follow the above steps, set 25G and 30G for newly created logical volumes si and ti, respectively, and use the lvdispaly command to view the list.
[root@localhost ~]# lvcreate -L 25G -n si siti
  Logical volume "si" created.
[root@localhost ~]# lvcreate -L 30G -n ti siti
  Logical volume "ti" created.
[root@localhost ~]# lvdisplay
  --- Logical volume ---
  LV Path                /dev/siti/si
  LV Name                si
  VG Name                siti
  ...//Omit some content...
  LV Size                25.00 GiB
  ...//Omit some content...
  Read ahead sectors     auto
  - currently set to     8192
  Block device           253:0

  --- Logical volume ---
  LV Path                /dev/siti/ti
  LV Name                ti
  VG Name                siti
  ...//Omit some content...
  LV Size                30.00 GiB
  ...//Omit some content...
  Read ahead sectors     auto
  - currently set to     8192
  Block device           253:1
2. Create a file system.
[root@localhost ~]# mkfs.xfs /dev/siti/si
meta-data=/dev/siti/si           isize=512    agcount=4, agsize=1638400 blks
         =                       sectsz=512   attr=2, projid32bit=1
...//Omit some content...
realtime =none                   extsz=4096   blocks=0, rtextents=0
[root@localhost ~]# mkfs.xfs /dev/siti/ti
meta-data=/dev/siti/ti           isize=512    agcount=4, agsize=1966080 blks
         =                       sectsz=512   attr=2, projid32bit=1
...//Omit some content...
realtime =none                   extsz=4096   blocks=0, rtextents=0
3. Mount si and ti so that we can use disk space normally.(What I do here is automount)
[root@localhost ~]# Mkdir/opt/siti{1..2} //Create siti1, siti2 directories
[root@localhost ~]# Ls/opt //Check to see if the creation was successful
rh  siti1  siti2
[root@localhost ~]# Vim/etc/fstab //Edit Profile
#
# /etc/fstab
# Created by anaconda on Fri Aug  9 11:45:58 2019
#
# Accessible filesystems, by reference, are maintained under '/dev/disk'
# See man pages fstab(5), findfs(8), mount(8) and/or blkid(8) for more info
#
UUID=2e181f68-3027-48da-a779-ac380076d6f3 /               xfs     defaults        0 0
UUID=0de201d1-2be8-4457-a420-78547726c995 /boot           xfs     defaults        0 0
UUID=8ac2bc9f-2520-410e-9408-c462d1bd249f /home           xfs     defaults        0 0
UUID=22d52505-e702-48db-a1ed-f82cb4b1feca swap            swap    defaults        0 0
/dev/siti/si    /opt/siti1      xfs     defaults        0 0
/dev/siti/ti    /opt/siti2      xfs     defaults        0 0
~
:wq                                                  //Save Exit
[root@localhost ~]# mount -a
[root@localhost ~]# df -hT
//File System Type Capacity Used Available%Mountpoint
/dev/sda2           xfs        20G  4.3G   16G   22% /
devtmpfs            devtmpfs  1.9G     0  1.9G    0% /dev
tmpfs               tmpfs     1.9G     0  1.9G    0% /dev/shm
tmpfs               tmpfs     1.9G  9.0M  1.9G    1% /run
tmpfs               tmpfs     1.9G     0  1.9G    0% /sys/fs/cgroup
/dev/sda5           xfs        10G   50M   10G    1% /home
/dev/sda1           xfs       2.0G  174M  1.9G    9% /boot
tmpfs               tmpfs     378M   12K  378M    1% /run/user/42
tmpfs               tmpfs     378M     0  378M    0% /run/user/0
/dev/mapper/siti-si xfs        25G   33M   25G    1% /opt/siti1    //Mount Successfully
/dev/mapper/siti-ti xfs        30G   33M   30G    1% /opt/siti2
Quota
To avoid the problem of insufficient disk space on the server, we can enable disk quota for users in a specified file system (partition)
Limit the amount of disk space and files used to prevent malicious or unintentional consumption of large amounts of disk space by individual users, thereby maintaining the stability and sustained availability of system storage space.
On CentOS systems, the kernel has customized disk quota capabilities to support the Linux file system, and tools for configuring and managing disk quotas on the system are provided by the xfs_quota quota manager of the xfsgrogs package.
First let's see if the xfsgrogs package is installed on Linux and if there are any quota components in the package
[root@localhost ~]# rpm -q xfsprogs
xfsprogs-4.5.0-12.el7.x86_64
[root@localhost ~]# rpm -ql xfsprogs | grep "xfs_quota"
/usr/sbin/xfs_quota
/usr/share/man/man8/xfs_quota.8.gz
Then turn off enhanced security features in the Linux operating system
[root@localhost ~]# setenforce 0
Overview of disk quotas
1. Scope of disk quotas
The disk quota function set by xfs_quota is only valid within the specified file system (partition) and will not be restricted when users use other file systems without quotas.
2. Restricted objects of disk quotas
xfs_quota is mainly for the user accounts and group accounts specified in the system. Users or groups that do not have the quota set will not be affected.Once a quota has been set for a group account, the sum of disk capacity and the number of files used by all users within the group cannot exceed the limit.
3. Restriction type of disk quota
- Disk capacity: Limit the size of disk data blocks that users can use, that is, limit the size of disk space, in KB by default.
- Number of files: Limit the number of files a user can own.
4. Restriction methods of disk quotas
- Soft limit: Specify a soft quota value (such as 480MB of disk space, 180 files) that will be allowed to temporarily exceed this limit within a fixed grace period (default is seven days), but warnings will be given.
- Hard limit: Specify a hard quota value (such as 500 MB of disk space, 200 files) that is absolutely prohibited from exceeding. When the hard limit is reached, the system will warn and prohibit further data writing.The quota value of the hard limit should be greater than the corresponding soft limit value, otherwise the soft limit will become invalid.
Disk Quota Management
1. Mount the file system in a way that supports quota functionality
In addition to the support of the kernel and the xfs_quota software, there is a precondition to implementing disk quota functionality, that is, the specified partition must be mounted and support disk quota functionality.During configuration debugging, the mount command with the -o usrquota,grpquota option can be used to mount the specified partition to increase support for user and group quota functions.
- First, I'll uninstall the two LVMs that were previously mounted (and the automount entries added to the configuration will also be deleted).
[root@localhost ~]# umount /dev/siti/si
[root@localhost ~]# umount /dev/siti/ti
[root@localhost ~]# df -h
//File System Capacity Used Available%Mountpoint
/dev/sda2        20G  4.3G   16G   22% /
devtmpfs        1.9G     0  1.9G    0% /dev
tmpfs           1.9G     0  1.9G    0% /dev/shm
tmpfs           1.9G  9.0M  1.9G    1% /run
tmpfs           1.9G     0  1.9G    0% /sys/fs/cgroup
/dev/sda5        10G   50M   10G    1% /home
/dev/sda1       2.0G  174M  1.9G    9% /boot
tmpfs           378M   12K  378M    1% /run/user/42
tmpfs           378M     0  378M    0% /run/user/0
- Then, mount it in a way that supports quota functionality, and I'm mounting it here in two different ways (automatic, manual).
[root@localhost ~]# Mount-o usrquota, grpquota/dev/siti/si/opt/siti1 //manual mount
[root@localhost ~]# df -h
//File System Capacity Used Available%Mountpoint
/dev/sda2             20G  4.3G   16G   22% /
devtmpfs             1.9G     0  1.9G    0% /dev
tmpfs                1.9G     0  1.9G    0% /dev/shm
tmpfs                1.9G  9.0M  1.9G    1% /run
tmpfs                1.9G     0  1.9G    0% /sys/fs/cgroup
/dev/sda1            2.0G  174M  1.9G    9% /boot
/dev/sda5             10G   50M   10G    1% /home
tmpfs                378M   12K  378M    1% /run/user/42
tmpfs                378M     0  378M    0% /run/user/0
/dev/mapper/siti-si   25G   33M   25G    1% /opt/siti1
[root@localhost ~]# Vim/etc/fstab //Enter edit, set automount
#
# /etc/fstab
# Created by anaconda on Fri Aug  9 11:45:58 2019
#
# Accessible filesystems, by reference, are maintained under '/dev/disk'
# See man pages fstab(5), findfs(8), mount(8) and/or blkid(8) for more info
#
UUID=2e181f68-3027-48da-a779-ac380076d6f3 /                 xfs     defaults        0 0
UUID=0de201d1-2be8-4457-a420-78547726c995 /boot             xfs     defaults        0 0
UUID=8ac2bc9f-2520-410e-9408-c462d1bd249f /home             xfs     defaults        0 0
UUID=22d52505-e702-48db-a1ed-f82cb4b1feca swap              swap    defaults        0 0
/dev/siti/ti    /opt/siti2      xfs     defaults,usrquota,grpquota      0 0
~                                                                                         :wq
[root@localhost ~]# mount -a
[root@localhost ~]# df -h
//File System Capacity Used Available%Mountpoint
/dev/sda2             20G  4.3G   16G   22% /
devtmpfs             1.9G     0  1.9G    0% /dev
tmpfs                1.9G     0  1.9G    0% /dev/shm
tmpfs                1.9G  9.0M  1.9G    1% /run
tmpfs                1.9G     0  1.9G    0% /sys/fs/cgroup
/dev/sda1            2.0G  174M  1.9G    9% /boot
/dev/sda5             10G   50M   10G    1% /home
tmpfs                378M   12K  378M    1% /run/user/42
tmpfs                378M     0  378M    0% /run/user/0
/dev/mapper/siti-si   25G   33M   25G    1% /opt/siti1
/dev/mapper/siti-ti   30G   33M   30G    1% /opt/siti2
2. Edit quota settings for user and group accounts
-
Xfs_quota-x-c'limit-u bsoft=N bhard=N isoft=N ihard=N username'mount point
-
Common Options
-x: Enable expert mode
-c: execute with command
-u: named user
-g: Specify group
-
Limit field
limit: soft and hard limits on disk capacity can be set; and soft and hard limits on the number of files; -u denotes the specified user (if -g is used for the specified group)
bsoft: Number of soft limits for setting disk capacity
bhard: A hard limit value that represents the hard limit for setting disk capacity
isoft: A soft limit value indicating the number of disk files to set
ihard: A hard limit value indicating the number of disk files to set
[root@localhost ~]# xfs_quota -x -c 'limit -u bsoft=100M bhard=150M isoft=100 ihard=150 sun' /opt/siti1
//Set user sun's disk quota with a soft limit of 100M and a hard limit of 150M for disk capacity, a soft limit of 100 files and a hard limit of 150 files
-
We can see user capacity limits by command
Xfs_quota-c'quota-uv username'mount point to view user disk restrictions
or
Xfs_quota-c'quota-uv-i username'mount point View user file limit
[root@localhost ~]# xfs_quota -c 'quota -uv -i sun' /opt/siti1
Disk quotas for User sun (1000)
Filesystem               Files      Quota      Limit  Warn/Time      Mounted on
/dev/mapper/siti-si          0        100        150   00 [--------] /opt/siti1
[root@localhost ~]# xfs_quota -c 'quota -uv sun' /opt/siti1
Disk quotas for User sun (1000)
Filesystem              Blocks      Quota      Limit  Warn/Time      Mounted on
/dev/mapper/siti-si          0     102400     153600   00 [--------] /opt/siti1
3. Verify disk quota function
- Log in to the Linux operating system with a quota-restricted user account, switch to a file system where the quota is applied, copy files, and write to test whether the disk quota entries you set are valid.Before that, check to see if the user setting the disk quota is authorized to write files to the disk.
root@localhost ~]# ls -l /opt
//Total dosage 0
drwxr-xr-x. 2 root root 6 3 February 26, 2015 rh
drwxr-xr-x. 2 root root 6 8 February 2316:10 siti1
drwxr-xr-x. 2 root root 6 8 February 2316:11 siti2
[root@localhost ~]# chmod 777 /opt/siti1
[root@localhost ~]# ls -l /opt
//Total dosage 0
drwxr-xr-x. 2 root root 6 3 February 26, 2015 rh
drwxrwxrwx. 2 root root 6 8 February 2316:10 siti1
drwxr-xr-x. 2 root root 6 8 February 2316:11 siti2
[root@localhost ~]# su - sun //Switch Users
//Last logon: on May 9, 12:19:27 CST 2019:1
[sun@localhost ~]$
- Enter siti1 in the sun user to create the file and verify that the file limit was successful.
[sun@localhost ~]$ cd /opt/siti1                //Enter the siti1 directory
[sun@localhost siti1]$ touch demo{1..100}.txt   //Create files demo1~demo100, the soft limit values we set
[sun@localhost siti1]$ touch demo{101..150}.txt //Create files demo101~demo150, the hard limit we set
[sun@localhost siti1]$ touch demo151.txt        //Create file demo151, this setting exceeds the limit set
touch: could not be built"demo151.txt": Disk quota exceeded          //System prompt could not be created
[sun@localhost siti1]$ -
We use validation commands to write files to validate restrictions.First delete the previously created empty file, then write the file with the command.
dd if=/dev/zero of=file path bs=N count=N
dd: copy
if=/dev/zero: take capacity from zero
of = File Path: Write the capacity to the file under the set quota disk
bs=N: how much to take at a time
count=N: how many times
[sun@localhost siti1]$ rm -rf *
[sun@localhost siti1]$ dd if=/dev/zero of=/opt/siti1/123.txt bs=10M count=8
 Recorded 8+0 reads//80M from zero written to 123.txt file in sist1 directory
 Write out of 8+0 recorded
 83886080 bytes (84 MB) copied, 0.0741589 seconds, 1.1 GB/sec
 [sun@localhost siti1]$ls-lh //View files in siti1 directory, written to file
 Total usage 80M
 -rw-rw-r--. 1 sun 80M August 23 19:11 123.txt
[sun@localhost siti1]$ dd if=/dev/zero of=/opt/siti1/1234.txt bs=10M count=8
 dd: Error writing'/opt/siti1/1234.txt': Disk quota exceeded
 Recorded 8+0 reads/ fetches 80M from zero and writes it to 1234.txt file in sist1 directory. Error exceeded limit
 Write out of 7+0 recorded
 73400 320 bytes (73 MB) copied, 0.0852517 seconds, 861 MB/sec
 [sun@localhost siti1]$ls-lh //View the contents of the siti1 directory, write a total capacity of 150M, set a limit value.
Total dosage 150M
 -rw-rw-r--. 1 sun sun 70M August 23 19:13 1234.txt
 -rw-rw-r--. 1 sun 80M August 23 19:11 123.txt
4. View quota usage
-
If you need to know the quota usage of users or groups in your file system, you can use the report command to view it.We also need to go back to the root user before we can view it.
Xfs_quota-x-c'report option'mount point
Common Options
-a: View all quotas
-i: View node information
-b: output report
-u: View user quotas
-g: View group quotas
[root@localhost ~]# xfs_quota -x -c 'report -aib' /opt/siti1
User quota on /opt/siti1 (/dev/mapper/siti-si)
                               Blocks                                          Inodes
User ID          Used       Soft       Hard    Warn/Grace           Used       Soft       Hard    Warn/ Grace
---------- -------------------------------------------------- --------------------------------------------------
root                0          0          0     00 [--------]          3          0          0     00 [--------]
sun            153600     102400     153600     00  [6 days]          2        100        150     00 [--------]

Group quota on /opt/siti1 (/dev/mapper/siti-si)
                               Blocks                                          Inodes
Group ID         Used       Soft       Hard    Warn/Grace           Used       Soft       Hard    Warn/ Grace
---------- -------------------------------------------------- --------------------------------------------------
root                0          0          0     00 [--------]          3          0          0     00 [--------]
sun            153600          0          0     00 [--------]          2          0          0     00 [--------]
Supplementary Content
Expand the disk capacity in mounted lvm, at which point we directly view the disk information system without displaying the expanded capacity, at which point we need to use the xfs_growfs/dev/volume group name/logical volume name command to reload.
[root@localhost ~]# Lvextend-L +4G/dev/siti/si//Add 4G capacity to logical volume Si
  Size of logical volume siti/si changed from 25.00 GiB (6400 extents) to 29.00 GiB (7424 extents).
  Logical volume siti/si successfully resized.
[root@localhost ~]# Df-h //View disk information
//File System Capacity Used Available%Mountpoint
/dev/sda2             20G  4.3G   16G   22% /
...//Omit some content...
/dev/mapper/siti-si   25G  183M   25G    1% /opt/siti1    //No increase capacity shown
/dev/mapper/siti-ti   30G   33M   30G    1% /opt/siti2
[root@localhost ~]# Xfs_growfs/dev/siti/si//reload
meta-data=/dev/mapper/siti-si    isize=512    agcount=4, agsize=1638400 blks
         =                       sectsz=512   attr=2, projid32bit=1
         =                       crc=1        finobt=0 spinodes=0
data     =                       bsize=4096   blocks=6553600, imaxpct=25
         =                       sunit=0      swidth=0 blks
naming   =version 2              bsize=4096   ascii-ci=0 ftype=1
log      =internal               bsize=4096   blocks=3200, version=2
         =                       sectsz=512   sunit=0 blks, lazy-count=1
realtime =none                   extsz=4096   blocks=0, rtextents=0
data blocks changed from 6553600 to 7602176
[root@localhost ~]# Df-h //View disk information
//File System Capacity Used Available%Mountpoint
/dev/sda2             20G  4.3G   16G   22% /
...//Omit some content...
/dev/mapper/siti-si   29G  183M   29G    1% /opt/siti1  //Show increased capacity
/dev/mapper/siti-ti   30G   33M   30G    1% /opt/siti2