1. Overview
Semantic segmentation is the basis of computer vision's understanding of the real world, ranging from automatic driving to personal applications. As long as you observe carefully, you can find the application places of semantic segmentation everywhere. In fact, semantic segmentation is equivalent to image segmentation + understanding of the segmented region.
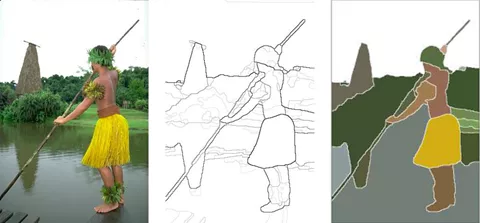
As shown in Figure 1, image segmentation is only responsible for segmenting different regions of the image.
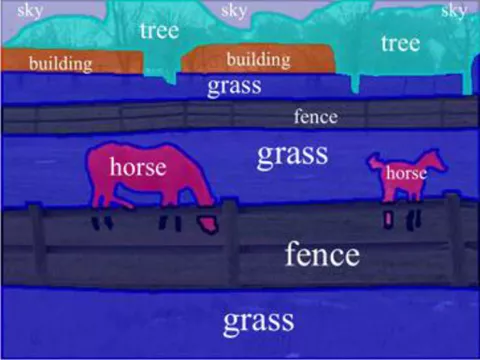
Compared with the image segmentation in Figure 1, the semantic segmentation in Figure 2 is obviously further. It not only divides different "areas", but also understands the things represented by different "areas", such as horses, grasslands, fences and sky.
Therefore, image semantic segmentation is also called image semantic annotation. Because image semantic segmentation not only needs to identify objects, but also mark the boundary of each object, the relevant models will have the intensive prediction ability of Pixel Level.
The main purpose of this article is to show how to deploy the existing Baidu PaddlePaddle Paddle model step by step to the Movidius Myriad X VPU of Intel. At the same time, this paper also shows an idea: how to find the correct information in the vast Internet network and avoid detours. The device containing Intel VPU used in this article is OAK-D Camera. It is worth mentioning that the model used in this paper is a relatively new BiSeNetV2 pavement segmentation model trained by the author (address: https://arxiv.org/pdf/2004.02147.pdf ). BiSeNetV2 is a model with a good balance between accuracy and performance. All the code can be found in part 6.
1.1 importance of deployment model landing
Presumably, many friends have trained many models on computers, but the real purpose of AI is not only to deploy on conventional computers for large-scale industrial applications, but also to combine it with edge devices such as IoT and use it in real-life scenes to facilitate people's life. Therefore, if a model cannot be separated from the PC and run on low-energy edge devices, such as Shumei pie, mobile phones and Intel VPU, its actual value will be greatly reduced.
1.2 focus and non focus of this article
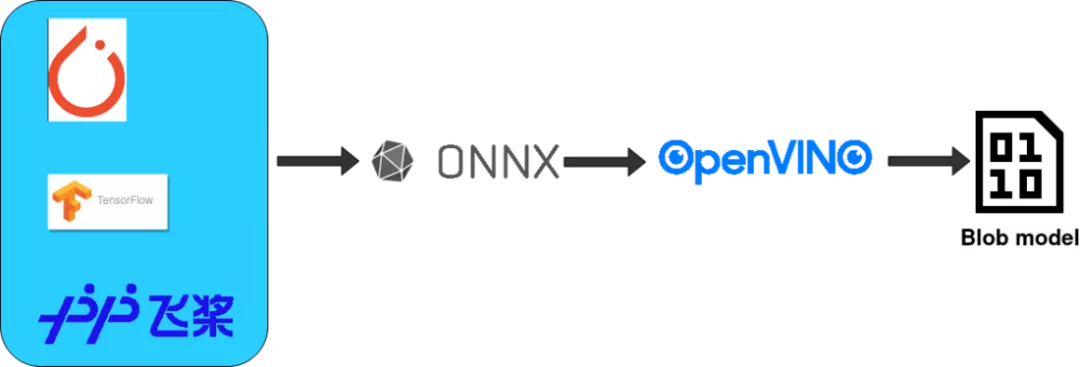
As mentioned earlier, the focus of this article is to demonstrate step by step how to transform the trained Baidu PaddlePaddle PaddleSeg model to ONNX and then to the OpenVINO IR model, and finally compile it into a smaller Blob model until it is deployed to a OAK-D camera containing Intel Movidius Myraid X VPU. At each step, I will provide the corresponding official website URL, step by step to push readers to the correct official website documents and reduce detours.
Let's talk about what this article doesn't say. This article doesn't explain how to install basic requirements frameworks such as Python, Anaconda and OpenVINO. The official website tutorials of the above products are very detailed and will be updated in real time. I don't want my articles to go out of date after a few months. I believe that for each different technology, reading the corresponding official documents can save a lot of trouble and detours. This article will focus more on explaining the transformation, deployment and troubleshooting between models.
1.3 introduction to Intel openvino
Intel OpenVINO (hereinafter referred to as OV) is a comprehensive toolkit released by Intel, which is used to quickly develop applications and solutions to solve various tasks. It includes human vision, automatic speech recognition, natural language processing, recommendation system and so on. The toolkit is based on the latest generation of artificial neural networks, including convolutional neural network (CNN), Recurrent Network and attention-based network ® Hardware extends computer vision and non vision workloads to maximize performance.
1.4 Baidu PaddlePaddle
Baidu PaddlePaddle (hereinafter referred to as Paddle) is a tool set that Baidu is aiming at making AI deep learning technology more innovative and applied. Including PaddleCV, PaddleSeg, PaddleClas and other tools to help you quickly build AI applications and land ai model projects as soon as possible. For friends with tensorflow and pytorch experience, the role of paddy is the same as the previous two, both of which are highly integrated AI frameworks. At present, paddle has a very active developer community, which is conducive to quickly find the answers and help you need.
2. Software for readers and needs
2.1 targeted readers
The readers of this article are developers with certain programming ability and experience, AI model developers, familiar with Python language and using Anaconda. They have trained models and look forward to deploying them to edge devices and putting them into actual production. It is also a good opportunity for 0 basic readers to understand the above technologies and how to use them comprehensively through an article, so as to make them handy tools to help you realize AI deployment as soon as possible.
2.2 required software
Anaconda, Python (it comes with Anaconda virtual environment), OpenVINO, Paddle, PaddleSeg, Paddle2Onnx, mamba.
3, install PaddlePaddle & PaddleSeg
After introducing the above contents or, we can officially start construction now. Since the BiSeNetV2 road segmentation model used in this paper is trained by PaddleSeg, it is necessary to install the base library PaddlePaddle of PaddleSeg. Then install PaddelSeg.
Before installing the paste component, make sure you have installed Anaconda. (address: https://docs.anaconda.com/anaconda/install/index.html )
Step 1: create a conda virtual environment:
conda create -n "paddle" python=3.8.8 ipython
After creating the environment, don't forget to activate the environment:
conda activate paddle
The second step: install GPU or CPU version of PaddlePaddle:
As for whether to choose the GPU or CPU version of the pad, it mainly depends on your hardware configuration. If you have NVIDIA graphics cards in recent years, such as RTX 1060, RTX 2070, etc., please choose to install the GPU version.
Install NVIDIA cudnn first
conda install cudnn
During installation, you can also change conda to Mamba (address: https://github.com/mamba-org/mamba )To get faster download speed.
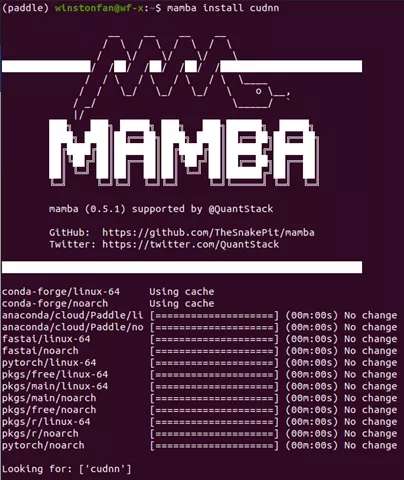
Here is a quick introduction to Mamba. It is a C + + implementation of CONDA. Compared with CONDA, it provides multi-threaded download, which means that it can make better use of network resources and download faster than CONDA. It also resolves dependencies faster. It is estimated that many friends who use CONDA will encounter it. Sometimes CONDA is very slow and takes a long time to find dependencies. Mamba is your good friend. When you see CONDA's commands in the following tutorials, you can automatically replace it with Mamba to improve your speed and make your efficiency fly ~!
When installing PaddlePaddle, the official website of Paddle ( https://www.paddlepaddle.org.cn/ )Is your good friend. (you can generally get the latest guide by finding the official website whenever you install anything). I take Ubuntu 20.04 system as an example (if you use other systems, please select the corresponding options)
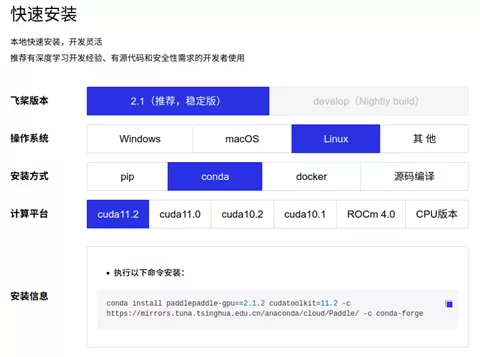
The specific commands are as follows:
conda install paddlepaddle-gpu==2.1.2 cudatoolkit=11.2 -c https://mirrors.tuna.tsinghua.edu.cn/anaconda/cloud/Paddle/ -c conda-forge
After installing the underlying framework, it is time to install paddleseg (address: https://github.com/PaddlePaddle/PaddleSeg )Yes. Similarly, when installing paddleseg, your good friend is still its official website or its Github warehouse.
pip install paddleseg
git clone https://github.com/PaddlePaddle/PaddleSeg
After installing PaddleSeg, we can start the exciting step: export the trained model ~!
4. Model transformation
The transformation of the model is divided into four steps:
-
Export the trained model
-
Convert to ONNX Model
-
adopt ONNX Model conversion to OpenVINO of IR Model
-
Final compilation IR Model becomes.blob Model
4.1 export the trained model
Here I take my pavement segmentation model as an example (if you have your own model, please replace the model in the following example and update the corresponding configuration). The format of the command is as follows:
export CUDA_VISIBLE_DEVICES=0 # Set 1 available card

$ python export.py --config /Github/PaddleSeg/configs/bisenet/bisenet_road_224.yml --model /models/paddle/road_seg_224_miou_9383_6000iter.pdparams
The specific trained model and the code of the training model have been released to Baidu's AI Studio: [AI Creation Camp] pavement segmentation model based on BiSeNetV2. [2] (address: https://aistudio.baidu.com/aistudio/projectdetail/2284078?channelType=0&channel=0 )
If you want to know more parameters, your good friend is the official Github Repository of paddleseg: model export (address: https://github.com/PaddlePaddle/PaddleSeg/blob/release/2.2/docs/export/export/model_export.md )
Let's explain this command.
– config is a file used to specify model configuration parameters. In this document, it explains the name of the model you use. For example, in my example, the model you use is BiSeNetV2. The number of categories you need, the optimizer you use, the loss function, and the batch size are all in this document.
Take a look at bisenetv2_road_224.yml
(address: https://github.com/franva/Intel-OpenVINO-Paddle )Contents of the document
_base_: '../_base_/cityscapes_1024x1024.yml'


train_dataset:

type: Cityscapes

transforms:

- type: RandomPaddingCrop

crop_size: [384, 384]

- type: RandomHorizontalFlip

prob: 0.3

- type: Resize

target_size: [224,224]

- type: Normalize

mode: train


val_dataset:

type: Cityscapes

transforms:

- type: Resize

target_size: [224,224]

- type: Normalize

mode: val


model:

type: BiSeNetV2

num_classes: 2


optimizer:

type: sgd

weight_decay: 0.0005


loss:

types:

- type: CrossEntropyLoss

- type: CrossEntropyLoss

- type: CrossEntropyLoss

- type: DiceLoss

- type: DiceLoss

coef: [1, 1, 1, 1, 1]


batch_size: 8

iters: 6000


lr_scheduler:

type: PolynomialDecay

learning_rate: 0.01

end_lr: 0.0001

decay_steps: 0.9
A trick is to refer to the existing templates in the PaddleSeg project (for example, the configurations / bisenet / bisenet_cityscapes_1024x1024_160k. YML under the PaddleSeg code you just cloned) and trace back to the bottom template level by level, so you can almost know what parameters can be specified in the xml file. At the same time, I also refer to the parameters used in the code when training the AI model, which are basically reflected in the config file.
– model refers to the model file you have trained.
4.2 transfer model to onnx: paddle -- > onnx
After the model is exported, the first conversion starts now. Paddle provides the conversion tool Paddle2onnx. (address: https://github.com/PaddlePaddle/Paddle2ONNX )Let's install it first:
pip install paddle2onnx
It's time to convert the model to ONNX
paddle2onnx \    --model_dir inference \    --model_filename model.pdmodel \    --params_filename model.pdiparams \    --save_file road_seg.onnx \    --opset_version 11

--enable_onnx_checker True
Here is the model_dir, model_filename, and params_filename and save_ Replace file with your own file path
–model_dir is the directory to save the converted model
–enable_ onnx_ The checker starts this, too, and lets the transformation program check the model for us
The problems I encountered at that time:
Opset_ The default value of version is 9 (address: https://github.com/PaddlePaddle/Paddle2ONNX#parameters ), when I switched to BiSeNetV2, I didn't specify this at first, and there was an error. After research, it was found that because the BiSeNetV2 framework is relatively new, I need to set this opset_ Raise the version to 11 and change it to 11. At present, we see that the official website can stably support 11, but we have also seen others use 12. You can try and use it at the same time.
If the conversion is successful, you will see the following similar information:
2021-08-23 22:14:33 [INFO] ONNX model generated is valid.
2021-08-23 22:14:33 [INFO] ONNX model saved in /onnx_models/road_seg.onnx
4.3 converting ONNX model to OpenVINO IR model
After laying the groundwork for a long time, I finally came to this step.
Let's quickly introduce the IR model of OpenVINO. The full name of IR is called intermediate representation. The model in IR format is composed of two files, which are. xml and. bin
Before coming to this step, please make sure that your Intel OpenVINO installation is successful. How do I install Intel OpenVINO? Your good friend will appear again: Intel OpenVINO official website installation tutorial (address: https://docs.openvinotoolkit.org/cn/latest/openvino_docs_install_guides_installing_openvino_linux.html#install-openvino), here is the official download address of Intel OpenVINO( https://software.seek.intel.com/openvino-toolkit )
The three installation options in the Intel OpenVINO installation package are:
-
Image interface GUI install
-
Command line installation
-
Command line installation quiet mode
For novices, it is recommended to install with GUI, which is clear and clear.
4.3.1 setting external software dependencies
After successful installation, remember to Install External Software Dependencies (address:
https://docs.openvinotoolkit.org/cn/latest/openvino_docs_install_guides_installing_openvino_linux.html#install -It is necessary to follow the requirements of external dependencies.
4.3.2 activate Intel OpenVINO environment variable
Tip: to use ov next, set its environment variables. Official tutorial (address: https://docs.openvinotoolkit.org/cn/latest/openvino_docs_install_guides_installing_openvino_linux.html#set -The environment variables) requires that the environment variables be loaded into your. bashrc file, so that the environment variables of OV can be loaded automatically every time you open any command line interface. But I found a problem in the actual use. After installing ov, some of my programs begin to report errors, and an error message related to GStreamer appears. After research, it is found that the original ov environment variables will conflict with Anaconda's virtual environment, resulting in problems with GStreamer.
In fact, the solution is also very simple. Generally, we only use ov during model transformation, so we don't set the environment variable of OV to the. bashrc file. We just need to activate the environment variable of OV on the command line before using ov. The method of activating environment variables is as follows:
source /opt/intel/openvino_2021/bin/setupvars.sh
Remember / opt/intel/openvino_2021/bin is the default OV installation path. If you change the path, please remember to change the path here.
4.3.3 configure Model Optimizer(MO)
Believe me, comrades, I know the process is very long, but the dawn is at hand ~! This is the last step to adjust before turning to OpenVINO IR model. Hold on ~!
MO is a Python based command line tool that can be used to import trained models from other popular artificial intelligence frameworks, such as Caffe, ONNX, TensorFlow, etc. Models that have not been optimized with MO cannot be used for reasoning on OV.
In this step, you can only configure the environment you need, such as ONNX or Tensorflow, but you can also configure the environment suitable for various artificial intelligence frameworks. I chose the latter here. After all, the road is slow and far away. Now it is possible to use any other network after using ONNX.
The first step is to CD to the folder set by MO:
cd/opt/intel/openvino_2021/deployment_tools/model_optimizer/install_prerequisites
Then run the following command to install the required dependencies:
sudo ./install_prerequisites.sh
4.3.4 switch ONNX model to IR mode
cd /opt/intel/openvino_2021/deployment_tools/model_optimizer

python mo_onnx.py --input_model /inference/onnx_models/road_seg.onnx \

--output_dir /openvino/FP16 \

--input_shape [1,3,224,224] \

--data_type FP16 \

--scale_values [127.5,127.5,127.5] \

--mean_values [127.5,127.5,127.5]
As can be seen from the command line above, you can use
–data_type to specify the accuracy of the model,
–input_shape to specify the shape of the image the model accepts.
The two key points I want to talk about are - mean_value(MV) and – scale_values(SV).
If these two parameters are specified when turning to the IR model, Normalization can be omitted when reasoning with the model later. Maybe you don't think this is useful, but these two options save me a lot of things. They will directly generate two operations inside the model to help you normalize.
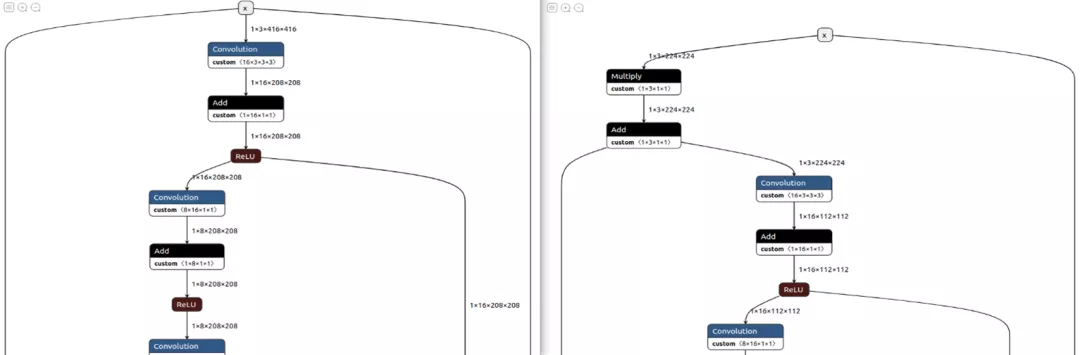
Figure 7: models without MV and SV are shown on the left, and models with MV and SV are included on the right
If the conversion is successful, you will see the following output:
Model Optimizer arguments:

Common parameters:

        - Path to the Input Model:   /inference/onnx_models/road_seg.onnx

        - Path for generated IR:        /openvino/FP16

        - IR output name:  road_seg

        - Log level:     ERROR

        - Batch:  Not specified, inherited from the model

        - Input layers:         Not specified, inherited from the model

        - Output layers:     Not specified, inherited from the model

        - Input shapes:       [1,3,224,224]

        - Mean values:       [127.5,127.5,127.5]

        - Scale values:        [127.5,127.5,127.5]

        - Scale factor:         Not specified

        - Precision of IR:    FP16

        - Enable fusing:     True

        - Enable grouped convolutions fusing:        True

        - Move mean values to preprocess section:        None

        - Reverse input channels:     False

ONNX specific parameters:

        - Inference Engine found in:          /opt/intel/openvino_2021/python/python3.8/openvino Inference Engine version:          2021.4.0-3839-cd81789d294-releases/2021/4 Model Optimizer version:      2021.4.0-3839-cd81789d294-releases/2021/4

[ SUCCESS ] Generated IR version 10 model.

[ SUCCESS ] XML file: /openvino/FP16/road_seg.xml

[ SUCCESS ] BIN file: /openvino/FP16/road_seg.bin

[ SUCCESS ] Total execution time: 10.50 seconds.

[ SUCCESS ] Memory consumed: 142 MB.
So far, if you don't pursue a smaller volume model, congratulations. The IR model can be directly run on Intel's Movidius Myriad X VPU. There is no difference in reasoning performance from the compiled model, but it will be slightly slower than the compiled model when reading the model, but it only occurs when the program initializes and reads the model
4.4 verify the converted IR model
Before proceeding, we should check whether the model is really transformed successfully.
Before running the following code, please change a command line window and start the Anaconda environment created before. This is to ensure that the environment variables of OV and Conda do not conflict with each other and generate errors.
Run the following code ir.py to check the correctness of the converted model:
import numpy as np

from openvino.inference_engine import IENetwork, IECore

import cv2

import paddleseg.transforms as T


def get_net(model_xml, model_bin, device_name="MYRIAD"):

ie = IECore()

# Read IR

net = IENetwork(model=model_xml, weights=model_bin)

input_blob = next(iter(net.inputs))

exec_net = ie.load_network(network=net, device_name=device_name)

del net

return exec_net, input_blob


def save_img(img, img_fn):

cv2.imwrite(img_fn, img)


model_xml = r'/openvino/ FP16/road_seg_half.xml'

model_bin = r'/openvino/ FP16/road_seg_half.bin'


transforms = [

T.Resize(target_size=(224,224))

]


# Run inference

img_fn = '/data/boxhill_079.jpeg'

img = cv2.imread(img_fn)


img, _ = T.Compose(transforms)(img)

# add an new axis in front

img_input = img[np.newaxis, :]

exec_net, input_blob = get_net(model_xml, model_bin)

result = exec_net.infer(inputs={input_blob: img_input})

img_segmentation = result['save_infer_model/scale_0.tmp_1']

img_segmentation = np.squeeze(img_segmentation)

class_colors = [[0,0,0], [0,255,0]]

class_colors = np.asarray(class_colors, dtype=np.uint8)

img_mask = class_colors[img_segmentation]

img_mask, _ = T.Compose(transforms)(img_mask)

img_overlayed = cv2.addWeighted(img, 0.8, img_mask, 0.2, 0.5)

img_overlayed = img_overlayed.transpose(1,2,0)

img_overlayed = cv2.cvtColor(img_overlayed, cv2.COLOR_RGB2BGR)

save_img(img_overlayed, 'demo.jpg')
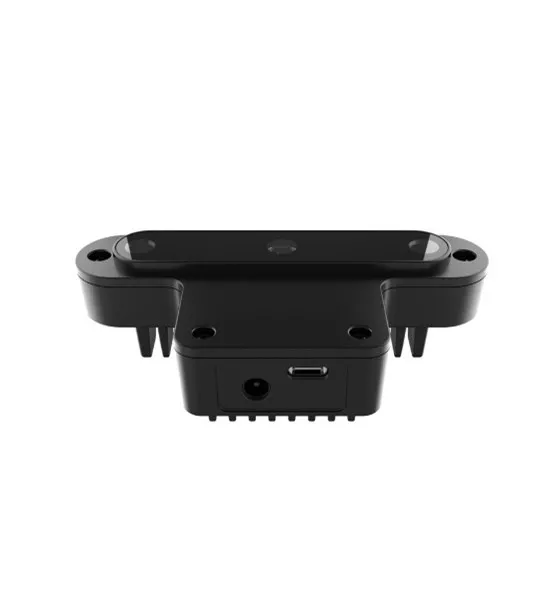
Before running the program, please remember to link your device with Intel Movidius Myriad X VPU to the computer. I use OAK-D Camera here.
Please replace the image and IR model path in the code
If successful, it should be seen that the pavement segmentation model will automatically recognize the pavement part and add a translucent green layer on the pavement of the original image, as shown in the following figure:
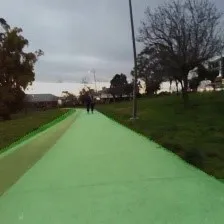
So far, congratulations on not only transferring the model to the IR format of Intel OpenVINO, but also successfully deploying it to Intel VPU.
Device in the code_ Name = "MYRIAD" specifies the deployment direction of the model. In addition to MYRIAD, it can also be CPU, etc.
4.5 compile IR model in Blob format
Finally, if you want to improve, not only deploy to the VPU, but also further reduce the model volume, you can compile the IR model with Intel OpenVINO. The specific commands are as follows:
(base) winstonfan@wf-x:/opt/intel/openvino_2021/deployment_tools/tools/compile_tool$ ./compile_tool -m /openvino/FP16/road_seg.xml \

-d MYRIAD \

-o /openvino/compiled_u8.blob \

-ip U8 \

-il NCHW

Inference Engine:

        IE version ......... 2021.4.0

        Build ........... 2021.4.0-3839-cd81789d294-releases/2021/4

Network inputs:

 x : U8 / NCHW

Network outputs:

save_infer_model/scale_0.tmp_1 : I32 / CHW

[Warning][VPU][Config] Deprecated option was used : VPU_MYRIAD_PLATFORM

Done. LoadNetwork time elapsed: 20295 ms
Tip: if you don't know the meaning of each parameter, you can use the - h parameter to get the parameter description.
4.6 test Blob model
In fact, the idea of verifying the compiled Blob model is the same as the IR model. The only code that needs to be replaced is the code when it is transferred into the neural network.
The code is as follows: blob_infer_img.py (address: https://github.com/franva/Intel-OpenVINO-Paddle ):
import time

import cv2

import numpy as np

from openvino.inference_engine import IECore

import paddleseg.transforms as T


def get_net(model_blob, device_name='MYRIAD'):

ie = IECore()

exec_net = ie.import_network(model_blob, device_name = device_name)

input_blob = next(iter(exec_net.inputs))

return exec_net, input_blob


def save_img(img, img_fn):

cv2.imwrite(img_fn, img)


# Run inference

img_fn = '/data/boxhill_079.jpeg'

img = cv2.imread(img_fn)


transforms = [

T.Resize(target_size=(224,224))

]


model_blob = r'/openvino/blob/ model_uint8.blob'


img, _ = T.Compose(transforms)(img)

# add an new axis in front

img_input = img[np.newaxis, :]

t1 = time.time()

exec_net, input_blob = get_net(model_blob)

result = exec_net.infer(inputs={input_blob: img_input})

print(' time used : {}'.format(time.time() - t1))

img_segmentation = result['save_infer_model/scale_0.tmp_1']

# img_segmentation is int32

img_segmentation = np.squeeze(img_segmentation)

class_colors = [[0,0,0], [0,255,0]]

class_colors = np.asarray(class_colors, dtype=np.uint8)

img_mask = class_colors[img_segmentation]

img_mask, _ = T.Compose(transforms)(img_mask)

img_overlayed = cv2.addWeighted(img, 0.8, img_mask, 0.2, 0.5)

img_overlayed = img_overlayed.transpose(1,2,0)

img_overlayed = cv2.cvtColor(img_overlayed, cv2.COLOR_RGB2BGR)

save_img(img_overlayed, "demo2.jpg")
So far, the whole process is over. Congratulations on the successful implementation of the model and its deployment to edge devices. Look forward to seeing your wonderful applications!
Finally, attach Github's accompanying code base for this article (address: https://github.com/franva/Intel-OpenVINO-Paddle ), welcome your valuable comments.
5. Summary
At the beginning of this paper, image segmentation and semantic segmentation are introduced, and the importance of deploying models to edge devices is expounded. A quick introduction to Intel's OpenVINO and Baidu's PaddlePaddle framework is presented. Then take a well trained Baidu PaddlePaddle Paddle model as an example, start with step by step, transform the model into the OpenVINO format, and compile and optimize it until you deploy it to the Movidius Myriad X VPU of Intel. For different models, you can quickly and independently develop your own AI applications with only appropriate changes. (author: western region spinach)