Deploy PHP projects under linux - Apache, php, mysql associations
Keywords:
Linux
MySQL
PHP
Apache
yum
Deploying PHP project environment under linux can be divided into two kinds, one is using Apache, php, mysql package installation, and the other is using yum command to install.
To install with compressed packages of three kinds of software, it is necessary to configure the relationship between them manually. The configuration between apache and PHP is not difficult, but when configuring with mysql, you need to understand php.
The following is to configure the php environment in linux with yum:
MySql
1.mysql and apache are best installed first, because when configuring php, they need to be associated with mysql and apache for configuration and testing.
First download mysql-sever file, because the blogger linux environment is the version of CentOS, yum source does not seem to have the normal installation of mysql-sever file, need to go to the official website to download.
1.downloadmysql-servicefile
[root@tele-1 ~]# wget http://dev.mysql.com/get/mysql-community-release-el7-5.noarch.rpm
2. Install mysql-service file
[root@tele-1 ~]# rpm -ivh mysql-community-release-el7-5.noarch.rpm
2. Install mysql
[root@tele-1 ~]# yum install mysql-community-server
3. Start mysql service after installation
[root@tele-1 ~]# service mysqld restart
4. Initially installed mysql has no password, and the default user name is root. So we need to change the password and use the mysql command line to change it.
1.Get into mysql command line
[root@tele-1 ~]# mysql -uroot
Welcome to the MySQL monitor.  Commands end with ; or \g.
Your MySQL connection id is 474801
Server version: 5.6.36 MySQL Community Server (GPL)

Copyright (c) 2000, 2017, Oracle and/or its affiliates. All rights reserved.

Oracle is a registered trademark of Oracle Corporation and/or its
affiliates. Other names may be trademarks of their respective
owners.

Type 'help;' or '\h' for help. Type '\c' to clear the current input statement.

mysql>
2. Use commands to modify passwords
mysql> set password for 'root'@'localhost' = password('The password you want to change');
Query OK, 0 rows affected (0.06 sec)
5. Because bloggers use local navicat software to connect mysql under linux, if they want to access it locally, they need to change the user table in MySQL database.
1.operation mysql Database table
mysql> use mysql;
Reading table information for completion of table and column names
You can turn off this feature to get a quicker startup with -A

Database changed
mysql>
2. View the data in the user table (you can write sql statements directly from the mysql command line)
mysql> select * from user;
+-----------+------+-----------------------------------+-------------+-------------+-------------+-------------+-------------+-----------+-------------+---------------+--------------+-----------+------------+-----------------+------------+------------+--------------+------------+-----------------------+------------------+--------------+-----------------+------------------+------------------+----------------+---------------------+--------------------+------------------+------------+--------------+------------------------+----------+------------+-------------+--------------+---------------+-------------+-----------------+----------------------+-----------------------+-----------------------+------------------+
| Host      | User | Password                                  | Select_priv | Insert_priv | Update_priv | Delete_priv | Create_priv | Drop_priv | Reload_priv | Shutdown_priv | Process_priv | File_priv | Grant_priv | References_priv | Index_priv | Alter_priv | Show_db_priv | Super_priv | Create_tmp_table_priv | Lock_tables_priv | Execute_priv | Repl_slave_priv | Repl_client_priv | Create_view_priv | Show_view_priv | Create_routine_priv | Alter_routine_priv | Create_user_priv | Event_priv | Trigger_priv | Create_tablespace_priv | ssl_type | ssl_cipher | x509_issuer | x509_subject | max_questions | max_updates | max_connections | max_user_connections | plugin                | authentication_string | password_expired |
+-----------+------+-----------------------------------+-------------+-------------+-------------+-------------+-------------+-----------+-------------+---------------+--------------+-----------+------------+-----------------+------------+------------+--------------+------------+-----------------------+------------------+--------------+-----------------+------------------+------------------+----------------+---------------------+--------------------+------------------+------------+--------------+------------------------+----------+------------+-------------+--------------+---------------+-------------+-----------------+----------------------+-----------------------+-----------------------+------------------+
| %         | root | *3ce8dad2446975d8b0c771bd7e48d15b | Y           | Y           | Y           | Y           | Y           | Y         | Y           | Y             | Y            | Y         | Y          | Y               | Y          | Y          | Y            | Y          | Y                     | Y                | Y            | Y               | Y                | Y                | Y              | Y                   | Y                  | Y                | Y          | Y            | Y                      |          |            |             |              |             0 |           0 |               0 |                    0 | mysql_native_password |                       | N                |
| localhost | root | *3ce8dad2446975d8b0c771bd7e48d15b | Y           | Y           | Y           | Y           | Y           | Y         | Y           | Y             | Y            | Y         | Y          | Y               | Y          | Y          | Y            | Y          | Y                     | Y                | Y            | Y               | Y                | Y                | Y              | Y                   | Y                  | Y                | Y          | Y            | Y                      |          |            |             |              |             0 |           0 |               0 |                    0 | mysql_native_password |                       | N                |
| 127.0.0.1 | root | *3ce8dad2446975d8b0c771bd7e48d15b | Y           | Y           | Y           | Y           | Y           | Y         | Y           | Y             | Y            | Y         | Y          | Y               | Y          | Y          | Y            | Y          | Y                     | Y                | Y            | Y               | Y                | Y                | Y              | Y                   | Y                  | Y                | Y          | Y            | Y                      |          |            |             |              |             0 |           0 |               0 |                    0 | mysql_native_password |                       | N                |
| ::1       | root | *3ce8dad2446975d8b0c771bd7e48d15b | Y           | Y           | Y           | Y           | Y           | Y         | Y           | Y             | Y            | Y         | Y          | Y               | Y          | Y          | Y            | Y          | Y                     | Y                | Y            | Y               | Y                | Y                | Y              | Y                   | Y                  | Y                | Y          | Y            | Y                      |          |            |             |              |             0 |           0 |               0 |                    0 | mysql_native_password |                       | N                |
| tele-1    |      |                                           | N           | N           | N           | N           | N           | N         | N           | N             | N            | N         | N          | N               | N          | N          | N            | N          | N                     | N                | N            | N               | N                | N                | N              | N                   | N                  | N                | N          | N            | N                      |          |            |             |              |             0 |           0 |               0 |                    0 | mysql_native_password | NULL                  | N                |
+-----------+------+-----------------------------------+-------------+-------------+-------------+-------------+-------------+-----------+-------------+---------------+--------------+-----------+------------+-----------------+------------+------------+--------------+------------+-----------------------+------------------+--------------+-----------------+------------------+------------------+----------------+---------------------+--------------------+------------------+------------+--------------+------------------------+----------+------------+-------------+--------------+---------------+-------------+-----------------+----------------------+-----------------------+-----------------------+------------------+
5 rows in set (0.00 sec)

mysql>
3. The blogger's table is a modified table. If you want to access it remotely, you need the data labeled red above. Host refers to the ip address that can access the database. Percentage means that all requests can be connected.
You can modify a data, you can also add a data. But it's better not to modify the data marked in blue above. The format of the modification statement is below.
mysql> update user set Host = '%' where ???
4. Finally, exit or\q are both ways to exit the mysql command line
mysql> \q
Bye
Installing Apache
1.apache installation method is relatively simple
[root@tele-2 ~]# yum install httpd
2. When an external network accesses the address in the virtual machine, we need to modify the apache configuration file/etc/httpd/conf/httpd.conf.
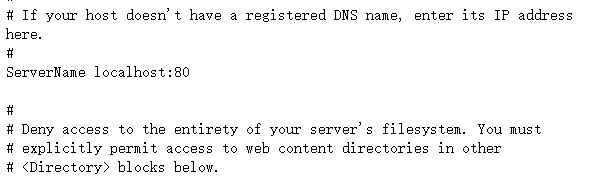
Find # ServerName www.example.com:80 and change it to ServerName localhost:80
As shown on the right:
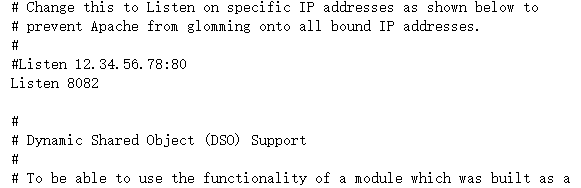
Find \ Listen "instead of \ Listen: 8080 (the port number open in Linux is 80XX)
As shown on the right:
3. We need to restart the httpd service and check the startup status after the modification is completed.
[root@tele-2 ~]# service httpd start
Redirecting to /bin/systemctl start  httpd.service
[root@tele-2 ~]# service httpd status
Redirecting to /bin/systemctl status  httpd.service
● httpd.service - The Apache HTTP Server
   Loaded: loaded (/usr/lib/systemd/system/httpd.service; enabled; vendor preset: disabled)
   Active: active (running) since Mon 2017-06-05 15:57:34 CST; 5s ago
     Docs: man:httpd(8)
           man:apachectl(8)
  Process: 54532 ExecStop=/bin/kill -WINCH ${MAINPID} (code=exited, status=0/SUCCESS)
  Process: 39046 ExecReload=/usr/sbin/httpd $OPTIONS -k graceful (code=exited, status=0/SUCCESS)
 Main PID: 54573 (httpd)
   Status: "Processing requests..."
   Memory: 15.8M
   CGroup: /system.slice/httpd.service
           ├─54573 /usr/sbin/httpd -DFOREGROUND
           ├─54576 /usr/sbin/httpd -DFOREGROUND
           ├─54577 /usr/sbin/httpd -DFOREGROUND
           ├─54578 /usr/sbin/httpd -DFOREGROUND
           ├─54579 /usr/sbin/httpd -DFOREGROUND
           └─54580 /usr/sbin/httpd -DFOREGROUND

Jun 05 15:57:34 tele-2 systemd[1]: Starting The Apache HTTP Server...
Jun 05 15:57:34 tele-2 systemd[1]: Started The Apache HTTP Server.
4. At this point, you can access your server, enter the localhost or ip address, and an Apache test page powered by centos test page appears.
PHP
1.php installation command
[root@tele-2 ~]# yum install php
2. Install all the way directly and restart httpd service after installation
[root@tele-2 ~]# service httpd start
Redirecting to /bin/systemctl start  httpd.service
3. After reboot, we test PHP related information, and we build a new PHP interface for testing.
Create a new test.php page under apache default page path/var/www/html and add code
<?php
 phpinfo();
?>

4. Visit this page, enter localhost/test.php, or
ip: Port number / test.php can see the configuration information of the php environment. As shown in the right picture:
Associate php with mysql
1. Search module
[root@tele-2 ~]# yum search php
2. Installation of relevant modules
[root@tele-2 ~]# yum install php-mysql php-gd php-imap php-ldap php-odbc php-pear php-xml php-xmlrpc
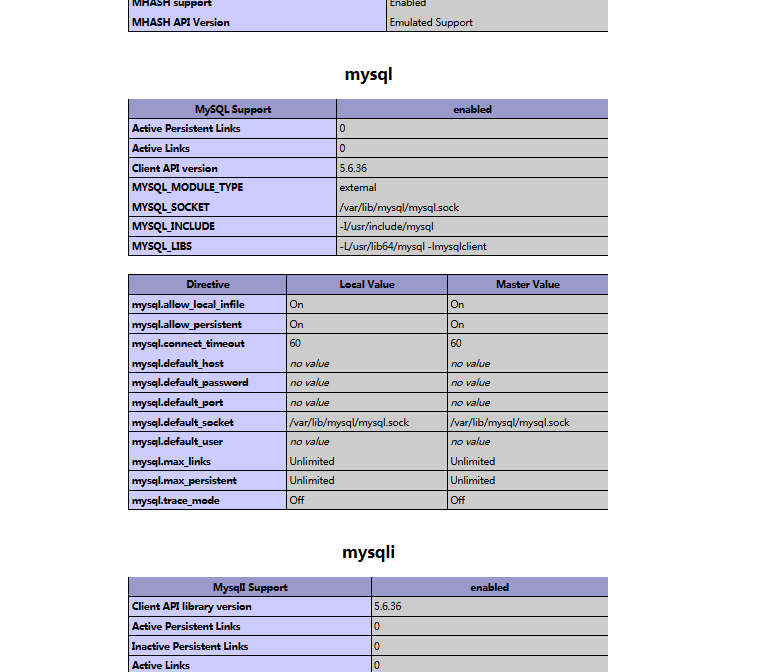
3. Installation complete, restart mysqld, restart httpd
Re-visit info.php, we found that MySQL has more information. As shown in the right picture:
At this point, the running environment of php in linux has been successfully configured.
1.mysql yum installs default folders and related commands
Database directory: / var/lib/mysql/

Configuration file: / usr/share/mysql (mysql.server command and configuration file)

Related commands: / usr/bin (commands such as mysqladmin mysqldump, etc.)

my.cnf: /etc/my.cnf

Start script: / etc/rc.d/init.d/(directory of startup script file mysql)
Start command: service mysql start
Stop command: service mysql stop
Running status: service mysql status
2.apache
Configuration file path: / etc/httpd/conf/httpd.conf
Start command: service httpd start
Stop command: service httpd stop
Running status: service httpd status
3.php
php default page path: / var/www/html
Related links:
http://www.centoscn.com/mysql/2014/0919/3778.html
http://www.cnblogs.com/IEBD/p/4563840.html
http://ernestchen.iteye.com/blog/1838168
Posted by cyberdwarf on Tue, 18 Dec 2018 01:51:04 -0800