1) environmental description
1. A total of 7 hosts are required, and their roles are as follows:
    A.  192.168.36.6(OS6): test
    B.  192.168.36.7(OS7): localdns
    C.  192.168.36.17(OS7): rootdns
    D.  192.168.36.27(OS7): comdns
    E.  192.168.36.37(OS7): master
    F.  192.168.36.47(OS7): slave
    G.  192.168.36.57(OS7): www
2. Close iptables and selinux
3. Set the corresponding IP address and do not set DNS, and modify the host name for easy identification
4. The test host does not set DNS server and can ping all DNS servers and www servers.
2) deploy www website
    1. Install http server: yum install httpd -y
    2. Generate an index.html homepage file: echo www.haha.com > / var / www / HTML / index.html
    3. Start httpd service: systemctl start httpd & & systemctl enable httpd
4. Test host test: curl 192.168.36.57 
3) deploy master:
    1.  install DNS The server: yum install bind -y
    2.  modify DNS Master profile: vim /etc/named.conf
                //  listen-on port 53 { 127.0.0.1; };
                        allow-transfer {192.168.36.47;};  #Allow 192.168.36.47 to grab dns information
                //  allow-query     { localhost; };
    3.  modify zone Profile: vim /etc/named.rfc1912.zones ,Add domain name information
                zone "magedu.com" {
                        type master;
                        file "magedu.com.zone";
                };
    4.  copy zone Database and keep properties: cp -p /var/named/named.localhost /var/named/magedu.com.zone
    5.  Modify master DNS Database content: vim /var/named/magedu.com.zone
                $TTL 1D
                @      IN   SOA     master   admin.magedu.com. (
                                                                2   ; serial
                                                                1D  ; refresh
                                                                1H  ; retry
                                                                1W  ; expire
                                                                3H )    ; minimum
                            NS    master
                            NS    slave  #First configure the
                master      A      192.168.36.37
                slave       A      192.168.36.47   #A record from DNS server
                www         A      192.168.36.57
    6.  Check profile: named-checkconf
    7.  start-up named Services: systemctl start named && systemctl enable named
    8.  test Host test: dig www.magedu.com @192.168.36.37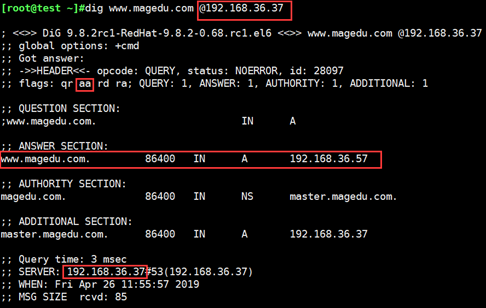
4) deploy slave:
    1.  install DNS The server: yum install bind -y
    2.  modify DNS Master profile: vim /etc/named.conf
                //  listen-on port 53 { 127.0.0.1; };
                        allow-transfer {none;};  No grab dns information
                //  allow-query     { localhost; };
    3.  modify cone Profile: vim /etc/named.rfc1912.zones  Add point to main DNS information
                zone "magedu.com" {
                        type slave;
                        masters {192.168.36.37;};
                        file "slaves/magedu.com.zone.slave";
                };
    4.  Check profile: named-checkconf
    5.  start-up named Services: systemctl start named && systemctl enable named
    6.  See ls /var/named/slaves/ Is there a master Synced zone file
7. test Host test: dig www.magedu.com @192.168.36.47 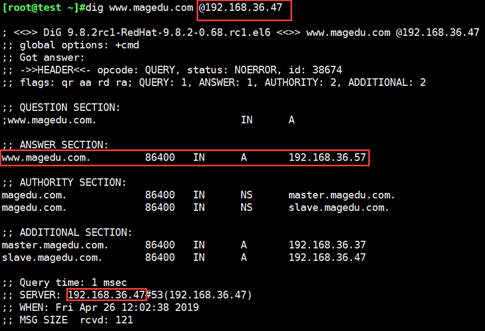
5) deploy comdns
    1.  install DNS The server: yum install bind -y
    2.  modify DNS Master profile: vim /etc/named.conf
                //  listen-on port 53 { 127.0.0.1; };
                //  allow-query     { localhost; };
    3.  modify zone Profile: vim /etc/named.rfc1912.zones  Add secondary domain name
                zone "com" {
                        type master;
                        file "com.zone";
                };
    4.  copy zone Database and keep properties: cp -p /var/named/named.localhost /var/named/com.zone
    5.  Modify database contents: vim /var/named/com.zone
                $TTL 1D
                @   IN          SOA   master   admin.magedu.com. (
                                                    1   ; serial
                                                    1D  ; refresh
                                                    1H  ; retry
                                                    1W  ; expire
                                                    3H )    ; minimum
                                NS  master
                magedu          NS  magedudns1   #Subdomain DNS server
                magedu          NS  magedudns2   #Subdomain DNS server
                master          A   192.168.36.27
                magedudns1      A   192.168.36.37   #A record of the subdomain DNS server
                magedudns2      A   192.168.36.47   #A record of the subdomain DNS server
    6.  Check profile: named-checkconf
    7.  start-up named Services: systemctl start named && systemctl enable named
8. test Host test: dig www.magedu.com @192.168.36.27 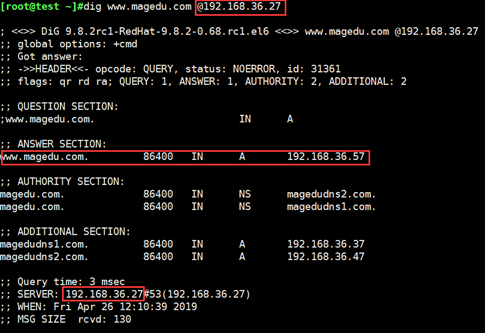
6) deploy rootdns
    1.  install DNS The server: yum install bind -y
    2.  modify DNS Master profile: vim /etc/named.conf
                //  listen-on port 53 { 127.0.0.1; };
                //  allow-query     { localhost; };
                #Modify the root to point to itself, as follows:
                zone "." IN {
                    type master;
                    file "root.zone";
                };
    3.  copy zone Database and keep properties: cp -p /var/named/named.localhost /var/named/root.zone
    4.  Modify database contents: vim /var/named/com.zone
                $TTL 1D
                @   IN      SOA master   admin.magedu.com. (
                                                1   ; serial
                                                1D  ; refresh
                                                1H  ; retry
                                                1W  ; expire
                                                3H )    ; minimum
                            NS  master
                com         NS  comdns   #Subdomain DNS server
                master      A   192.168.36.17
                comdns      A   192.168.36.27    #A record of the subdomain DNS server
    5.  Check profile: named-checkconf
    6.  start-up named Services: systemctl start named && systemctl enable named
7. test Host test: dig www.magedu.com @192.168.36.17 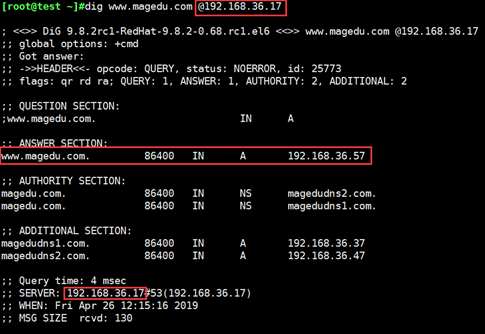
7) deploy localdns
    1.  install DNS The server: yum install bind -y
    2.  modify DNS Master profile: vim /etc/named.conf
                //  listen-on port 53 { 127.0.0.1; };
                //  allow-query     { localhost; };
                #Close dnssec function as follows:
                    dnssec-enable no;
                    dnssec-validation no;
    3.   Modify the root server that points to: vim /var/named/named.ca,Leave only 2 lines of content.
                .           518400  IN  NS  a.root-servers.net.
                a.root-servers.net. 3600000 IN  A   192.168.36.17
    4.  Check profile: named-checkconf
    5.  start-up named Services: systemctl start named && systemctl enable named
8) use the rndc flush command to clear the records of all DNS servers
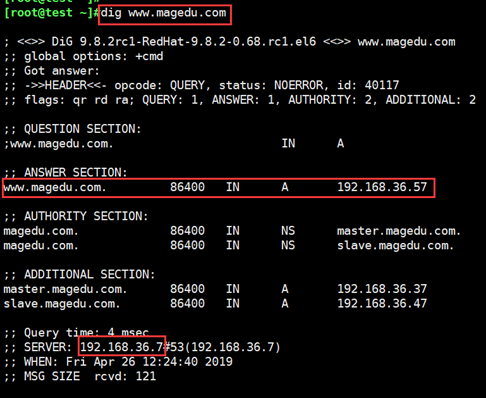
9) modify the dns of test host to point to local dns
    1.  DNS1=192.168.36.7
    2.  service network restart
    3. Cat / etc / resolv.conf check whether DNS is effective
    4. Test host test: dig www.magedu.com @192.168.36.7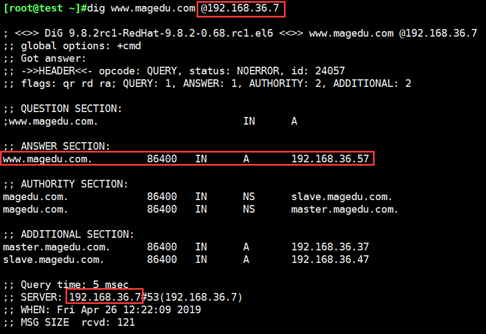
10) test DNS master-slave function
    1. Use the rndc flush command to clear the records of all DNS servers
    2. Stop the DNS service on the master server: systemctl stop named
    3. Test host test: dig www.magedu.com