1. Background
In daily development, delayed task is an unavoidable topic. In order to achieve the purpose of delay, there will be different solutions in different scenarios. The awareness of the advantages and disadvantages of each scheme determines the effectiveness of architecture decision-making.
In this article, taking the e-commerce order overtime non payment as the business scenario, a variety of solutions are derived, and the advantages and disadvantages of each solution are analyzed. The solutions involved include:
1. Database polling scheme. 2. Stand alone memory solution. 3. Distributed delay queue scheme.
Finally, in order to improve R & D efficiency, we will use declarative programming idea to encapsulate the distributed delay queue scheme and effectively separate business and technology.
1.1 business scenario
The business scenario is very simple. It is the most familiar e-commerce order. I believe many careful partners have found that after we place an order on the e-commerce platform, if it has not been paid for more than a certain time, the system will automatically set the order to timeout and cancel automatically, so as to release the bound resources.
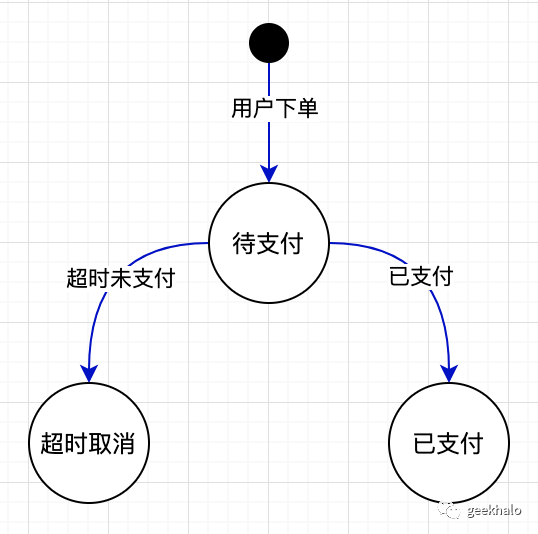
The core process is as follows:
1. Place an order on the e-commerce platform and generate an order to be paid; 2. If the payment is not completed within the specified time, the system will automatically cancel the order, and the order status will change to "timeout cancellation"; 3. If the payment is completed within the specified time, the order will become "paid"
The order status machine is as follows:
State machine
1.2 introduction to basic components
The whole Demo adopts the design idea of DDD. In order to facilitate understanding, first introduce the basic components involved:
1.2.1. OrderInfo
The order aggregation root provides business methods such as build and cancel. The specific codes are as follows:
@Data
@Entity
@Table(name = "order_info")
public class OrderInfo {

    @Id
    @GeneratedValue(strategy = GenerationType.IDENTITY)
    private Long id;

    @Column(name = "status")
    @Enumerated(EnumType.STRING)
    private OrderInfoStatus orderStatus;

    @Column(name = "create_time")
    private Date createTime = new Date();

    /**
     * cancellation of order
     */
    public void cancel() {
        setOrderStatus(OrderInfoStatus.CANCELLED);
    }

    /**
     * Create order
     * @param createDate
     * @return
     */
    public static OrderInfo create(Date createDate){
        OrderInfo orderInfo = new OrderInfo();
        orderInfo.setCreateTime(createDate);
        orderInfo.setOrderStatus(OrderInfoStatus.CREATED);
        return orderInfo;
    }
}
1.2.2 OrderInfoRepository
It is implemented based on Spring Data Jpa and is mainly used for database access. The code is as follows:
public interface OrderInfoRepository extends JpaRepository<OrderInfo, Long> {
    List<OrderInfo> getByOrderStatusAndCreateTimeLessThan(OrderInfoStatus created, Date overtime);
}
Spring Data will generate proxy objects according to method signatures or @ Query annotations. We can achieve basic database access without writing any code.
1.2.3. OrderInfoService
The application service layer, oriented to User Case, mainly completes the business process arrangement, and the check code is as follows:
@Service
@Slf4j
public class OrderInfoService {
    @Autowired
    private ApplicationEventPublisher eventPublisher;

    @Autowired
    private OrderInfoRepository orderInfoRepository;


    /**
     * Generate doc interface < br / >
     * 1. Create order and save to database
     * 2. Publish domain events to trigger subsequent processing
     * @param createDate
     */
    @Transactional(readOnly = false)
    public void create(Date createDate){
        OrderInfo orderInfo = OrderInfo.create(createDate);
        this.orderInfoRepository.save(orderInfo);
        eventPublisher.publishEvent(new OrderInfoCreateEvent(orderInfo));
    }

    /**
     * cancellation of order
     * @param orderId
     */
    @Transactional(readOnly = false)
    public void cancel(Long orderId){
        Optional<OrderInfo> orderInfoOpt = this.orderInfoRepository.findById(orderId);
        if (orderInfoOpt.isPresent()){
            OrderInfo orderInfo = orderInfoOpt.get();
            orderInfo.cancel();
            this.orderInfoRepository.save(orderInfo);
            log.info("success to cancel order {}", orderId);
        }else {
            log.info("failed to find order {}", orderId);
        }
    }

    /**
     * Find orders that have not been paid over time
     * @return
     */
    @Transactional(readOnly = true)
    public List<OrderInfo> findOvertimeNotPaidOrders(Date deadLine){
        return this.orderInfoRepository.getByOrderStatusAndCreateTimeLessThan(OrderInfoStatus.CREATED, deadLine);
    }
}
1.2.4. OrderController
The externally exposed Web interface provides the interface to create orders, which is mainly used for testing. The code is as follows:
@RestController
@RequestMapping("order")
public class OrderController {
    @Autowired
    private OrderInfoService orderInfoService;

    /**
     * Generate new orders, mainly for testing
     */
    @PostMapping("insertTestData")
    public void createTestOrder(){
        Date date = DateUtils.addMinutes(new Date(), -30);
        date = DateUtils.addSeconds(date, 10);
        this.orderInfoService.create(date);
    }
}
After introducing the dependent components, let's enter the first scheme.
2. Database polling scheme
This is the simplest scheme. The creation time of each order is saved. You only need to write a scheduled task, query the expired but unpaid orders from the database, and cancel the orders in turn.
2.1. Scheme realization
The core process is as follows:

Database polling scheme
1. The user creates an order and saves the order information to the database; 2. Set a scheduled task and trigger an inspection task every second; 3. The task is executed according to the following steps • first find the overdue order from the database; • Execute the scheduled Cancel operation in sequence; • Save the changes to the database;
The core code is as follows:
@Service
@Slf4j
public class DatabasePollStrategy {
    @Autowired
    private OrderInfoService orderInfoService;

    /**
     * Run every 1S < br / >
     * 1. Query overdue unpaid orders from DB (status is CREATED, creation time is less than deadLintDate)
     * 2. Cancel the order in sequence
     */
    @Scheduled(fixedDelay = 1 * 1000)
    public void poll(){
        Date now = new Date();
        Date overtime = DateUtils.addMinutes(now, -30);
        List<OrderInfo> overtimeNotPaidOrders = orderInfoService.findOvertimeNotPaidOrders(overtime);
        log.info("load overtime Not paid orders {}", overtimeNotPaidOrders);
        overtimeNotPaidOrders.forEach(orderInfo -> this.orderInfoService.cancel(orderInfo.getId()));
    }
}
2.2. Scheme summary
1. Advantages: simple • simple development. Low system complexity, especially with the help of Spring Schedule; • The test is simple. There is no external dependency, and the logic is centralized, which is convenient to locate the problem quickly; • It's easy to go online. No cumbersome configuration and complex application process; 2. Disadvantages: • heavy burden on database. Continuous polling will increase the load on the database; • Insufficient timeliness. The maximum task delay is polling time, which is not suitable for scenarios with high timeliness requirements (it is enough in the order scenario); • There are a large number of invalid polls. A large number of invalid scans occur without overdue orders; • No peak elimination capability. A large number of overdue orders appear in a short time, which will lead to centralized task execution and obvious business peak;
In short, the scheme is very suitable for projects with small business scale and fast business iteration.
3. Stand alone memory solution
For delayed tasks, JDK has prepared a large number of tools for us. Using these tools can solve our problems.
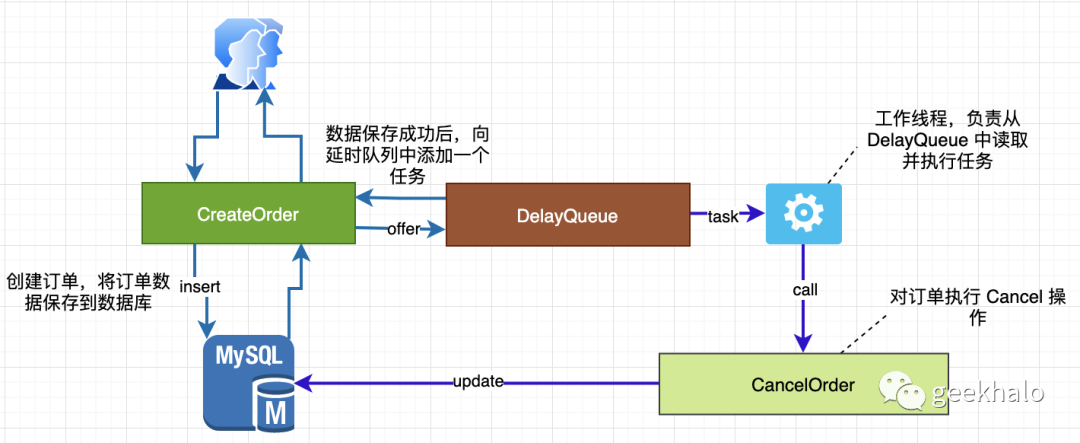
3.1 DelayQueue
DelayQueue is a special blocking queue, which can specify the delay time for each task. Tasks can be obtained only after the delay time arrives.
The overall structure is as follows:
Delay queue
The core process is as follows:
1. After placing an order, the user submits a task to the delay queue; 2. After the time reaches, the background worker thread reads the task from the queue; 3. The worker thread calls the CancelOrder method to cancel the overdue and unpaid orders;
The core code is as follows:
@Slf4j
@Service
public class DelayQueueStrategy implements SmartLifecycle {
    private final DelayQueue<DelayTask> delayTasks = new DelayQueue<>();
    private final Thread thread = new OrderCancelWorker();
    private boolean running;
    @Autowired
    private OrderInfoService orderInfoService;

    @TransactionalEventListener
    public void onOrderCreated(OrderInfoCreateEvent event){
        // Put the order number into the delay queue
        this.delayTasks.offer(new DelayTask(event.getOrderInfo().getId(), 10));
        log.info("success to add Delay Task for Cancel Order {}", event.getOrderInfo().getId());
    }

    /**
     * Start the background thread to consume the tasks in the delay queue
     */
    @Override
    public void start() {
        if (this.running){
            return;
        }
        this.thread.start();

        this.running = true;
    }

    /**
     * Stop background thread
     */
    @Override
    public void stop() {
        if (!this.running){
            return;
        }
        this.thread.interrupt();
        this.running = false;
    }

    @Override
    public boolean isRunning() {
        return this.running;
    }

    @Override
    public boolean isAutoStartup() {
        return true;
    }


    /**
     * Delayed task
     */
    @Value
    private static class DelayTask implements Delayed{
        private final Long orderId;
        private final Date runAt;

        private DelayTask(Long orderId, int delayTime) {
            this.orderId = orderId;
            this.runAt = DateUtils.addSeconds(new Date(), delayTime);
        }

        /**
         * Get remaining time
         * @param timeUnit
         * @return
         */
        @Override
        public long getDelay(TimeUnit timeUnit) {
            return timeUnit.convert(getRunAt().getTime() - System.currentTimeMillis(), TimeUnit.MILLISECONDS);
        }

        @Override
        public int compareTo(Delayed delayed) {
            if (delayed == this) {
                return 0;
            } else {
                long d = this.getDelay(TimeUnit.NANOSECONDS) - delayed.getDelay(TimeUnit.NANOSECONDS);
                return d == 0L ? 0 : (d < 0L ? -1 : 1);
            }
        }
    }

    /**
     * The background thread consumes messages in the delay queue
     */
    private class OrderCancelWorker extends Thread {
        @Override
        public void run() {
            // Determine whether to exit according to the interrupt status
            while (!Thread.currentThread().isInterrupted()){
                DelayTask task = null;
                try {
                    // Get task from queue
                    task = delayTasks.take();
                } catch (InterruptedException e) {
                    e.printStackTrace();
                }
                // cancellation of order
                if (task != null){
                    orderInfoService.cancel(task.getOrderId());
                    log.info("Success to Run Delay Task, Cancel Order {}", task.getOrderId());
                }
            }
        }
    }
}
The idea of this scheme is very simple, but it has a certain complexity. It needs to manually maintain the life cycle of the working thread. Relatively speaking, JDK has encapsulated our scenario, that is, the scheduled executorservice based on DelayQueue.
3.2 ScheduledExecutorService
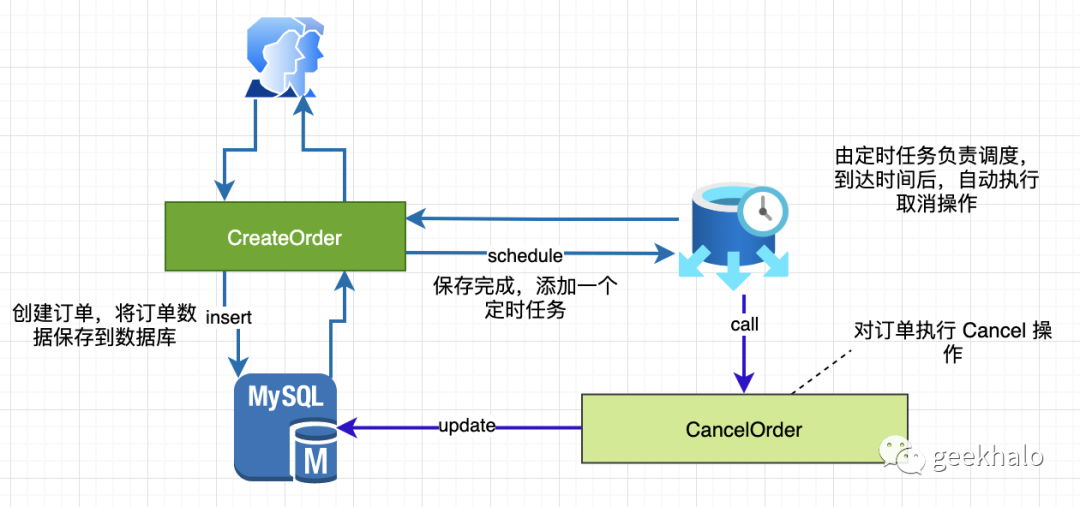
ScheduledExecutorService is a scheduled scheduling component based on DelayQueue, which has great advantages over the previous Timer.
The overall structure is as follows:
ScheduleExecutorService
The core process is as follows:
1. After placing an order, the user registers a scheduled task with the ScheduledExecutorService; 2. When the time reaches, the ScheduledExecutorService will start the task; 3. The thread pool thread calls the CancelOrder method to cancel the overdue and unpaid orders;
The core code is as follows:
@Slf4j
@Service
public class ScheduleExecutorStrategy {
    @Autowired
    private OrderInfoService orderInfoService;

    private ScheduledExecutorService scheduledExecutorService;

    public ScheduleExecutorStrategy(){
        BasicThreadFactory basicThreadFactory = new BasicThreadFactory.Builder()
                .namingPattern("Schedule-Cancel-Thread-%d")
                .daemon(true)
                .build();
        this.scheduledExecutorService = new ScheduledThreadPoolExecutor(1, basicThreadFactory);
    }

    @TransactionalEventListener
    public void onOrderCreated(OrderInfoCreateEvent event){
        // Add scheduled task
        this.scheduledExecutorService.schedule(new CancelTask(event.getOrderInfo().getId()), 5, TimeUnit.SECONDS);
        log.info("Success to add cancel task for order {}", event.getOrderInfo().getId());
    }

    private class CancelTask implements Runnable{
        private final Long orderId;

        private CancelTask(Long orderId) {
            this.orderId = orderId;
        }

        @Override
        public void run() {
            // Execute order cancellation
            orderInfoService.cancel(this.orderId);
            log.info("Success to cancel task for order {}", this.orderId);
        }
    }
}
Compared with the DelayQueue scheme, the amount of scheduled executorservice code is much less, avoiding cumbersome details.
3.3 summary
advantage:
1. Avoid polling the DB and reduce the pressure on the DB; 2. The overall scheme is simple and completed by using JDK components without additional dependency;
Disadvantages:
1. Tasks are easy to lose. Tasks are stored in memory. Service restart or machine shutdown will cause memory task loss; 2. Single machine strategy, lack of cluster capability.
In order to solve the problem of single machine memory solution, we need to introduce distributed solution.
In the single machine memory scheme, in addition to the implementation of delay queue, there is also a "time wheel" scheme, which can greatly reduce memory consumption. Interested partners can study it.
4. Distributed delay queue scheme
Memory queues have many limitations. In practice, we usually introduce distributed solutions.
4.1 Redis based delay queue
Redis is the most commonly used infrastructure. As a data structure server, it can be encapsulated into a variety of advanced structures with the help of rich data structures. Delay queue is one of them.
To avoid reinventing the wheel, we directly use the delay queue in Redisson.
The overall architecture is basically the same as DelayQueue, except that the memory delay queue is upgraded to a distributed delay queue, which is not discussed here.
Firstly, Redisson dependency is introduced into pom
<dependency>
    <groupId>org.redisson</groupId>
    <artifactId>redisson-spring-boot-starter</artifactId>
    <version>3.16.2</version>
</dependency>
Then, add redis related configuration in the application configuration file
spring.redis.host=127.0.0.1
spring.redis.port=6379
spring.redis.database=0
Finally, you can inject the core component redisonclient
@Autowired
private RedissonClient redissonClient;
The code after process integration is as follows:
@Slf4j
@Service
public class RDelayQueueStrategy implements SmartLifecycle {
    private boolean running;

    private Thread thread = new OrderCancelWorker();

    private RBlockingQueue<Long> cancelOrderQueue;

    private RDelayedQueue<Long> delayedQueue;

    @Autowired
    private OrderInfoService orderInfoService;

    @Autowired
    private RedissonClient redissonClient;

    /**
     * Create Redis queue
     */
    @PostConstruct
    public void init(){
        this.cancelOrderQueue = redissonClient.getBlockingQueue("DelayQueueForCancelOrder");
        this.delayedQueue = redissonClient.getDelayedQueue(cancelOrderQueue);
    }

    @TransactionalEventListener
    public void onOrderCreated(OrderInfoCreateEvent event){
        this.delayedQueue.offer(event.getOrderInfo().getId(), 5L, TimeUnit.SECONDS);
        log.info("success to add Delay Task for Cancel Order {}", event.getOrderInfo().getId());
    }

    /**
     * Start background thread
     */
    @Override
    public void start() {
        if (this.running){
            return;
        }
        thread.start();
        this.running = true;

    }

    /**
     * Stop background thread
     */
    @Override
    public void stop() {
        if (!this.running){
            return;
        }
        thread.interrupt();
        this.running = false;
    }

    @Override
    public boolean isRunning() {
        return this.running;
    }

    @Override
    public boolean isAutoStartup() {
        return true;
    }

    private class OrderCancelWorker extends Thread {
        @Override
        public void run() {
            // Determine whether to exit according to the interrupt status
            while (!Thread.currentThread().isInterrupted()){
                Long orderId = null;
                try {
                    // Get order number from queue
                    orderId = cancelOrderQueue.take();
                } catch (InterruptedException e) {
                    e.printStackTrace();
                }
                // cancellation of order
                if (orderId != null){
                    orderInfoService.cancel(orderId);
                    log.info("Success to Run Delay Task, Cancel Order {}", orderId);
                }
            }
        }
    }
}
This scheme is very simple and can be applied to most business scenarios. However, Redis itself follows the AP rather than CP model, and messages will be lost during cluster switching. Therefore, for scenarios with high consistency requirements, it is recommended to use the RocketMQ scheme.
4.2 RocketMQ based delay queue
RocketMQ is an open source distributed messaging middleware of Alibaba. Its overall design draws on a lot of ideas from Kafka, but some extensions are added for business scenarios, of which delay queue is the most important part.
The overall architecture design is as follows:
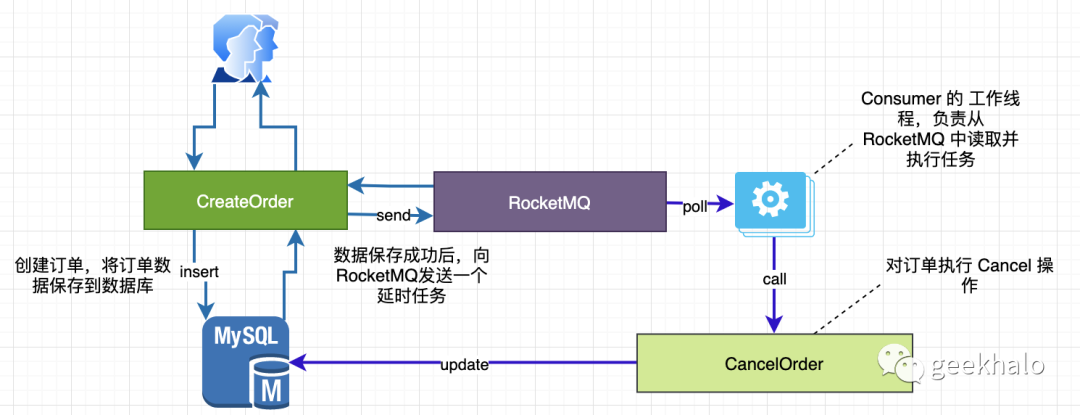
RocketMQ delay queue
The core process is as follows:
1. After placing an order, the user submits a message to RocketMQ; 2. After the time reaches, the consuming thread obtains the message from the work queue; 3. the consumer thread parses the message and calls the CancelOrder method to execute the cancellation operation for the overdue unpaid order.
First, you need to add RocketMQ related dependencies
<dependency>
    <groupId>org.apache.rocketmq</groupId>
    <artifactId>rocketmq-spring-boot-starter</artifactId>
    <version>2.2.1</version>
</dependency>
Then, add the relevant configuration in the application
rocketmq.name-server=http://127.0.0.1:9876
rocketmq.producer.group=delay-task-demo
Finally, we can use RocketMQTemplate to send messages
@Autowired
private RocketMQTemplate rocketMQTemplate;
Note: RocketMQ does not support any time, but provides several fixed delay times, which can generally meet our business needs. If the existing fixed delay cannot meet the needs, it can be solved by multiple delivery. For example, RocketMQ supports a maximum delay of 2H, while the business needs a delay of 24H. You only need to add the expected execution time in the message body. After obtaining the message, if the expected execution time has not been reached, send the message back to the delay queue; If the desired execution time is reached, perform the task for.
Send delay message:
@Service
@Slf4j
public class RocketMQBasedDelayStrategy {
    private static final String messageDelayLevel = "1s 5s 10s 30s 1m 2m 3m 4m 5m 6m 7m 8m 9m 10m 20m 30m 1h 2h";
    @Autowired
    private RocketMQTemplate rocketMQTemplate;

    @TransactionalEventListener
    public void onOrderCreated(OrderInfoCreateEvent event){
        // Send data to the delay queue of RocketMQ
        Message<String> message = MessageBuilder
                .withPayload(String.valueOf(event.getOrderInfo().getId()))
                .build();
        this.rocketMQTemplate.syncSend("delay-task-topic", message, 200, 2);
        log.info("success to sent Delay Task to RocketMQ for Cancel Order {}", event.getOrderInfo().getId());
    }
}
Building Consumer consumption messages
@Service
@Slf4j
@RocketMQMessageListener(topic = "delay-task-topic", consumerGroup = "delay-task-consumer-group")
public class RocketMQBasedDelayTaskConsumer implements RocketMQListener<MessageExt> {
    @Autowired
    private OrderInfoService orderInfoService;

    /**
     * Receive the message callback and cancel the order
     * @param message
     */
    @Override
    public void onMessage(MessageExt message) {
        byte[] body = message.getBody();
        String idAsStr = new String(body);
        orderInfoService.cancel(Long.valueOf(idAsStr));
    }
}
4.3 summary
Generally, Internet companies will use RocketMQ solution to solve the delay problem.
The advantages mainly come from the distributed service features:
1. High performance. As a sharp tool for peak shaving and valley filling, the sender, server and consumer all provide high performance; 2. High availability. Redis and RocketMQ provide rich deployment modes, which are the basis of high availability; 3. Extensible. Redis and RocketMQ clusters have good scalability;
Disadvantages:
1. Intermediate support is required. First, infrastructure support is required. Redis and RocketMQ will increase the operation and maintenance cost; 2. Need to learn new API. Need to master new APIs, increase learning costs, and problems may occur if they are not used properly;
5. Declarative programming
There is a very important principle in architecture design: effectively separate technology and business and avoid the interaction between them.
5.1 declarative programming
Declarative programming (English: declarative programming) is a programming paradigm, which is opposite to imperative programming. It describes the nature of the goal and allows the computer to understand the goal, not the process. Declarative programming does not need to tell the computer the problem domain, so as to avoid the attendant side effects. Imperative programming requires algorithms to clearly point out what to do at each step.
Every time a middleware is introduced, researchers need to learn a new API. How to effectively reduce the access cost is a huge challenge, and one of the most commonly used important means is declarative programming.
In short, it is to abstract the capability so that it can be flexibly applied to the required scenarios through configuration.
First, let's look at the final effect:
@Service
@Slf4j
public class RocketMQBasedDelayService {
    @Autowired
    private OrderInfoService orderInfoService;

    /**
     * Specify the method as a delay method through rocketmqbaseddedelay. This annotation does two things: < br / >
     * 1. Based on AOP technology, intercept the call to cancelOrder, convert the parameter to Message, and send it to the delay queue of RocketMQ
     * 2. For the cancelOrder method, create a DefaultMQPushConsumer and subscribe to related messages for message processing
     * @param orderId
     */
    @RocketMQBasedDelay(topic = "delay-task-topic-ann",
            delayLevel = 2, consumerGroup = "CancelOrderGroup")
    public void cancelOrder(Long orderId){
        if (orderId == null){
            log.info("param is invalidate");
            return;
        }
        this.orderInfoService.cancel(orderId);
        log.info("success to cancel Order for {}", orderId);
    }
}
Compared with ordinary methods, adding @ rocketmqbaseddedelay can give the method delay ability, which is the power of "declarative programming"
1. First, add @ RocketMQBasedDelay annotation on the method to configure the delay queue name, delay time and Consumer information; 2. When the method is called, it will not execute directly, but forward the request to the delay queue of RocketMQ and return directly; 3. When the message delay time is reached, the Consumer obtains the message from the delay queue and calls the cancelOrder method to process the business process.
In this way, the access cost is greatly reduced and the probability of error is reduced.
5.2 core design
The core design is as follows:

RocketMQBasedDelay
During startup, two extension points are added:
1. Scan @ RocketMQBasedDelay annotation method and add SendMessageInterceptor interceptor for the method; 2. Scan the @ RocketMQBasedDelay annotation method, generate the managed object of RocketMQConsumerContainer, and complete the configuration and startup of DefaultMQPushConsumer;
The specific implementation process is as follows:
1. When the method is called, the call is intercepted by SendMessageInterceptor, thus changing the original execution rules. The new process is as follows: • obtain relevant configuration parameters from @ rocketmqbaseddedelay; • Serialize the request parameters; • Sending delay messages using RocketMQTemplate; • Return directly and interrupt the original method call; 2. When the delay time reaches, DefaultMQPushConsumer in RocketMQConsumerContainer will get the message for business processing: • deserialization call parameters; • Calling business methods; • Return to consumption status;
5.3 core implementation
Core components are mainly divided into two categories:
1. Working components. • SendMessageInterceptor. Intercept the request and forward the request to the delay queue of RocketMQ; • RocketMQConsumerContainer. The encapsulation of DefaultMQPushConsumer mainly completes the configuration of the Consumer, registers the listener, and triggers the execution of the task after the message arrives; 2. Configure components. • RocketMQConsumerContainerRegistry. Scan the beans in the Spring container, encapsulate the @ RocketMQBasedDelay annotation method into a rocketmqconsumercontainer, and register it in the Spring container; • RocketMQBasedDelayConfiguration. Register the AOP interceptor and rocketmqconsumercontainerregistry with the Spring container;
The RocketMQBasedDelay annotation is as follows:
@Target(ElementType.METHOD)
@Retention(RetentionPolicy.RUNTIME)
public @interface RocketMQBasedDelay {
    /**
     * RocketMQ topic
     * @return
     */
    String topic();

    /**
     * Delay level
     * @return
     */
    int delayLevel();

    /**
     * Consumer group information
     * @return
     */
    String consumerGroup();
}
The annotation can be placed on the method and takes effect at run time.
The core code of SendMessageInterceptor is as follows:
/**
 * Intercept the method call, encapsulate the request as a Message and send it to the Topic of RocketMQ
 */
@Slf4j
public class SendMessageInterceptor implements MethodInterceptor {
    @Autowired
    private RocketMQTemplate rocketMQTemplate;


    @Override
    public Object invoke(MethodInvocation methodInvocation) throws Throwable {
        Method method = methodInvocation.getMethod();

        // 1. Obtain annotation information on the method
        RocketMQBasedDelay rocketMQBasedDelay = method.getAnnotation(RocketMQBasedDelay.class);

        // 2. Convert request parameters to MQ
        Object[] arguments = methodInvocation.getArguments();
        String argData = serialize(arguments);
        Message<String> message = MessageBuilder
                .withPayload(argData)
                .build();

        // 3. Send MQ
        this.rocketMQTemplate.syncSend(rocketMQBasedDelay.topic(), message , 200, rocketMQBasedDelay.delayLevel());
        log.info("success to sent Delay Task to RocketMQ for {}", Arrays.toString(arguments));
        return null;
    }

    private String serialize(Object[] arguments) {
        Map<String, String> result = Maps.newHashMapWithExpectedSize(arguments.length);
        for (int i = 0; i < arguments.length; i++){
             result.put(String.valueOf(i), SerializeUtil.serialize(arguments[i]));
        }
        return SerializeUtil.serialize(result);
    }

}
The source code of RocketMQConsumerContainer is as follows:
/**
 * Consumer Container for encapsulating DefaultMQPushConsumer
 */
@Data
@Slf4j
public class RocketMQConsumerContainer implements InitializingBean, SmartLifecycle {
    private DefaultMQPushConsumer consumer;
    private boolean running;
    private String consumerGroup;
    private String nameServerAddress;
    private String topic;
    private Object bean;
    private Method method;

    @Override
    public boolean isAutoStartup() {
        return true;
    }

    @Override
    public void start() {
        if (this.running){
            return;
        }
        try {
            this.consumer.start();
        } catch (MQClientException e) {
            e.printStackTrace();
        }
        this.running = true;
    }

    @Override
    public void stop() {
        this.running = false;
        this.consumer.shutdown();
    }

    @Override
    public boolean isRunning() {
        return running;
    }

    @Override
    public void afterPropertiesSet() throws Exception {
        // Build DefaultMQPushConsumer
        DefaultMQPushConsumer consumer = new DefaultMQPushConsumer();
        consumer.setConsumerGroup(this.consumerGroup);
        consumer.setNamesrvAddr(this.nameServerAddress);

        // Subscribe to topic
        consumer.subscribe(topic, "*");
        // Add interceptor
        consumer.setMessageListener(new DefaultMessageListenerOrderly());
        this.consumer = consumer;
    }

    private class DefaultMessageListenerOrderly implements MessageListenerOrderly {

        @Override
        public ConsumeOrderlyStatus consumeMessage(List<MessageExt> msgs, ConsumeOrderlyContext context) {
            for (MessageExt messageExt : msgs) {
                log.debug("received msg: {}", messageExt);
                try {
                    long now = System.currentTimeMillis();

                    // Deserialize the data from the Message to obtain the method call parameters
                    byte[] body = messageExt.getBody();
                    String bodyAsStr = new String(body);
                    Map deserialize = SerializeUtil.deserialize(bodyAsStr, Map.class);
                    Object[] params = new Object[method.getParameterCount()];

                    for (int i = 0; i< method.getParameterCount(); i++){
                        String o = (String)deserialize.get(String.valueOf(i));
                        if (o == null){
                            params[i] = null;
                        }else {
                            params[i] = SerializeUtil.deserialize(o, method.getParameterTypes()[i]);
                        }
                    }

                    // Execute business methods
                    method.invoke(bean, params);
                    long costTime = System.currentTimeMillis() - now;
                    log.debug("consume {} cost: {} ms", messageExt.getMsgId(), costTime);
                } catch (Exception e) {
                    log.warn("consume message failed. messageId:{}, topic:{}, reconsumeTimes:{}", messageExt.getMsgId(), messageExt.getTopic(), messageExt.getReconsumeTimes(), e);
                    context.setSuspendCurrentQueueTimeMillis(1000);
                    return ConsumeOrderlyStatus.SUSPEND_CURRENT_QUEUE_A_MOMENT;
                }
            }

            return ConsumeOrderlyStatus.SUCCESS;
        }
    }
}
The source code of RocketMQConsumerContainerRegistry is as follows:
/**
 * Each bean is processed based on BeanPostProcessor#postProcessAfterInitialization
 * Scan the methods annotated by @ RocketMQBasedDelay in the bean and encapsulate the methods into RocketMQConsumerContainer,
 * To start DefaultMQPushConsumer
 */
public class RocketMQConsumerContainerRegistry implements BeanPostProcessor {
    private final AtomicInteger id = new AtomicInteger(1);
    @Autowired
    private GenericApplicationContext applicationContext;
    @Value("${rocketmq.name-server}")
    private String nameServerAddress;

    /**
     * Process each bean in turn
     * @param bean
     * @param beanName
     * @return
     * @throws BeansException
     */
    @Override
    public Object postProcessAfterInitialization(Object bean, String beanName) throws BeansException {
        // 1. Get @ RocketMQBasedDelay annotation method
        Class targetCls = AopUtils.getTargetClass(bean);
        List<Method> methodsListWithAnnotation = MethodUtils.getMethodsListWithAnnotation(targetCls, RocketMQBasedDelay.class);

        // 2. Register RocketMQConsumerContainer for each @ RocketMQBasedDelay annotation method
        for(Method method : methodsListWithAnnotation){
            String containerBeanName = targetCls.getName() + "#" + method.getName() + id.getAndIncrement();
            RocketMQBasedDelay annotation = method.getAnnotation(RocketMQBasedDelay.class);
            applicationContext.registerBean(containerBeanName, RocketMQConsumerContainer.class, () -> createContainer(bean, method, annotation));
        }

        return bean;
    }

    /**
     * Building RocketMQConsumerContainer
     * @param proxy
     * @param method
     * @param annotation
     * @return
     */
    private  RocketMQConsumerContainer createContainer(Object proxy, Method method, RocketMQBasedDelay annotation) {
        Object bean = AopProxyUtils.getSingletonTarget(proxy);
        RocketMQConsumerContainer container = new RocketMQConsumerContainer();
        container.setBean(bean);
        container.setMethod(method);
        container.setConsumerGroup(annotation.consumerGroup());
        container.setNameServerAddress(nameServerAddress);
        container.setTopic(annotation.topic());
        return container;
    }
}
The source code of rocketmvbaseddelayconfiguration is as follows:
@Configuration
public class RocketMQBasedDelayConfiguration {

    /**
     * Declare RocketMQConsumerContainerRegistry, scan RocketMQBasedDelay method,
     * Create DefaultMQPushConsumer and complete registration
     * @return
     */
    @Bean
    public RocketMQConsumerContainerRegistry rocketMQConsumerContainerRegistry(){
        return new RocketMQConsumerContainerRegistry();
    }

    /**
     * Declare AOP interceptor
     * When calling the @ RocketMQBasedDelay annotation method, it will automatically intercept and send the request to RocketMQ
     * @return
     */
    @Bean
    public SendMessageInterceptor messageSendInterceptor(){
        return new SendMessageInterceptor();
    }

    /**
     * Intercept the @ RocketMQBasedDelay annotation method
     * @param sendMessageInterceptor
     * @return
     */
    @Bean
    public PointcutAdvisor pointcutAdvisor(@Autowired SendMessageInterceptor sendMessageInterceptor){
        return new DefaultPointcutAdvisor(new AnnotationMatchingPointcut(null, RocketMQBasedDelay.class), sendMessageInterceptor);
    }
}
5.4 summary
Declarative programming will have an obvious threshold in design, but this cost is in exchange for the convenience of use. This one-time investment and multiple value creation is highly recommended, which greatly improves the R & D efficiency and reduces the probability of errors.
6. Summary
In this paper, the business scenario of automatically canceling overdue orders is introduced
1.DB polling scheme; 2. Stand alone memory scheme based on delay queue and ScheduleExecutorService; 3. Distributed delay queue scheme based on Redis and RocketMQ;
The advantages and disadvantages of each scheme are described in detail. We hope that all partners can choose the best solution according to the business scenario in the actual development.
Finally, the "declarative programming" is briefly introduced to reduce the access cost through technical means.
As usual, attach the source code