1. Android Control Architecture
Each control of Android is a rectangular area, roughly divided into two categories, inheriting View and ViewGroup. ViewGroup is equivalent to a container. It can manage multiple sub-Views. Controls on the whole interface form a tree structure, which is commonly referred to as the control tree. The upper control is responsible for the measurement and drawing of the lower control, and passing interactive events through findviewbyid() is a method of getting, in fact, traversing lookups, there is a ViewParent object at the top of the tree graph, which is the control core. All interactive management events are dispatched and allocated by it to control the whole view.
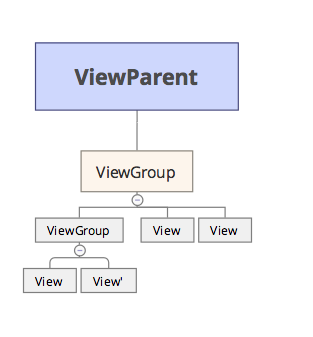
Usually, if we want to display an active view, we need to use the setContentView () method, so what exactly has this method done?Let's first look at the architecture of the Android system
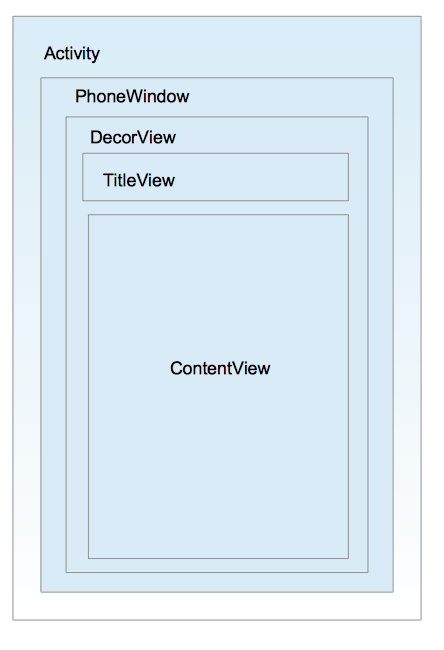
We can see that each activity has a window object. In Android, a window object is usually implemented by a Phonewindow. Phonewindow sets a DecorView as the root view of the whole window and DecorView as the top view of the window interface. It encapsulates some common methods. It can be said that DecorView gives phonewindow what it will display, which is whereSome View listeners are received through WindowManagerService OnClicListener through the corresponding callback. On the display, he divides the screen into two parts, one title and one content. When you see this, you should see a familiar interface ContentView, which has an ID of content, framelayout, and activity_main.xml is set inside this framelayout.We can see the following picture:
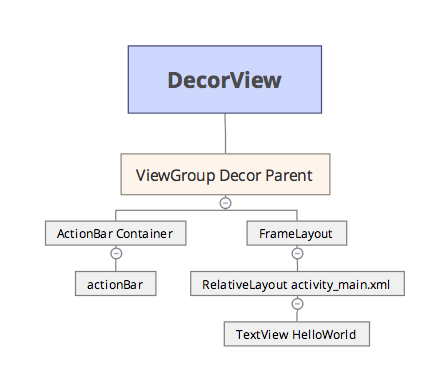
In the code, when the program onCreate(), the layout is set, and after execution, the activitymanagerservice calls onResume directly, which adds the entire DecorView to Phonewindow and displays it to complete the final drawing, so it is onResume that the View is fully initialized.
2. Measurements of View s
We want to draw a View, first we need to know the size of the View, how the system draws it, in Android, if we want to draw a View, we need to know the size of the View, and then tell the system that this process is done in onMeasure().
 /**
     * measure
     * @param widthMeasureSpec
     * @param heightMeasureSpec
     */
    @Override
    protected void onMeasure(int widthMeasureSpec, int heightMeasureSpec)
    {
        super.onMeasure(widthMeasureSpec, heightMeasureSpec);
    }
Android provides us with a short and compact design class, the MeasureSpec class, which helps us measure Views. MeasureSpec is a 32-bit int value with two higher bits in the measurement mode and 30 lower bits in the measurement size to improve and optimize efficiency when using bit operations in calculations.
Measurement mode:
- EXACTLY: Indicates that the parent view expects the size of the child view to be determined by the value of specSize. By default, the size of the child view is set according to this rule. Developers can of course set the size to any size they want.
- AT_MOST: Indicates that the subview can be at most the size specified in the specSize, and that the developer should set this view as small as possible and ensure that it does not exceed the specSize.The system defaults to this rule to set the size of the subview, and developers can of course set it to any size they want.
- UNSPECIFIED: Indicates that a developer can set the View to any size he or she wants without any restrictions.This is less common and is only used when customizing Views.
View's default onMeasure only supports EXACTLY mode, so if you don't override this method when customizing a control, you can only use EXACTLY mode. The control can respond to specific width and height values or match_parent properties that you specify. If we customize View to support wrap_content, we must override onMeasure to specify the size of wrap_content.
With the MeasureSpec class, we get the measurement mode and drawing size of the View. With this information, we can control the size of the View display. Next, we can see a simple example. Let's override the onMeasure method.
 /**
     * measure
     * @param widthMeasureSpec
     * @param heightMeasureSpec
     */
    @Override
    protected void onMeasure(int widthMeasureSpec, int heightMeasureSpec)
    {
        super.onMeasure(widthMeasureSpec, heightMeasureSpec);
    }
Looking at the super.onMeasure() method, you can see that the system will eventually call setMeasuredDimension() to set the width and height of the measurement to complete the measurement.
protected void onMeasure(int widthMeasureSpec, int heightMeasureSpec)
{  setMeasuredDimension(getDefaultSize(getSuggestedMinimumWidth(),widthMeasureSpec),getDefaultSize(getSuggestedMinimumHeight(), heightMeasureSpec));
}
We know from the source that we customize the width to set, so here's an example of how we customize measurements
The first step is to extract the specific measurement mode and size from the MeasureSpec class
 int specMode = MeasureSpec.getMode(measureSpec);
 int specSize = MeasureSpec.getSize(measureSpec);
We then give different measurements based on the mode, using the specified specSize directly when the specMode is EXACTLY, and when the other two modes are used, we need a default value, especially when specifying the package content, that is, AT_MOST mode, measureWidth() method:
private int measureWidth(int measureSpec) {
        int result = 0;
        int specMode = MeasureSpec.getMode(measureSpec);
        int specSize = MeasureSpec.getSize(measureSpec);

        if (specMode == MeasureSpec.EXACTLY) {
            result = specSize;

        } else {
            result = 200;
            if (specMode == MeasureSpec.AT_MOST) {
                result = Math.min(result, specSize);
            }
        }
        return result;
    }
The width and height are set the same way, so when we set match_parent in the layout, it will fill the container. If wrap_content is set, it will be the package content. If it is not set, it will only be 200 size.
3. Drawing of View
When we have finished measuring with the wrap_content method, we should rewrite the onDraw() method for drawing. This should be familiar to everyone. First, we need to know some API s related to 2D drawing.
Canvas: As the name implies, what the canvas means, and onDraw() is a parameter, Canvas. If we want to draw elsewhere, we need a new object
Canvas canvas = new Canvas(Bitmap);This Bitmap is closely related to Canvas, a process we call loading canvas. This bitmap stores some pixel information of the canvas, and we can use canvas.drawxxx() to draw the related base graphics. You can see the details below.
//draw a straight line
canvas.drawLine(float startX, float startY, float stopX, float stopY, Paint paint);

//draw rectangle
canvas.drawRect(float left, float top, float right, float bottom, Paint paint);

//Draw a circle
canvas.drawCircle(float cx, float cy, float radius, Paint paint);

//Draw Characters
canvas.drawText(String text, float x, float y, Paint paint);

//Draw Graphics
canvas.drawBirmap(Bitmap bitmap, float left, float top, Paint paint);
4. Custom View
Customizing the View has always been a difficult task. Android's own controls are difficult to meet our needs. We need to rewrite the control or customize a View if we want, but generally powerful Views still have a few bug s, and now with the diversity of Android ROM s, the problem of adapting is getting more and more difficult.
There are usually the following more important callback methods in View s:
- onFinishInflate()
//Callback after loading components from XML
    @Override
    protected void onFinishInflate() {
        // TODO Auto-generated method stub
        super.onFinishInflate();
}- onSizeChanged()
//Callback when component size changes
    @Override
    protected void onSizeChanged(int w, int h, int oldw, int oldh) {
        // TODO Auto-generated method stub
        super.onSizeChanged(w, h, oldw, oldh);
}- onMeasure()
// Callback method for measuring
    @Override
    protected void onMeasure(int widthMeasureSpec, int heightMeasureSpec) {
        // TODO Auto-generated method stub
        super.onMeasure(widthMeasureSpec, heightMeasureSpec);
}- onLayout()
// Callback this method to determine where to display
    @Override
    protected void onLayout(boolean changed, int left, int top, int right,
            int bottom) {
        // TODO Auto-generated method stub
        super.onLayout(changed, left, top, right, bottom);
}- onTouchEvent()
// Callback when monitoring touch time
    @Override
    public boolean onTouchEvent(MotionEvent event) {
        // TODO Auto-generated method stub
        return super.onTouchEvent(event);
}- onDraw()
// Mapping
    @Override
    protected void onDraw(Canvas canvas) {
        // TODO Auto-generated method stub
        super.onDraw(canvas);
    }
The above methods do not need to be all written out. There are generally three ways to implement custom controls, depending on your personal needs:
- Extend existing controls
- Implement new controls through components
-Rewrite View to implement new controls
1. Expand existing components
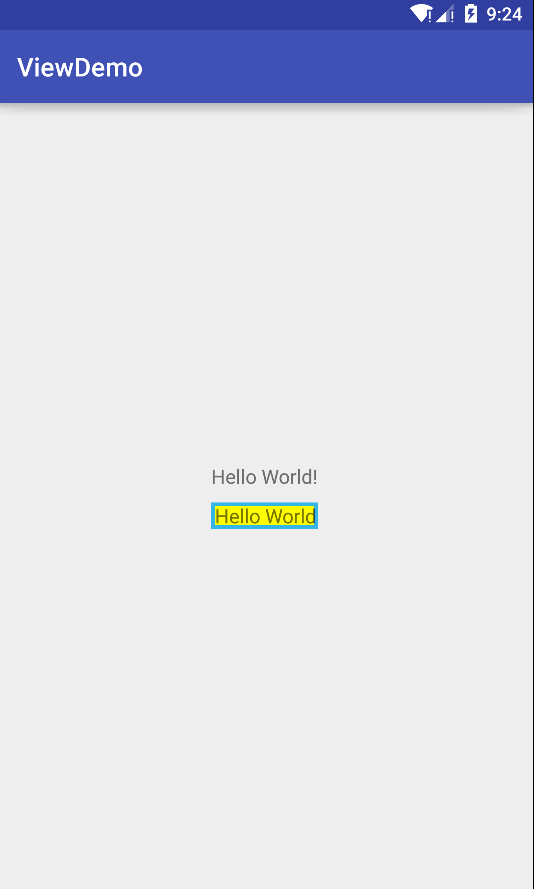
Let's analyze this effect. It's actually a two-layer drawing. We still want to use onDraw(), program super.onDraw(canvas); methods to implement native control functions, but we can implement our logic before and after calling super.onDraw(canvas)
   @Override
    protected void onDraw(Canvas canvas) {
        //Implement your own logic before calling back the parent, which for textview is before drawing the text content
        super.onDraw(canvas);
         //After calling back the parent class, implement your own logic, which for textview is after drawing the text content
     }
//Instantiation Brush1
paint1 = new Paint();
//Set Colors
paint1.setColor(getResources().getColor(android.R.color.holo_blue_light));
//Set style
paint1.setStyle(Paint.Style.FILL);
//Ditto
paint2 = new Paint();
paint2.setColor(Color.YELLOW);
paint2.setStyle(Paint.Style.FILL);The most important part is when super is called and we start drawing
 //Draw Outer Layer
        canvas.drawRect(0, 0, getMeasuredWidth(), getMeasuredHeight(), paint1);
        //Draw Inner Layer
        canvas.drawRect(10, 10, getMeasuredWidth() - 10, getMeasuredHeight() - 10, paint2);

        canvas.save();
        //Shift 10 pixels before drawing text
        canvas.translate(10, 0);
        //Parent Completion Method
        super.onDraw(canvas);
        canvas.restore();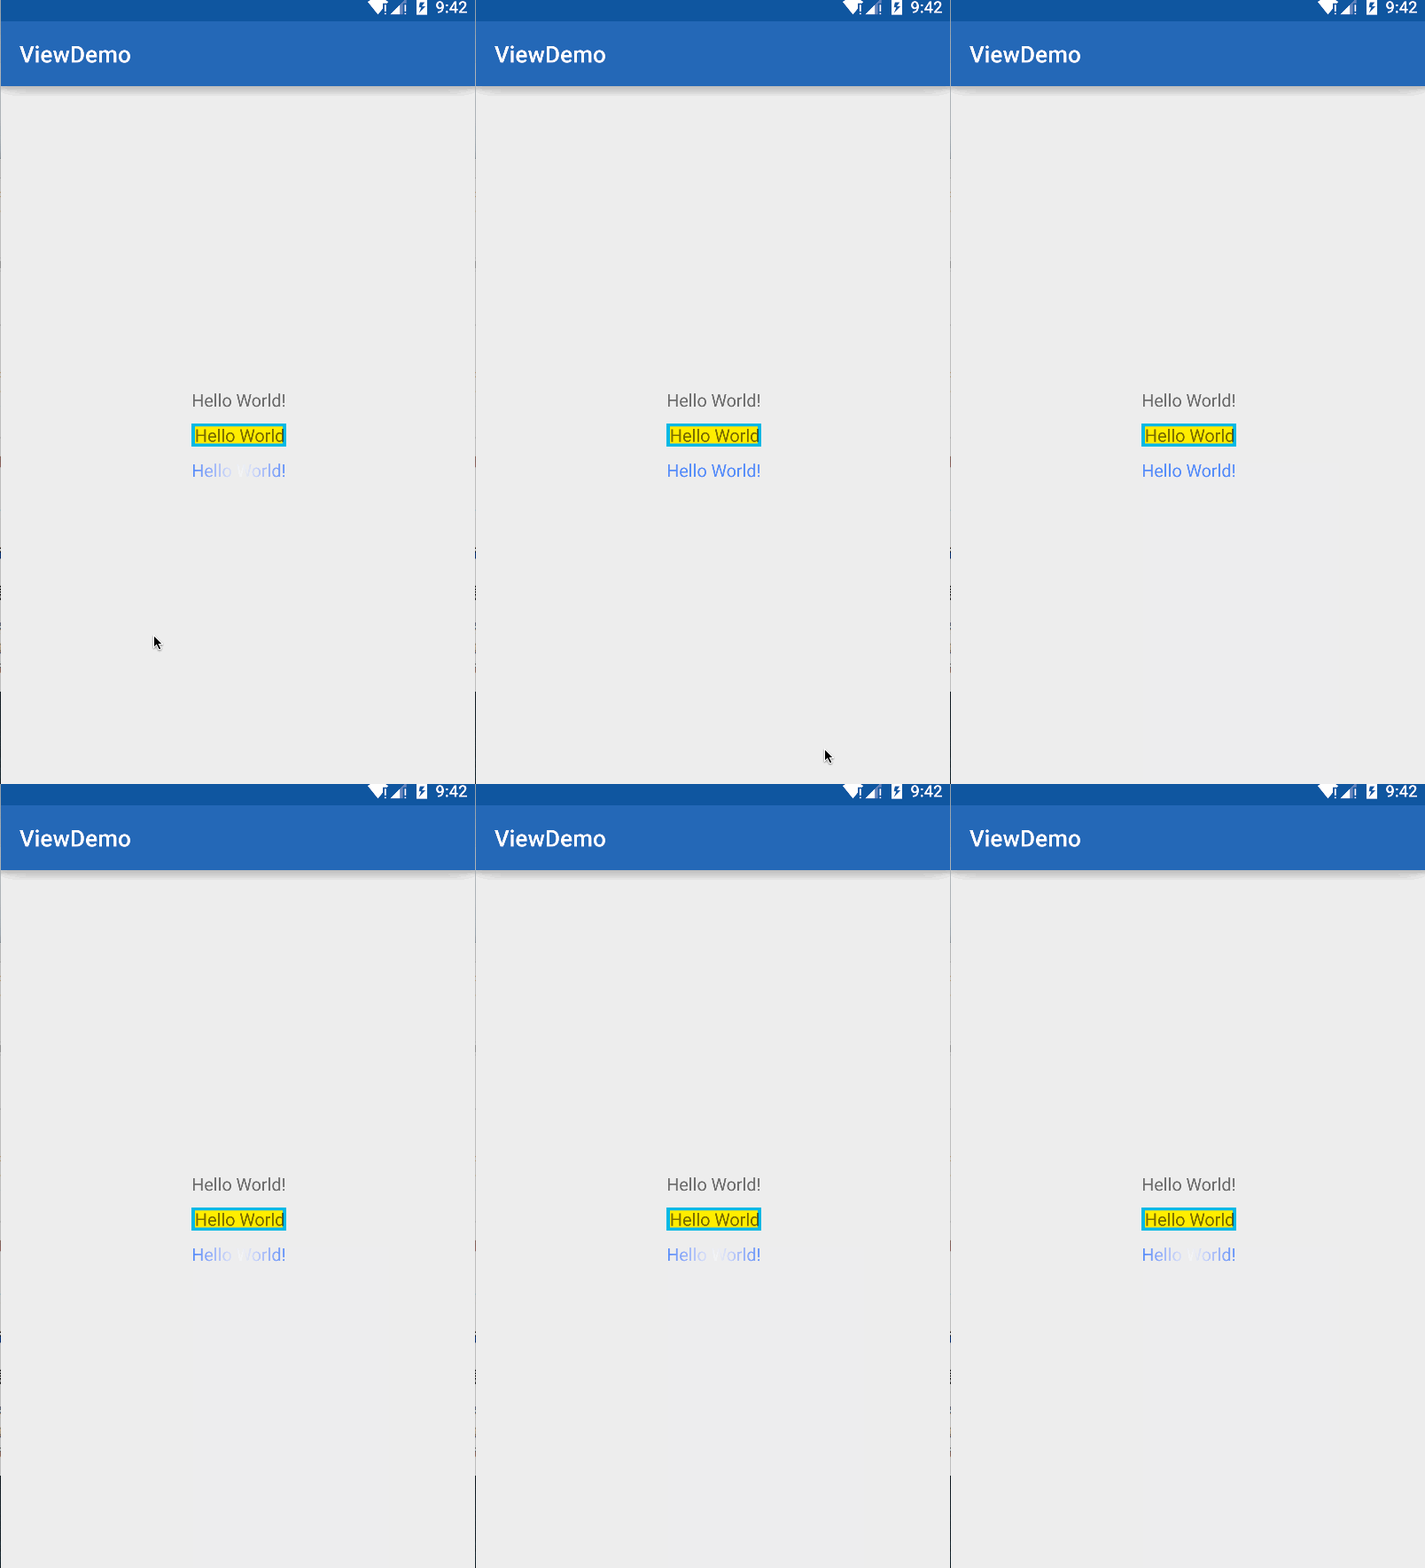
This can be done using LinearGradient, Shader, Matrix to achieve a sparkling flicker effect. We make full use of the Shader renderer to set up a changing LinearGradient. First, we need to do some initialization in the onSizeChanged() method
**
 * Text Gradient
 * Created by lgl on 16/3/4.
 */
public class CosuTwoTextView extends TextView {

    int mViewWidth = 0;
    private Paint mPaint;
    private LinearGradient mLinearGradient;
    private Matrix matrix;
    private int mTranslate;

    public CosuTwoTextView(Context context, AttributeSet attrs) {
        super(context, attrs);
    }

    @Override
    protected void onSizeChanged(int w, int h, int oldw, int oldh) {
        super.onSizeChanged(w, h, oldw, oldh);
        if (mViewWidth == 0) {
            mViewWidth = getMeasuredWidth();
            if (mViewWidth > 0) {
                //Get Brush Object
                mPaint = getPaint();
                //Renderer
                mLinearGradient = new LinearGradient(0, 0, mViewWidth, 0, new int[]{Color.BLUE, 0xffffffff, Color.BLUE},
                        null, Shader.TileMode.CLAMP);
                mPaint.setShader(mLinearGradient);
                //matrix
                matrix = new Matrix();
            }
        }
    }

    @Override
    protected void onDraw(Canvas canvas) {
        super.onDraw(canvas);
        if (matrix != null) {
            mTranslate += mViewWidth + 5;
            if (mTranslate > 2 * mViewWidth / 5) {
                mTranslate = -mViewWidth;
            }
            matrix.setTranslate(mTranslate, 0);
            mLinearGradient.setLocalMatrix(matrix);
            //Flash every 100 milliseconds
            postInvalidateDelayed(100);
        }
    }
}
2. Composite controls
Creating a Reviewer control is a good way to create a collection of controls with important functions. This way, you often need to inherit an appropriate ViewGroup and add controls with specified functions to form a new appropriate control. Controls created in this way, we usually assign him some properties to make them more extensible. BelowTake a TopBar as an example to show how to create a composite control
(1) Property Definition
We need to define some attributes for him, so we need to create a new attrs.xml file under values
<?xml version="1.0" encoding="utf-8"?>
<resources>
    <declare-styleable name="TopBar">
        <attr name="title" format="string" />
        <attr name="titleTextSize" format="dimension" />
        <attr name="titleTextColor" format="color" />
        <attr name="leftTextColor" format="color" />
        <attr name="leftBackground" format="reference|color" />
        <attr name="leftText" format="string" />
        <attr name="rightTextColor" format="color" />
        <attr name="rightBackground" format="reference|color" />
        <attr name="rightText" format="string" />
    </declare-styleable>
</resources>
We can use the < declare-styleable > tag to declare some attributes in the code, and then the name corresponds to the ID so that our classes can be found, and when that's done, we create a new class called TopBarView
public class TopBarView extends ViewGroup {

    private int mLeftTextColor;
    private Drawable mLeftBackground;
    private String mLeftText;

    private int mRightTextColor;
    private Drawable mRightBackgroup;
    private String mRightText;

    private float mTitleSize;
    private int mTitleColor;

    private String mTitle;

    //Construction method with parameters
    public TopBarView(Context context, AttributeSet attrs) {
        super(context, attrs);

        //In this way, you can read values from your attrs.xml file and store them in your TypedArray
        TypedArray ta = context.obtainStyledAttributes(attrs, R.styleable.TopBar);
        //Read out the corresponding value setting property
        mLeftTextColor = ta.getColor(R.styleable.TopBar_leftTextColor, 0);
        mLeftBackground = ta.getDrawable(R.styleable.TopBar_leftBackground);
        mLeftText = ta.getString(R.styleable.TopBar_leftText);

        mRightTextColor = ta.getColor(R.styleable.TopBar_rightTextColor, 0);
        mRightBackgroup = ta.getDrawable(R.styleable.TopBar_rightBackground);
        mRightText = ta.getString(R.styleable.TopBar_rightText);

        mTitleSize = ta.getDimension(R.styleable.TopBar_titleTextSize, 10);
        mTitleColor = ta.getColor(R.styleable.TopBar_titleTextColor, 0);

        mTitle = ta.getString(R.styleable.TopBar_title);

        //After getting the value of TypedArray, the recyle method is typically called to avoid errors in repeated creation.
        ta.recycle();
    }
(2) Composite control
In fact, this template is also made up of two Button s on the left and right sides and a TextView in the middle. In this case, we can add these attributes to them, which can be defined directly and assigned completely:
 mLeftButton = new Button(context);
        mRightButton = new Button(context);
        mTitleView = new TextView(context);


        //Assigning values to created elements
        mLeftButton.setTextColor(mLeftTextColor);
        mLeftButton.setBackground(mLeftBackground);
        mLeftButton.setText(mLeftText);

        mRightButton.setTextColor(mRightTextColor);
        mRightButton.setBackground(mRightBackgroup);
        mRightButton.setText(mRightText);

        mTitleView.setText(mTitle);
        mTitleView.setTextColor(mTitleColor);
        mTitleView.setTextSize(mTitleSize);
        mTitleView.setGravity(Gravity.CENTER);
         // Set appropriate layout elements for component elements
        mLeftParams = new LayoutParams(
                LayoutParams.WRAP_CONTENT,
                LayoutParams.MATCH_PARENT);
        mLeftParams.addRule(RelativeLayout.ALIGN_PARENT_LEFT, TRUE);
        // Add to ViewGroup
        addView(mLeftButton, mLeftParams);

        mRightParams = new LayoutParams(
                LayoutParams.WRAP_CONTENT,
                LayoutParams.MATCH_PARENT);
        mRightParams.addRule(RelativeLayout.ALIGN_PARENT_RIGHT, TRUE);
        addView(mRightButton, mRightParams);

        mTitlepParams = new LayoutParams(
                LayoutParams.WRAP_CONTENT,
                LayoutParams.MATCH_PARENT);
        mTitlepParams.addRule(RelativeLayout.CENTER_IN_PARENT, TRUE);
        addView(mTitleView, mTitlepParams);

        // Button click event, no specific implementation is required,
        // Just call the method of the interface, when callback, there will be a specific implementation
        mRightButton.setOnClickListener(new OnClickListener() {

            @Override
            public void onClick(View v) {
                mListener.rightClick();
            }
        });

        mLeftButton.setOnClickListener(new OnClickListener() {

            @Override
            public void onClick(View v) {
                mListener.leftClick();
            }
        });
(3) Referencing UI templates
xmlns:android="http://schemas.android.com/apk/res/android"And we need our own namespace to customize haunted attributes
xmlns:custom="http://schemas.android.com/apk/res/custom" <com.lgl.viewdemo.CosuTwoTextView
android:layout_width="wrap_content"
android:layout_height="wrap_content"
custom:leftText="Test Title"
custom:leftBackground = "#222222"
custom:leftTextSize="18sp"/>This, and so on, is how we use custom attributes
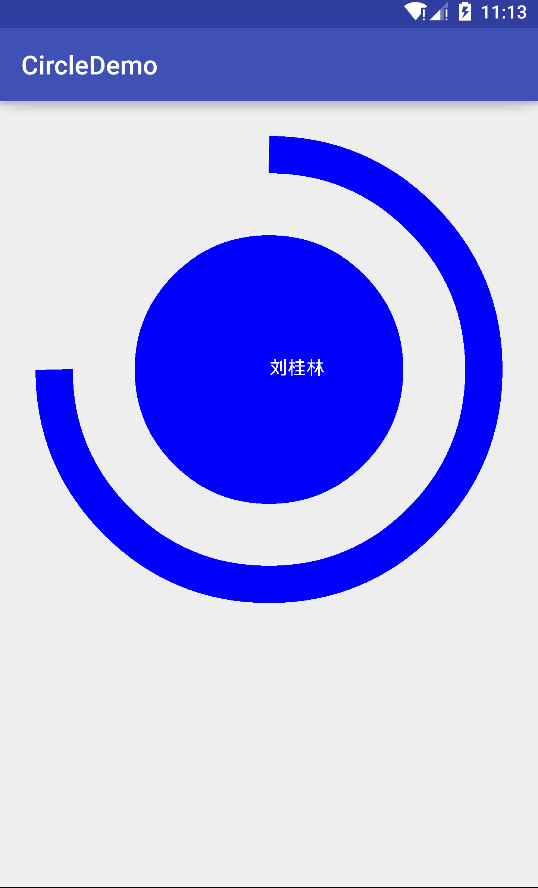
3. Rewrite View to implement new controls
Override View Primary Custom Class inherits View Class, overrides onMeasure, onDraw, and so on.
public class CircleView extends View {

    //The length of a circle
    private int mCircleXY;
    //Screen height and width
    private int w, h;
    //The radius of a circle
    private float mRadius;
    //A round brush
    private Paint mCirclePaint;
    //Arc Brush
    private Paint mArcPaint;
    //Text Brush
    private Paint mTextPaint;
    //Text to display
    private String mShowText = "Liu Guilin";
    //Text size
    private int mTextSize = 50;
    //Radian of center scan
    private int mSweepAngle = 270;


    public CircleView(Context context, AttributeSet attrs) {
        super(context, attrs);
        //Get screen width
        WindowManager wm = (WindowManager) getContext()
                .getSystemService(Context.WINDOW_SERVICE);
        w = wm.getDefaultDisplay().getWidth();
        h = wm.getDefaultDisplay().getHeight();


        init();
    }

    private void init() {
        mCircleXY = w / 2;
        mRadius = (float) (w * 0.5 / 2);

        mCirclePaint = new Paint();
        mCirclePaint.setColor(Color.BLUE);

        mArcPaint = new Paint();
        //Set Line Width
        mArcPaint.setStrokeWidth(100);
        //Set Hollow
        mArcPaint.setStyle(Paint.Style.STROKE);
        //Set Colors
        mArcPaint.setColor(Color.BLUE);

        mTextPaint = new Paint();
        mTextPaint.setColor(Color.WHITE);
        mTextPaint.setTextSize(mTextSize);

    }

    @Override
    protected void onDraw(Canvas canvas) {
        super.onDraw(canvas);

        //draw rectangle
        RectF mArcRectF = new RectF((float) (w * 0.1), (float) (w * 0.1), (float) (w * 0.9), (float) (w * 0.9));
        //Draw a circle
        canvas.drawCircle(mCircleXY, mCircleXY, mRadius, mCirclePaint);
        //Draw an arc
        canvas.drawArc(mArcRectF, 270, mSweepAngle, false, mArcPaint);
        //Draw Text
        canvas.drawText(mShowText, 0, mShowText.length(), mCircleXY, mCircleXY + (mTextSize / 4), mTextPaint);
    }
}
We can also set some other states, set his radian, and we'll write an external method
public void setSweepValues(float sweepValues){
        if(sweepValues !=- 0){
            mSweepAngle = sweepValues;
        }else{
            //If not, we set it by default
            mSweepAngle = 30;
        }
        //Remember to refresh
        invalidate();
    }
5. Analysis of Event Interception Mechanism
This chapter is about some basic concepts of an event interception mechanism. When the Android system catches various input events from users, how can it accurately deliver them to the control that really needs this event?In fact, Android provides a very complete set of event delivery and handling mechanisms to help developers complete accurate event allocation and handling
To understand the interception mechanism, we first need to know what touch events are, the gestures provided by MotionEvent in general, the DOWN,UP,MOVE that we commonly use
There are many things encapsulated in Motion Event, such as getting the coordinate point event.getX() and getRawX() to get
But this time we're talking about event interception, what is event interception? For example, View and ViewGroup need this event. Event interception happens here. It's actually a decreasing meaning. In general, ViewGroup needs to rewrite three methods
 @Override
    public boolean dispatchTouchEvent(MotionEvent ev) {
        return super.dispatchTouchEvent(ev);
    }

    @Override
    public boolean onInterceptTouchEvent(MotionEvent ev) {
        return super.onInterceptTouchEvent(ev);
    }

    @Override
    public boolean onTouchEvent(MotionEvent event) {
        return super.onTouchEvent(event);
    }
And we only have two views
@Override
    public boolean dispatchTouchEvent(MotionEvent ev) {
        return super.dispatchTouchEvent(ev);
    }

    @Override
    public boolean onTouchEvent(MotionEvent event) {
        return super.onTouchEvent(event);
    }
Get Click Event Log
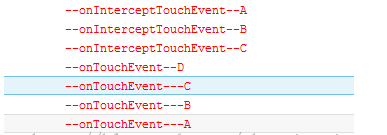
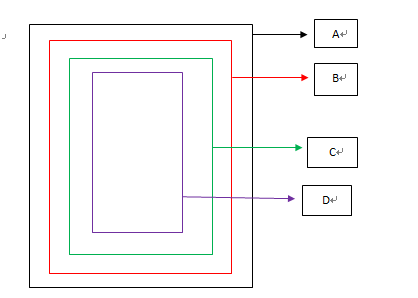
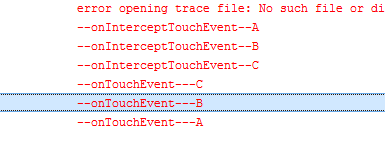
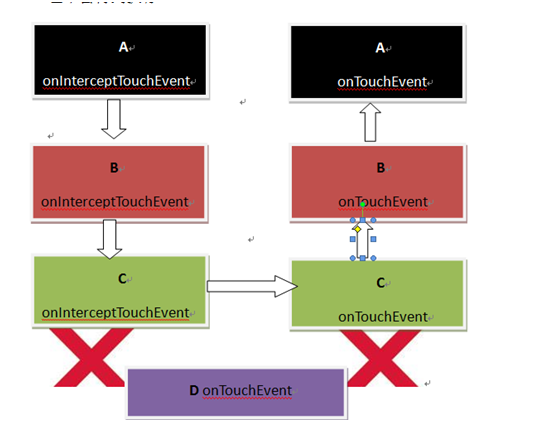
From this diagram, you can see that the onInterceptTouchEvent event is executed in the order from parent control to child control and takes precedence over the onTouchEvent method of your own control. The onTouchEvent event is executed in the reverse order from child control to parent control.Note that since false is returned at this time, there is no view to handle the ACTIONs of this touch event, which is why onTouchEvent is passed all the way to A.Events such as ACTION_MOVE and ACTION_UP are not handled accordingly, and in this case, even if you write the following code in D's onTouchEvent method, it will not be executed. 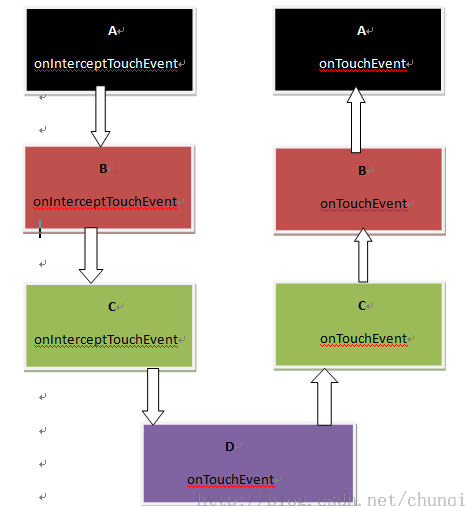
If A's InterceptTouchEvent returns true and the rest still returns false, the log of the execution output is: 
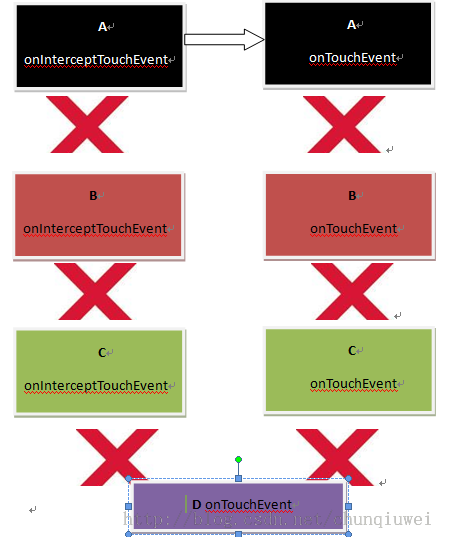
You can see that at this time A intercepted the Touch event and the event is no longer passed to B C D, a child control of A.All action events, such as finger movement events ACTION_MOVE or ACTION_UP events, are handled by the onTouchEvent method of A (of course, if the onTouchEvent method returns true, these actions will not correspond when returning false is tested).Event handling intercept methods and event handling methods for B, C, D controls cannot be executed.
Only if the onIntercepteTouchEvent event for B returns true, the printed log is
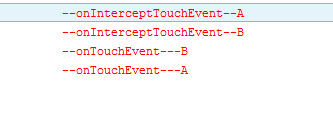
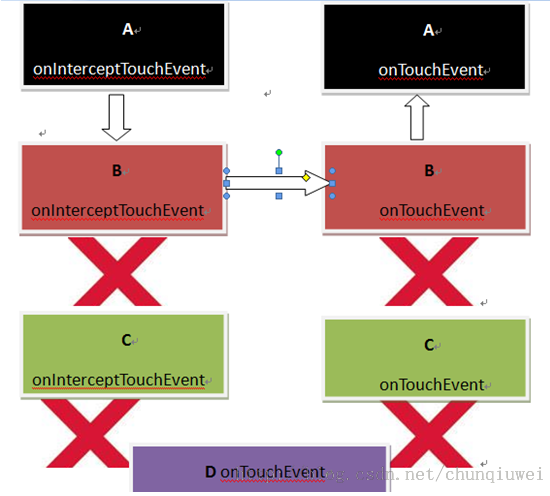
At this point, the Touch event is intercepted by B and will not be passed to the C D child control; similarly, since the onTouchEvent event returns false, the various action s of the event.getAction() for this event will not be handled.
Similarly, the onIntercept method of the C control returns true, while the rest returns false, the output log is
Here's how onTouchEvent returns true for each view
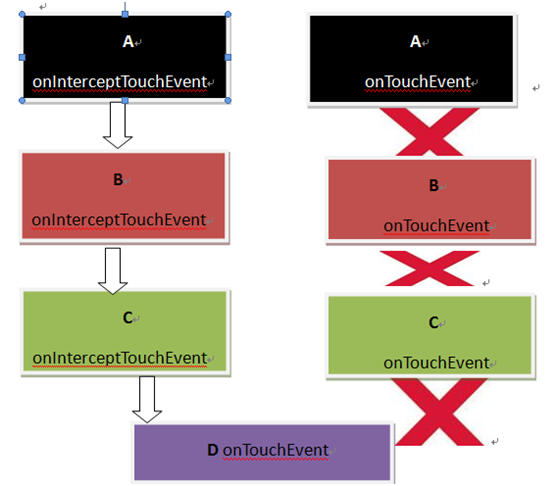
Since onTouchEvent events are passed from a child control to a parent control, when D's onTouchEvent returns true, the test output is as follows

Some pictures refer to resources on the Internet. If there is any infringement, please let us know.