by Aurora
Today, I'd like to introduce the model part of Django framework. The model is a simple and clear description of real data. It contains the necessary fields and behaviors for stored data. Django follows the DRY Principle. Its goal is that you only need to define the data model, and then you don't need to care about other miscellaneous codes, which will be automatically generated from the model.
Django model
Django model is a simple and clear description of real data, which contains the necessary fields and behaviors of stored data. Before creating the model, you need to configure the database. Django provides good support for various databases, including PostgreSQL, MySQL, SQLite, Oracle, etc. Django provides a unified call API for these databases. We can choose different databases according to our business needs.
Database configuration
Python has SQLite built in, so you don't need to install anything else to use it. In the TestProject project directory, open TestProject/settings.py Configuration file, SQLite has been configured as the default database. Of course, if in a real project, we can change to a more extensible database, such as Mysql. The specific configuration operations are as follows:
# TestProject/settings.py

# Database
DATABASES = {
    'default': {
        'ENGINE': 'django.db.backends.sqlite3',
        'NAME': os.path.join(BASE_DIR, 'db.sqlite3'),
    }
}
Configuration Description:
- ENGINE: database driver, optional (' django.db.backends.sqlite3',' django.db.backends.postgresql',' django.db.backends.mysql ', or' django.db.backends.oracle')
- NAME: the NAME of the database (SQLite used here corresponds to a database file path)
- USER: database login USER name
- PASSWORD: database login PASSWORD
- HOST: HOST connection address of the database (can be domain name or IP address)
- PORT: the host service PORT number of the database
Create model
Based on the voting application we created earlier, we create two models in this application -- Question and Choice.
- Question contains two fields: the content of the question and the time of publication.
- The Choice contains options for the question and the number of votes that have been cast. Each question can have multiple options.
Next, we will describe the above model by editing the poll/ models.py The file is defined.
# polls/models.py

from django.db import models


class Question(models.Model):
    question_text = models.CharField(max_length=200)
    pub_date = models.DateTimeField('Release date')


class Choice(models.Model):
    question = models.ForeignKey(Question, on_delete=models.CASCADE)
    choice_text = models.CharField(max_length=200)
    votes = models.IntegerField(default=0)
Here are the following points to note:
- Each model is defined as django.db.models Subclass of the. Model class.
- Each model has some class variables that represent a database field in the model.
- Each Field is an instance of the Field class, such as the string Field in the database corresponding to CharField.
- The name of each Field instance variable is also the Field name, such as question_text, database Field rules need to be followed when defining.
- The name of the instance variable can be used to define a comment name for code understanding, such as pub_date = models.DateTimeField('release date').
- Some Field class instances need parameters when defining, and some optional parameters correspond to database table structure. For example, CharField class needs to define length max_length.
- Foreign key association can be defined by using ForeignKey. For example, in this example, ForeignKey is used to define that each Choice must be associated with a Question object.
Activate model
By configuring the above models.py The code to create the model in class is enough for Django to create the database and corresponding table structure for us. Now we will install the poll application into our TestProject project project.
Open the TestProject again first/ settings.py Configuration file, in the configuration class installed_ Add point type path of poll application in apps' polls.apps.PollsConfig , the configuration is completed as follows:
# TestProject/settings.py

INSTALLED_APPS = [
    'polls.apps.PollsConfig',   #New poll path
    'django.contrib.admin',
    'django.contrib.auth',
    'django.contrib.contenttypes',
    'django.contrib.sessions',
    'django.contrib.messages',
    'django.contrib.staticfiles',
]
Because the pollsconfig class is written in the file polls/apps.py , so its dotted path is' polls.apps.PollsConfig '
Save the configuration and exit, and then run the makemigrations command. Django will detect your changes to the model file, and save the modified part as a migration (migration is Django's storage form for model definition, that is, changes in your database structure).
$ python manage.py makemigrations polls
Migrations for 'polls':
  polls/migrations/0001_initial.py
    - Create model Question
    - Create model Choice
After successful execution, you can execute the migrate command again to synchronize the database changes you defined in the model to the database table structure of the application. The execution results are as follows:
$ python manage.py migrate
Operations to perform:
  Apply all migrations: polls
Running migrations:
  Applying polls.0001_initial... OK
The database migration operation is divided into two commands: generate and apply, so that you can submit the migration data on the code control system and use it in multiple applications. This will not only make the development easier, but also bring convenience to other developers and production environments.
Model operation
The operation of model objects is essentially the operation of database data. Next, we implement the basic CURD operation for database records by operating on model objects.
New data
Edit poll under TestProject project/ views.py File code to add data to the corresponding table of the Question model by accessing the URL.
# polls/views.py
from django.shortcuts import render

# Create your views here.
from django.http import HttpResponse
from polls.models import Choice, Question
from django.utils import timezone

def index(request):
    return HttpResponse("Hello, this is a voting page.")

# Add problem description information
def add(request):
    question = Question(question_text='Which platform do you chop your hands on?',pub_date=timezone.now())
    question.save();
    return HttpResponse("New voting succeeded!")
Edit poll again/ urls.py File code. Add an add route. The code is as follows:
# polls/urls.py
from django.urls import path
from . import views

urlpatterns = [
    path('', views.index, name='index'),
    path('add', views.add, name='add'),    #Add add route
]
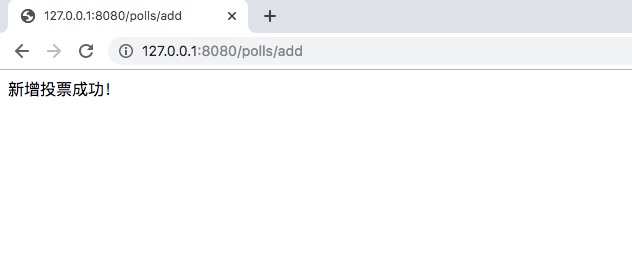
After saving, through Python manage.py The runserver 127.0.0.1:8080 command starts the local development server. After starting, enter the URL address in the browser http://127.0.0.1 : 8080 / poll / add, the following page will be returned to indicate the success of adding data.
Next, we will refresh the next page, which will add another piece of data, and then we will find out these two records.
Query data
Django provides a variety of ways to query out database records, such as querying all the data corresponding to the above Question model, the data of an id and the data needed through multi criteria filtering. Still edit the poll under the TestProject project/ views.py File, add query corresponding code:
# polls/views.py
# ……  Omit some codes

def query(request):
    # All data rows are obtained through all() of objects, the model manager, which is equivalent to SELECT * FROM question in SQL
    questionList = Question.objects.all()
    # Get single object
    response2 = Question.objects.get(id=1)
    # Equivalent to WHERE id=1 in SQL, conditional filtering can be set
    response3 = Question.objects.filter(id=1)
    #Sort by id field
    response5 = Question.objects.order_by("id")

    res = ""
    # Traverse all objects
    for q in questionList:
        res += str(q.id) + "." + q.question_text + " <br />"
    return HttpResponse("Query all questions:<br />" + res)
Edit poll again/ urls.py File code. Add a query route. The code is as follows:
# polls/urls.py
from django.urls import path
from . import views

urlpatterns = [
    path('', views.index, name='index'),
    path('add', views.add, name='add'),
    path('query', views.query, name='query'),  #New query route
]
Then enter the URL in the browser http://127.0.0.1 : 8080 / poll / query, see the request result as follows:
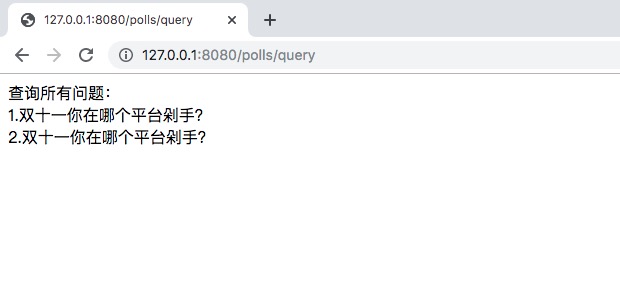
You can see that there are two identical records, but the id is different, but this is exactly what we expected. Next, we will modify and delete the first data.
Modify data and delete
Modify and delete data can operate one or more records, which depends on your query conditions. Edit the poll under TestProject again/ views.py File, add, modify and delete corresponding codes:
# polls/views.py
# ……  Omit some codes

#Modify data
def update(request):
    question1 = Question.objects.get(id=1)
    question1.question_text = 'Which would you choose, tmall or Jingdong?'
    question1.save()

    # One or more pieces of data can also be updated through conditional filtering
    # Question.objects.filter(id=1).update(question_text: 'which would you choose, tmall or Jingdong? )

    return HttpResponse("to update id=1: " + question1.question_text)

#Delete data
def delete(request):
    question2 = Question.objects.get(id=2)
    question2.delete()

    # One or more pieces of data can also be deleted through conditional filtering
    # Question.objects.filter(id=2).delete()

    # Delete all data
    # Question.objects.all().delete()

    res3 = ''
    questionList = Question.objects.all()
    # Traverse all objects
    for q in questionList:
        res3 += str(q.id) + "." + q.question_text + " <br />"
    return HttpResponse("Query after deletion:<br />" + res3)
Edit poll again/ urls.py File code. Add a query route. The code is as follows:
# polls/urls.py
from django.urls import path
from . import views

urlpatterns = [
    path('', views.index, name='index'),
    path('add', views.add, name='add'),
    path('query', views.query, name='query'),
    path('update', views.update, name='update'),  # New update route
    path('del', views.delete, name='del'),  # Add del route
]
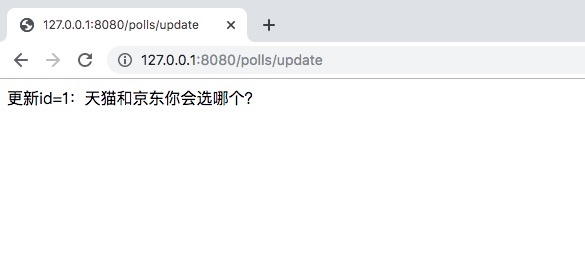
After completing the above code configuration, we can access the URL http://127.0.0.1 : 8080 / poll / update implements the first data update operation. The page returned after the request is as follows:
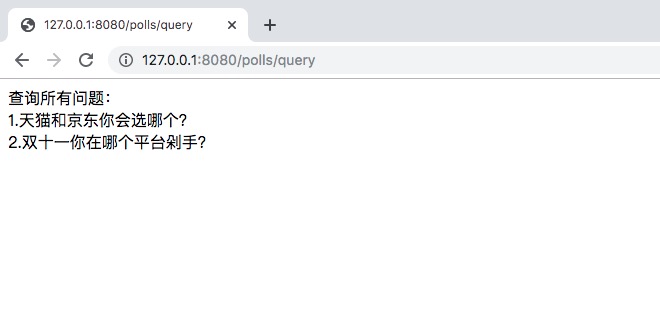
In this way, we have updated the problem description of the first data, again through the URL http://127.0.0.1 : 8080 / poll / query queries all the data, and you can see the return page as follows:
OK, after the update is successful, we try to delete the data again. By checking the deletion related code, we delete the data with id 2. The URL we visited this time http://127.0.0.1 : 8080 / poll / del, and then return to the page to query all records again after deletion, as shown below:
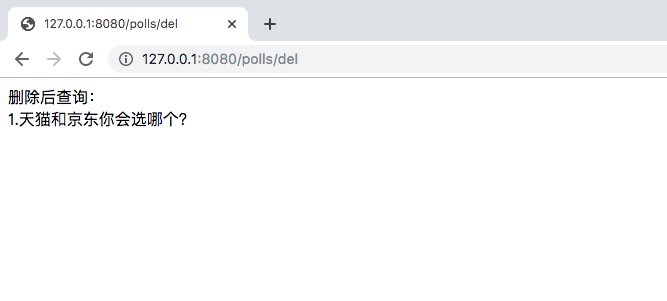
You can see that there is only one piece of data left, indicating that we have successfully deleted it.
summary
This article introduces Django's model for you, through the above learning we know that the powerful function of the model saves a lot of work for our database based development. Django also has built-in functions such as templates, forms, routing, authentication, basic database management, etc. next, we will further introduce other functions provided by Django.
reference resources
- Django Chinese document: https://docs.djangoproject.com/zh-hans/2.2/
- Introduction to Django W3C: https://www.w3cschool.cn/django/
Example code: https://github.com/JustDoPython/python-100-day
Pay attention to the official account: python technology, reply to "python", learn and communicate with each other.