Learning objectives:
Can name four common registration events, can name the advantages of on binding events, can name the advantages and methods of jQuery event delegation, can name binding events and unbinding events, can name the copy method of jQuery objects, can name two methods of jQuery multi library coexistence, and can use jQuery plug-ins
1.1. jQuery event registration
JQuery provides us with a convenient event registration mechanism. The advantages and disadvantages of jQuery are as follows:
-
Advantages: simple operation and no need to worry about event coverage.
-
Disadvantages: ordinary event registration cannot delegate events, and cannot unbind events. Other methods are needed.
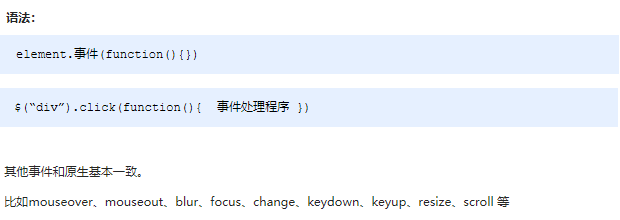
grammar
Demo code
<body>
<div></div>
<script>
$(function() {
// 1. Single event registration
$("div").click(function() {
$(this).css("background", "purple");
});
$("div").mouseenter(function() {
$(this).css("background", "skyblue");
});
})
</script>
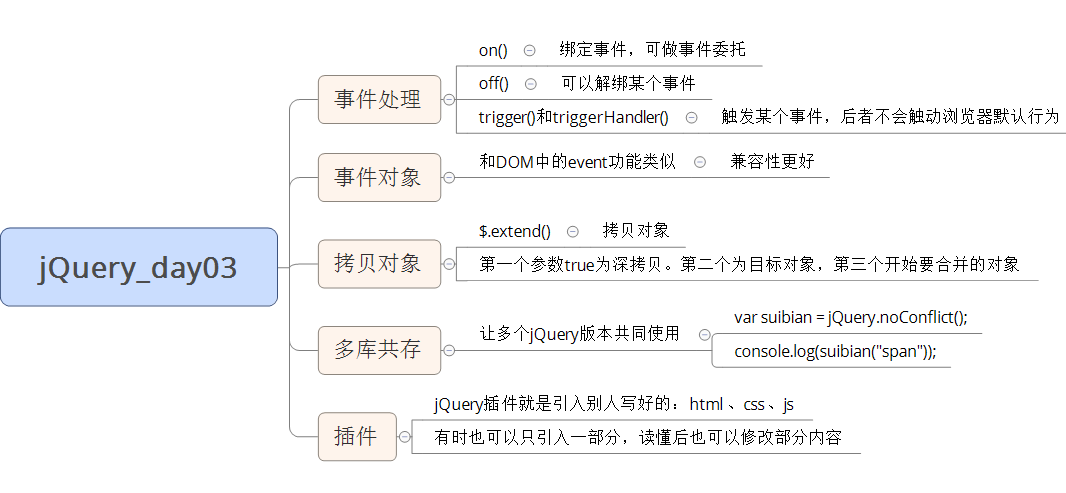
</body>1.2. jQuery event handling
Because of the shortcomings of ordinary registration event methods, jQuery has developed several processing methods, which are mainly explained as follows:
-
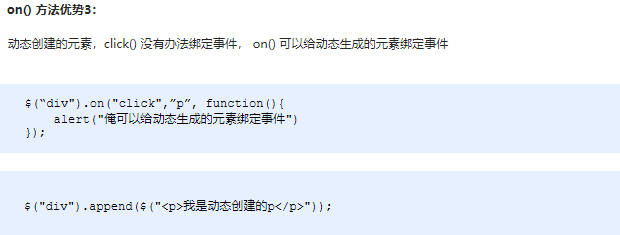
on(): used for event binding, the best event binding method at present
-
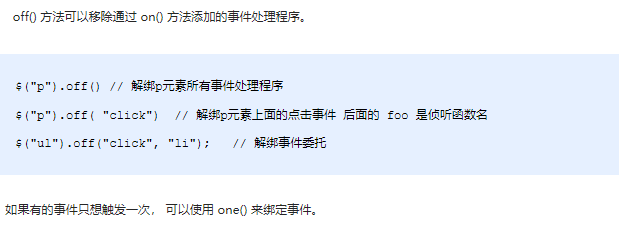
off(): event unbinding
-
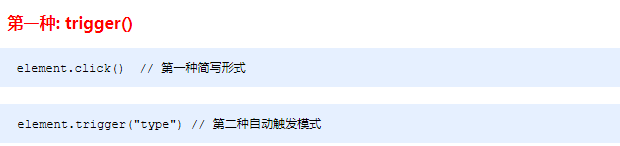
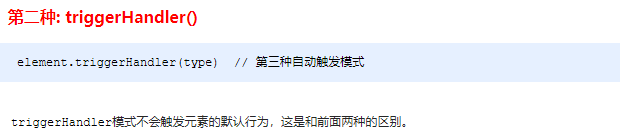
trigger() / triggerHandler(): event triggering
1.2.1 event handling on() binding event
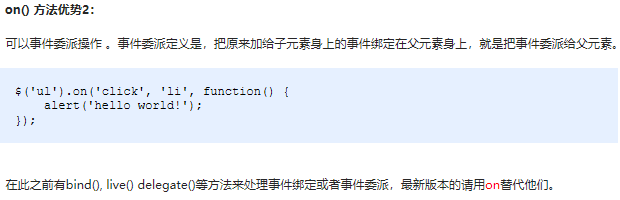
Because of the shortage of ordinary event registration methods, jQuery has created several new event binding methods, such as bind() / live() / delegate() / on(), of which the best one is: on()
grammar
Demo code
<body>
<div></div>
<ul>
<li>We are all good children</li>
<li>We are all good children</li>
<li>We are all good children</li>
</ul>
<ol></ol>
<script>
$(function() {
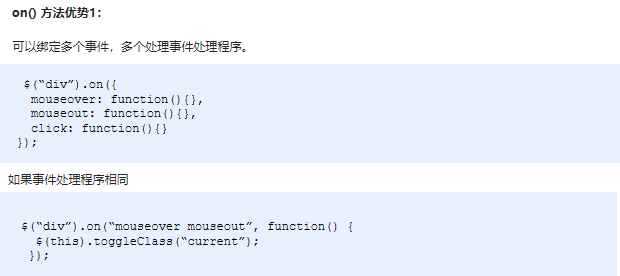
// (1) on can bind one or more event handlers
// $("div").on({
// mouseenter: function() {
// $(this).css("background", "skyblue");
// },
// click: function() {
// $(this).css("background", "purple");
// }
// });
$("div").on("mouseenter mouseleave", function() {
$(this).toggleClass("current");
});
// (2) on can implement event delegation (delegation)
// click is bound to ul, but the trigger object is the small li in ul
// $("ul li").click();
$("ul").on("click", "li", function() {
alert(11);
});
// (3) on can bind events to dynamically created elements in the future
$("ol").on("click", "li", function() {
alert(11);
})
var li = $("<li>I was founded later</li>");
$("ol").append(li);
})
</script>
</body>
1.2.2. Case: case of publishing microblog
1. Click the Publish button to dynamically create a small li, put the content in the text box and the delete button, and add it to the ul. 2. Click the delete button to delete the current microblog message.
Code implementation is omitted. (refer to the source code for details)
1.2.3. Event handling (off) unbinding event
When the logic on an event is not needed under specific requirements, the logic on the event can be removed. This process is called event unbinding. jQuery provides us with a variety of event unbinding methods: die() / undelegate() / off(), and even the event binding method one(), which is triggered only once. Here we focus on off();
grammar
Demo code
<body>
    <div></div>
    <ul>
        <li>We are all good children</li>
        <li>We are all good children</li>
        <li>We are all good children</li>
    </ul>
    <p>I am a P label</p>
    <script>
        $(function() {
            // Event binding
            $("div").on({
                click: function() {
                    console.log("I clicked");
                },
                mouseover: function() {
                    console.log('I passed the mouse');
                }
            });
            $("ul").on("click", "li", function() {
                alert(11);
            });

            // 1. Event unbinding off
            // $("div").off();  //  This is the release of all events on Div
            $("div").off("click"); // This is to release the click event on the div
            $("ul").off("click", "li");

            // 2. one() but it can only trigger the event once
            $("p").one("click", function() {
                alert(11);
            })
        })
    </script>
</body>
1.2.4. Event handling trigger() automatically triggers an event
Sometimes, under certain specific conditions, we want some events to be triggered automatically. For example, the automatic playback function of the rotation chart is the same as clicking the button on the right. You can use the timer to automatically trigger the button click event on the right without mouse click. Thus, jQuery provides us with two automatic trigger events trigger() and triggerHandler();
grammar
Demo code
<body>
<div></div>
<input type="text">
<script>
$(function() {
// Binding event
$("div").on("click", function() {
alert(11);
});
// Auto trigger event
// 1. Element. Event ()
// $("div").click(); Triggers the default behavior of the element
// 2. Element. trigger("event")
// $("div").trigger("click"); Triggers the default behavior of the element
$("input").trigger("focus");
// 3. The element. triggerHandler("event") is the default behavior that will not trigger the element
$("input").on("focus", function() {
$(this).val("how are you");
});
// One will get the focus, the other will not
$("div").triggerHandler("click");
// $("input").triggerHandler("focus");
});
</script>
</body>1.3. jQuery event object
jQuery encapsulates the event object event in DOM, which has better compatibility, easier access and little change in use. When an event is triggered, an event object will be generated.
grammar

Demo code
<body>
<div></div>
<script>
$(function() {
$(document).on("click", function() {
console.log("Click document");
})
$("div").on("click", function(event) {
// console.log(event);
console.log("Click div");
event.stopPropagation();
})
})
</script>
</body>Note: the event object in jQuery can be used for reference to the event object in API and DOM.
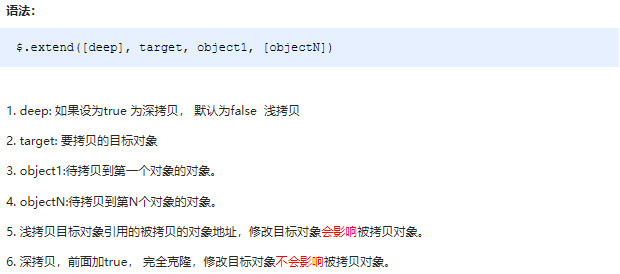
1.4. jQuery copy object
jQuery provides us with two sets of API s for quickly obtaining and setting element size and location, which are easy to use. The contents are as follows.
grammar
Demo code
 <script>
        $(function() {
            // 1. Consolidated data
            var targetObj = {};
            var obj = {
                id: 1,
                name: "andy"
            };
            // $.extend(target, obj);
            $.extend(targetObj, obj);
            console.log(targetObj);

            // 2. The original data in targetObj will be overwritten
            var targetObj = {
                id: 0
            };
            var obj = {
                id: 1,
                name: "andy"
            };
            // $.extend(target, obj);
            $.extend(targetObj, obj);
            console.log(targetObj);
        })
    </script>
1.5. jQuery multi database coexistence
In the actual development, many projects have been developed continuously for more than ten years, and the jQuery version is constantly updated. The initial jQuery version cannot meet the requirements. At this time, it is necessary to ensure that the new functions are implemented with the new jQuery version under the normal operation of the old version. This situation is called jQuery multi database coexistence.
grammar

Demo code
<script>
    $(function() {
        // Let jquery release control over $and let it decide for itself
        var suibian = jQuery.noConflict();
        console.log(suibian("span"));
    })
</script>
1.6. jQuery plug-in
JQuery has limited functions. If you want more complex special effects, you can complete them with the help of jQuery plug-in. These plug-ins also depend on jQuery, so they must be introduced first
JQuery file, so it is also called jQuery plug-in.
Websites commonly used by jQuery plug-ins:
-
jQuery plug-in library JQuery plug-in library - collect the latest and best jQuery plug-ins
-
jQuery house JQuery House - freely share the plug-in libraries of jQuery, html5 and css3
jQuery plug-in usage steps:
-
Import relevant documents. (jQuery files and plug-in files)
-
Copy relevant html, css and js (call the plug-in).
1.4.1. Waterfall flow plug-in (key explanation)
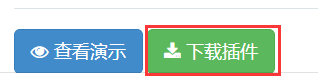
The first plug-in we learned is the open source plug-in of jQuery house, waterfall flow. We will focus on the detailed explanation, from finding the web page where the plug-in is located, and then clicking to download the code to the use of the plug-in. For the later use of the plug-in, please refer to the use of the waterfall flow plug-in.
Download location

Code demonstration
There are three points to use plug-ins: 1. Introduce css. 2. Introduce js. 3. Introduce html. (some simple plug-ins only need to introduce html and js, and even some just need to introduce js)
-
1. Introduce css
<link rel="stylesheet" href="css/normalize.css">
<link rel="stylesheet" type="text/css" href="css/default.css">
<!-- The following style code is a page layout, which can be imported or written by yourself. You can design your own page style. Generally, it is imported directly for convenience -->
<style type="text/css">
#gallery-wrapper {
position: relative;
max-width: 75%;
width: 75%;
margin: 50px auto;
}
img.thumb {
width: 100%;
max-width: 100%;
height: auto;
}
.white-panel {
position: absolute;
background: white;
border-radius: 5px;
box-shadow: 0px 1px 2px rgba(0, 0, 0, 0.3);
padding: 10px;
}
.white-panel h1 {
font-size: 1em;
}
.white-panel h1 a {
color: #A92733;
}
.white-panel:hover {
box-shadow: 1px 1px 10px rgba(0, 0, 0, 0.5);
margin-top: -5px;
-webkit-transition: all 0.3s ease-in-out;
-moz-transition: all 0.3s ease-in-out;
-o-transition: all 0.3s ease-in-out;
transition: all 0.3s ease-in-out;
}
</style>-
2. Introduce js
<!-- The first two must be introduced -->
<script src="js/jquery-1.11.0.min.js"></script>
<script src="js/pinterest_grid.js"></script>
<!-- The following is the code for starting waterfall flow. The parameters can be adjusted, and the specific functions can be referred to readme.html -->
<script type="text/javascript">
	$(function() {
      $("#gallery-wrapper").pinterest_grid({
          no_columns: 5,
          padding_x: 15,
          padding_y: 10,
          margin_bottom: 50,
          single_column_breakpoint: 700
      });
	});
</script>-
3. Import html
	<!-- html The structure is generally written in advance. It is difficult to modify the structure, but the content and the number of pictures can be modified( article (label) -->
	<section id="gallery-wrapper">
        <article class="white-panel">
            <img src="images/P_000.jpg" class="thumb">
            <h1><a href="#"> I'm rotating picture 1</a></h1>
            <p>It's wonderful inside</p>
        </article>
        <article class="white-panel">
            <img src="images/P_005.jpg" class="thumb">
            <h1><a href="#"> I'm rotating picture 1</a></h1>
            <p>It's wonderful inside</p>
        </article>
        <article class="white-panel">
            <img src="images/P_006.jpg" class="thumb">
            <h1><a href="#"> I'm rotating picture 1</a></h1>
            <p>It's wonderful inside</p>
        </article>
        <article class="white-panel">
            <img src="images/P_007.jpg" class="thumb">
            <h1><a href="#"> I'm rotating picture 1</a></h1>
            <p>It's wonderful inside</p>
        </article>
    </section>
Summary: jQuery plug-in is to introduce html, css and js written by others (sometimes only a part can be introduced, and some contents can be modified after reading)
1.4.2. Image loading plug-in
Lazy loading of pictures: when the page slides to the position with pictures, the pictures are loaded to improve the speed of page opening and user experience. (download omitted)
Code demonstration
Lazy loading only needs to introduce html and js operations. This plug-in does not involve css.
-
1. Introduce js
<script src="js/EasyLazyload.min.js"></script>
<script>
   	lazyLoadInit({
   		showTime: 1100,
   		onLoadBackEnd: function(i, e) {
     		console.log("onLoadBackEnd:" + i);
   		},
   		onLoadBackStart: function(i, e) {
     		console.log("onLoadBackStart:" + i);
   		}
 	});
</script>-
2. Import html
<img data-lazy-src="upload/floor-1-3.png" alt="">
1.4.3. Full screen scrolling plug-in
Full screen scrolling plug-ins are relatively large, so generally large plug-ins will have help documents or websites. Full screen scrolling plug-ins are described in detail on the following websites:
jQuery full screen scrolling plug-in fullPage.js demo_ dowebok
Code demonstration
Full screen scrolling has multiple forms, so it has different styles, html and css are also different, but js changes little. Therefore, the following only demonstrates the introduction of js. The introduction of html and css is based on your actual situation
What style does the project need to use to introduce the corresponding HTML and CSS.
<script src="js/jquery.min.js"></script>
<script src="js/fullpage.min.js"></script>
<script>
  	$(function() {
  		$('#dowebok').fullpage({
    		sectionsColor: ['pink', '#4BBFC3', '#7BAABE', '#f90'],
    		navigation: true
  		});
	});
</script>
Note: in actual development, generally copy the file, and then modify and add functions in the file.
1.4.4. bootstrap component
Bootstrap is a concise, intuitive and powerful front-end development framework designed by Twitter based on HTML, CSS and JavaScript. It is implemented by jQuery and supports responsiveness
Layout, making Web development more convenient and fast.
If software reuse is used in software development, the reused parts can be called components, and the components with reserved interfaces in the application program are plug-ins. Bootstrap component
It is very convenient to use: 1. Introduce css and JS related to bootstrap 2. Go to the official website to copy html
Code demonstration
-
Introduce css and js related to bootstrap
<link rel="stylesheet" href="bootstrap/css/bootstrap.min.css">
<script src="bootstrap/js/jquery.min.js"></script>
<script src="bootstrap/js/bootstrap.min.js"></script>
-
Go to the official website to copy the function module of html
 <div class="container">
        <!-- Single button -->
        <div class="btn-group">
            <button type="button" class="btn btn-default dropdown-toggle" data-toggle="dropdown" aria-haspopup="true" aria-expanded="false">
      		Action <span class="caret"></span>
    		</button>
            <ul class="dropdown-menu">
                <li><a href="#">Action</a></li>
                <li><a href="#">Another action</a></li>
                <li><a href="#">Something else here</a></li>
                <li role="separator" class="divider"></li>
                <li><a href="#">Separated link</a></li>
            </ul>
     	</div>
	</div>
1.4.5. bootstrap plug-in (JS)
In fact, the js plug-in in bootstrap is also a part of the component. It is just a component that needs js calling function. Therefore, generally, the js plug-in in of bootstrap will be accompanied by js code (some can also be used)
Omit js and implement it with attributes).
Steps: 1. Introduce css and js related to bootstrap 2. Go to the official website to copy html 3. Copy js code and start js plug-in.
Code demonstration
-
Introduce css and js related to bootstrap
<link rel="stylesheet" href="bootstrap/css/bootstrap.min.css">
<script src="bootstrap/js/jquery.min.js"></script>
<script src="bootstrap/js/bootstrap.min.js"></script>
-
Go to the official website to copy the function module of html
<!-- Modal box -->
<!-- Large modal -->
<button type="button" class="btn btn-primary" data-toggle="modal" data-target=".bs-example-modal-lg">Large modal</button>
<div class="modal fade bs-example-modal-lg" tabindex="-1" role="dialog" aria-labelledby="myLargeModalLabel">
    <div class="modal-dialog modal-lg" role="document">
        <div class="modal-content">
            Inside is the modal box
        </div>
    </div>
</div>-
Copy the js code and start the js plug-in.
<script>
	// When we click the button defined by ourselves, the modal box pops up
	$(".myBtn").on("click", function() {
		// alert(11);
		$('#btn').modal()
	})
</script>
1.4.6. bootstrap case - Alibaba Baixiu
1. Implement the navigation bar by calling the component 2. Login by calling the plug-in 3. Implement the tab bar by calling the plug-in tab
Code implementation is omitted. (refer to the source code for details)
1.7. Comprehensive case: toDoList case analysis (code omitted)
1.7.1 case: case introduction
//1. Enter the content in the text box and press enter to generate to-do items.
//2. Click the to-do check box to add the current data to the completed items.
//3. Click the completed items check box to add the current data to the to-do list.
//4. However, the content refresh page of this page will not be lost.
1.7.2 case: toDoList analysis
//1. Refreshing the page will not lose data, so local storage is required
 //2. Core idea: press enter or click the check box to load the locally stored data into the page, so as to ensure that the data will not be lost when refreshing and closing the page
 //3. Stored data format: VAR todolist = [{Title: 'xxx', done: false}]
//4. Note 1: only string format can be stored in local storage. Therefore, the object needs to be converted to string JSON.stringify(data).
//5. Note 2: to obtain the locally stored data, we need to convert the string into the object format JSON.parse() before we can use the data.
1.7.3 case: toDoList press enter to add new data to local storage
//1. Remember: the data in the page should be obtained from the local storage, so that the data will not be lost when refreshing the page, so the data should be saved to the local storage first.
//2. Use the event object. keyCode to judge that the user pressed the Enter key (13).
//3. Declare an array to save data.
//4. First read the original data stored locally (declaration function getData()) and put it into this array.
//5. Then add the latest data obtained from the form to the array.
//6. Finally, store the array to local storage (declare the function savaDate())
1.7.4 case: toDoList locally stores data, renders and loads it to the page
//1. Since loading operations are often rendered later, a function load is declared to facilitate subsequent calls
 //2. First read the local stored data. (don't forget to convert data to object format)
//3. After traversing the data ($. each()), if there are several pieces of data, several small li are generated and added to ol.
//4. Before each rendering, empty the original contents, and then load the latest data.
1.7.5 case: toDoList deletion
//1. Click the a link inside to delete the corresponding data stored locally instead of deleting the li.
//2. Core principle: first obtain the locally stored data, delete the corresponding data, save it to the local storage, and re render the list li
 //3. We can record the current index number for the link custom attribute
 //4. Delete the relevant data according to the index number -- the splice(i, 1) method of the array
 //5. Store the modified data and then store it to local storage
 //6. Re render and load the data list
 //7. Because a is created dynamically, we use the on method to bind events
1.7.6 case: toDoList in progress and completed option operation
//1. When we click the small check box, modify the locally stored data, and then re render the data list.
//2. Click to obtain local stored data.
//3. Modify the corresponding data attribute done to the checked status of the current check box.
//4. Then save the data to local storage
 //5. Re render and load the data list
 //6. Add a new condition in the load function. If the done of the current data is true, the list rendering is loaded into the ul
 //7. If the done of the current data is false, it is a to-do, and the list rendering is loaded into ol
1.7.7 case: toDoList counts the number of ongoing and completed projects
//1. Operate in our load function
 //2. Declare 2 variables: todoCount to-do number doneCount completed number
//3. When traversing the locally stored data, if the data done is false, todoCount + +, otherwise doneCount++
//4. Finally, modify the corresponding element text()
1.8. Today's summary