The reason why the method of generating SQL is recommended here is that the migration is more flexible after generating SQL scripts. It mainly has the following advantages:
1. We can delete or add scripts based on the SQL scripts generated by migration as needed
2. You can directly send the script to the database administrator for upgrade.
3. You can check the correctness of the SQL script generated by the migration to avoid destructive upgrade.
1, Environmental preparation
-
Install the efcore cli command line tool: open the package management console and enter: dotnet tool install -- global dotnet EF. If it has been installed, please skip this step.
-
Create an asp.net core mvc project and a class library project, as shown in the following figure
2, Create DbContext
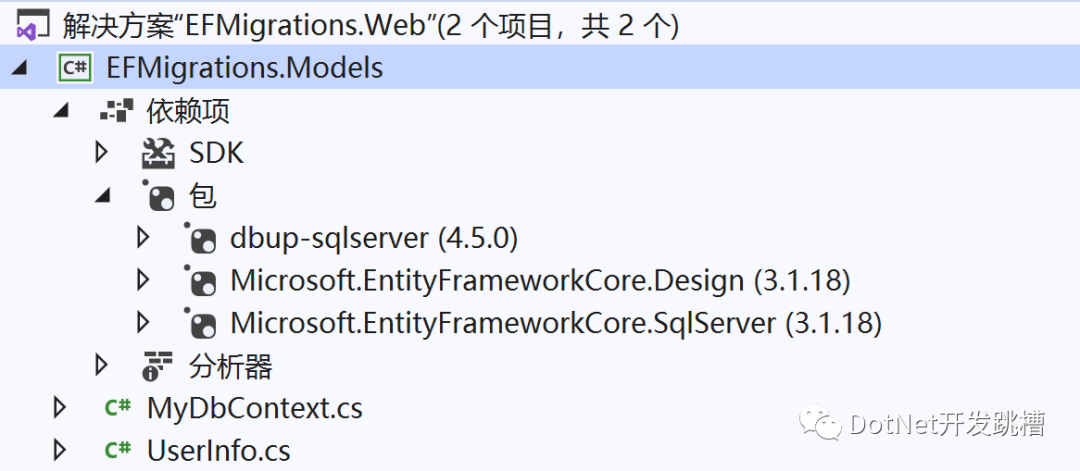
First, add the Nuget package related to EFCore and the dbup sqlserver package for application migration to the class library project, Microsoft.EntityFrameworkCore.SqlServer, Microsoft.EntityFrameworkCore.Design and dbup sqlserver, as shown in the following figure:
Then define an entity model UserInfo and DbContext
using System;using System.Collections.Generic;using System.ComponentModel.DataAnnotations;using System.ComponentModel.DataAnnotations.Schema;using System.Text;
namespace EFMigrations.Models{    public class UserInfo    {        [Key]        [DatabaseGenerated(DatabaseGeneratedOption.Identity)]        public int UserId { get; set; }        public string UserName { get; set; }        public string Password { get; set; }        public string Email { get; set; }    }}
using Microsoft.EntityFrameworkCore;using System;using System.Collections.Generic;using System.Text;
namespace EFMigrations.Models{    public class MyDbContext : DbContext    {        ///< summary > / / / a constructor that receives the dbcontextoptions parameter must be declared here, otherwise the migration cannot be added normally. / / /</ summary>        /// <param name="options"></param>        public MyDbContext(DbContextOptions<MyDbContext> options) : base(options)        {        }        public DbSet<UserInfo> UserInfos { get; set; }        protected override void OnConfiguring(DbContextOptionsBuilder optionsBuilder)        {            base.OnConfiguring(optionsBuilder) ;        }    }}
3, Configure Web project
1 add Microsoft.EntityFrameworkCore.Design Nuget package reference. After reference, remember to regenerate the next project.
2 open appsettings.Development.json and configure the database connection string, as shown below:
{ "Logging": { "LogLevel": { "Default": "Information", "Microsoft": "Warning", "Microsoft.Hosting.Lifetime": "Information" } }, "AllowedHosts": "*", "ConnectionStrings": { "ConnectionStr": "Server=.;Database=TestDb;User Id=sa;Password=xxxx" }}3 open the Startup.cs file and register the DbContext in the service container.
public void ConfigureServices(IServiceCollection services) { services.AddDbContext<MyDbContext>(builder=> { builder.UseSqlServer(Configuration["ConnectionStrings:ConnectionStr"]); }); services.AddControllersWithViews(); }3, Add migration
First look at the instructions for the migration command, open the package management console, and enter the following command to view the usage of the migration generated command:
dotnet ef migrations add --help

-s option: indicates the project to be started when generating migration. This is EFMigrations.Web
-p option: specify the root directory of the project to store the migration files. Normally, it is the project where the DbContext class is located.
-o option: you can additionally specify the directory where the migration file will be stored. If you do not specify this option, it will be generated by default under the Migrations folder of the project where the - p option is located
Open the package management console and enter the command dotnet EF migrations add InitDatabase - S. / efmigrations.web - P. / efmigrations.models to generate the first migration. The migration name here can be customized, not necessarily InitDatabase. After success, it is shown in the following figure:
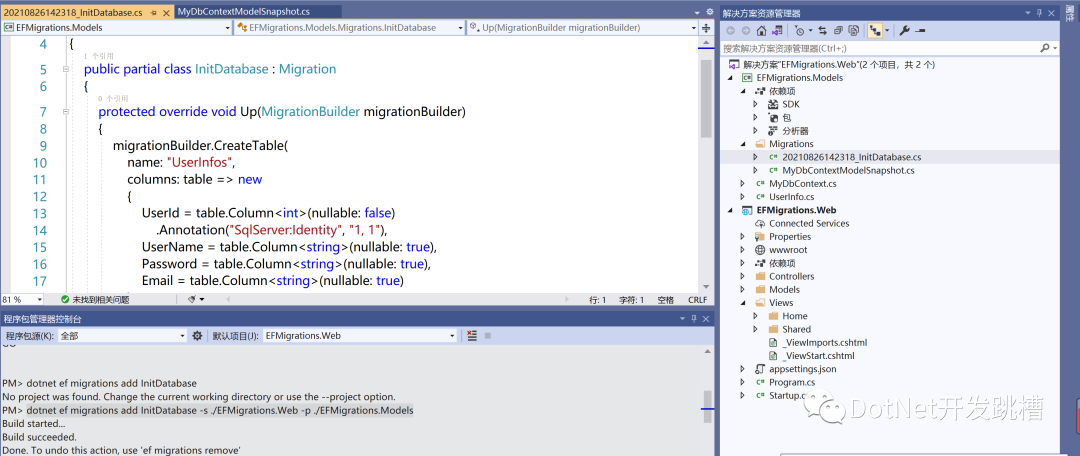
// <auto-generated />using EFMigrations.Models;using Microsoft.EntityFrameworkCore;using Microsoft.EntityFrameworkCore.Infrastructure;using Microsoft.EntityFrameworkCore.Metadata;using Microsoft.EntityFrameworkCore.Storage.ValueConversion;
namespace EFMigrations.Models.Migrations{    [DbContext(typeof(MyDbContext))]    partial class MyDbContextModelSnapshot : ModelSnapshot    {        protected override void BuildModel(ModelBuilder modelBuilder)        {#pragma warning disable 612, 618            modelBuilder                .HasAnnotation("ProductVersion", "3.1.18")                .HasAnnotation("Relational:MaxIdentifierLength", 128)                .HasAnnotation("SqlServer:ValueGenerationStrategy", SqlServerValueGenerationStrategy.IdentityColumn);
            modelBuilder.Entity("EFMigrations.Models.UserInfo", b =>                {                    b.Property<int>("UserId")                        .ValueGeneratedOnAdd()                        .HasColumnType("int")                        .HasAnnotation("SqlServer:ValueGenerationStrategy", SqlServerValueGenerationStrategy.IdentityColumn);
                    b.Property<string>("Email")                        .HasColumnType("nvarchar(max)");
                    b.Property<string>("Password")                        .HasColumnType("nvarchar(max)");
                    b.Property<string>("UserName")                        .HasColumnType("nvarchar(max)");
                    b.HasKey("UserId");
                    b.ToTable("UserInfos");                });#pragma warning restore 612, 618        }    }}
You can see the contents in the MyDbContextModelSnapshot.cs file. At this time, the changes in InitDatabase migration are also recorded, that is, EF compares the changes in the migration snapshot file (here: MyDbContextmodelSnapshot.cs) with the existing model to determine which changes to include in the new migration.
4, Convert migration to SQL script
Let's take a look at the command description of converting EF migration to database script. Open the package management console and enter the following command to view the usage of EF migration to SQL script command:
dotnet ef migrations script --help
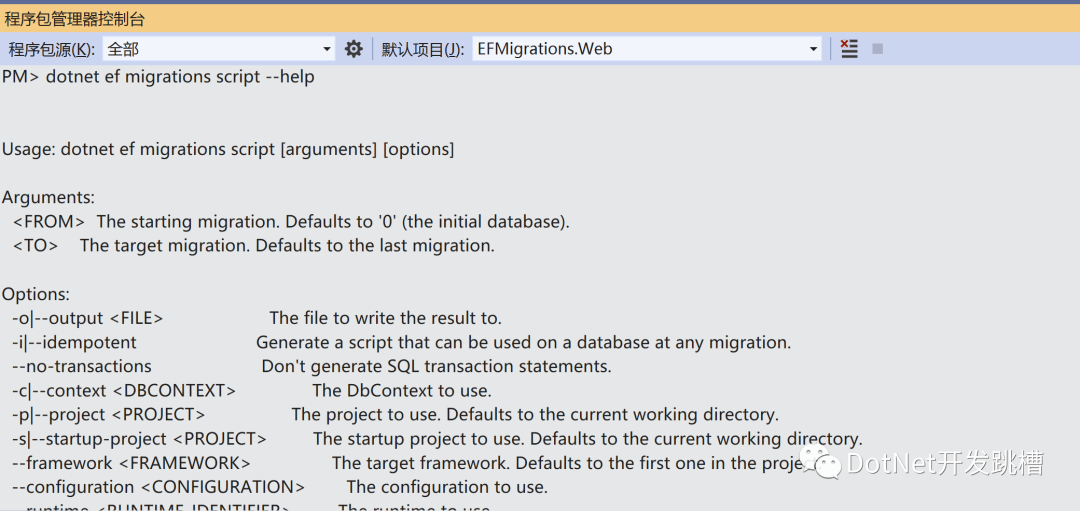
FROM parameter: indicates the migration FROM which the SQL script is generated. If it is generated FROM the first migration, this parameter is passed to 0, otherwise the first migration cannot generate the SQL script.
TO parameter: indicates the migration TO which the SQL script is generated. The migration added after this migration will not generate SQL script.
-s option: Specifies the path of the csproj file of the startup project when generating the SQL script, which can be a relative path to the current directory (the default current directory is the directory where the. sln file is located when the package management console is opened). The startup project refers to the executable project containing the Main function, which is EFMigrations.Web
-p option: specify the project where the migration is located. Generally, this path is specified as the root directory of the project containing DbContext class. Like - s, it is also specified by using the relative path relative to the current directory. You can use
dir Command to view the current directory.
-o option: used to specify the path to generate SQL scripts, which can be a relative directory.
input cd ./EFMigrations.Models Enter the project root directory containing the DbContext class, so that we don't have to specify the project path where the DbContext is located.
input dotnet ef migrations script 0 20210826142318_InitDatabase -s ../EFMigrations.Web -o ./SqlScripts/InitDatabase.sql
The above command indicates 20210826142318_InitDatabase the SQL generated by the migration is stored in the EFMigrations.Models/SqlScripts directory.
After success, you can see the following figure:

Note: when deleting a migration, try to use dotnet ef migrations remove. Try not to delete the migration file manually, because if you delete the migration file manually, you must delete the changes about the migration in the migration snapshot (MyDbContextModelSnapShot.cs) file manually, otherwise the migration cannot be generated again.
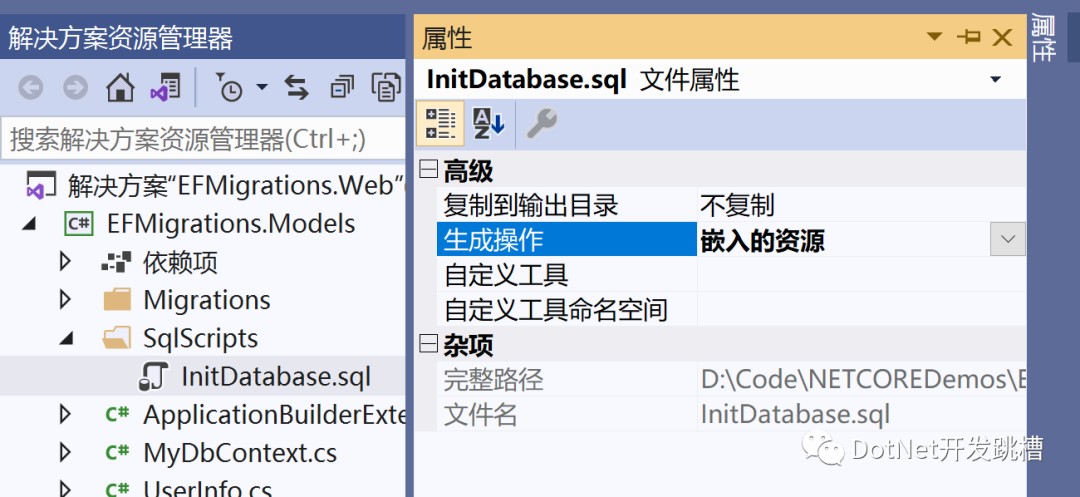
You need to set the. sql script as an embedded resource, right-click the. sql script, select properties - > generate operation - > embedded resources, and set as follows:
5, First migration application
1. Add the ApplicationBuilderExtensions class under the EFMigrations.Models project
using DbUp;using Microsoft.AspNetCore.Builder;using Microsoft.Extensions.Configuration;using Microsoft.Extensions.Logging;using System;using System.Collections.Generic;using System.Reflection;using System.Text;
namespace EFMigrations.Models{    public static class ApplicationBuilderExtensions    {        public static void DbMigrate(this IApplicationBuilder builder, IConfiguration configuration,ILogger logger)        {            string connectionString = configuration["ConnectionStrings:ConnectionStr"];            //If the database does not exist, create EnsureDatabase.For.SqlDatabase(connectionString);
            //Here, you will find all the. sql scripts contained in the current assembly and find the sql scripts that have not been upgraded to upgrade. var upgrader = DeployChanges.To            .SqlDatabase(connectionString)            .WithScriptsEmbeddedInAssembly(Assembly.GetExecutingAssembly())            .LogToConsole()            .Build();
            var result = upgrader.PerformUpgrade();
            if (!result.Successful)            {                logger.LogInformation(result.Error, "Database upgrade failed");            }        }    }}
2. Open the Startup.cs file under EFMigrations.Web and modify the Configure method as follows:
    public void Configure(IApplicationBuilder app, IWebHostEnvironment env,ILogger<Startup> logger)        {            if (env.IsDevelopment())            {                app.UseDeveloperExceptionPage();            }            else            {                app.UseExceptionHandler("/Home/Error");            }            app.UseStaticFiles();
            app.UseRouting();
            app.UseAuthorization();
            app.UseEndpoints(endpoints =>            {                endpoints.MapControllerRoute(                    name: "default",                    pattern: "{controller=Home}/{action=Index}/{id?}");            });
            //Here you start to apply the database migration app.DbMigrate(Configuration,logger);}
After success, you can see that the database TestDb and the table UserInfo have been created
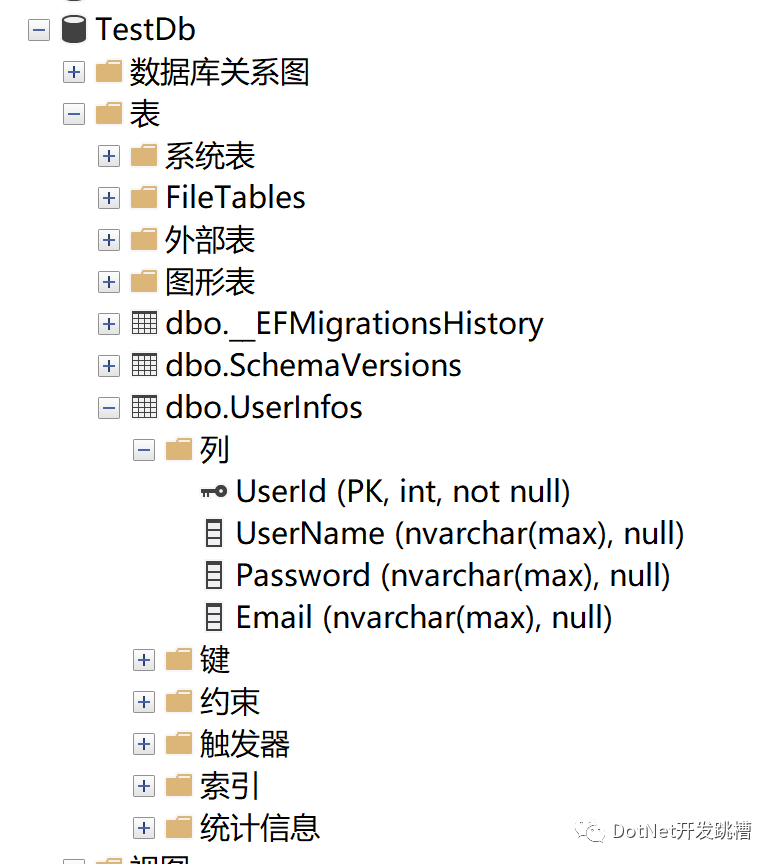
Here, schemavers is a table created by DB SQL server to record those SQL scripts that have been applied.
6, Change migration application
The above only creates a migration. Suppose we add several fields to the UserInfo entity at this time, what should we do to synchronize the changes of this model with the database changes in the formal environment?
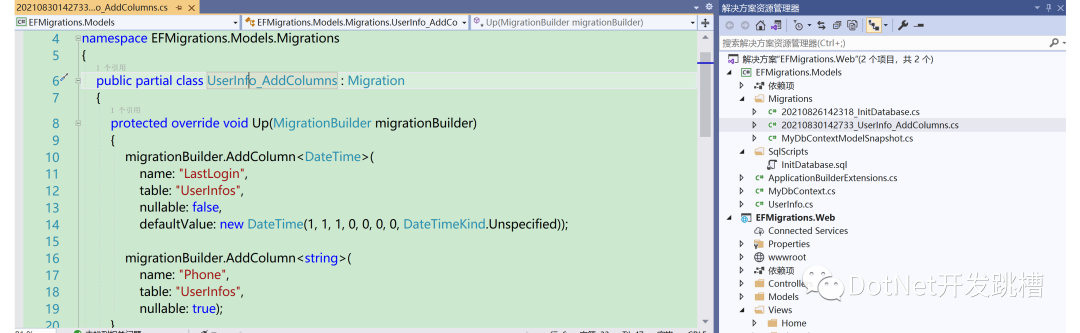
1. Generate migration
dotnet ef migrations add UserInfo_AddColumns -p ./EFMigrations.Models/EFMigrations.Models.csproj -s ./EFMigrations.Web/
2. The migration is converted into SQL script and embedded into the assembly, and then the assembly is compiled and published to the formal environment
cd ./EFMigrations.Models
dotnet ef migrations script 20210826142318_InitDatabase 20210830142733_UserInfo_AddColumns -o ./SqlScripts/UserInfo_AddColumns.sql -s ../EFMigrations.Web/
Here, you must specify the sql file name after - o. if you only specify the directory, such as: - o. / sqlscripts /, you will be prompted that the path cannot be found.
In addition, it should be noted that the migration (20210826142318_InitDatabase) specified by the FROM parameter will be excluded and the corresponding SQL script will not be generated.
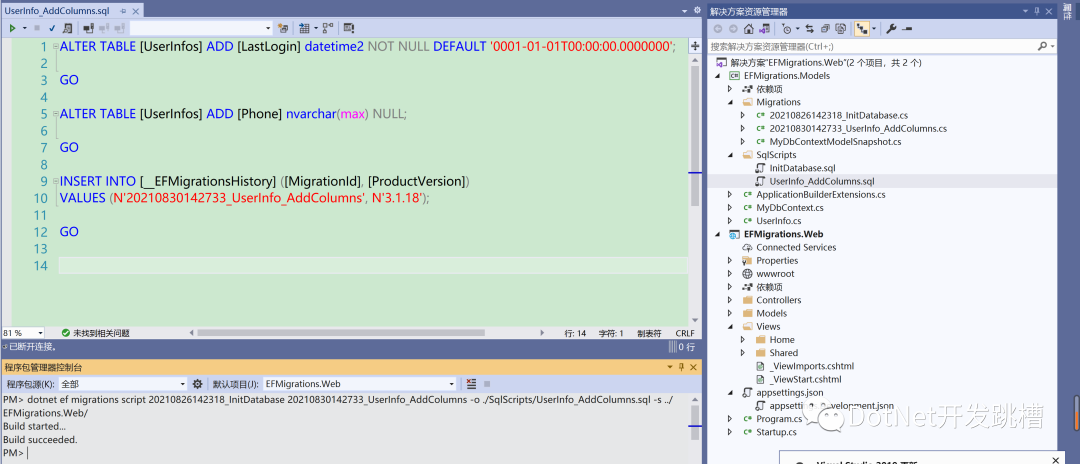
After generating an SQL script, remember to set the generation operation of the script to embedded resources.
3. Just restart the website.

You can see that after restarting the website, the field is created successfully.
Dbup official document address: https://dbup.readthedocs.io/en/latest/#getting-started