Data Binding Use Tutorial (4): BaseObservable and Bidirectional Binding
This article mainly talks about two points of knowledge:
- Two-way binding: The main point is to explain some notes in the previous article in detail through specific examples, through these examples, try to make the two-way binding clear.
- BaseObservable: Includes things related to BaseObservable. For example: @Bindable annotations, responsive packaging classes, etc.
What is bi-directional binding?
For example, in TextView, we display the data in the entity in TextView through dataBinding, which is a binding from entity to view direction; when the data of TextView changes, such as when we input some data manually, we set the data in view into the field of corresponding entity class through dataBinding, which is from view to entity class. Binding in the direction of integration is two-way binding. But bi-directional binding is easier said than done, so dataBinding provides a series of annotations starting with Inverse to help DataBinding's entire system and developers better control and use bi-directional binding.
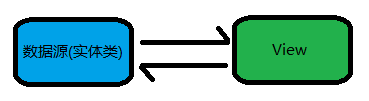
Above is a two-way binding schematic diagram that I sketched simply:
- When the left data source (entity class) changes, the right view is automatically notified to refresh the data and bind the new data to the view for display.
- When the content in the right view changes, the left data source (entity class) is automatically notified to refresh the data, and the new content in the view is bound to the data source (entity class).
Bidirectional Binding Problem
Based on the above explanation of bidirectional binding, we find two problems:
- Dead-loop binding: Because the change of data source will inform view refresh, and the change of view will inform the refresh of data source, so that the cycle will continue, forming a dead-loop binding.
- Data in the data source sometimes needs to be transformed to be displayed in view, and the content displayed in view also needs to be transformed to be bound to the corresponding data source.
Solutions to Binding Problem
- Dead-cycle binding solutions:
The solution is simple, for example, in the dataBinding source code, path: android. databinding. adapters. TextViewBinding Adapter:
@BindingAdapter("android:text")
public static void setText(TextView view, CharSequence text) {
    final CharSequence oldText = view.getText();
    if (text == oldText || (text == null && oldText.length() == 0)) {
        return;
    }
    if (text instanceof Spanned) {
        if (text.equals(oldText)) {
            return; // No change in the spans, so don't set anything.
        }
    } else if (!haveContentsChanged(text, oldText)) {
        return; // No content changes, so don't set anything.
    }
    view.setText(text);
}- 1
- 2
- 3
- 4
- 5
- 6
- 7
- 8
- 9
- 10
- 11
- 12
- 13
- 14
- 15
As can be seen from the source code above, when dealing with the business logic of bidirectional binding, we should compare the old and new data, only deal with the data that are different from the old and new data, and return the same data as the old and new data, so as to avoid the dead-cycle binding in this way.
- Data in data sources sometimes need to be transformed to be displayed in view, and the content displayed in view also needs to be transformed to be bound to the corresponding data sources.
Some developers may not understand what data in a data source needs to be transformed to be displayed in the view, and what is displayed in the view also needs to be transformed to be bound to the corresponding data source. Let me cite a scenario in actual development:
In some types of APP, such as car appointment or takeaway, there is the field of order type. Take car appointment APP as an example. There are other types of order, such as immediate order, reservation order, pick-up order, etc. After submitting an order, the user can see the type of order in the list or details of the user's order, such as "immediate order", but at the server side, when the field of immediate order is stored, and Instead of directly storing the words "immediate list", we store them in the form of dictionary tables. For example, "OT00001" stands for immediate list. In development, we certainly can't show "OT00001" to users on the interface, but the server returns "OT00001" to us in json, so we need to convert "OT00001" into "OT00001" when we receive "OT00001".“ The instant list is displayed to the user on the interface, which means that the data in the data source needs to be transformed before it can be displayed in the view.
If the user modifies the order type and submits it to the server for modification, we must submit it it to the server in the form of "OT00001", but the user inputs in the form of "immediate order", so when submitting to the server, we need to convert "immediate order" to "OT00001" and then submit to the server, which is the content shown in the view. It also needs to be converted to bind to the corresponding data source.
If you don't use dataBinding, the timing and logic of these transformations will be mastered by ourselves, but after using dataBinding, these operations will become automated. When you set "OT00001", they will automatically be converted to "immediate list" and displayed on the interface. When you enter "immediate list", the corresponding entity field will automatically become "OT00001", which will save a lot. Our development cost.
We can do this automation through @InverseMethod. @ The basic usage of InverseMethod has been explained in the previous article, and the code is directly posted here:
1. Define the transformation method using @InverseMethod
public class InverseMethodDemo {

    @InverseMethod("orderTypeToString")
    public static String stringToOrderType(String value) {
        if (value == null) {
            return null;
        }
        switch (value) {
            case "Immediate order":
                return AppConstants.ORDER_TYPE_1;
            case "Booking form":
                return AppConstants.ORDER_TYPE_2;
            case "Pick up order":
                return AppConstants.ORDER_TYPE_3;
            case "Delivery order":
                return AppConstants.ORDER_TYPE_4;
            case "Half day rental list":
                return AppConstants.ORDER_TYPE_5;
            case "Full day rental list":
                return AppConstants.ORDER_TYPE_6;
            default:
                return null;
        }
    }


    public static String orderTypeToString(String code) {
        if (code == null) {
            return null;
        }
        switch (code) {
            case AppConstants.ORDER_TYPE_1:
                return "Immediate order";
            case AppConstants.ORDER_TYPE_2:
                return "Booking form";
            case AppConstants.ORDER_TYPE_3:
                return "Pick up order";
            case AppConstants.ORDER_TYPE_4:
                return "Delivery order";
            case AppConstants.ORDER_TYPE_5:
                return "Half day rental list";
            case AppConstants.ORDER_TYPE_6:
                return "All day rents";
            default:
                return null;
        }
    }
}
- 1
- 2
- 3
- 4
- 5
- 6
- 7
- 8
- 9
- 10
- 11
- 12
- 13
- 14
- 15
- 16
- 17
- 18
- 19
- 20
- 21
- 22
- 23
- 24
- 25
- 26
- 27
- 28
- 29
- 30
- 31
- 32
- 33
- 34
- 35
- 36
- 37
- 38
- 39
- 40
- 41
- 42
- 43
- 44
- 45
- 46
- 47
- 48
- 49
2. Use in Layout Files
<?xml version="1.0" encoding="utf-8"?>
<layout xmlns:android="http://schemas.android.com/apk/res/android"
        xmlns:app="http://schemas.android.com/apk/res-auto">

    <data>

        <import type="com.qiangxi.databindingdemo.databinding.method.InverseMethodDemo"/>

        <variable
            name="orderTypeCode"
            type="String"/>

    </data>

    <LinearLayout
        android:layout_width="match_parent"
        android:layout_height="match_parent"
        android:orientation="vertical">

        <EditText
            android:id="@+id/textView"
            android:layout_width="match_parent"
            android:layout_height="55dp"
            android:gravity="center_horizontal"
            android:text="@={InverseMethodDemo.orderTypeToString(orderTypeCode)}"/>

    </LinearLayout>
</layout>- 1
- 2
- 3
- 4
- 5
- 6
- 7
- 8
- 9
- 10
- 11
- 12
- 13
- 14
- 15
- 16
- 17
- 18
- 19
- 20
- 21
- 22
- 23
- 24
- 25
- 26
- 27
- 28
When mBinding.setOrderTypeCode("OT00001") is used, the "immediate list" is automatically displayed in EditText. When the content in EditText is changed to "reservation list", the value of the orderTypeCode field automatically changes to "OT00002".
Note that:
- In the conversion method, the null pointer anomaly will be caused if the parameter is null judged.
- Remember to use bi-directional binding expressions, otherwise the transformation method will not work. Bi-directional binding expressions are written in "@={}"
Question: When the content in EditText is changed to "Reservation Form", the value of the orderTypeCode field will automatically change to "OT00002". How does data Binding do this?
Answer: When the text content of EditText changes, dataBinding receives notification and calls TextViewBindingAdapter.getTextString(textView); gets the EditText content, and then gets the corresponding code "OT00002" through the @InverseMethod annotation marker transformation method InverseMethodDemo. StringToderType ("reservation form"); but at this time, the value of the orderTypeCode field has not changed to "OT00002".“ To change the value of the orderTypeCode field to "OT00002", dataBinding calls mBinding.setOrderTypeCode("OT00002") to assign "OT00002" to the orderTypeCode field. I post the source code generated by data Binding, and you can understand it by comparison:
private android.databinding.InverseBindingListener textViewandroidTextAttrChanged = new android.databinding.InverseBindingListener() {
    @Override
    public void onChange() {
        // Inverse of InverseMethodDemo.orderTypeToString(orderTypeCode)
        //         is com.qiangxi.databindingdemo.databinding.ActivityXmlLabelBinding.this.setOrderTypeCode(InverseMethodDemo.stringToOrderType(callbackArg_0))
        java.lang.String callbackArg_0 = android.databinding.adapters.TextViewBindingAdapter.getTextString(textView);
        // localize variables for thread safety
        // InverseMethodDemo.orderTypeToString(orderTypeCode)
        java.lang.String inverseMethodDemoOrderTypeToStringOrderTypeCode = null;
        // orderTypeCode
        java.lang.String orderTypeCode = mOrderTypeCode;


        if ((com.qiangxi.databindingdemo.databinding.ActivityXmlLabelBinding.this) != (null)) {


            com.qiangxi.databindingdemo.databinding.method.InverseMethodDemo.stringToOrderType(callbackArg_0);

            com.qiangxi.databindingdemo.databinding.ActivityXmlLabelBinding.this.setOrderTypeCode(com.qiangxi.databindingdemo.databinding.method.InverseMethodDemo.stringToOrderType(callbackArg_0));
        }
    }
};- 1
- 2
- 3
- 4
- 5
- 6
- 7
- 8
- 9
- 10
- 11
- 12
- 13
- 14
- 15
- 16
- 17
- 18
- 19
- 20
- 21
- 22
- 23
But I don't know if the smart buddy noticed that when data binding helps us call mBinding.setOrderTypeCode("OT00002"), according to the binding mechanism of data Binding, it will definitely trigger the content change of EditText again, and invoke the InverseMethodDemo. orderTypeToString (orderTypeToString) method to convert "OT00002" to "reservation list" string and display it in EditText. But at this time, the content of EditText is already a "reservation list" string. If we do not restrict it, it will cause the deadly cycle binding we mentioned above. So now we know the harm of the deadly cycle binding. This requires us to prevent the deadly cycle binding when we customize some logic of bidirectional binding. The solution of the deadly cycle binding is also mentioned above. To compare the old and new content, if the old and new content are the same, then return, which can avoid the dead-loop binding.
@ InverseBindingMethod and @InverseBindingMethod instances
@ InverseBindingMethods annotations are similar to @BindingMethods in that they are equivalent to a container, except that @InverseBindingMethods is used to store @InverseBindingMethod, so the @InverseBindingMethod annotation is really a two-way binding function. Let's explain the @InverseBindingMethod annotation in an example way.
In the last article, we know that:
- @ The InverseBindingMethod annotation has only one more String type event attribute than the @BindingMethod annotation in the number of attributes; in fact, the focus of the @InverseBindingMethod annotation is on this event attribute. The rules for generating event attribute values were discussed in detail in the previous article, but they are not discussed here.
- @ InverseBindingMethod and @InverseBindingMethods need to be combined with the @BindingAdapter annotation to work
But how do you combine the @BindingAdapter annotation? In other words, how does the @BindingAdapter annotation fit?
Let's look at a piece of code to illustrate:
@InverseBindingMethods({
        @InverseBindingMethod(type = RatingBar.class, attribute = "android:rating"),
})
public class RatingBarBindingAdapter {
    @BindingAdapter("android:rating")
    public static void setRating(RatingBar view, float rating) {
        if (view.getRating() != rating) {
            view.setRating(rating);
        }
    }

    @BindingAdapter(value = {"android:onRatingChanged", "android:ratingAttrChanged"},
            requireAll = false)
    public static void setListeners(RatingBar view, final OnRatingBarChangeListener listener,
            final InverseBindingListener ratingChange) {
        if (ratingChange == null) {
            view.setOnRatingBarChangeListener(listener);
        } else {
            view.setOnRatingBarChangeListener(new OnRatingBarChangeListener() {
                @Override
                public void onRatingChanged(RatingBar ratingBar, float rating, boolean fromUser) {
                    if (listener != null) {
                        listener.onRatingChanged(ratingBar, rating, fromUser);
                    }
                    ratingChange.onChange();
                }
            });
        }
    }
}- 1
- 2
- 3
- 4
- 5
- 6
- 7
- 8
- 9
- 10
- 11
- 12
- 13
- 14
- 15
- 16
- 17
- 18
- 19
- 20
- 21
- 22
- 23
- 24
- 25
- 26
- 27
- 28
- 29
- 30
The above code is the source of dataBinding, and the path is: android. databinding. adapters. RatingBarBinding Adapter. We analyze it from top to bottom:
@InverseBindingMethods({
        @InverseBindingMethod(type = RatingBar.class, attribute = "android:rating"),
})- 1
- 2
- 3
This code defines the android:rating attribute of RatingBar class, but it does not define event and method attributes. Since there is no definition, we use default values. According to the content of the previous article, we can know that the attribute value of event is "android:ratingAttrChanged", and the attribute value of method is "getRating".
@BindingAdapter("android:rating")
public static void setRating(RatingBar view, float rating) {
    if (view.getRating() != rating) {
        view.setRating(rating);
    }
}- 1
- 2
- 3
- 4
- 5
- 6
This is where the @BindingAdapter annotation is needed.
We know that the android:rating attribute is already provided by default in RatingBar, but why redefine an identical one with @BindingAdapter? The reason is to prevent dead-cycle binding. The @InverseBindingMethod annotation above specifies that the android:rating attribute needs to support bidirectional binding, so naturally the problem of dead-loop binding should be prevented.
When we define an identical android:rating attribute through the @BindingAdapter, once the dataBinding expression is used for this attribute in the layout file, dataBinding calls the "setRating" method here. If the dataBinding expression used is a bidirectional binding expression "@={}", then the dead-loop binding can be avoided.
@BindingAdapter(value = {"android:onRatingChanged", "android:ratingAttrChanged"},
            requireAll = false)
public static void setListeners(RatingBar view, final OnRatingBarChangeListener listener,
        final InverseBindingListener ratingChange) {
    if (ratingChange == null) {
        view.setOnRatingBarChangeListener(listener);
    } else {
        view.setOnRatingBarChangeListener(new OnRatingBarChangeListener() {
            @Override
            public void onRatingChanged(RatingBar ratingBar, float rating, boolean fromUser) {
                if (listener != null) {
                    listener.onRatingChanged(ratingBar, rating, fromUser);
                }
                ratingChange.onChange();
            }
        });
    }
}- 1
- 2
- 3
- 4
- 5
- 6
- 7
- 8
- 9
- 10
- 11
- 12
- 13
- 14
- 15
- 16
- 17
- 18
This is another place where the @BindingAdapter annotation is needed.
In the previous article, we explained in detail the various uses and usage scenarios of @BindingAdapter, but the code here is slightly different from the example in the previous article. There is an additional "android:ratingAttrChanged" attribute and an additional parameter of InverseBindingListener type. As we know from the previous article, the order and side of the attributes in the annotations The order of parameters in the method should be consistent, so the "android:ratingAttrChanged" attribute corresponds to the InverseBindingListener type parameter, and we also know that the "android:ratingAttrChanged" attribute is the attribute value of the event attribute in the @InverseBindingMethod annotation, that is to say, the event attribute is eventually converted to the InverseBindingListener, and the event attribute is used for bidirectional binding. Timely notification of changes in view, but we have not known how event attributes inform changes in view content, in other words, we do not know how event attributes inform messages; now we know, after the original event attributes into Inverse BindingListener, with the help of Inverse BindingListener to achieve informing, but InverseBindingListener. When is the time for ndingListener to get the news out? As we can see from the source code above, RatingBar has set up an OnRatingBarChangeListener listener, which triggers when RatingBar's rating value changes. This is an excellent opportunity for Inverse BindingListener to take this opportunity and notify the message in the callback of RatingBar Changed.
In the above way, when the view changes, notifications can be sent out at the same time. But only the sending of the notification is not enough. Someone has to receive and process the notification. Otherwise, the function of two-way binding is not comprehensive enough. So how does data Binding receive and process notifications? Let's look at a piece of code:
...

// Inverse Binding Event Handlers
private android.databinding.InverseBindingListener textViewandroidTextAttrChanged = new android.databinding.InverseBindingListener() {
    @Override
    public void onChange() {
        // Inverse of InverseMethodDemo.orderTypeToString(orderTypeCode)
        //         is com.qiangxi.databindingdemo.databinding.ActivityXmlLabelBinding.this.setOrderTypeCode(InverseMethodDemo.stringToOrderType(callbackArg_0))
        java.lang.String callbackArg_0 = android.databinding.adapters.TextViewBindingAdapter.getTextString(textView);
        // localize variables for thread safety
        // InverseMethodDemo.orderTypeToString(orderTypeCode)
        java.lang.String inverseMethodDemoOrderTypeToStringOrderTypeCode = null;
        // orderTypeCode
        java.lang.String orderTypeCode = mOrderTypeCode;

        if ((com.qiangxi.databindingdemo.databinding.ActivityXmlLabelBinding.this) != (null)) {

            com.qiangxi.databindingdemo.databinding.method.InverseMethodDemo.stringToOrderType(callbackArg_0);

            com.qiangxi.databindingdemo.databinding.ActivityXmlLabelBinding.this.setOrderTypeCode(com.qiangxi.databindingdemo.databinding.method.InverseMethodDemo.stringToOrderType(callbackArg_0));
        }
    }
};

...- 1
- 2
- 3
- 4
- 5
- 6
- 7
- 8
- 9
- 10
- 11
- 12
- 13
- 14
- 15
- 16
- 17
- 18
- 19
- 20
- 21
- 22
- 23
- 24
- 25
The above code directly new an InverseBindingListener. As we said before, the notification of view change is sent through the InverseBindingListener, which means that the InverseBindingListener we instantiate now is used to receive and process the notification of view change. But simply instantiating InverseBindingListener is not good, because there is no place to call an instance of InverseBindingListener. We need to set the InverseBindingListener instance where it should go, so where should it go? First look at a piece of code:
...

@BindingAdapter(value = {"android:beforeTextChanged", "android:onTextChanged",
        "android:afterTextChanged", "android:textAttrChanged"}, requireAll = false)
public static void setTextWatcher(TextView view, final BeforeTextChanged before,
        final OnTextChanged on, final AfterTextChanged after,
        final InverseBindingListener textAttrChanged) {
   ...
   ...
   ...
}

...- 1
- 2
- 3
- 4
- 5
- 6
- 7
- 8
- 9
- 10
- 11
- 12
- 13
The InverseBindingListener type parameter in the setTextWatcher method above is where it should go. So when is the time to send Inverse BindingListener to where it should go? Let's look at another piece of code:
...

@Override
protected void executeBindings() {
    ...
    if ((dirtyFlags & 0x8L) != 0) {
        // api target 1
        android.databinding.adapters.TextViewBindingAdapter.setTextWatcher(this.textView,
        (android.databinding.adapters.TextViewBindingAdapter.BeforeTextChanged)null,
        (android.databinding.adapters.TextViewBindingAdapter.OnTextChanged)null,
        (android.databinding.adapters.TextViewBindingAdapter.AfterTextChanged)null,
        textViewandroidTextAttrChanged);
    }
    ...
}

...- 1
- 2
- 3
- 4
- 5
- 6
- 7
- 8
- 9
- 10
- 11
- 12
- 13
- 14
- 15
- 16
- 17
As you can see, when dataBinding executes the executeBindings method, it calls the setTextWatcher method of the TextViewBindingAdapter and sets the instance textView and roidTextAttrChanged of the InverseBindingListener to where it should go. Now the function of bidirectional binding is complete. Although the whole process of bidirectional binding is based on @InverseBinding Method and @InverseBinding Method, the principle of bidirectional binding is unchanged, and so is @InverseBinding Adapter.
@ Example of Inverse Binding Adapter
The principle of bi-directional binding has been explained in detail when it comes to @InverseBindingMethod and @InverseBindingMethods. I will not go into any more details. Here I will mainly talk about some unique features of @InverseBindingAdapter. We also post a code to explain the code.
public class TabHostBindingAdapter {

    @InverseBindingAdapter(attribute = "android:currentTab")
    public static int getCurrentTab(TabHost view) {
        return view.getCurrentTab();
    }

    @InverseBindingAdapter(attribute = "android:currentTab")
    public static String getCurrentTabTag(TabHost view) {
        return view.getCurrentTabTag();
    }

    @BindingAdapter("android:currentTab")
    public static void setCurrentTab(TabHost view, int tab) {
        if (view.getCurrentTab() != tab) {
            view.setCurrentTab(tab);
        }
    }

    @BindingAdapter("android:currentTab")
    public static void setCurrentTabTag(TabHost view, String tabTag) {
        if (view.getCurrentTabTag() != tabTag) {
            view.setCurrentTabByTag(tabTag);
        }
    }

    @BindingAdapter(value = {"android:onTabChanged", "android:currentTabAttrChanged"},
            requireAll = false)
    public static void setListeners(TabHost view, final OnTabChangeListener listener,
            final InverseBindingListener attrChange) {
        if (attrChange == null) {
            view.setOnTabChangedListener(listener);
        } else {
            view.setOnTabChangedListener(new OnTabChangeListener() {
                @Override
                public void onTabChanged(String tabId) {
                    if (listener != null) {
                        listener.onTabChanged(tabId);
                    }
                    attrChange.onChange();
                }
            });
        }
    }
}- 1
- 2
- 3
- 4
- 5
- 6
- 7
- 8
- 9
- 10
- 11
- 12
- 13
- 14
- 15
- 16
- 17
- 18
- 19
- 20
- 21
- 22
- 23
- 24
- 25
- 26
- 27
- 28
- 29
- 30
- 31
- 32
- 33
- 34
- 35
- 36
- 37
- 38
- 39
- 40
- 41
- 42
- 43
- 44
- 45
In the previous article, we already know that the @InverseBindingAdapter annotation acts on methods. Let's cut a piece of code to see:
@InverseBindingAdapter(attribute = "android:currentTab")
public static int getCurrentTab(TabHost view) {
    return view.getCurrentTab();
}- 1
- 2
- 3
- 4
You can see that @InverseBindingAdapter configures only one attribute attribute attribute attribute, and the event attribute of String type is not configured, so use the default configuration: the attribute value of event is "android: current TabAttrChanged".
As we said before, in bi-directional bindings, when a view changes, it notifies the corresponding data source to refresh, so the change of the data source must depend on the content of the view change. That is to say, when the android:currentTab attribute value of TabHost changes, it obtains the attribute value of android:currentTab, that is, the getCurrentTab method, but this is a bit strange, because TabHost already has. Define the getCurrentTab method, just use it directly. Why do you need to redefine a method with the same function? In fact, it is also due to the mechanism of bidirectional binding. If you specify an attribute to satisfy the requirement of bidirectional binding in the way of @InverseBinding Adapter, dataBinding will find an appropriate method to use from the method of @InverseBinding Adapter tag when obtaining the attribute value, so whether there is a corresponding method in the original view or not, you need to use @InverseBinding Adapter. RseBindingAdapter tags a method with the same functionality; but if you specify an attribute in the @InverseBindingMethod way to meet the requirements of bidirectional binding, you don't need to do so.
@ Other aspects of the InverseBinding Adapter are much the same as those described in @InverseBinding Method and @InverseBinding Method, such as the role of event, and so on; this is not going to be repeated here.
So far, some of the @inverse opening notes left over from the previous article have been exhausted. Let's summarize:
- As long as you customize two-way bindings, you must have the @BindingAdapter annotation involved.
-@ InverseBindingMethod and @InverseBindingMethod+BindingAdapter can achieve bidirectional binding.
-@ InverseBinding Adapter +@BindingAdapter can also achieve bidirectional binding.
-@ InverseMethod is a relatively independent annotation with powerful functions.
BaseObservable
The use of BaseObservable + @Bindable + notifyPropertyChanged() has been explained in the previous article, [Data Binding Use Tutorial (3): Detailed Annotations], and will not be discussed here. Let's talk about the role of BaseObservable:
The specific performance of BaseObservable function is to automatically notify view to refresh data when the data source changes. This sentence contains two meanings:
- BaseObservable is the foundation of bidirectional binding.
- Combined with the bidirectional binding expression @={}, it can also automatically notify the update of the data source when the view content changes.
Although BaseObservable can achieve bidirectional binding, don't think that only BaseObservable plus bidirectional binding expression @={} can achieve bidirectional binding. This is a superficial phenomenon. In fact, when using bidirectional binding, we have to rely on the help of various annotations. After all, monitoring the change of view content is beyond BaseObservable's ability, and we have to rely on the specified annotations to get the view content. Change notifications (for android's own view, Data Binding has helped us), and BaseObservable triggers when it receives these notifications Notify Property Changed (), which changes the data source and interface.
Although BaseObservable is 666, it has its limitations, such as:
- Subclasses must be required to inherit BaseObservable
- After inheritance, you must use the @Bindable annotation and notifyPropertyChanged() method
This raises some questions:
- Our entity class has inherited other parent classes and can no longer inherit BaseObservable.
- There are many fields in our entity class. If every get/set method corresponds to the @Bindable annotation and notifyPropertyChanged() method, it's hard to accept.
Since there are problems, then solve them:
1. Entity classes have inherited other parent classes and can no longer inherit BaseObservable:
Since you can't inherit BaseObservable, implement the Observable interface. BaseObservable is the implementation class of the Observable interface anyway. But the problem is how to deal with the get/set method in the entity class and the two methods in the Observable interface: addOnPropertyChangedCallback and removeOnPropertyChangedCallback.
Fortunately, DataBinding provides a solution, namely Property Change Registry. A simple example is as follows:
public class User implements Observable {
    private PropertyChangeRegistry registry = new PropertyChangeRegistry();

    private String name;
    private int age;
    private String sex;
    private boolean isStudent;

    @Bindable
    public String getName() {
        return name;
    }

    public void setName(String name) {
        this.name = name;
        registry.notifyChange(this, BR.name);
    }

    @Bindable
    public int getAge() {
        return age;
    }

    public void setAge(int age) {
        this.age = age;
        registry.notifyChange(this, BR.age);
    }

    @Bindable
    public String getSex() {
        return sex;
    }

    public void setSex(String sex) {
        this.sex = sex;
        registry.notifyChange(this, BR.sex);
    }

    @Bindable
    public boolean isStudent() {
        return isStudent;
    }

    public void setStudent(boolean student) {
        isStudent = student;
        registry.notifyChange(this, BR.student);
    }

    @Override
    public void addOnPropertyChangedCallback(OnPropertyChangedCallback callback) {
        registry.add(callback);
    }

    @Override
    public void removeOnPropertyChangedCallback(OnPropertyChangedCallback callback) {
        registry.remove(callback);
    }
}- 1
- 2
- 3
- 4
- 5
- 6
- 7
- 8
- 9
- 10
- 11
- 12
- 13
- 14
- 15
- 16
- 17
- 18
- 19
- 20
- 21
- 22
- 23
- 24
- 25
- 26
- 27
- 28
- 29
- 30
- 31
- 32
- 33
- 34
- 35
- 36
- 37
- 38
- 39
- 40
- 41
- 42
- 43
- 44
- 45
- 46
- 47
- 48
- 49
- 50
- 51
- 52
- 53
- 54
- 55
- 56
- 57
- 58
As you can see, implementing the Observable interface still requires adding `@Bindable annotations for each get method, and just adding notifyChange for the set method in a different way. But it did solve the problem.
- There are many fields in the entity class. It's too time-consuming to add @Bindable annotation and notifyPropertyChanged() method to each get/set method.
To solve this problem, DataBinding provides responding objects:
Specific packaging classes are provided for eight basic types of data structures
- ObservableBoolean
- ObservableByte
- ObservableChar
- ObservableDouble
- ObservableFloat
- ObservableInt
- ObservableLong
- ObservableShort
Packaging classes for collections
- ObservableArrayList
- ObservableArrayMap
Packaging classes for objects that implement Parcelable interfaces
- ObservableParcelable
Packaging classes for other types
- Observable Field. Typical: Observable Field
An example of using a responsive object:
public class User02 {
    public final ObservableField<String> name = new ObservableField<>();
    public final ObservableInt age = new ObservableInt();
    public final ObservableField<String> sex = new ObservableField<>();
    public final ObservableBoolean isStudent = new ObservableBoolean();
}
- 1
- 2
- 3
- 4
- 5
- 6
- 7
As you can see, by using responsive objects, you really don't need to write the @Bindable annotation and notifyPropertyChanged() method. Even the get/set method is omitted. Everything looks good, but the problem with responsive objects is that assignment and valuation operations become slightly more complex, as follows:
 User user = new User();
 user.age.set(5);//assignment
int i = user.age.get();//Value- 1
- 2
- 3
And defining fields as public forms destroys Java's encapsulation, some of which do not conform to the daily coding habits.
Standing on the shoulders of giants
From the above description, both of the solutions provided by Data Binding are very good, but there are more or less the same problems, you can choose a way to use it according to the specific situation.
Let's talk more about the two-way bindings that inherit the BaseObservable approach:
Based on the above description, we can summarize the two-way bindings that inherit the BaseObservable approach:
Advantage:
- Do not destroy the encapsulation of the program
- Assignment and selection are in accordance with the normal coding style.
Disadvantages:
- When there are many fields, it is a waste of time to add @Bindable annotation and notifyPropertyChanged() method to each get/set method.
- Manual addition of @Bindable annotations and notifyPropertyChanged() is extremely error-prone, such as the BR field in the notifyPropertyChanged() method.
If every get/set method is automatically added with the @Bindable annotation and notifyPropertyChanged() method, it will greatly save our development time and make no mistakes. The simplest and most direct way to achieve this goal is to use plug-ins:
My younger brother is not talented, wrote a simple Android Studio plug-in - data Binding Generator, specifically used to generate the code mentioned above, the language is always pale, let's take a motion map to feel the plug-in's function, shortcut key: Alt+Insert; [If the motion map link is invalid, please click on it. Here Look at the Motion Map):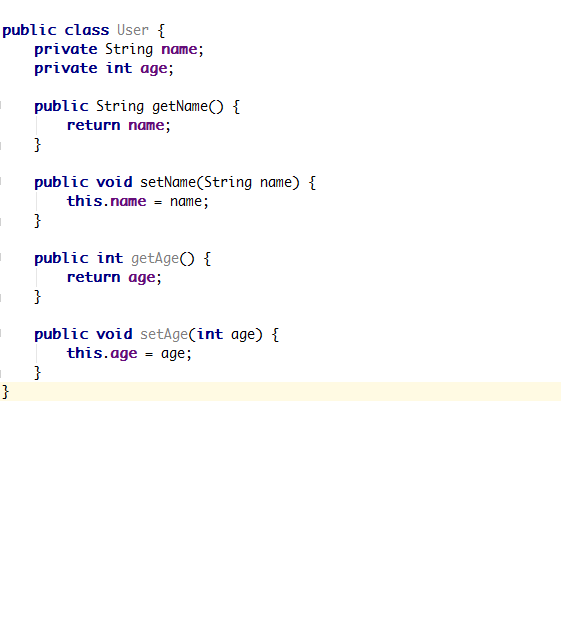
The function of this plug-in can be seen from the figure above. If you want to use this plug-in, you can click on it. Here Download [the only way to download], because the plug-in has just been developed, it is not powerful and may have some bug s, so it is not uploaded to intellij's plug-in repository.
summary
The knowledge of bidirectional binding is also over. Generally speaking, there are not many scenarios using bidirectional binding, but as long as it is used, it will greatly improve our development efficiency.
Up to this article, all the important points of Data Binding in personal planning have been explained, and there will be an article on "Summary + Leak Search and Fill-up". Some unmentioned but very useful points will be put in that article.
Although I have tried my best to explain the relevant knowledge and principles of Data Binding clearly, due to limited personal ability and energy, there are inevitably inadequate explanations in this article, and I also ask readers to understand; there are also inevitably omissions or misunderstandings, I urge developers to pat bricks!!!