Preface
The company is developing a mall project, because of the project needs, it has made an address selector which imitates a lot of spelling, but there is some discrepancy with the implementation method of spelling many, the general effect is similar.Say nothing but the last action map:
<figcaption></figcaption>
start
- Let's start with some of the concepts in this article.Regional level: such as provincial, municipal, county and town levels, then this is at most level 4.
- Okay, let's analyze a wave of effect maps. When a level of area is selected, a new Tab is created, and when the last level of area is selected, no new Tab is created.If you go back and reselect a level of area, you remove the subsequent tabs and create a new one.Once selected, if you tap Tab to switch to the corresponding region level and scroll to the previously selected region display, creating a new Tab will scroll to the location of the first position by default.
- Next, let's look at the layout of our interface:
<?xml version="1.0" encoding="utf-8"?>
<LinearLayout xmlns:android="http://schemas.android.com/apk/res/android"
   xmlns:app="http://schemas.android.com/apk/res-auto"
   android:layout_width="match_parent"
   android:layout_height="560dp"
   android:orientation="vertical"
   android:paddingStart="12dp"
   android:paddingEnd="12dp">
   <!-- Dialog Title -->
   <TextView
       android:id="@+id/user_tv_dialog_title"
       android:layout_width="wrap_content"
       android:layout_height="wrap_content"
       android:layout_marginTop="18dp"
       android:layout_gravity="center_horizontal"/>
   <!-- First horizontal line under heading -->
   <View
       android:layout_width="match_parent"
       android:layout_height="1dp"
       android:background="#e6e6e6"
       android:layout_marginTop="17dp"/>
   <!-- Top TabLayout -->
   <android.support.design.widget.TabLayout
       android:id="@+id/user_tb_dialog_tab"
       android:layout_width="match_parent"
       android:layout_height="wrap_content"
       app:tabSelectedTextColor="@color/colorPrimary"
       app:tabGravity="fill"
       app:tabMode="scrollable"/>
   <!-- TabLayout Horizontal line below -->
   <View
       android:layout_width="match_parent"
       android:layout_height="1dp"
       android:background="#e6e6e6"/>
   <!-- Displaying regional data RecyclerView -->
   <android.support.v7.widget.RecyclerView
       android:id="@+id/user_rv_dialog_list"
       android:layout_width="match_parent"
       android:layout_height="0dp"
       android:layout_weight="1"/>
</LinearLayout>
- From the layout, we can see that I mostly rely on TabLayout plus RecyclerView to achieve this effect, and a lot of people guess that TabLayout plus RecyclerView plus ViewPager, so a lot of RecyclerView can slide sideways to the previous Tab page or the next, which is also the difference from the spelling effect.
Start code
- Start with the code by laying out the list of individual regions:
<?xml version="1.0" encoding="utf-8"?>
<LinearLayout
    xmlns:android="http://schemas.android.com/apk/res/android"
    xmlns:tools="http://schemas.android.com/tools"
    android:layout_width="match_parent"
    android:layout_height="wrap_content"
    android:orientation="horizontal"
    android:paddingTop="10dp"
    android:paddingBottom="10dp"
    tools:ignore="UseCompoundDrawables">
    <!-- Show Area Name -->
    <TextView
        android:id="@+id/user_tv_address_dialog"
        android:layout_width="wrap_content"
        android:layout_height="wrap_content"/>
    <!-- Show the check icon behind -->
    <ImageView
        android:id="@+id/user_iv_address_dialog"
        android:layout_width="13dp"
        android:layout_height="9dp"
        android:src="@drawable/user_icon_address_check"
        android:layout_marginStart="11dp"
        android:layout_gravity="center_vertical"
        android:visibility="gone"
        tools:ignore="ContentDescription" />
</LinearLayout>
- Create the region as an entity object:
public class AddressItem {
    // Area Name
    private String address;
    // Check
    private boolean isChecked;
    // Region ID, what I need for this project is int type, you can modify it according to your project needs
    private int id;

    public String getAddress() {
        return this.address;
    }

    public void setAddress(String address) {
        this.address = address;
    }

    public boolean isChecked() {
        return this.isChecked;
    }

    public void setChecked(boolean checked) {
        this.isChecked = checked;
    }

    public int getId() {
        return this.id;
    }

    public void setId(int id) {
        this.id = id;
    }

    @Override
    public String toString() {
        return "AddressItem{" +
                "address='" + address + '\'' +
                ", isChecked=" + isChecked +
                ", id=" + id +
                '}';
    }
}
- Write the adapter for RecyclerView:
public class AddressAdapter extends RecyclerView.Adapter<AddressAdapter.MyViewHolder> {
    // Save a list of regional data
    private List<AddressItem> list = new ArrayList<>();
    // Custom Item Clicked to Listen for Events
    private ItemClickListener listener;

    @NonNull
    @Override
    public MyViewHolder onCreateViewHolder(@NonNull ViewGroup viewGroup, int i) {
        View view = LayoutInflater.from(viewGroup.getContext()).inflate(R.layout.user_item_address_bottom_sheet_dialog, viewGroup, false);
        return new MyViewHolder(view);
    }

    @Override
    public void onBindViewHolder(@NonNull MyViewHolder myViewHolder, int i) {
        AddressItem item = list.get(i);
        if (item.isChecked()) {
            myViewHolder.tvAddress.setText(item.getAddress());
            myViewHolder.tvAddress.setTextColor(Color.parseColor("#1F83FF"));
            myViewHolder.ivChecked.setVisibility(View.VISIBLE);
        } else {
            myViewHolder.tvAddress.setText(item.getAddress());
            myViewHolder.tvAddress.setTextColor(Color.BLACK);
            myViewHolder.ivChecked.setVisibility(View.GONE);
        }
    }

    @Override
    public int getItemCount() {
        return this.list == null ? 0 : list.size();
    }

    public void setList(List<AddressItem> list) {
        if (this.list != null && list != null) {
            this.list.clear();
            this.list.addAll(list);
            this.notifyDataSetChanged();
        }
    }

    public void setOnItemClickListener(@NonNull ItemClickListener listener) {
        this.listener = listener;
    }

    class MyViewHolder extends RecyclerView.ViewHolder {
        TextView tvAddress;
        ImageView ivChecked;
        MyViewHolder(@NonNull View itemView) {
            super(itemView);
            tvAddress = itemView.findViewById(R.id.user_tv_address_dialog);
            ivChecked = itemView.findViewById(R.id.user_iv_address_dialog);
            if (listener != null) {
                itemView.setOnClickListener(v -> listener.onItemClick(getAdapterPosition()));
            }
        }
    }

    public interface ItemClickListener {
        void onItemClick(int position);
    }
}
- Start by writing two BaseDialog s yourself. It's not nutritious, and the code is simple:
public abstract class CustomBaseDialog extends Dialog {

    protected Context context;

    public CustomBaseDialog(@NonNull Context context) {
        super(context);
        this.context = context;
    }

    protected abstract Integer getLayout();
    protected abstract Integer getGravity();
    protected abstract Integer getBackgroundRes();
    protected abstract Integer getWindowAnimations();
    protected abstract void initView();

    @Override
    protected void onCreate(Bundle savedInstanceState) {
        super.onCreate(savedInstanceState);
        if (getLayout() != null)
            setContentView(getLayout());
        Window window = getWindow();
        if (window != null) {
            // Remove the default interior margin of DecorView so that the layout fills the entire horizontal screen
            View decorView = window.getDecorView();
            decorView.setPadding(0,0,0,0);
            if (getGravity() != null)
                window.setGravity(getGravity());
            else
                window.setGravity(Gravity.CENTER);
            if (getWindowAnimations() != null)
                window.setWindowAnimations(getWindowAnimations());
            if (getBackgroundRes() != null)
                decorView.setBackgroundResource(getBackgroundRes());
        }
        initView();
    }

    protected void setClickListener(int id, View.OnClickListener listener) {
        findViewById(id).setOnClickListener(listener);
    }
}

public abstract class CustomBaseBottomSheetDialog extends CustomBaseDialog {
    public CustomBaseBottomSheetDialog(@NonNull Context context) {
        super(context);
    }

    @Override
    protected Integer getGravity() {
        return Gravity.BOTTOM;
    }

    @Override
    protected void onCreate(Bundle savedInstanceState) {
        super.onCreate(savedInstanceState);
        Window window = getWindow();
        if (null != window) {
            // Remove margin s from window s in order to fill the screen with layouts
            WindowManager.LayoutParams layoutParams = window.getAttributes();
            layoutParams.width = WindowManager.LayoutParams.MATCH_PARENT;
            layoutParams.horizontalMargin = 0;
            window.setAttributes(layoutParams);
        }
    }
}
- Then the focus is on customizing the address selector Dialog:
public class AddressBottomSheetDialog extends CustomBaseBottomSheetDialog {

    private TabLayout tabLayout;
    private AddressAdapter addressAdapter;

    private int maxLevel;   // The maximum number of levels can be customized by the setMaxLevel method
    private SparseArray<List<AddressItem>> levelList;     // Level List Data
    private SparseIntArray levelPosition;                 // List position selected at each level
    private SparseIntArray levelIds;                      // Address ID s selected at each level
    private String title;  // Title
    private String tabText = "Please select";                    // Text displayed by default for new Tab
    private TabSelectChangeListener changeListener;       // Tab's Selection Changed Listening

    public AddressBottomSheetDialog(@NonNull Context context) {
        super(context);
    }

    @Override
    protected Integer getLayout() {
        return R.layout.user_layout_address_bottom_sheet_dialog;
    }

    @Override
    protected Integer getBackgroundRes() {
        return R.drawable.bg_dialog_bottom;
    }

    @Override
    protected Integer getWindowAnimations() {
        return R.style.DialogBottom;
    }

    @Override
    protected void initView() {
        levelList = new SparseArray<>();
        levelPosition = new SparseIntArray();
        levelIds = new SparseIntArray();

        ((TextView)findViewById(R.id.user_tv_dialog_title)).setText(title);
        tabLayout = findViewById(R.id.user_tb_dialog_tab);
        final RecyclerView recyclerView = findViewById(R.id.user_rv_dialog_list);

        tabLayout.addOnTabSelectedListener(new TabLayout.BaseOnTabSelectedListener() {
            @Override
            public void onTabSelected(TabLayout.Tab tab) {
                final int position = tab.getPosition();
                List<AddressItem> list = levelList.get(position);
                if (null != list && !list.isEmpty()) {   // If the selected level of List has no data, it is obtained by executing callbacks, otherwise it is directly multiplexed
                    addressAdapter.setList(list);
                    final int lastClickPositon = levelPosition.get(position, -1); // Gets the position of the last selected region, and returns -1 by default if it cannot be found
                    if (lastClickPositon >= 0) recyclerView.smoothScrollToPosition(lastClickPositon); // If last selected, RecyclerView scrolls to the specified position
                } else if (changeListener != null) {
                    changeListener.onSelectChange(position, levelIds.get(position));
                }
            }
            @Override
            public void onTabUnselected(TabLayout.Tab tab) {}
            @Override
            public void onTabReselected(TabLayout.Tab tab) {}
        });
        addressAdapter = new AddressAdapter();
        // List Single Click Events
        addressAdapter.setOnItemClickListener(position -> {
            final int selectedTabPosition = tabLayout.getSelectedTabPosition(); // position of selected Tab
            levelIds.put(selectedTabPosition, levelList.get(selectedTabPosition).get(position).getId()); // Update the ID of the selected area
            changeSelect(selectedTabPosition, position);
            levelPosition.put(selectedTabPosition, position); // Update the position of the selected area in the list
            setTabText(selectedTabPosition, levelList.get(selectedTabPosition).get(position).getAddress()); // Display the name of the selected area on the Tab
            if (selectedTabPosition < maxLevel - 1 && selectedTabPosition == tabLayout.getTabCount() - 1) { // Add a Tab if MaxLevel is not reached and the selected Tab is the last one, and RecyclerView scrolls to the top
                tabLayout.addTab(createTab(), true);
                recyclerView.smoothScrollToPosition(0);
            }
        });
        recyclerView.setLayoutManager(new LinearLayoutManager(context));
        recyclerView.setAdapter(addressAdapter);
        tabLayout.addTab(createTab(), true); // Add a Tab by default
    }

    // Create a tab of your choice and return
    private TabLayout.Tab createTab() {
        return tabLayout.newTab().setText(tabText);
    }

    // Method to execute when the RecyclerView entry is clicked
    private void changeSelect(int selectedTabPosition, int nowClickPosition) {
        // The last click on the current list saved. If the value is not found, return to -1 by default
        final int lastPosition = levelPosition.get(selectedTabPosition, -1);
        // If the previous and next click locations are the same, do not change
        if (nowClickPosition == lastPosition) {
            return;
        }
        // If it is not the last one and the level region is re-selected, remove the following Tab
        final int count = tabLayout.getTabCount();
        // If you have four Tab s, you remove the tenth one, and then the first one is not the first one.Because you removed the zero, the first one was in the zero position.So it would be wise to remove it upside down
        if (selectedTabPosition < count - 1) {
            TabLayout.Tab nowTab = tabLayout.getTabAt(selectedTabPosition);
            if (null != nowTab) nowTab.setText(tabText);
            for (int i = count - 1; i > selectedTabPosition; i--) {
                // Remove list data at the corresponding region level
                levelList.remove(i);
                // Reset the previously selected position to -1
                levelPosition.put(i, -1);
                // Reset previously recorded region ID to -1
                levelIds.put(i, -1);
                tabLayout.removeTabAt(i);
            }
        }
        // Set the currently selected region to already selected
        levelList.get(selectedTabPosition).get(nowClickPosition).setChecked(true);
        // Update List Individual Objects via adapter
        addressAdapter.notifyItemChanged(nowClickPosition);
        if (lastPosition >= 0) {
            // Mark the last selected area as unselected
            levelList.get(selectedTabPosition).get(lastPosition).setChecked(false);
            // Update List Individual Objects via adapter
            addressAdapter.notifyItemChanged(lastPosition);
        }
    }
    // Set the text of the tab number
    private void setTabText(int tabPosition, String text) {
        TabLayout.Tab tab = tabLayout.getTabAt(tabPosition);
        if (null != tab) tab.setText(text);
    }

    // ------------------------------------------------------------------------------------------------------------------------------------------------------------------------

    /**
     *  Set Dialog Title
     * @param title Title Text
     */
    public void setDialogTitle(String title) {
        this.title = title;
    }

    /**
     *  Set the text that tab displays by default when no region has been selected under the current tab
     * @param tabDefaultText Text displayed by default
     */
    public void setTabDefaultText(String tabDefaultText) {
        this.tabText = tabDefaultText;
    }

    /**
     *  Set the maximum level of address (for example, province, city, county, town is the maximum level 4)
     * @param level Maximum Level
     */
    public void setMaxLevel(int level) {
        this.maxLevel = level;
    }

    /**
     *  Set the list data to display for the current level list
     * @param list List data
     * @param level Regional Level
     */
    public void setCurrentAddressList(List<AddressItem> list, int level) {
        levelList.put(level, list);
        addressAdapter.setList(list);
    }

    /**
     *  Set up monitoring for Tab click switching in Dialog
     * @param listener tab Switch Listening Implementation
     */
    public void setTabSelectChangeListener(@NonNull TabSelectChangeListener listener) {
        this.changeListener = listener;
    }

    /**
     *  Customized Tab Switch Listening Interface
     */
    public interface TabSelectChangeListener {
        void onSelectChange(int level, int parentId);
    }
}
- Usage method:
private void init() {
    mDialog = new AddressBottomSheetDialog(this);
    mDialog.setDialogTitle("Delivery to");
    mDialog.setMaxLevel(4);
    mDialog.setTabDefaultText("Please select");
    mDialog.setTabSelectChangeListener((level, parentId) ->
            mDialog.setCurrentAddressList(requestAddress(level, parentId), level)
    );
    binding.userIvSelectAddress.setOnClickListener(v -> mDialog.show());
}
private List<AddressItem> requestAddress(int level, int parentID) {
    List<AddressItem> list = new ArrayList<>();
    String levelTxt = "Unknown";
    switch (level) {
        case 0:
            levelTxt = "provincial level";
            break;
        case 1:
            levelTxt = "City level";
            break;
        case 2:
            levelTxt = "County-level";
            break;
        case 3:
            levelTxt = "Town level";
    }
    for (int i = 0; i < 32; i++) {
        AddressItem item = new AddressItem();
        item.setChecked(false);
        item.setAddress(levelTxt + i);
        list.add(item);
    }
    return list;
}
summary
Although the code above has been commented in great detail, there are still some things you haven't covered in detail, such as what SparseArray is, and so on.
- What is SparseArray?A generic, SparseArray, is needed behind SparseArray, which can be interpreted as HashMap<Integer, T>.But why not use this with HashMap?SparseArray is Google's Map for Android, which saves memory and takes up less memory than HashMap.Previously, my practice was to have a list of provincial list data and a list of municipal data.Not only is this writing highly coupled, but users cannot customize what the largest regional level is, and switch ing judgments are necessary in the writing process.Later on, the position selected by Tab represents a level. It is not good to get the list of corresponding levels directly from Map.
- What is SparseIntArray?It's actually equivalent to SparseArray, and Google has encapsulated SparseArray for us with other basic data types, SparseBoolean Array and SpaseLongArray, all of which are used similarly.
-
Why not use a member variable to record the position of the currently selected tab and update the member variable in onTabSelected?I did this before, but the odd thing is that TabLayout's line doesn't move up to the town level after a city reselect, after removing the tabs that follow and then reselecting the county level.For reasons unknown, guess the onTabSelected trigger timing may have caused the selected Tab's position to be updated in time.If you have a friend who knows about it, you can expect to be generous with your advice.As follows:
 Problems that arise.gif
[Appendix] Relevant Architecture and Data
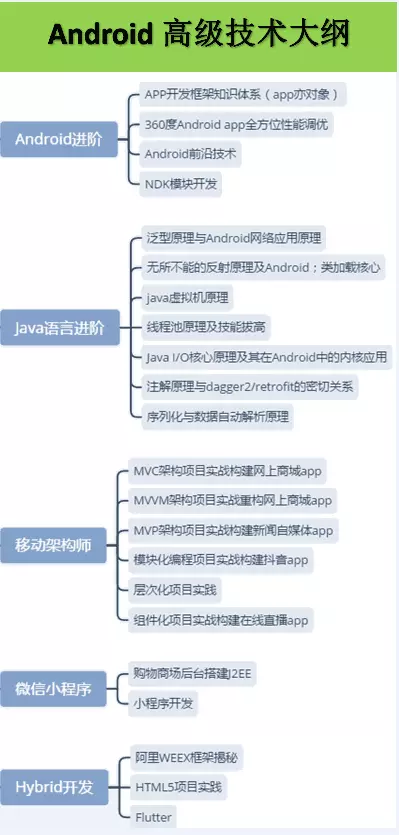
Brochure Release Desk
Dot Zan+Group for Free Android IOC Architecture Design
Get Android Advanced Architecture materials, source code, notes, videos in advance.Advanced UI, Performance Optimization, Architect Course, NDK, ReactNative+Weex Wechat Applet, Flutter's all-round advanced Android practices, as well as technical bulls within the group to discuss communication and solve problems.