Custom virtual machine installation
1, Create a virtual switch
Principle: call dnsmasq to provide DNS, DHCP and other functions
Create configuration file / etc/libvirt/qemu/networks/vbr.xml
<network>
  <name>vbr</name>
  <bridge name="vbr"/>
  <forward mode="nat"/>
  <ip address="192.168.1.254" netmask="255.255.255.0">
    <dhcp>
      <range start="192.168.1.100" end="192.168.1.200"/>
    </dhcp>
  </ip>
</network>
2, Quick configuration of network yum source on real room
[root@room ~]# yum install vsftp
[root@room ~]# vim  /etc/vsftpd/vsftpd.conf
 ...
 listen=YES
 listen_ipv6=NO
 ...
[root@room ~]# systemctl enable vsftpd
[root@room ~]# systemctl start vsftpd

[root@room ~]# mkdir  /var/ftp/centos7
[root@room ~]# mount  –t  iso9660   –o loop,ro  /root/CentOS7-1708.iso    /var/ftp/centos7

[root@room ~]# yum repolist
3, Graphical installation of virtual machine by virt Manager
1. Start the virt manager software and select new virtual machine
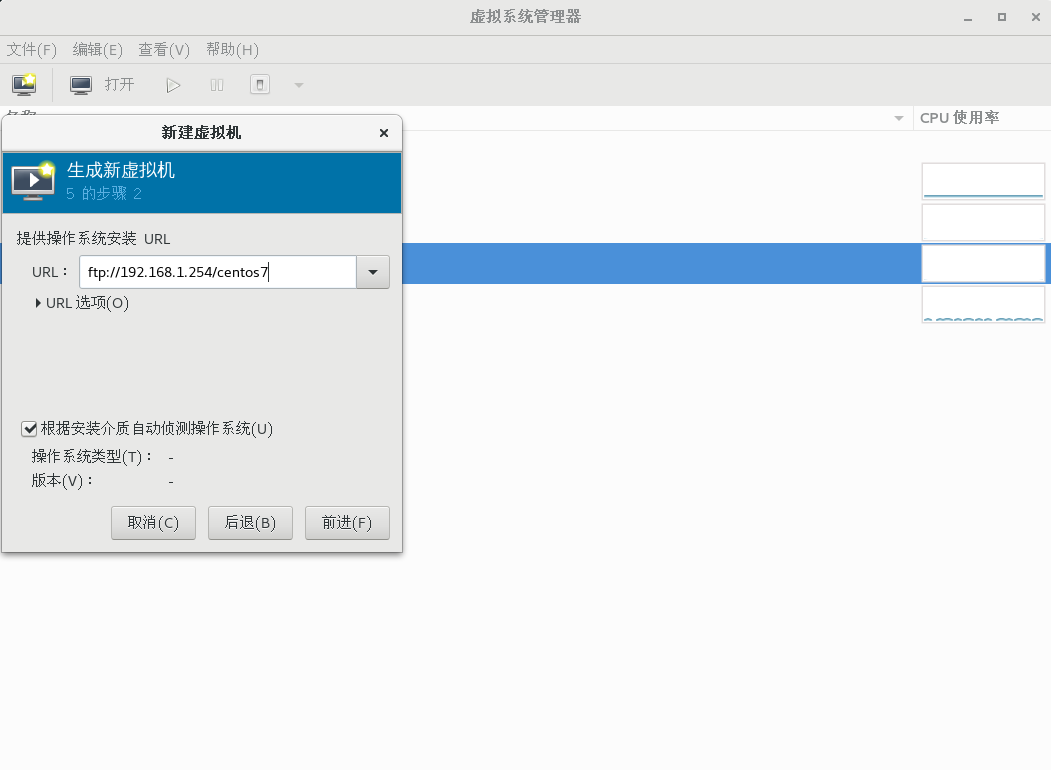
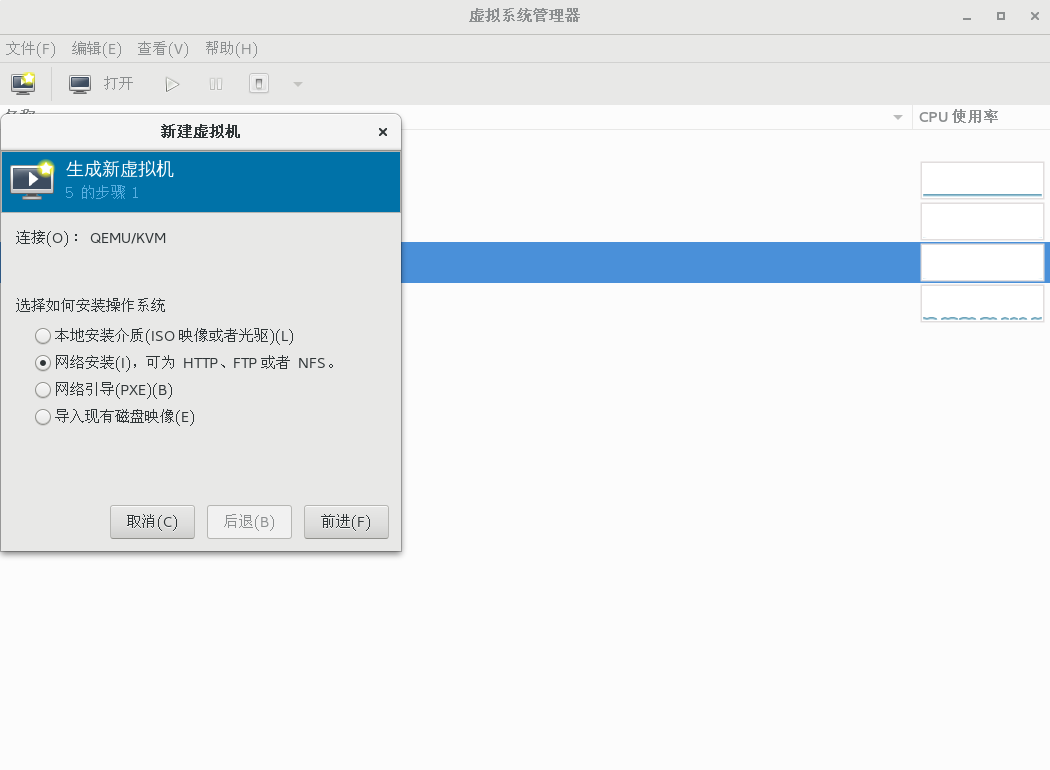 2. Select network installation source
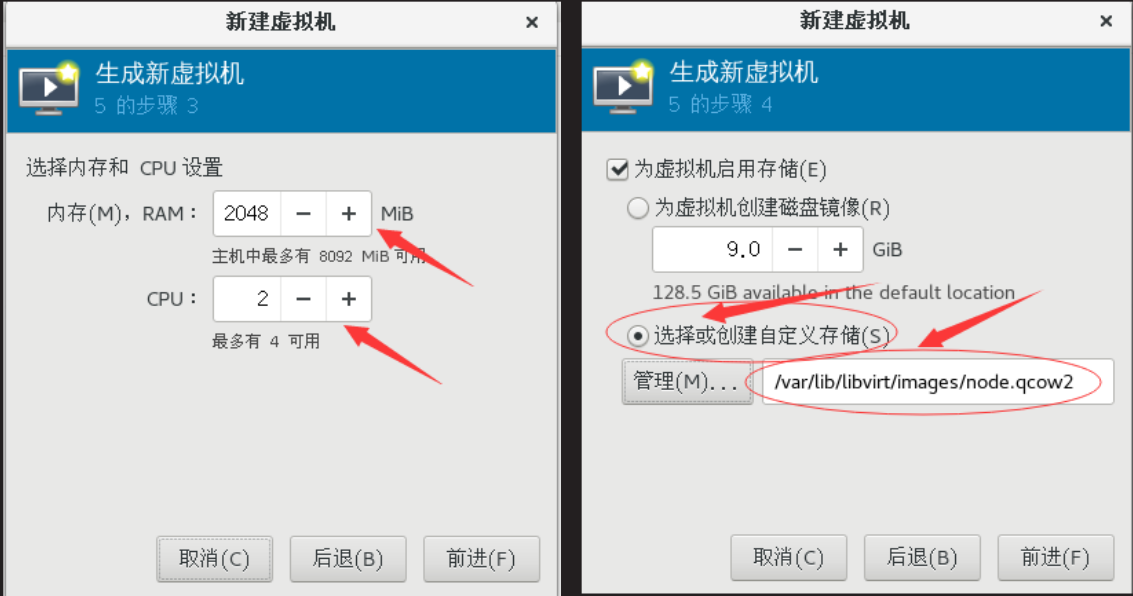
 3. Create a custom image file node.img
[root@room ~]# qemu-img create -f qcow2 /var/lib/libvirt/images/node.img 16G
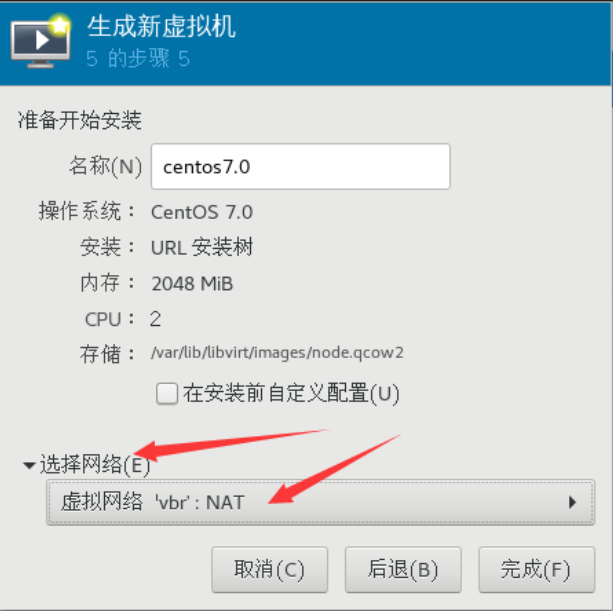
4. vbr for network selection
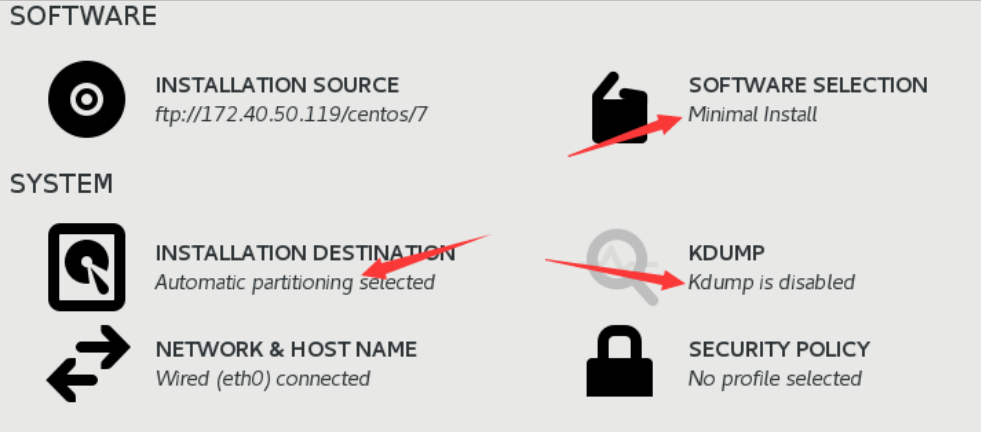
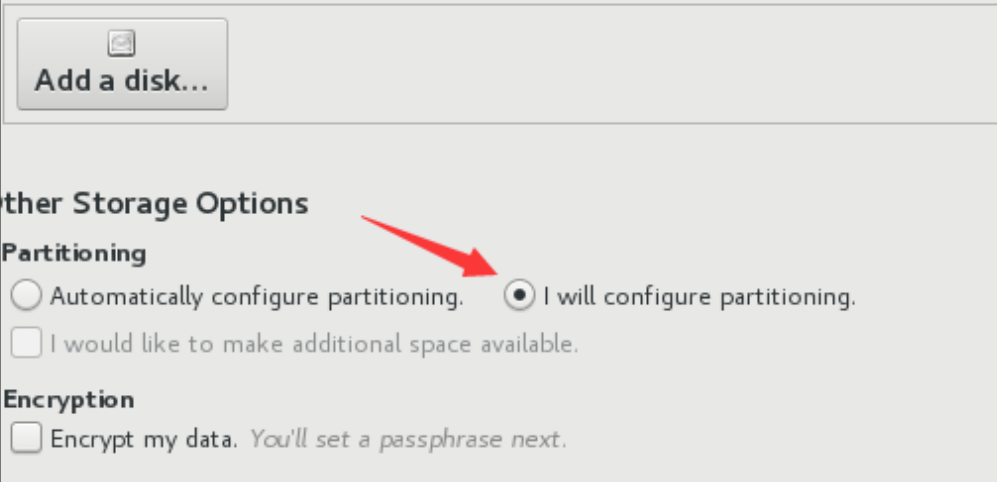
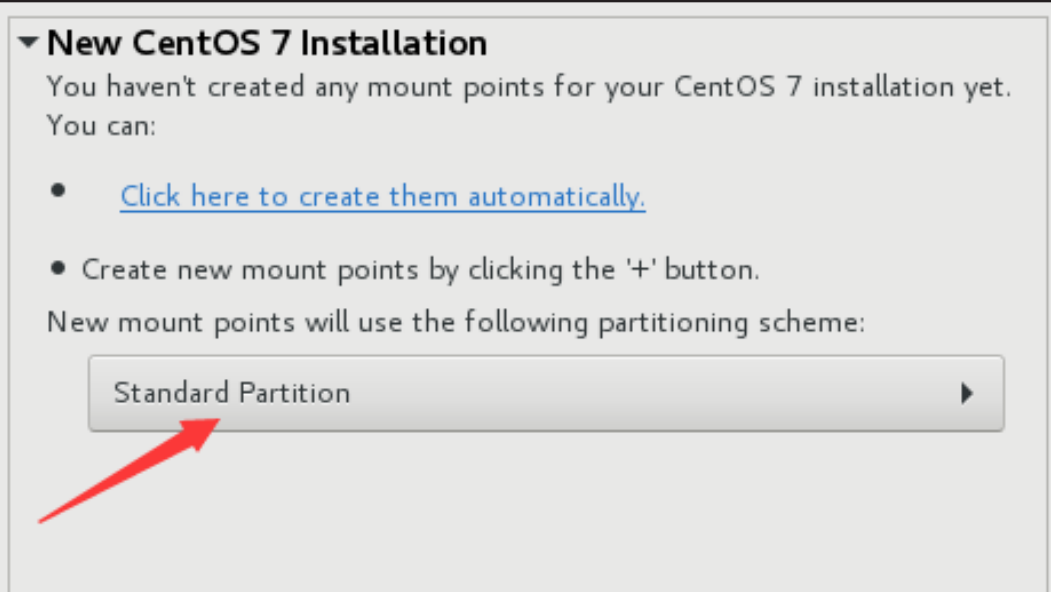
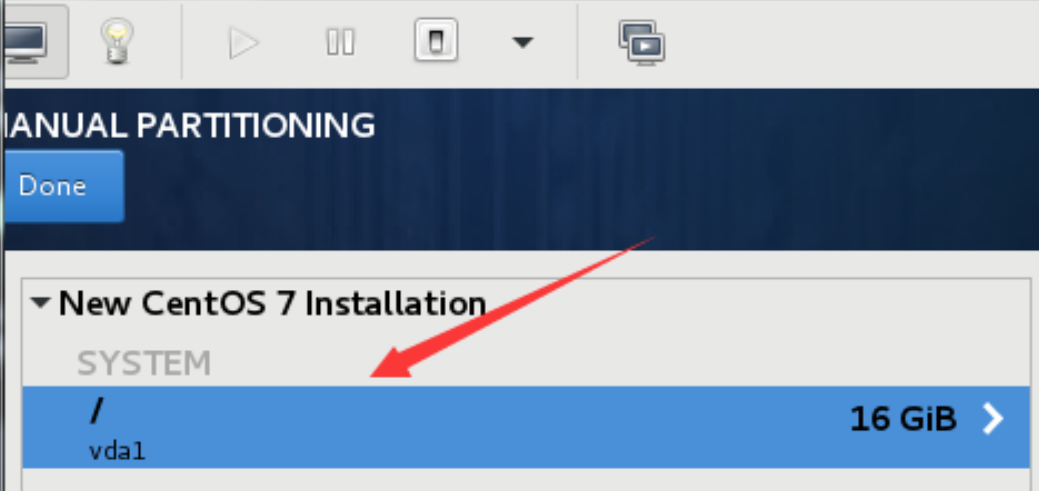
5. Select minimal, close KDUMP, and select Manual partition
4, Virtual machine template making
Initialize the newly installed system
1. Disable selinux
[root@localhost ~]#  vim  /etc/selinux/config
 SELINUX=disabled
2. Uninstall related software
[root@localhost ~]# yum remove -y NetworkManager-* firewalld-*
3. Configure yum source
 [root@localhost ~]# vim /etc/yum.repo.d/centos7.repo
   [local_repo]
   name=centos7
   baseurl="ftp://192.168.1.254/centos7"
   enabled=1
   gpgcheck=0
4. Common system command installation
[root@localhost ~]# yum install -y net-tools vim-enhanced bridge-utils
5. Modify the network card configuration file
[root@localhost ~]# vim /etc/sysconfig/network-scripts/ifcfg-eth0
   DEVICE="eth0"
   ONBOOT="yes"
   IPV6INIT="no"
   TYPE="Ethernet"
   BOOTPROTO ="dhcp"
6. Disable empty routing
[root@localhost ~]#  vim  /etc/sysconfig/network
   NOZEROCONF="yes"
7. Restart the machine
[root@localhost ~]# reboot
8. Add the Console configuration and personalized information in the initial partition removal
[root@localhost ~]# vim  /etc/default/grub
   ...
   GRUB_CMDLINE_LINUX="biosdevname=0 net.ifnames=0
   console=ttyS0,115200n8"
   GRUB_DISABLE_LINUX_UUID="true"
   GRUB_ENABLE_LINUX_LABEL="true"
9. Regenerate grub.cfg
[root@localhost ~]# grub2-mkconfig -o /boot/grub2/grub.cfg
10. Modify / etc/fstab, blkid to view the disk device corresponding to UUID, and modify UUID to system device
[root@localhost ~]# blkid
   /dev/vda1: UUID="98bd48a3-dd66-49bd-a0e1-3c70e337f2aa" TYPE="xfs"

[root@localhost ~]# vim  /etc/fstab
   /dev/vda1       /          xfs     defaults        0    0
11. Install partition expansion software
[root@localhost ~]# yum install -y cloud-utils-growpart

[root@localhost ~]# chmod 755 /etc/rc.local      # Set the root directory of the first boot self expansion

[root@localhost ~]#  vim    /etc/rc.local
/usr/bin/growpart /dev/vda 1                     # Expand partition space (make / dev/vda1 larger)
/usr/sbin/xfs_growfs /                           # Expand file system identification space (make df-h usable space larger)
12. Shut down the virtual machine and clean up the information (real machine)
[root@room ~]# virt-sysprep -d  centos7.0
[   0.0] Examining the guest ...
[  28.9] Performing "abrt-data" ...
[  28.9] Performing "backup-files" ...
[  29.2] Performing "bash-history" ...
[  29.2] Performing "blkid-tab" ...
[  29.3] Performing "crash-data" ...
[  29.3] Performing "cron-spool" ...
[  29.3] Performing "dhcp-client-state" ...
[  29.3] Performing "dhcp-server-state" ...
[  29.3] Performing "dovecot-data" ...
[  29.3] Performing "logfile s" ...
[  29.3] Performing "machine-id" ...
[  29.3] Performing "mail-spool" ...
[  29.3] Performing "net-hostname" ...
[  29.3] Performing "net-hwaddr" ...
[  29.3] Performing "pacct-log" ...
[  29.3] Performing "package-manager-cache" ...
[  29.3] Performing "pam-data" ...
[  29.3] Performing "passwd-backups" ...
[  29.3] Performing "puppet-data-log" ...
[  29.3] Performing "rh-subscription-manager" ...
[  29.3] Performing "rhn-systemid" ...
[  29.3] Performing "rpm-db" ...
[  29.3] Performing "samba-db-log" ...
[  29.3] Performing "script" ...
[  29.3] Performing "smolt-uuid" ...
[  29.3] Performing "ssh-hostkeys" ...
[  29.3] Performing "ssh-userdir" ...
[  29.3] Performing "sssd-db-log" ...
[  29.3] Performing "tmp-files" ...
[  29.3] Performing "udev-persistent-net" ...
[  29.3] Performing "utmp" ...
[  29.3] Performing "yum-uuid" ...
[  29.3] Performing "customize" ...
[  29.3] Setting a random seed
[  29.8] Performing "lvm-uuids" ...
13. Backup XML configuration file of virtual machine
[root@room ~]#cd  /etc/libvirt/qemu/
[root@room qemu]#cp  centos7.xml   centos7.0.xml.bak
14. Modify the XML configuration file as follows
<domain type='kvm'>
  <name>node</name>
  <memory unit='KB'>2097152</memory>
  <currentMemory unit='KB'>2097152</currentMemory>
  <vcpu placement='static'>2</vcpu>
  <os>
    <type arch='x86_64' machine='pc'>hvm</type>
    <boot dev='hd'/>
    <bootmenu enable='yes'/>
    <bios useserial='yes'/>
  </os>
  <features>
    <acpi/>
    <apic/>
  </features>
  <cpu mode='host-passthrough'>
  </cpu>
  <clock offset='localtime'/>
  <on_poweroff>destroy</on_poweroff>
  <on_reboot>restart</on_reboot>
  <on_crash>restart</on_crash>
  <devices>
    <emulator>/usr/libexec/qemu-kvm</emulator>
    <disk type='file' device='disk'>
      <driver name='qemu' type='qcow2'/>
      <source file='/var/lib/libvirt/images/node.img'/>
      <target dev='vda' bus='virtio'/>
    </disk>
    <interface type='bridge'>
      <source bridge='vbr'/>
      <model type='virtio'/>
</interface>
<channel type='unix'>
      <target type='virtio' name='org.qemu.guest_agent.0'/>
    </channel>
    <serial type='pty'></serial>
    <console type='pty'>
      <target type='serial'/>
    </console>
    <memballoon model='virtio'></memballoon>
  </devices>
</domain>
15. Delete virtual machine definition
[root@room ~]# virsh undefine centos7.0
16. View template virtual machine image
[root@room ~]#  ll  -h  /var/lib/libvirt/images/node.img
-rw-r--r--  1  root  root  1.2G  9 Month 717:35  node.img
5, Create virtual machine quickly - for example, create virtual machine node1
1. Create disk file
[root@room ~]# cd /var/lib/libvirt/images
[root@room images]# qemu-img create -b node.img -f qcow2 node1.img 32G
2. Create virtual machine configuration file
[root@room images]#sed 's/node/node1/' /root/nsd1804/centos7.0.xml > /etc/libvirt/qemu/node1.xml
[root@room images]#virsh define /etc/libvirt/qemu/node1.xml
//Define domain node1 (from / etc/libvirt/qemu/node1.xml)
3. Start the virtual machine
[root@room images]#virsh start node1
 Domain node1 started
4. Connect to view virtual machine
[root@room images]# virsh console node1