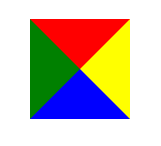
There are three methods:
(1) , parent element transform: skewX(-45deg); child element transform: skewX(45deg);
Rendering 1:

<!DOCTYPE html>
<html lang="en">

<head>
  <meta charset="UTF-8">
  <meta name="viewport" content="width=device-width, initial-scale=1.0">
  <meta http-equiv="X-UA-Compatible" content="ie=edge">
  <title>Document</title>
  <style>
    .react {
      margin-left: 100px;
      width: 300px;
      height: 50px;
      line-height: 50px;
      text-align: center;
      background: #ddd;
      transform: skewX(-45deg);
    }
    .text {
      display: inline-block;
      transform: skewX(45deg);
    }
  </style>
</head>

<body>
  <div class="react">
    <span class="text">React front-end technology</span>
  </div>
</body>

</html>
(2) , place the parallelogram style in the "pseudo element" style, or use transform: skewX(-45deg);
Rendering 2:

<!DOCTYPE html>
<html lang="en">

<head>
  <meta charset="UTF-8">
  <meta name="viewport" content="width=device-width, initial-scale=1.0">
  <meta http-equiv="X-UA-Compatible" content="ie=edge">
  <title>Document</title>
  <style>
    .vue{
      margin-left: 100px;
      position: relative;
      width: 300px;
      height: 50px;
      line-height: 50px;
      text-align: center;
    }
    .vue::before{
      position:absolute;
      top: 0;
      left: 0;
      bottom: 0;
      right: 0;
      content: '';
      background: #ddd;
      z-index: -1;
      transform: skewX(-45deg);
    }
  </style>
</head>

<body>
  <div class="vue"> Vue front-end technology</div>

</body>

</html>
(3) First draw a rectangle, and then splice it with the triangles at both ends. The two triangles also use "pseudo elements";
Let's first understand that the width and height of border drawing are 0, and border width has a certain width of graphics. Look at the graphics and talk
border-color: red yellow blue green; //Color of top border, right border, bottom border and left border respectively
Rendering 3:

<!DOCTYPE html>
<html lang="en">

<head>
  <meta charset="UTF-8">
  <meta name="viewport" content="width=device-width, initial-scale=1.0">
  <meta http-equiv="X-UA-Compatible" content="ie=edge">
  <title>Document</title>
  <style>
    .test{
      width: 0;
      height: 0;
      border-width: 50px;
      border-style: solid;
      border-color: red yellow blue green;

    }
  </style>
</head>

<body>
  <div class="test"></div>

</body>

</html>
What about drawing parallelograms?
Idea: draw the middle rectangle first, and then draw the triangles at both ends with absolute positioning. Each triangle is composed of two small triangles, and the small triangles mentioned above are drawn with the width and height of 0. Set the border width. Do you understand the idea? Look at the code, look at the renderings:
Rendering 4:

Red, green and blue are used to distinguish. You can change your own projects to the same color.
<!DOCTYPE html>
<html lang="en">

<head>
  <meta charset="UTF-8">
  <meta name="viewport" content="width=device-width, initial-scale=1.0">
  <meta http-equiv="X-UA-Compatible" content="ie=edge">
  <title>Document</title>
  <style>
    .angular{
      margin-left: 100px;
      position: relative;
      display: inline-block;
      width: 300px;
      height: 50px;
      line-height: 50px;
      padding: 0 10px;
      text-align: center;
      color: #fff;
      background: green;
    }
    .angular::before{
      display: block;
      position: absolute;
      top: 0;
      left: -50px;
      width: 0;
      height: 0;
      content: '';
      border-width: 25px;
      border-style: solid;
      border-color: transparent red blue transparent;
    }
    .angular::after{
      border-color: blue transparent transparent red;
      content: '';
      display: block;
      width: 0;
      height: 0;
      position: absolute;
      border-style: solid;
      border-width: 25px;
      top: 0;
      right: -50px;
    }
  </style>
</head>

<body>

  <div class="angular">Angular front-end technology</div>

</body>

</html>
Generally speaking, I prefer the first one, less code!
There should be more ideas, incremental add, welcome to like message!