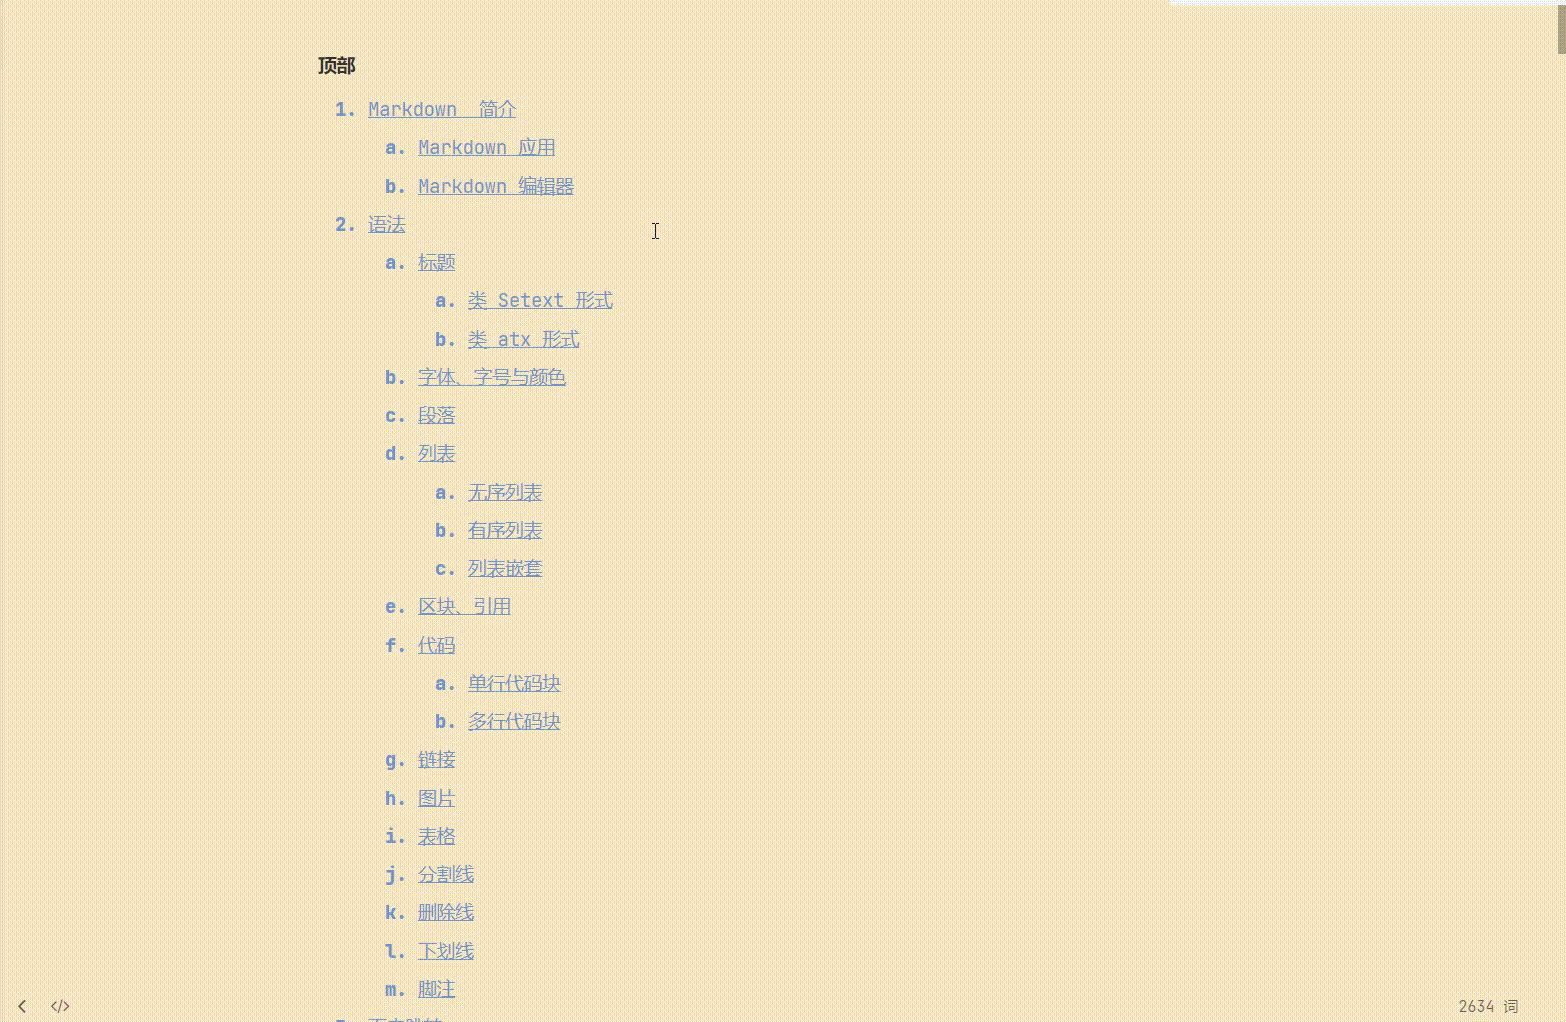
Top
Introduction to Markdown

Markdown is a lightweight markup language that allows people to write documents in plain text format that is easy to read and write. Through simple markup syntax, it enables us to format the text to a certain extent without leaving the keyboard. You can export documents in PPT, LaTex, HTML, Word, PDF, Epub, JPG and other formats with the document suffix. md.
Markdown application
Those who have written blogs or documents on github should know the importance of Markdown syntax!!
Markdown is a popular writing language with low learning cost and quick start. It can be used to write blogs, notes and so on!
Special editor
The content of this note is explained by the typora editor, which is a Markdown text editor that supports real-time preview. Typora supports MacOS, Windows and Linux platforms, and contains a variety of themes. After editing, it can directly render the effect.
Support the export of HTML, PDF, Word, pictures and other types of files.
Typora official website: https://typora.io/
grammar
title
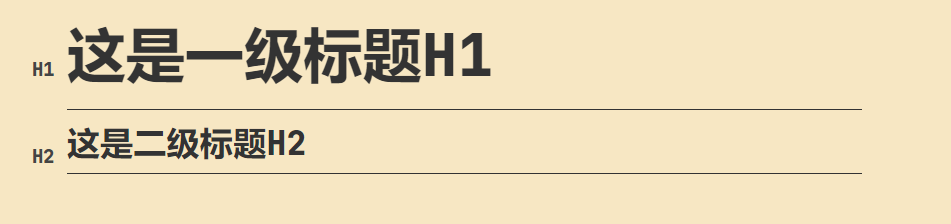
The Markdown header has two formats: class Setext and class atx.
Use = and - to mark primary and secondary titles (in the form of class Setext)
The form of class Setext is in the form of bottom line, using = (highest order title) and - (second order title), as follows:
tips: any number of = and - can have an effect.
This is the first level title H1
=============

This is the secondary title H2
-------------
The display effect is as follows:
Tag with # number (in Atx like form)
The Atx like form is to insert 1 to 6 #, corresponding to order 1 to 6 of the title, at the beginning of the line.
The # number can be used to represent level 1-6 titles. The first level Title corresponds to one # number, the second level Title corresponds to two # numbers, and so on.
tips: # there must be at least one space between the sign and the text
# Primary title
## Secondary title
### Tertiary title
#### Four level title
##### Five level title
###### Six level title
The display effect is as follows:

Font, size and color
Font, font size and color can be implemented with HTML syntax elements.
Specify the font, font size and font color of the text.
-
typeface
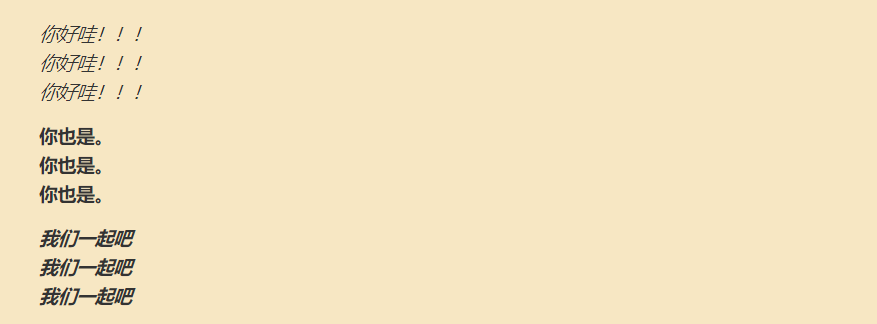
Common: italic, bold, bold italic
// Italicized text: enter an asterisk * or an underscore before and at the end of the italicized text_
*Hello, wow!!!*
_Hello, wow!!!_
<i>Hello, wow!!!</i>


// Bold text: enter two asterisks * * or two underscores before and at the end of bold text_
**you too.**
__you too.__
<b>you too.</b>

// Bold italic text: you can enter three asterisks * * * or three underscores before and at the end of bold italic text_
***Let's go together***
___Let's go together___
<b><i>Let's go together</i></b>
The display effect is as follows:
-
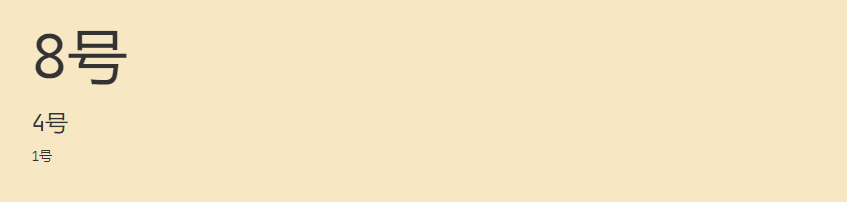
Font size
<font size=8>8 number</font>
<font size=4>4 number</font>
<font size=1>1 number</font>
The display effect is as follows:
-
colour
HTML colors are defined by a hexadecimal symbol consisting of red, green, and blue values (RGB).
The minimum value for each color is 0 (hex: #00). The maximum value is 255 (hex: #FF).
<font color="red">gules</font>
<font color="#Ffff00 "> yellow < / font >
<font color="#FF00FF "> purple < / font >
The display effect is as follows:

This is the RGB color query cross reference table (do not remember to query at any time if necessary):
https://www.sojson.com/rgb.html
paragraph
The line feed of a paragraph is more than two consecutive spaces + carriage return
Use a blank line after a paragraph to restart a paragraph
The third is to use html language line feed tags

list
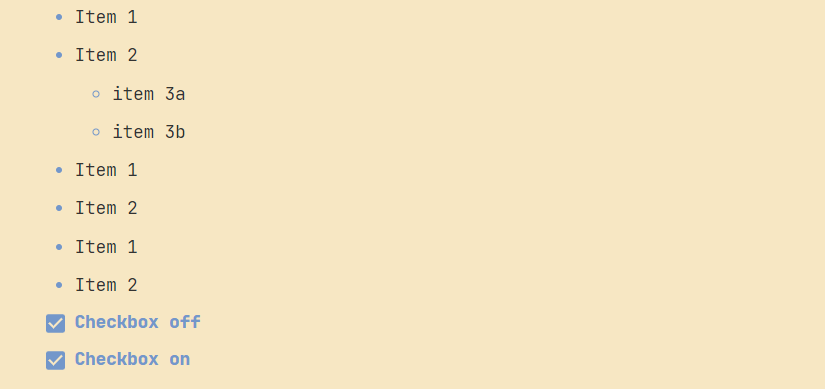
Unordered list
Unordered lists use *, + or - as list tags
tips: add a space after these tags, and then fill in the content
* Item 1
* Item 2
    * item 3a
    * item 3b

- Item 1
- Item 2

+ Item 1
+ Item 2

// task list

- [ ] Checkbox off
- [x] Checkbox on
The display effect is as follows:
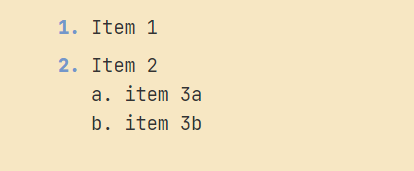
Ordered list
An ordered list is represented by numbers and a. Sign
tips: same!! Add a space after these marks, and then fill in the content
1. Item 1
2. Item 2
    a. item 3a
    b. item 3b
The display effect is as follows:
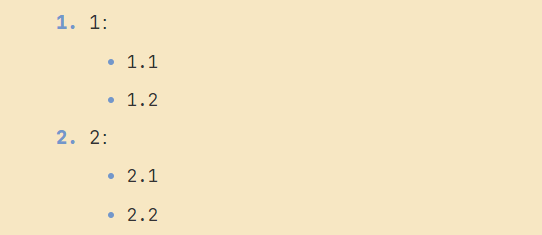
Nested list
For list nesting, just add four spaces in front of the options in the sub list (or use tab before the symbol -):
1. 1:
    - 1.1
    - 1.2
2. 2:
    - 2.1
    - 2.2
The display effect is as follows:
Block, reference
A block reference uses the > symbol at the beginning of a paragraph, followed by a space symbol:
Block and reference writing specification:

> CSDN
The display effect is as follows:

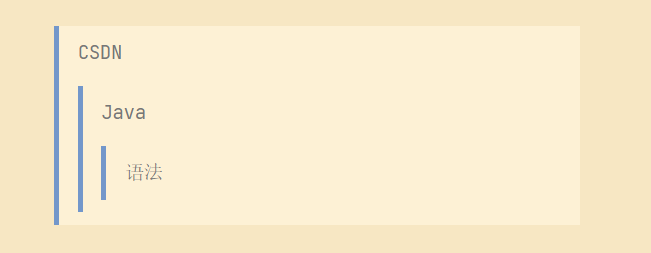
Blocks can be nested. One > symbol is the outermost layer, two > symbols are the first layer of nesting, and so on:
Block and reference writing specification:

> CSDN
>> Java
>>> grammar
The display effect is as follows:
code
There are two ways to insert code into an article, embedded code and code blocks
Single line code blocks: embedded codes
If it is the code of a function or fragment on a paragraph, it can be wrapped in back quotation marks (`), for example:
example: `new Girl();` Embedded code
The display effect is as follows:

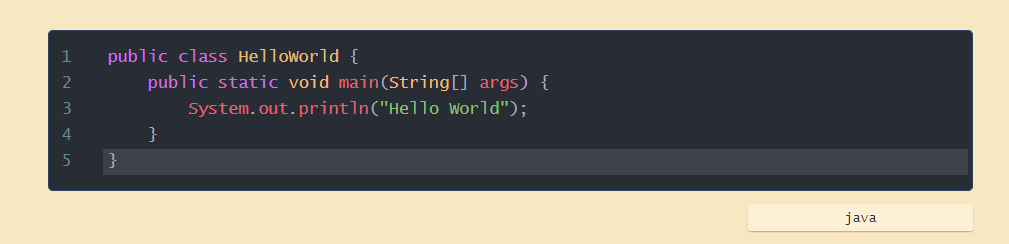
Multiline code blocks: code blocks
You can also use ` ` ` to wrap a piece of code and specify a language (or not):
```java
public class HelloWorld {
    public static void main(String[] args) {
        System.out.println("Hello World");
    }
}
```
The display effect is as follows:
link
The link is used as follows:
// [link name] (link address)
[CSDN](https://www.csdn.net/)


// < link address >
<https://www.csdn.net/>
We can set a link through variables, and the variable assignment is carried out at the end of the document:
// This link uses link as the URL variable [CSDN][link]
[link][CSDN]
// Assign value to variable (URL)
[CSDN]: https://www.csdn.net/
picture
Picture syntax format:
- An exclamation point at the beginning!
- Then a square bracket with alternative text of the picture
- Then an ordinary bracket with the URL of the picture inside. Finally, you can wrap it in quotation marks and add the text of the optional 'title' attribute.
 
Linked pictures
// Normal picture  // Picture + link [](https://blog.csdn.net/weixin_44695700?spm=1001.2014.3001.5343 "(avatar)
The display effect is as follows:
Normal picture:

The link covers the picture. Click to jump to the corresponding link:
form
Make a table, use | to separate different cells, and - to separate headers and other rows.
// Table format:

|  Student number   | full name  |
|  ----  | ----  |
| 20181001  | Xiao Ming |
| 20181002  | Xiao Hong |
The display effect is as follows:
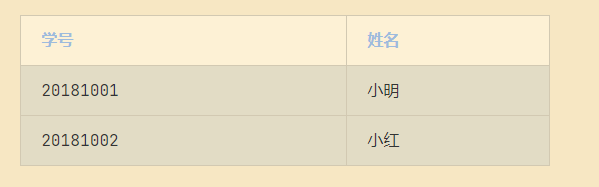
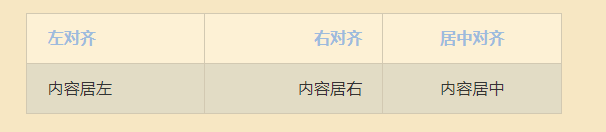
Table alignment:
- -: set right alignment of content and title block
- : - align the content and title bar to the left
- : -: center the content and title block
| Align left | Right align | Center alignment |
| :-----| ----: | :----: |
| Content left | Content on the right | Content centered |
The display effect is as follows:
Split line
You can use more than three *****, -, in a line_ To create a separator. There can be nothing else in the line. You can also insert a space between * * * * * or -. (or HTML tag usage)
)You can create separation lines in each of the following ways: *** --- * * * - - - ***** -----
The display effect is as follows:

Delete line
If you want to add a strikeout to the text on the paragraph, just add two wavy lines ~ ~ at both ends of the text (or use HTML tag usage )
CSND
~~CSDN~~
// The < del > tag is used to define the deleted text in the document
<del>CSDN</del>
// The < strike > tag is used to define strikethrough text
<strike>CSDN</strike>
The display effect is as follows:

Underline
Underline can be realized through HTML Tags:
<u>This line of text has been underlined</u>
The display effect is as follows:

footnote
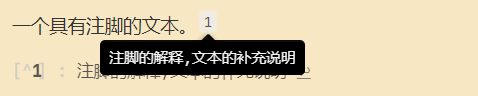
Footnotes are supplementary notes to the text.
A text with footnotes.[^1]


[^1]: Explanation of footnotes,Supplementary description of the text
The display effect is as follows:
Intra page Jump
Jump method in the article: click the jump name to jump to the span of the corresponding id
[jump name] (# jump id)
< span id = "jump ID" ></span>
Tips: < span > < / span > it is recommended to leave a space or text in the middle
// The middle is blank, and the < span > label cannot be hidden
 Top<span id="0"> </span>


[Back to the top](#0)
The display effect is as follows: