
The article was forwarded from the professional Laravel developer community, the original link: https://learnku.com/laravel/t...
We are The third part Instead of building a real client, we learn to use Vue routing to get component data. Now we are ready to turn our attention to the ability to create CRUD s for users - this tutorial will focus on editing existing users.
When dealing with the first form, we had the opportunity to understand how to define dynamic Vue routing. The dynamic part of our routing is the user ID that matches the user data record. For editing users, the Vue routing is as follows:
/users/:id/edit
The dynamic part of this routing is the id parameter, which will depend on the user's id. We'll use the id field in the database, but you can also use UUID or other data identifiers.
install
Before dealing with Vue components, we need to define a new API interface to get the specified user, and then define an interface to handle updates.
Open the routes/api.php routing file and add the following routing under the index routing for all users:
Route::namespace('Api')->group(function () {
    Route::get('/users', 'UsersController@index');
    Route::get('/users/{user}', 'UsersController@show');
});
For Laravel's built-in routing model binding, the controller approach is straightforward. Add the following method in app/Http/Controllers/Api/UsersController.php:
// app/Http/Controllers/Api/UsersController

public function show(User $user)
{
    return new UserResource($user);
}
Requesting a user like / api/users/1 will return the following JSON:
{
    "data": {
        "name": "Antonetta Zemlak",
        "email":"znikolaus@example.org"
    }
}
The UserResource in Part 3 needs to contain the id column, so you need to update app/Http/Resources/UserResource.php to add the id key. The entire document is as follows:
<?php

namespace App\Http\Resources;

use Illuminate\Http\Resources\Json\Resource;

class UserResource extends Resource
{
    /**
     * Transform the resource into an array.
     *
     * @param  \Illuminate\Http\Request  $request
     * @return array
     */
    public function toArray($request)
    {
        return [
            'id' => $this->id,
            'name' => $this->name,
            'email' => $this->email,
        ];
    }
}
Now both / api/users and / api/users/{user} routes will return the id field, through which users can be distinguished in the route.
Define UsersEdit components
After defining show, we then define the routing and the corresponding components in Vue. Add corresponding routes to resources/js/app.js. Below is a code snippet that introduces the UsersEdit component (not yet created) and the entire routing instance:
import UsersEdit from './views/UsersEdit';

// ...

const router = new VueRouter({
    mode: 'history',
    routes: [
        {
            path: '/',
            name: 'home',
            component: Home
        },
        {
            path: '/hello',
            name: 'hello',
            component: Hello,
        },
        {
            path: '/users',
            name: 'users.index',
            component: UsersIndex,
        },
        {
            path: '/users/:id/edit',
            name: 'users.edit',
            component: UsersEdit,
        },
    ],
});
We added users.edit routing at the end of routes.
Next, we need to create the UsersEdit component in resources/assets/js/views/UsersEdit.vue. The code is as follows:
<template>
  <div>
      <form @submit.prevent="onSubmit($event)">
        <div class="form-group">
            <label for="user_name">Name</label>
            <input id="user_name" v-model="user.name" />
        </div>
        <div class="form-group">
            <label for="user_email">Email</label>
            <input id="user_email" type="email" v-model="user.email" />
        </div>
        <div class="form-group">
            <button type="submit">Update</button>
        </div>
    </form>
  </div>
</template>
<script>
export default {
  data() {
    return {
      user: {
        id: null,
        name: "",
        email: ""
      }
    };
  },
  methods: {
    onSubmit(event) {
        // @todo form submit event
    }
  },
  created() {
      // @todo load user details
  }
};
</script>
Let's start with the template section: We write <form> in div, because later we just need to show <form> after loading user data.
<form> has a default @submit event, and we define an onSubmit() method to handle it. Finally, we need to mention the v-model attribute on the <input> element, which corresponds to the data.users object one by one. We set default values for id, name, and email.
Now when you open / users/1/edit, you should see a blank form:

We're going to edit existing users, so the next step is to show how to get the dynamic id in the routing and load user data in UsersEdit.vue.
Use dedicated modules to get user details
Before we load user data in components, we define an additional dedicated module to process / api/users resources, including querying all users, querying individual users and updating users.
The first step is to create a new folder to place the module on the back end of the request. You can create these files in any way. Here we show the commands under Nix:
mkdir -p resources/assets/js/api/
touch resources/assets/js/api/users.js
users.js module exposes some methods for processing / api/users resources. This module will be as simple as possible, but then you can process the data at will before or after the request. This file serves as a repository for reusable API operations:
import axios from 'axios';

export default {
    all() {
        return axios.get('/api/users');
    },
    find(id) {
        return axios.get(`/api/users/${id}`);
    },
    update(id, data) {
        return axios.put(`/api/users/${id}`, data);
    },
};
Now we can use the same module to get all users, query and update a single user:
// Get all users
client.all().then((data) => mapData);

// Query a single user
client.find(userId);
So far, all() method does not support paging, you need to implement paging yourself, and then use the new all() to replace the method in UsersIndex.vue component.
Loading user data in UsersEdit components
Now we have a reusable but crude api client that we use to get user data when editing pages are generated.
Initially, we added the create () method to the component, and now we can get the user's data in it:
// UsersEdit.vue Component
<script>
import api from '../api/users';

export default {
  // ...
  created() {
      api.find(this.$route.params.id).then((response) => {
        this.loaded = true;
        this.user = response.data.data;
      });
  }
}
</script>
In create (), the users.js client returns a Promise object using the find() method. In Promise's callback, we set the loaded property (not yet created) and the user property.
Now add the loaded attribute to the data with the default value false:
data() {
  return {
    loaded: false,
    user: {
      id: null,
      name: "",
      email: ""
    }
  };
},
Since our component loads data in create (), a "load" prompt message is displayed when the component loads data:
<div v-if="! loaded">Loading...</div>
<form @submit.prevent="onSubmit($event)" v-else>
<!-- ... -->
</form>
Refresh the page and you'll see a simple Loading... message:

The user data is then displayed in the form:

The API is very fast. If you want to make sure that the loading prompt is working properly, you need to use setTimeout to delay setting the user attribute:
api.find(this.$route.params.id).then((response) => {
    setTimeout(() => {
      this.loaded = true;
      this.user = response.data.data;
    }, 5000);
});
The code above displays the loading message for 5 seconds, and then sets the loaded and user properties.
Update user
We will complete the onSubmit() method and update the user with PUT/api/users/{user}.
We first refine onSubmit(), and then go to the back end to process database updates:
onSubmit(event) {
  this.saving = true;

  api.update(this.user.id, {
      name: this.user.name,
      email: this.user.email,
  }).then((response) => {
      this.message = 'User updated';
      setTimeout(() => this.message = null, 2000);
      this.user = response.data.data;
  }).catch(error => {
      console.log(error)
  }).then(_ => this.saving = false);
},
We call the api.update() method through the user ID, passing in the values of name and email obtained from the binding form.
Then we link a callback method on Promise, set the success prompt after the API is successfully executed, and set the latest user data. After 2000 milliseconds, we blank out the prompt information, which also hides the message in the template.
So far, we have simply grabbed all the errors and exported them to the console. In the future, we will go back to rewrite error processing (server error or validation error), but now, we skip this part and focus on processing after the request succeeds.
We use this. save to determine if we are updating user information. We added the disabled attribute to the template to avoid duplicate submissions, which ensures that the submission button is prohibited when we update the data:
<div class="form-group">
  <button type="submit" :disabled="saving">Update</button>
</div>
We link another then() after catch and set this. save to false once the API request ends. We need to reset this property to false to ensure that we can submit data again. Our last () uses to indicate that there is a variable here, but we don't need to use it. You can also define an arrow function using empty brackets:
.then(() => this.saving = false);
We added two new attributes to data():
data() {
  return {
    message: null,
    loaded: false,
    saving: false,
    user: {
      id: null,
      name: "",
      email: ""
    }
  };
},
Next, let's modify <template> to show the message:
<template>
  <div>
      <div v-if="message" class="alert">{{ message }}</div>
      <div v-if="! loaded">Loading...</div>
      <form @submit.prevent="onSubmit($event)" v-else>
        <div class="form-group">
            <label for="user_name">Name</label>
            <input id="user_name" v-model="user.name" />
        </div>
        <div class="form-group">
            <label for="user_email">Email</label>
            <input id="user_email" type="email" v-model="user.email" />
        </div>
        <div class="form-group">
            <button type="submit" :disabled="saving">Update</button>
        </div>
    </form>
  </div>
</template>
Finally, we add some styles to alert information at the bottom of the UsersEdit.vue file:
<style lang="scss" scoped>
$red: lighten(red, 30%);
$darkRed: darken($red, 50%);
.form-group label {
  display: block;
}
.alert {
    background: $red;
    color: $darkRed;
    padding: 1rem;
    margin-bottom: 1rem;
    width: 50%;
    border: 1px solid $darkRed;
    border-radius: 5px;
}
</style>
Now that the front-end component has been modified, it can handle form submission and update the template synchronously after the API has been successfully executed. Now we need to go to the back end to finish the rest.
Update users at the API back end
We are going to define an update method on the User resource controller to connect all parts. We do data validation on the server side. But we won't dock with the front end for the time being.
First, we define new routes in routes/api.php: PUT/api/users/{user}:
Route::namespace('Api')->group(function () {
    Route::get('/users', 'UsersController@index');
    Route::get('/users/{user}', 'UsersController@show');
    Route::put('/users/{user}', 'UsersController@update');
});
Next, the UsersController@update method uses the request object to validate the data and return the data we want to update. Add the following method to app/Http/Controllers/Api/UsersController.php:
public function update(User $user, Request $request)
{
    $data = $request->validate([
        'name' => 'required',
        'email' => 'required|email',
    ]);

    $user->update($data);

    return new UserResource($user);
}
Like the show() method, we use implicit model binding to load user data from the database. After data validation, update the user model and create a new UserResource to return the updated model.
Successful back-end-oriented requests return updated user data (in JSON format), which we then use to update the this.user attribute in the Vue component.
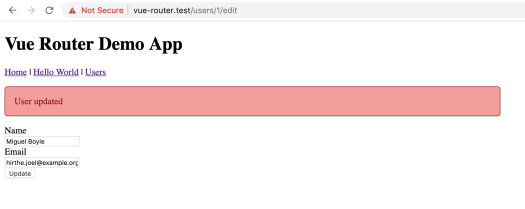
{
  "data": {
    "id": 1,
    "name":"Miguel Boyle",
    "email":"hirthe.joel@example.org"
  }
}
Navigate to the edit page
We have been directly requesting the / users/:id/edit page, but we have not added routing anywhere in the interface. Before you see how I can do this, try to figure out how to navigate dynamically to the editing page.
This is me. The second part UsersIndex.vue template is created and the way to add edit links for each user is listed on the / users index page:
<ul v-if="users">
    <li v-for="{ id, name, email } in users">
        <strong>Name:</strong> {{ name }},
        <strong>Email:</strong> {{ email }} |
        <router-link :to="{ name: 'users.edit', params: { id } }">Edit</router-link>
    </li>
</ul>
We reconstruct the user object in the loop to provide id, name, and email attributes. We use the <router-link/> component to introduce our named users.edit routing and use params to pass the ID parameter.
To better visualize <router-link> attributes, the following is the routing definition in the app.js file we added earlier:
{
  path: '/users/:id/edit',
  name: 'users.edit',
  component: UsersEdit,
},
If you refresh the application or access the / users endpoint, you will see the following:

Put them together
If you want to edit a user now, you need to save it in the background and return a 200 status code to indicate that the response is successful. After a successful PUT request, you should see the following in two seconds:
You can see the full UsersEdit.vue component content below:
<template>
  <div>
      <div v-if="message" class="alert">{{ message }}</div>
      <div v-if="! loaded">Loading...</div>
      <form @submit.prevent="onSubmit($event)" v-else>
        <div class="form-group">
            <label for="user_name">Name</label>
            <input id="user_name" v-model="user.name" />
        </div>
        <div class="form-group">
            <label for="user_email">Email</label>
            <input id="user_email" type="email" v-model="user.email" />
        </div>
        <div class="form-group">
            <button type="submit" :disabled="saving">Update</button>
        </div>
    </form>
  </div>
</template>
<script>
import api from '../api/users';

export default {
  data() {
    return {
      message: null,
      loaded: false,
      saving: false,
      user: {
        id: null,
        name: "",
        email: ""
      }
    };
  },
  methods: {
    onSubmit(event) {
        this.saving = true;

        api.update(this.user.id, {
            name: this.user.name,
            email: this.user.email,
        }).then((response) => {
            this.message = 'User updated';
            setTimeout(() => this.message = null, 10000);
            this.user = response.data.data;
        }).catch(error => {
            console.log(error)
        }).then(_ => this.saving = false);
    }
  },
  created() {
      api.find(this.$route.params.id).then((response) => {
          setTimeout(() => {
            this.loaded = true;
            this.user = response.data.data;
          }, 5000);
      });
  }
};
</script>
<style lang="scss" scoped>
$red: lighten(red, 30%);
$darkRed: darken($red, 50%);
.form-group label {
  display: block;
}
.alert {
    background: $red;
    color: $darkRed;
    padding: 1rem;
    margin-bottom: 1rem;
    width: 50%;
    border: 1px solid $darkRed;
    border-radius: 5px;
}
</style>
task
When the user information is updated successfully, we reset the message only two seconds later. Modify it to a set message and redirect the user back to the previous location (e.g. / users page).
Second, add a return or cancel button at the bottom of the form to abandon the update and navigate back to the previous page.
If you don't think it's rigorous, display the validation error when the UsersEdit component sends an invalid request to the API. Clear the error message after submitting the form successfully.
What is the next step?
As users update, we turn our attention to deleting users. Deleting users will help demonstrate how to navigate programmatically after successful deletion. Now, we will define a global 404 page because we have dynamic routing for editing users.
If you are ready, please continue. The fifth part.