Crazy God video address
https://www.bilibili.com/video/BV1WE411d7Dv?p=3
1,Spring
1-1. Introduction to spring
Spring: Spring -------- -- > brings spring to the software industry!
In 2002, the prototype of Spring framework: interface21 framework was launched for the first time!
Spring framework is based on interface21 framework. After redesign and constantly enriching its connotation, it released the official version of 1.0 on March 24, 2004.
Rod Johnson, founder and famous author of Spring Framework. It's hard to imagine that rod Johnson's degree really surprised many people. He is a doctor at the University of Sydney. However, his major is not computer, but musicology.
Spring concept: make the existing technology easier to use. It is a hodgepodge and integrates the existing technology framework!
1-2. Advantages of spring
- Spring is an open source free framework (container)!
- Spring is a lightweight, non intrusive framework!
- Inversion of control (IOC), aspect oriented programming (AOP)!
- Support transaction processing and framework integration!
To sum up: Spring is a lightweight inversion of control (IOC) and aspect oriented programming (AOP) framework!
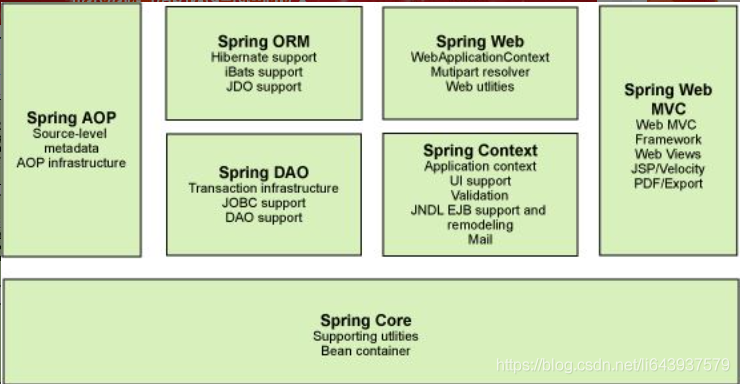
1-3.Spring composition
1-4.Spring expansion
Modern Java development! To put it bluntly, it is Spring based development!
Spring Boot
- A rapid development of scaffolding.
- Based on SpringBoot, you can quickly develop a single microservice.
- The contract is greater than the configuration.
Spring Cloud
- Spring cloud is implemented based on SpringBoot.
- Because most companies are now using SpringBoot for rapid development, the premise of learning SpringBoot is to fully master Spring and Spring MVC! The role of connecting the preceding and the following!
Disadvantages: after developing for too long, it violates the original concept! Configuration is very cumbersome, known as "configuration hell!"
2. IOC theoretical derivation
2-1.UserDao interface
public interface UserDao {

    void getUser();

}
2-2.UserDaoImpl implementation class
public class UserDaoImpl implements UserDao {

    public void getUser() {
        System.out.println("Get user data");
    }
}
2-3.UserService business interface
public interface UserService {

    void getUser();
}
2-4.UserServiceImpl business implementation class
public class UserServiceImpl implements UserService {

    UserDao userDao = new UserDaoImpl();

    public void getUser() {
      userDao.getUser();
    }
}
2-5. Test
public class Test {
    public static void main(String[] args) {

        UserService userService = new UserServiceImpl();
        userService.getUser();

    }
}
in our previous business, the user's needs may affect our original code. We need to modify the original code according to the user's needs! If the amount of program code is very large, the cost of modifying once is very expensive!

we use a Set interface to implement it, which has undergone revolutionary changes!
UserDao userDao;

public void setUserDao(UserDao userDao){
    this.userDao = userDao;
}
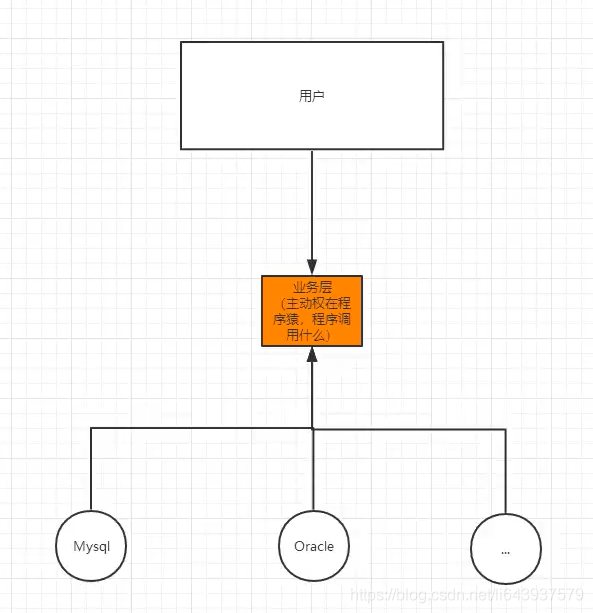
before, the program actively created objects! Control is in the hands of programmers!
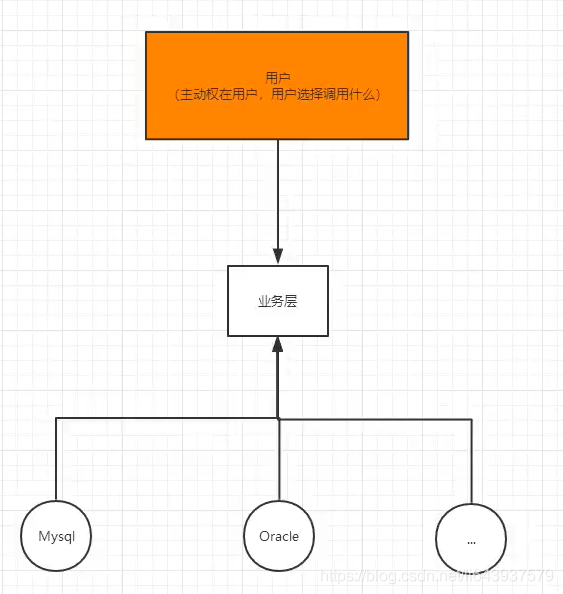
after using set injection, the program is no longer active, but becomes a passive acceptance object!
The control is reversed and the initiative is handed over to the user

this idea essentially solves the problem. Our programs don't have to manage the creation of objects. The coupling of the system is greatly reduced ~, and you can focus more on the implementation of business! This is the prototype of IOC!
3. IOC essence
Inversion of Control is a design idea. DI (dependency injection) is a method to realize IoC. Some people think that DI is just another way of saying IoC. In programs without IoC, we use object-oriented programming. The creation of objects and the dependencies between objects are completely hard coded. In programs, the creation of objects is controlled by the program itself. After the control is reversed, the creation of objects is transferred to a third party. Personally, I think the so-called control reversal is the reversal of the way to obtain dependent objects.
when configuring beans in XML, the definition information of beans is separated from the implementation, and the annotation method can integrate the two. The definition information of beans is directly defined in the implementation class in the form of annotation, so as to achieve the purpose of zero configuration.
inversion of control is a way to produce or obtain specific objects through description (XML or annotation) and through a third party. In Spring, the IoC container implements control inversion, and its implementation method is Dependency Injection (DI).
4. Getting started with Spring
4-1. Entity class
public class User {
    private String name;

    public String getName() {
        return name;
    }

    public void setName(String name) {
        this.name = name;
    }

    @Override
    public String toString() {
        return "User{" +
                "name='" + name + '\'' +
                '}';
    }
}
4-2. Configuration file
<?xml version="1.0" encoding="UTF-8"?>
<beans xmlns="http://www.springframework.org/schema/beans"
       xmlns:xsi="http://www.w3.org/2001/XMLSchema-instance"
       xsi:schemaLocation="http://www.springframework.org/schema/beans
        https://www.springframework.org/schema/beans/spring-beans.xsd">

    <!--use Spring To create an object, in Spring In, these are called bean
    Type variable name = new type();
    User user = new User();

        bean = object new User();
    id = Variable name
    class = new Object of;
    property It is equivalent to setting a value for the attribute in the object!

    -->
    <bean id="user" class="cn.bloghut.domain.User">
            <property name="name" value="csdn_balderdash"/>
    </bean>

</beans>
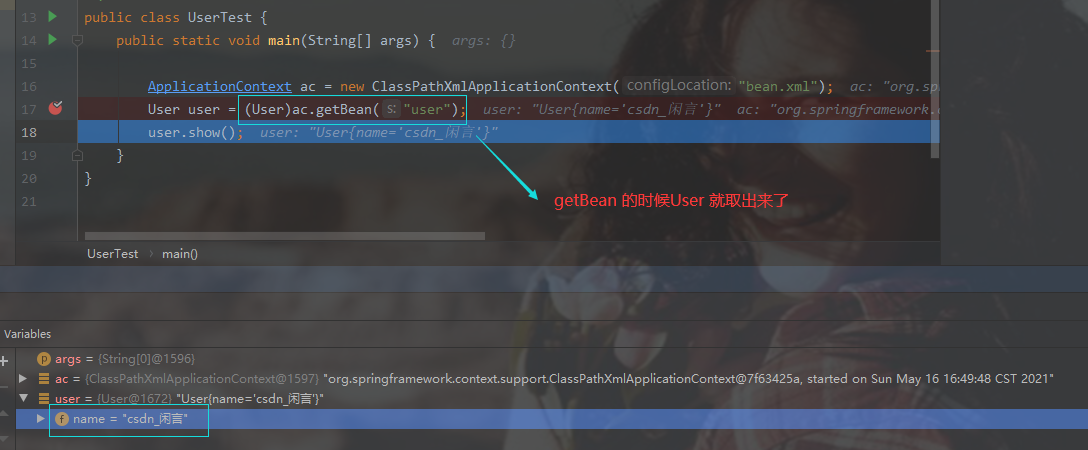
4-3. Test
public static void main(String[] args) {
    //Get the context object of Spring
    ApplicationContext ac = new ClassPathXmlApplicationContext("beans.xml");
    //Our objects are now managed in Spring. If we want to use them, just take them out directly
    User user = (User)ac.getBean("user");
    //Print
    System.out.println(user.toString());
}
4-4. Results
User{name='balderdash'}
4-5. Thinking?
Who created the Hello object?
the Hello object is created by Spring.
How are the properties of the Hello object set?
the properties of the Hello object are set by the Spring container.
This process is called control reversal:
control: who controls the creation of objects? The objects of traditional applications are created by the program itself. After using Spring, the objects are created by Spring.
inversion: the program itself does not create an object, but becomes a passive receiving object.
Dependency injection: it uses the set method to inject.
IOC is a programming idea, from active programming to passive reception.
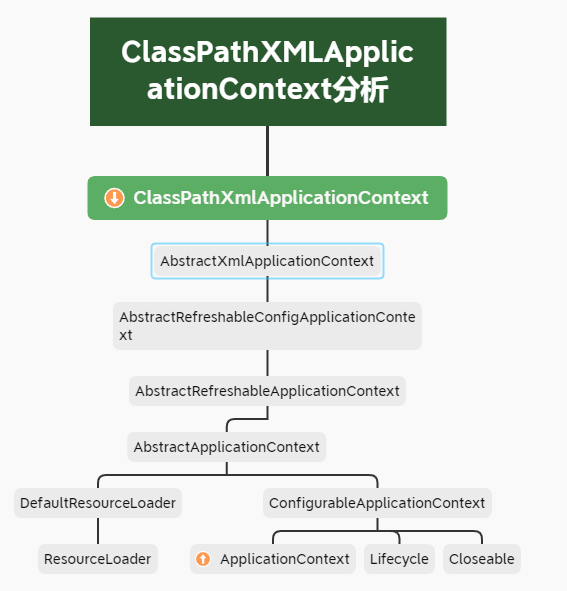
You can browse the underlying source code through the new ClassPathXmlApplicationContext.
Now, you don't have to change it in the program. To realize different operations, you only need to modify it in the xml configuration file. The so-called IOC is done in one sentence: objects are created, managed and assembled by Spring!
5. How IOC creates objects
5-1. Create an object using parameterless construction, default!
public User() {
    System.out.println("User The null parameter construction method is executed");
}

<!--injection user-->
<bean id="user" class="cn.bloghut.pojo.User">
    <property name="name" value="csdn_balderdash"/>
</bean>
5-2. Creating objects with parametric constructs
Subscript assignment
public User(String name) {
    this.name = name;
}

<bean id="user" class="cn.bloghut.pojo.User">
    <constructor-arg index="0" value="csdn_balderdash"/>
</bean>
5-3. Type
public User(String name) {
    this.name = name;
}
<!--Pass type-->
<bean id="user" class="cn.bloghut.pojo.User">
    <constructor-arg type="java.lang.String" value="csdn_balderdash"/>
</bean>

Parameter name
<!--Parameter name-->
<bean id="user" class="cn.bloghut.pojo.User">
    <constructor-arg name="name" value="csnd_balderdash"/>
</bean>
Summary: when the configuration file is loaded, the objects managed in the container have been initialized!
The Spring container is similar to the matchmaking website.
- The information is registered in it
- Take it when you want to see (get)
6. Spring configuration
6-1. Alias
<bean id="user" class="cn.bloghut.pojo.User">
    <constructor-arg name="name" value="csnd_balderdash"/>
</bean>
<alias name="user" alias="user2"/>

ApplicationContext ac = new ClassPathXmlApplicationContext("bean.xml");
User user = (User)ac.getBean("user2");
user.show();

Output: csnd_balderdash
6-2.Bean configuration
Aliases can be split in many ways

Space segmentation
 Comma Division
 Semicolon Division
<bean id="user" class="cn.bloghut.pojo.User" name="user2 u2,u3;u4">
    <property name="name" value="csdn_balderdash"/>
</bean>

//        User user = (User)ac.getBean("user");
//        User user = (User)ac.getBean("user2");
//        User user = (User)ac.getBean("u2");
//        User user = (User)ac.getBean("u3");
         User user = (User)ac.getBean("u4");
        user.show();

Output: csdn_balderdash
6-3.import
this import. It is generally used for team development. It can import and merge multiple configuration files into one.
suppose that there are multiple developers in the project, and these three people are responsible for different class development. Different classes need to be registered in different beans. We can use import to merge everyone's beans.xml into a general bean!
- Zhang San
- Li Si
- Wang Wu
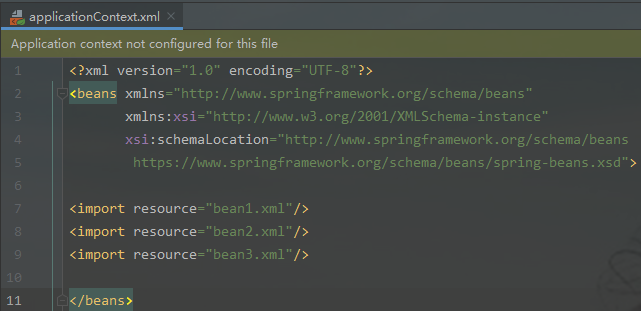
When using, just use the general configuration directly.
7. Dependency injection
7-1. Constructor injection
slightly
7-2.Set injection
Dependency: the creation of bean object depends on the container!
Injection: all attributes in the bean object are injected by the container!
Address class
public class Address {
    private String address;
        ellipsis setter
}
student class
public class Student {

    private String name;
    private Address address;
    private String[] books;
    private List<String> hobbies;
    private Map<String,String> card;
    private Set<String> games;
    private String wife;
    private Properties info;
    ellipsis setter
}
bean.xml
<?xml version="1.0" encoding="UTF-8"?>
<beans xmlns="http://www.springframework.org/schema/beans"
       xmlns:xsi="http://www.w3.org/2001/XMLSchema-instance"
       xsi:schemaLocation="http://www.springframework.org/schema/beans
        https://www.springframework.org/schema/beans/spring-beans.xsd">


    <bean id="address" class="cn.bloghut.domain.Address">
        <property name="address" value="csdn_balderdash"/>
    </bean>

    <bean id="student" class="cn.bloghut.domain.Student">
        <!--injection address type-->
        <property name="address" ref="address"/>
        <!--String type-->
        <property name="name" value="csdn_balderdash"/>
        <!--String type-->
        <property name="books">
            <array>
                <value>JavaSE</value>
                <value>JavaWeb</value>
                <value>Spring</value>
                <value>SpringMVC</value>
                <value>Mybatis</value>
            </array>
        </property>
        <!--List-->
        <property name="hobbies">
            <list>
                <value>sing</value>
                <value>jump</value>
                <value>rap</value>
                <value>Basketball</value>
            </list>
        </property>
        <!--Map-->
        <property name="card">
            <map>
                <entry key="balderdash" value="csdn-balderdash"></entry>
                <entry key="Gossip blog" value="csdn-Gossip - blog"></entry>
            </map>
        </property>
        <!--set-->
        <property name="games">
            <set>
                <value>sing</value>
                <value>jump</value>
                <value>rap</value>
                <value>Basketball</value>
            </set>
        </property>
        <!--String-->
        <property name="wife" value="xxx"></property>
        <!--Properties-->
        <property name="info">
            <props>
                <prop key="p1">v1</prop>
                <prop key="p2">v2</prop>
                <prop key="p3">v3</prop>
            </props>
        </property>
    </bean>

</beans>
test
public static void main(String[] args) {
    ApplicationContext ac = new ClassPathXmlApplicationContext("bean.xml");
    Student student = (Student)ac.getBean("student");
    System.out.println(student);
}
output
Student{
name='csdn_balderdash',
address=Address{address='csdn_balderdash'},
books=[JavaSE, JavaWeb, Spring, SpringMVC, Mybatis],
hobbies=[sing, jump, rap, Basketball],
card={balderdash=csdn-balderdash, Gossip blog=csdn-Gossip - blog},
games=[sing, jump, rap, Basketball],
wife='xxx',
info={p3=v3, p2=v2, p1=v1}
}
- p namespace corresponds to setter injection (set method should be provided)
- c command space corresponding construction method (parameter construction method shall be provided)
<?xml version="1.0" encoding="UTF-8"?>
<beans xmlns="http://www.springframework.org/schema/beans"
       xmlns:xsi="http://www.w3.org/2001/XMLSchema-instance"
       xmlns:p="http://www.springframework.org/schema/p"
       xmlns:c="http://www.springframework.org/schema/c"
       xsi:schemaLocation="http://www.springframework.org/schema/beans
        https://www.springframework.org/schema/beans/spring-beans.xsd">


</beans>
bean.xml
<?xml version="1.0" encoding="UTF-8"?>
<beans xmlns="http://www.springframework.org/schema/beans"
       xmlns:xsi="http://www.w3.org/2001/XMLSchema-instance"
       xmlns:p="http://www.springframework.org/schema/p"
       xmlns:c="http://www.springframework.org/schema/c"
       xsi:schemaLocation="http://www.springframework.org/schema/beans
        https://www.springframework.org/schema/beans/spring-beans.xsd">


    <bean id="user" class="cn.bloghut.domain.User" p:name="balderdash" p:age="18"/>
    <bean id="user2" class="cn.bloghut.domain.User" c:name="csdn-balderdash" c:age="19" />

</beans>
pojp
public class User {
    private String name;
    private int age;

    public User() {
    }

    public User(String name, int age) {
        this.name = name;
        this.age = age;
    }
    ellipsis setter
}
test
ApplicationContext ac = new ClassPathXmlApplicationContext("userbeans.xml");
User user = (User)ac.getBean("user");
User user2 = (User)ac.getBean("user2");
System.out.println(user);
System.out.println(user2);
output
User{name='balderdash', age=18}
User{name='csdn-balderdash', age=19}
9. Scope of the bean
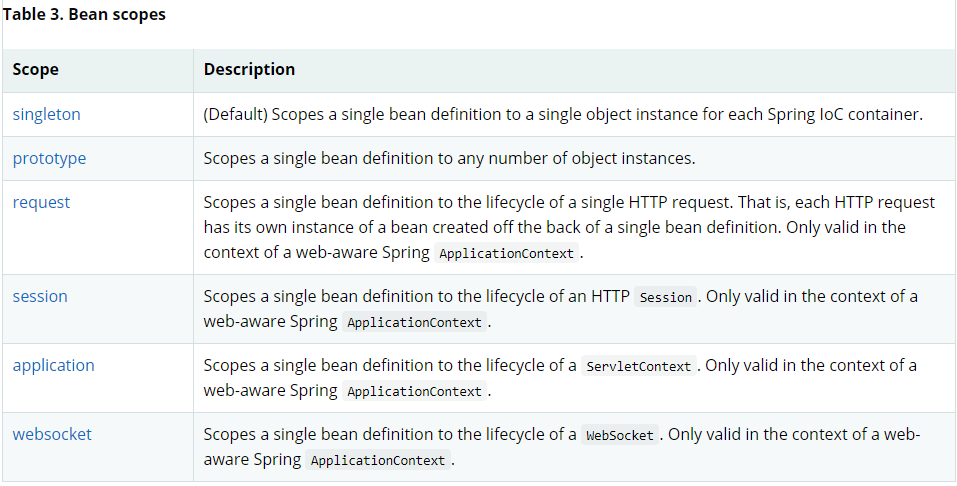
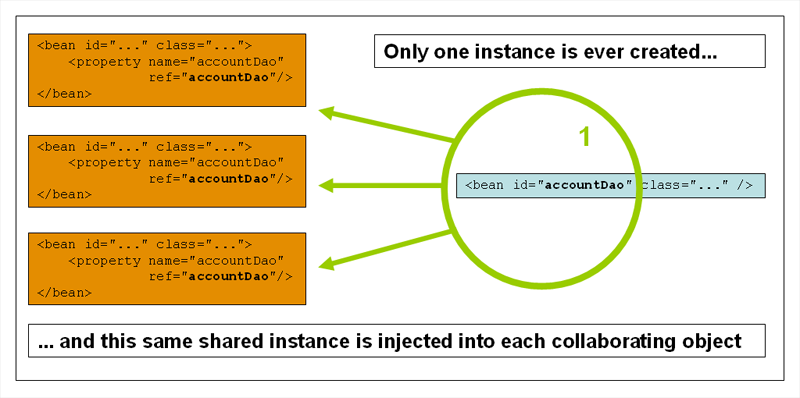
9-1. Singleton mode (Spring default mechanism)
scope="singleton"
<bean  scope="singleton" id="user2" class="cn.bloghut.domain.User" c:name="csdn-balderdash" c:age="19" />

User user2 = (User)ac.getBean("user2");
User user3 = (User)ac.getBean("user2");
System.out.println(user2.hashCode());
System.out.println(user3.hashCode());
output
817406040
817406040
9-2. Prototype mode: every time you get from the container, a new object will be generated
<bean scope="prototype" id="user" class="cn.bloghut.domain.User" p:name="balderdash" p:age="18"/>

ApplicationContext ac = new ClassPathXmlApplicationContext("userbeans.xml");
    for (int i = 0;i< 5;i++){
       System.out.println(ac.getBean("user").hashCode());
}
output
817406040
1955915048
1270855946
2083117811
157683534
Single thread - single instance
Multithreading - multiple instances
10. Automatic assembly of bean
Automatic assembly is a way for Spring to meet bean dependencies!
Spring will automatically find in the context and automatically assemble properties for the bean!
There are three ways to assemble in Spring
- Configuration displayed in xml
- Display configuration in java
- Implicit automatic assembly bean [important]
ByName method auto assemble
- autowire="byName"
- It will automatically find the bean id corresponding to the value behind the set method of its own object in the container context!
- Disadvantages: the value after the set method is the same as the id
bean.xml
<bean id="cat" class="cn.bloghut.domin.Cat"/>
<bean id="dog" class="cn.bloghut.domin.Dog"/>

<!--
    byName: It will automatically find its own objects in the container context set Method bean id!

-->
<bean id="people" class="cn.bloghut.domin.People" autowire="byName">
    <property name="name" value="csdn_balderdash"/>
</bean>
test
public static void main(String[] args) {
ApplicationContext ac = new ClassPathXmlApplicationContext("bean.xml");
People people = ac.getBean("people", People.class);
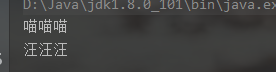
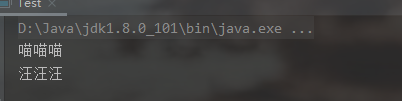
people.getCat().shout();
people.getDog().shout();
}
ByName method auto assemble
- autowire="byType"
- It will automatically find bean s with the same object property type in the container context
- Disadvantage: it must ensure that the type is globally unique (only one in the IOC container).
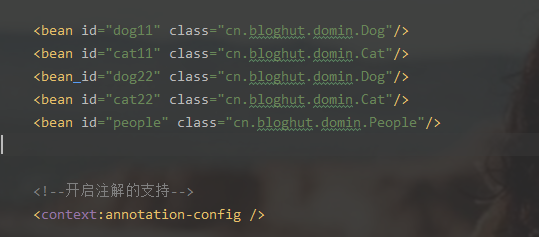
<bean id="cat" class="cn.bloghut.domin.Cat"/>
<bean id="dog11" class="cn.bloghut.domin.Dog"/>
   <!--
    byType: It will automatically find the object with the same property type as its own object in the container context bean

-->
  <bean id="people" class="cn.bloghut.domin.People" autowire="byType">
      <property name="name" value="csdn_balderdash"/>
  </bean>
test
public static void main(String[] args) {

    ApplicationContext ac = new ClassPathXmlApplicationContext("bean.xml");
    People people = ac.getBean("people", People.class);

    people.getCat().shout();
    people.getDog().shout();

}
Summary:
When byName, it is necessary to ensure that the IDs of all beans are unique, and the bean needs to be consistent with the value of the set method of the automatically injected attribute
When byType, you need to ensure that the class of all beans is unique, and the bean needs to be consistent with the type of the automatically injected attribute
11. Annotation for automatic assembly
-
Annotations supported by jdk1.5 annotations supported by spring 2.5
-
The introduction of annotation-based configuration raised the question of whether this approach is "better" than XML
-
@Autowired
-
@Quelifier
-
@Resource
xml Header file constraints
<?xml version="1.0" encoding="UTF-8"?>
<beans xmlns="http://www.springframework.org/schema/beans"
      xmlns:xsi="http://www.w3.org/2001/XMLSchema-instance"
      xmlns:context="http://www.springframework.org/schema/context"
      xmlns:aop="http://www.springframework.org/schema/aop"
      xsi:schemaLocation="http://www.springframework.org/schema/beans
       https://www.springframework.org/schema/beans/spring-beans.xsd
       http://www.springframework.org/schema/context
       https://www.springframework.org/schema/context/spring-context.xsd
       http://www.springframework.org/schema/aop
       https://www.springframework.org/schema/aop/spring-aop.xsd">

   <!--Enable annotation support-->
   <context:annotation-config/>
</beans>
11-1.@Autowired
- Use on properties
- Use in set mode
- Using Autowired, you don't need to write the set method. The premise is that your auto assembled attribute exists in the IOC (Spring) container (it needs to be injected into the container through other ways) and conforms to the name byName.
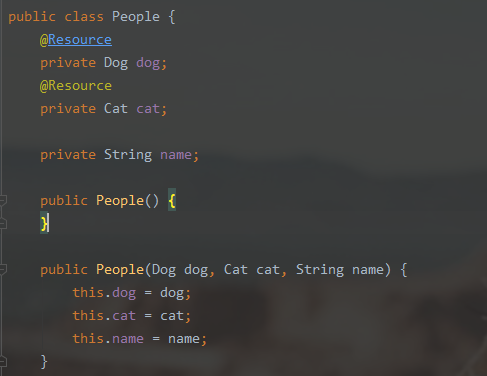
public class People {
    @Autowired
    private Dog dog;

    @Autowired
    private Cat cat;
    private String name;

    public People() {
    }

    public People(Dog dog, Cat cat, String name) {
        this.dog = dog;
        this.cat = cat;
        this.name = name;
    }
    ellipsis setter
}
Autowired has a unique attribute (required)
@Target({ElementType.CONSTRUCTOR, ElementType.METHOD, ElementType.PARAMETER, ElementType.FIELD, ElementType.ANNOTATION_TYPE})
@Retention(RetentionPolicy.RUNTIME)
@Documented
public @interface Autowired {
    boolean required() default true;
}
@Nullable
The field is marked with this annotation, indicating that the field can be null
@Qualifier
- When there are multiple bean s of the same type and different names in our container. Auto assembly cannot be completed using @ Autowired
- At this time, you need to use @ Qualifier and @ Autowired annotations together.
- Use @ Qualifier to specify a unique bean object injection!
for example
There are multiple bean s with the same type and different IDS in the IOC container
Specify a unique bean through @ Qualifier

test

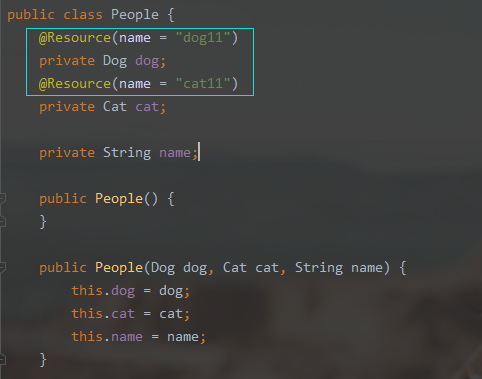
11-2.@Resource
do not specify the name value. First judge byName and byType. If one can be injected, it will succeed
Find by type
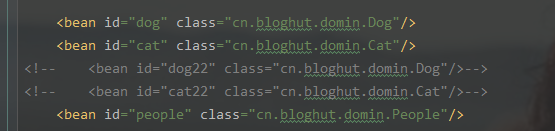
11-3. Search by type and id
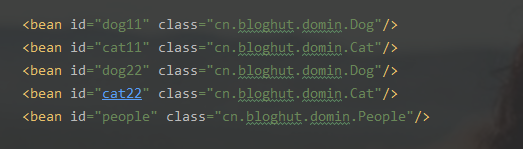
If there are multiple bean s with different names and the same type in the IOC container, you can specify a unique id through the name attribute of the @ Resource annotation;

Summary:
- They are used for automatic assembly and can be placed on the * attribute field *
- @Autowired is implemented by byType, and this object must exist!
- @Resource is implemented by byName (id) by default. If the name cannot be found, it is implemented by byType! If both cannot be found, an error will be reported!
- Different execution order: @ Autowired is implemented by byType@ Resource is implemented by byName by default.
12. Using annotation development
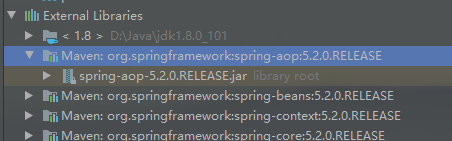
After spring 4, to develop with annotations, you must ensure that the aop package is imported
To use annotations, you need to import context constraints and add annotation support!
<?xml version="1.0" encoding="UTF-8"?>
<beans xmlns="http://www.springframework.org/schema/beans"
       xmlns:xsi="http://www.w3.org/2001/XMLSchema-instance"
       xmlns:context="http://www.springframework.org/schema/context"
       xmlns:aop="http://www.springframework.org/schema/aop"
       xsi:schemaLocation="http://www.springframework.org/schema/beans
        https://www.springframework.org/schema/beans/spring-beans.xsd
        http://www.springframework.org/schema/context
        https://www.springframework.org/schema/context/spring-context.xsd
        http://www.springframework.org/schema/aop
        https://www.springframework.org/schema/aop/spring-aop.xsd">
    <!--Enable annotation scanning-->
    <context:component-scan base-package="cn.bloghut"/>

    <!--Enable annotation support-->
    <context:annotation-config/>

</beans>
bean injection uses @ Componet annotation
Equivalent to < bean id = "user" class = "CN. Blogout. Domain. User" >
@Component
public class User {

}
Attribute injection uses @ Value annotation
<property name="name" value="balderdash">
@Component
public class User {

    private String name;

    @Value("balderdash")
    public void  setName(String name){
        this.name = name;
    }
}
Derived annotation
- @Componet has several derived annotations. In web development, it will be layered according to the mvc three-tier architecture!
- @Service ------- business layer annotation
- @Repository - persistent layer annotation
- @Controller ---- control layer annotation
The four annotation functions are the same. They all represent registering a class in Spring and assembling beans
automatic assembly
- @Autowired auto assembly type and name
If Autowired cannot uniquely auto assemble attributes, you need to pass @ Qualifier(value = "xxx") - @The Nullable field marks this annotation, indicating that this field can be null
- @Resource is automatically assembled by name and type
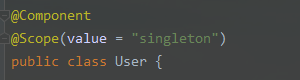
Scope
@Scope("singleton")Single case
summary
XML and annotations
- xml is more versatile and suitable for any occasion! Simple and convenient maintenance
- Annotations are not their own classes and cannot be used. Maintenance is relatively complex
XML and annotation best practices
- xml is used to manage bean s
- Annotations are only responsible for completing attribute injection
- In the process of using, we only need to pay attention to one problem: to make the annotation effective, we need to turn on the annotation support
<!--Enable annotation scanning-->
<context:component-scan base-package="cn.bloghut"/>

<!--Enable annotation support-->
<context:annotation-config/>
13. Configuring Spring in java
JavaConfig is a subproject of Spring. It has become a new feature after Spring 4
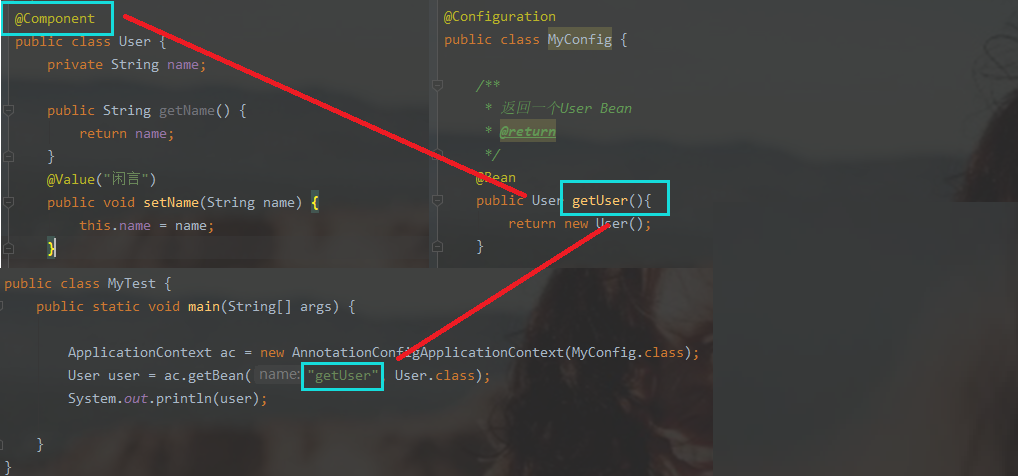
- First, define a class, add the @ Component annotation on the class, and let it load into the Spring IOC container (managed by Spring)
- Define a Java Configuration class and add @ Configuration annotation on the class to indicate that the class is a Configuration class. This class will also be managed by Spring because it is a @ Component
- Add the getUser method in the Myconfig class to return a user object
- The @ bean annotation on the getUser method registers a bean function, which is equivalent to
<bean id="getUser" class="cn.bloghut.domain.User">
- The name of the method, which is equivalent to the id attribute in the bean tag.
- Method, which is equivalent to the class attribute in the bean tag. (because we have guided the package, Spring knows which one)
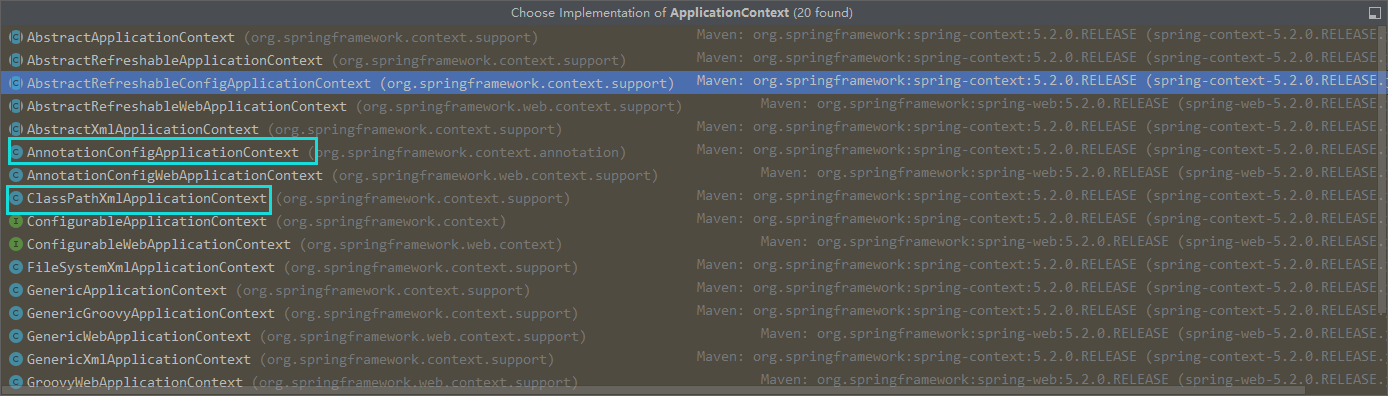
- If the configuration class method is completely used, we can only obtain the container through the AnnotationConfigApplicationContext context and load it through the class object of the configuration class!
Complete code
- @Configuration is a configuration class
- @ComponentScan is used to scan packages
- @Import is used to import other configuration classes
13-1. Main configuration class
@Configuration
@ComponentScan(basePackages = {"cn.bloghut.domain"})
@Import({MyConfig2.class})
public class MyConfig {

    /**
     * Returns a User Bean
     * @return
     */
    @Bean
    public User getUser(){
        return new User();
    }

}
13-2. Configuration class 2
@Configuration
public class MyConfig2 {


}
13-3.User entity class
@Component
public class User {
    private String name;

    public String getName() {
        return name;
    }
    @Value("balderdash")
    public void setName(String name) {
        this.name = name;
    }

    @Override
    public String toString() {
        return "User{" +
                "name='" + name + '\'' +
                '}';
    }
}
13-4. Testing
public class MyTest {
    public static void main(String[] args) {

        ApplicationContext ac = new AnnotationConfigApplicationContext(MyConfig.class);
        User user = ac.getBean("getUser", User.class);
        System.out.println(user);

    }
}
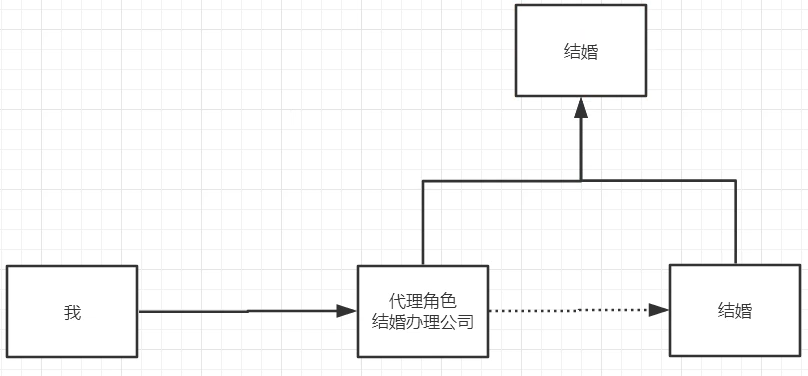
14. Agent mode
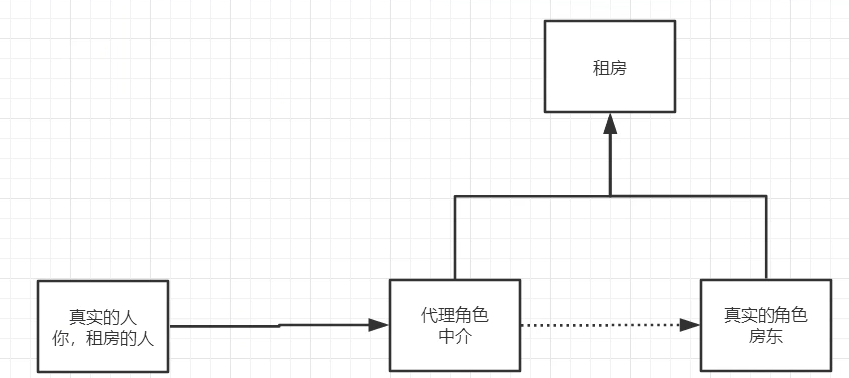
14-1. Role analysis:
- Abstract role: it is usually solved by using interfaces or abstract classes
- Real role: the role represented
- Agent role: represent the real role. After representing the real role, we usually do some ancillary operations
- Client: the person who accesses the proxy object
Code steps:
14-2. Interface
public interface Rent {
    /**
     * Rent a house
     */
    void rent();
}
14-3. Real role
public class Host implements Rent{

    @Override
    public void rent() {
        System.out.println("The landlord wants to rent the house");
    }


}
14-4. Agent role
public class Proxy implements Rent{

    private Host host;

    public Proxy() {
    }

    public Proxy(Host host) {
        this.host = host;
    }

    @Override
    public void rent() {
        seeHouse();
        host.rent();
        fare();
        hetong();
    }
    //House viewing
    public void seeHouse(){
        System.out.println("The agent will show you the house");
    }

    //Intermediary fee
    public void fare(){
        System.out.println("Intermediary fee");
    }
    //sign a contract
    public void hetong(){
        System.out.println("sign a contract");
    }
}
14-5. Client access agent role
public class Client {
    public static void main(String[] args) {

        Host host = new Host();
        //Agents and intermediaries help the landlord, but what? Agent roles usually have some ancillary operations!
        Proxy proxy = new Proxy(host);
        //You don't have to face the landlord, just find an intermediary to rent a house!
        proxy.rent();
    }
}
14-6. Benefits of agent model:
- It can make the operation of real characters more concise! Don't pay attention to some public business
2. The public is handed over to the agent role to realize the division of business - When the public business is expanded, it is convenient for centralized management
14-7. Disadvantages:
- A real role will produce a proxy role, the amount of code will double, and the development efficiency will be low
15. Static proxy
- One day, the company leader asked me to add a log output function for all methods of a class.
- How?
- Add log output to each method on the original class?
- This is to change the original code.
- Changing the original business code is a big taboo in the company!
- It is possible that you have modified someone else's code, which may have been changed.
- A new class is added, which has low production cost and single responsibility.
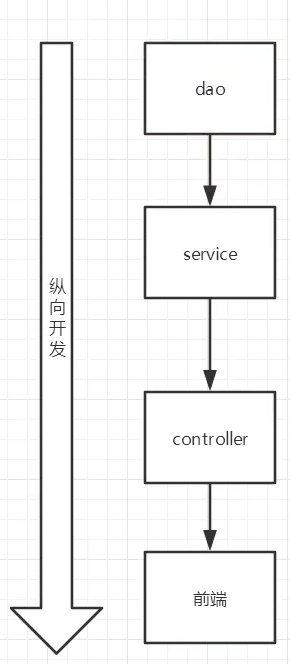
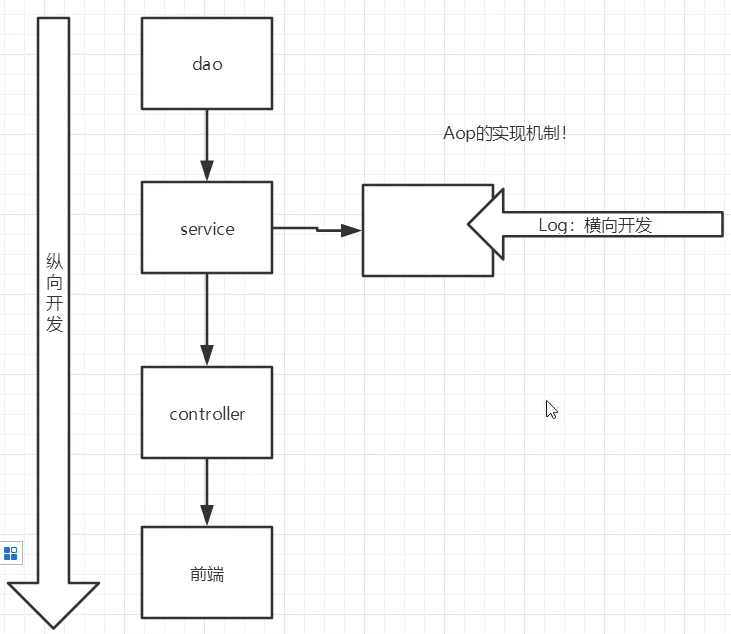
Original development mode (vertical development)
Add log function (cross cut in)
The code is as follows:
Business interface:
public interface UserService {
    void add();

    void delete();

    void update();

    void query();
}
Original business class
public class UserServiceImpl implements UserService {
    @Override
    public void add() {
        System.out.println("New user");
    }

    @Override
    public void delete() {
        System.out.println("delete user");
    }

    @Override
    public void update() {
        System.out.println("Modify user");
    }

    @Override
    public void query() {
        System.out.println("Query user");
    }
}
proxy class
public class UserServiceProxy implements UserService {

    private UserService userService;

    public void setUserService(UserService userService) {
        this.userService = userService;
    }

    @Override
    public void add() {
        log("add");
        userService.add();
    }

    @Override
    public void delete() {
        log("delete");
        userService.delete();
    }

    @Override
    public void update() {
        log("update");
        userService.update();
    }

    @Override
    public void query() {
        System.out.println("query");
        userService.query();
    }

    //Log method
    public void log(String msg){
        System.out.println("[Debug ]Used"+msg+"method");
    }
}
Test class
public static void main(String[] args) {

    UserServiceProxy userService = new UserServiceProxy();
    userService.setUserService(new UserServiceImpl());
    userService.add();
}
16. Dynamic agent
- Dynamic agents have the same role as static agents
- The proxy class of dynamic proxy is generated dynamically, which is not written directly
Dynamic agents are divided into two categories: interface based dynamic agents and class based dynamic agents - Interface based: JDK dynamic agent
- Class based: cglib
- java bytecode implementation: javasist
Two classes need to be understood: Proxy: Proxy InvocationHandler: call handler
java.lang.reflect.Proxy
Proxy provides static methods for creating dynamic Proxy classes and instances. It is also a superclass of all dynamic Proxy classes created by these methods. (colloquialism: This is a static class, in which there are methods to get the Proxy class)
dynamic proxy class (hereinafter referred to as proxy class) is a class that implements the interface list specified at run time when the class is created, and has the following behaviors. A proxy interface is an interface implemented by a proxy class. A proxy instance is an instance of a proxy class. Each proxy instance has an associated call handler object that implements the interface
the method call on the proxy instance through one of its proxy interfaces will be dispatched to the invoke method of the instance call handler, passing the proxy instance, java.lang.reflect.Method, java.lang.reflect.Method object of the called method, and array of type object containing parameters. The call handler handles the encoded method call appropriately, and the returned result will be returned as the result of the method call on the proxy instance.
The proxy class has the following properties:
- Proxy classes are public, final, not abstract, if all proxy interfaces are public.
- If any proxy interface is non-public, the proxy class is non-public, final, not abstract.
- The unqualified name of the Proxy class was not specified. However, class name spaces starting with the string "$Proxy" should be reserved for Proxy classes.
- A proxy class extends java.lang.reflect.Proxy.
- The proxy class implements the interfaces specified when it was created in exactly the same order.
- If a proxy class implements a non-public interface, it will be defined in the same package as the interface. Otherwise, the package of the proxy class is also unspecified. Note that package sealing does not prevent the proxy class from being successfully defined in a specific package at run time, and the class is not defined by the same class loader and has the same package as a specific signer.
- Because the proxy class implements all the interfaces specified when it is created, getInterfaces calls getInterfaces on its class object to return an array containing the same list interfaces (in the order specified when it is created), and calls getMethods on its class object to return an array of method objects, including all the methods in these interfaces, And call getMethod to find the expected method in the proxy interface.
- The Proxy.isProxyClass method will return true if it passes through the proxy class - the class returned by Proxy.getProxyClass or the class of the object returned by Proxy.newProxyInstance - otherwise false.
- The java.security.ProtectionDomain proxy class is the same. The boot class loader loads the system class, such as java.lang.Object, because the code of the proxy class is generated from the trusted system code. This protection domain will normally be granted java.security.AllPermission.
- Each proxy class has a public constructor and a parameter. The implementation of the interface InvocationHandler sets the proxy instance of the calling handler. Instead of using the reflection API to access the public constructor, you can also create a proxy instance by calling the Proxy.newProxyInstance method, which calls the constructor together with the calling handler.
17. Implementation of dynamic Proxy based on Proxy class and InvocationHandler
17-1. Real role
public class Host implements Rent{


    public void rent() {
        System.out.println("Rent a house");
    }
}
17-2. Proxy interface
public interface Rent {

    void rent();

}
17-3. Proxy real role ProxyInvocationHandler
public class ProxyInvocationHandler implements InvocationHandler {

    //Proxy interface
    private Rent rent;


    public void setRent(Rent rent){
        this.rent = rent;
    }
    //Generated proxy class
    public Object getProxy(){
        return  Proxy.newProxyInstance(this.getClass().getClassLoader(),rent.getClass().getInterfaces(),this);
    }
    /**
     * Process the proxy instance and return the result
     * @param proxy
     * @param method
     * @param args
     * @return
     * @throws Throwable
     */
    public Object invoke(Object proxy, Method method, Object[] args) throws Throwable {
        //The essence of dynamic proxy is to use reflection mechanism
        //Call before method invocation
        seeHouse();
        Object result = method.invoke(rent,args);
        //Call after method invocation
        heTong();
        return result;
    }
    public void seeHouse(){
        System.out.println("Look at the house");
    }
    public void heTong(){
        System.out.println("sign a contract");
    }
}
17-4. Users
public class Client {
    public static void main(String[] args) {
        //Create real characters
        Host host = new Host();
        //The create proxy role does not exist
        ProxyInvocationHandler proxyInvocationHandler = new ProxyInvocationHandler();
        //Sets the object to proxy
        proxyInvocationHandler.setRent(host);
        //Gets the proxy object and casts it
        Rent proxy = (Rent)proxyInvocationHandler.getProxy();
        //call
        proxy.rent();
    }
}
17-5. Output results
Look at the house
 Rent a house
 sign a contract
18. Implementation of dynamic Proxy based on Proxy class and InvocationHandler 2
Proxy: to generate a dynamic proxy instance
InvocationHandler: the handler called and the result returned
Universal automatic generation proxy class
package cn.bloghut.demo3;

import java.lang.reflect.InvocationHandler;
import java.lang.reflect.Method;
import java.lang.reflect.Proxy;

/**
 * @Classname ProxyInvocationHandler
 * @Description Automatically generate proxy classes
 * @Date 2021/5/17 15:44
 * @Created by balderdash
 */
public class ProxyInvocationHandler implements InvocationHandler {

    //1. Proxy interface
    public Object target;

    public void  setTarget(Object target){
        this.target = target;
    }

    //2. Generate the proxy class (who is the proxy)
    public Object getProxy(){
        return Proxy.newProxyInstance(this.getClass().getClassLoader(),
                target.getClass().getInterfaces(),this);
    }

    //3. Process the agent instance and return the result (substitute agent)
    public Object invoke(Object proxy, Method method, Object[] args) throws Throwable {
        //Get method name dynamically
        log(method.getName());
        Object result = method.invoke(target, args);
        return result;
    }
    /**
     * Print log method
     * @param msg
     */
    public void log(String msg){
        System.out.println("[debug]===> Executable"+msg+"method");
    }
}
public static void main(String[] args) {

    //Real role
    UserServiceImpl userService = new UserServiceImpl();
    //Proxy role, does not exist
    ProxyInvocationHandler invocationHandler = new ProxyInvocationHandler();
    //Sets the object to proxy
    invocationHandler.setTarget(userService);
    //Get proxy object
    UserService proxy = (UserService)invocationHandler.getProxy();
    //Execution method
    proxy.query();
}
[debug]===> Executable query method
query
19. Summary of dynamic and static agents
19-1. Static proxy
- The source code is created by the programmer or automatically generated by a specific tool, and then compiled. Before the program runs, the. Class file of the agent class already exists
- Static proxies usually represent only one class
- The static agent knows in advance what is to be represented
The code is as follows:
- As follows, the HelloServiceProxy class is a proxy class and the HelloServiceImpl class is a delegate class. Both classes implement the HelloService interface.
- HelloServiceImpl class is the real implementer of HelloService interface, and HelloServiceProxy class provides specific services by calling the relevant methods of HelloServiceImpl class.
- The echo() method and getTime() method of the HelloServiceProxy class will call the echo() method and getTime() method of the represented HelloServiceImpl object respectively, and perform some simple printing operations before and after the method call.
- It can be seen that the agent class can preprocess messages for the delegate class, forward messages to the delegate class, and post process messages.
HelloService interface
public interface HelloService {
    String echo(String msg);

    Date getTime();
}

HelloServiceImpl Delegate class
public class HelloServiceImpl implements HelloService {
    @Override
    public String echo(String msg) {
        return "echo:" + msg;
    }

    @Override
    public Date getTime() {
        return new Date();
    }
}
HelloServiceProxy proxy class
public class HelloServiceProxy implements HelloService {

    //Represents the HelloService instance being proxied
    private HelloService helloService;

    public HelloServiceProxy(HelloService helloService) {
        this.helloService = helloService;
    }

    public void setHelloServiceProxy(HelloService helloService) {
        this.helloService = helloService;
    }

    @Override
    public String echo(String msg) {
        //Pretreatment
        System.out.println("before calling echo()");
        //Call the echo() method of the proxy HelloService instance
        String result = helloService.echo(msg);
        //Post treatment
        System.out.println("after calling echo()");
        return result;
    }


    public Date getTime() {
        //Pretreatment
        System.out.println("before calling getTime()");
        //Call the getTime() method of the proxy HelloService instance
        Date date = helloService.getTime();
        //Post treatment
        System.out.println("after calling getTime()");
        return date;
    }
}
test
public class Test {
    public static void main(String[] args) {
        //Create delegate class
        HelloServiceImpl helloService = new HelloServiceImpl();
        //Create proxy class
        HelloServiceProxy helloServiceProxy = new HelloServiceProxy(helloService);
        //Call method
        Date time = helloServiceProxy.getTime();
        System.out.println(time);
    }
}
19-2. Dynamic agent
- When the program is running, it is dynamically created by using the reflection mechanism
- A dynamic proxy is a proxy that represents multiple implementation classes under one interface
- Dynamic agents don't know what to proxy, only at run time
compared with the static Proxy class, the dynamic Proxy class. The bytecode of the dynamic Proxy class is dynamically generated by the Java reflection mechanism when the program is running, without the need for programmers to manually write its source code. Dynamic Proxy class not only simplifies programming, but also improves the scalability of software system, because Java reflection mechanism can generate any type of dynamic Proxy class. The Proxy class and InvocationHandler interface in the java.lang.reflect package provide the ability to generate dynamic Proxy classes.
the Proxy class provides static methods for creating dynamic Proxy classes and their instances.
The code is as follows:
public static void main(String[] args) {

    //Real role
    HelloServiceImpl helloService = new HelloServiceImpl();
    //The proxy role does not exist
    ProxyInvocationHandler proxyInvocationHandler = new ProxyInvocationHandler();
    proxyInvocationHandler.setTarget(helloService);
    HelloService proxy = (HelloService)proxyInvocationHandler.getProxy();
    //Execution method
    String echo = proxy.echo("Proxy InvocationHandler Implement dynamic proxy");
    System.out.println(echo);
}
output
Call before proxy method execution
 After the proxy method is executed, it is called.
echo:Proxy InvocationHandler Implement dynamic proxy
public class ProxyInvocationHandler implements InvocationHandler {

    //Class to proxy
    private Object target;

    public void setTarget(Object target){
        this.target = target;
    }

    //Gets the instance to proxy
    public Object getProxy(){
        return Proxy.newProxyInstance(this.getClass().getClassLoader(),target.getClass().getInterfaces(),this);
    }

    //Method of executing agent
    @Override
    public Object invoke(Object proxy, Method method, Object[] args) throws Throwable {
        System.out.println("Call before proxy method execution");
        //Execution method
        Object result = method.invoke(target, args);
        System.out.println("After the proxy method is executed, it is called.");

        return result;
    }
}
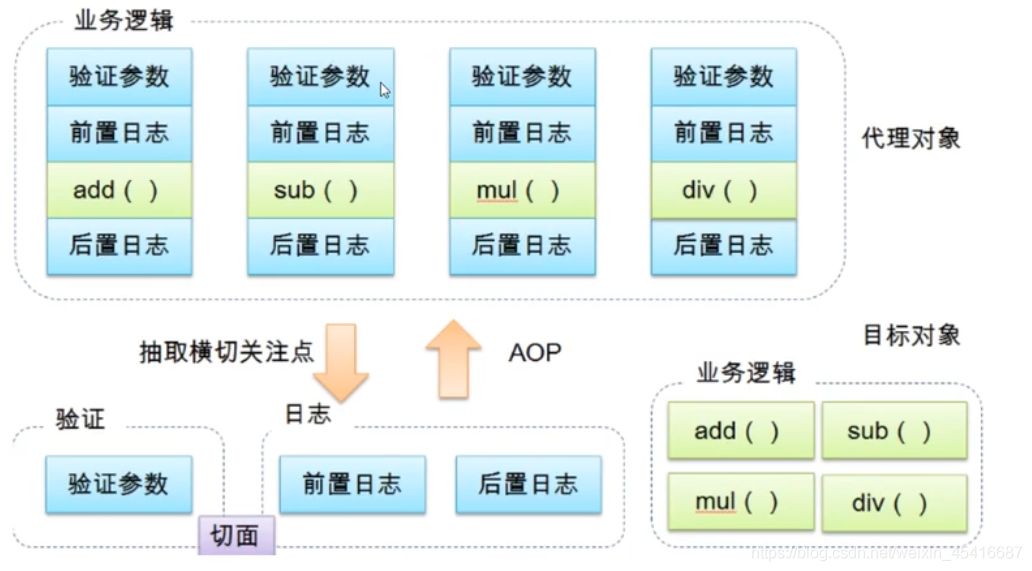
20. What is Aop
AOP (Aspect Oriented Programming) means: Aspect Oriented Programming, a technology that realizes the unified maintenance of program functions through precompiling and runtime dynamic agents. AOP is the continuation of OOP, a hot spot in software development, an important content in the Spring framework, and a derived generic type of functional programming. AOP can isolate each part of business logic, reduce the coupling between each part of business logic, improve the reusability of program, and improve the efficiency of development.
20-1. The role of AOP in Spring
Provide declarative transactions: allows users to customize aspects
- Crosscutting concerns: methods or functions that span multiple modules of an application. That is, the part that has nothing to do with our business logic, but we need to focus on is crosscutting concerns. Such as logging, security, caching, transactions, etc...
- ASPECT: a special object whose crosscutting concerns are modularized. That is, it is a class
- Advice: the work that must be done in the aspect, that is, it is a method in the class
- target: the notified object
- Proxy: an object created after notification is applied to the target object
- PointCut: the definition of the "place" where the aspect notification is executed
- Join point: the execution point that matches the pointcut
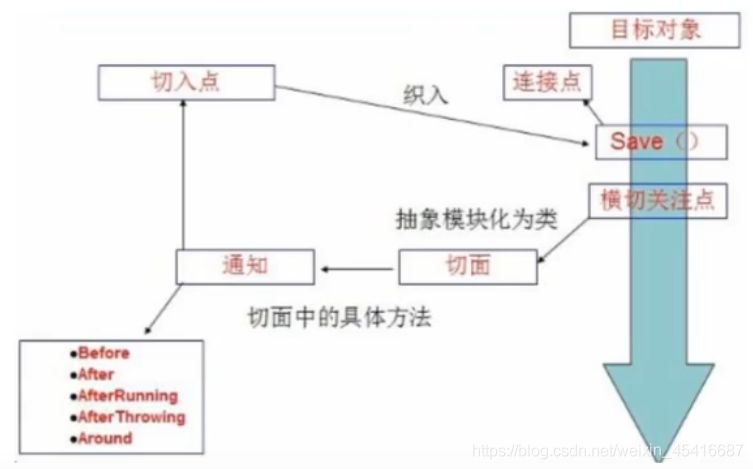
In Spring Aop, crosscutting logic is defined through Advice. There are five types of Advice supported in Spring

21. Aop implementation mode 1 - based on native API
21-1. Import dependency
<dependency>
    <groupId>org.aspectj</groupId>
    <artifactId>aspectjweaver</artifactId>
    <version>1.9.4</version>
</dependency>
21-2. Add logging function before executing all methods of UserService implementation class
public class Log implements MethodBeforeAdvice {

    /**
     *
     * @param method Target object method to execute
     * @param args parameter
     * @param target       Target object
     * @throws Throwable
     */
    public void before(Method method, Object[] args, Object target) throws Throwable {
        System.out.println(target.getClass().getName()+" of "+method.getName()+"Method is executed");
    }

}
21-3. Add logging function after executing all methods of UserService implementation class
public class AfterLog implements AfterReturningAdvice {

    /**
     *
     * @param returnValue Return value
     * @param method
     * @param args
     * @param target
     * @throws Throwable
     */
    public void afterReturning(Object returnValue, Method method, Object[] args, Object target) throws Throwable {
        System.out.println("Yes"+method.getName()+"Method, the return result is"+returnValue);
    }
}
21-4.UserService interface
public interface UserService {
    void add();

    void delete();

    void update();

    void select();
}
21-5.UserServiceImpl interface
public class UserServiceImpl implements UserService {
    public void add() {
        System.out.println("add");
    }

    public void delete() {
        System.out.println("delete");
    }

    public void update() {
        System.out.println("update");
    }

    public void select() {
        System.out.println("select");
    }
}
21-6.bean.xml file
<?xml version="1.0" encoding="UTF-8"?>
<beans xmlns="http://www.springframework.org/schema/beans"
       xmlns:xsi="http://www.w3.org/2001/XMLSchema-instance"
       xmlns:context="http://www.springframework.org/schema/context"
       xmlns:aop="http://www.springframework.org/schema/aop"
       xsi:schemaLocation="http://www.springframework.org/schema/beans
       https://www.springframework.org/schema/beans/spring-beans.xsd
       http://www.springframework.org/schema/context
       https://www.springframework.org/schema/context/spring-context.xsd
       http://www.springframework.org/schema/aop
       https://www.springframework.org/schema/aop/spring-aop.xsd">


    <!--register bean-->
    <bean id="userService" class="cn.bloghut.service.UserServiceImpl"/>
    <bean id="afterLog" class="cn.bloghut.log.AfterLog"/>
    <bean id="log" class="cn.bloghut.log.Log"/>

    <!--Method 1: use native Api Interface-->
    <!--to configure aop-->
    <aop:config>
        <!--1.Configure pointcuts  pointcut breakthrough point expression expression, execution(Location to execute!)-->
        <!-- Where does the pointcut execute your code-->
        <aop:pointcut id="pointcut" expression="execution(* cn.bloghut.service.UserServiceImpl.*(..))"/>

        <!--Execute surround increase!-->
        <aop:advisor advice-ref="log" pointcut-ref="pointcut"/>
        <aop:advisor advice-ref="afterLog" pointcut-ref="pointcut"/>

    </aop:config>

</beans>
21-7. Testing
public class Test {
    public static void main(String[] args) {

        ApplicationContext ac = new ClassPathXmlApplicationContext("bean.xml");
        //The dynamic proxy is the interface
        UserService userService = (UserService)ac.getBean("userService");
        userService.add();

    }
}
21-7. Output results
cn.bloghut.service.UserServiceImpl of add Method is executed
add
 Yes add Method, the return result is null
22. Aop implementation mode 2 - Section mode
- configuration file
- Configure aop
- Configure pointcuts
- Configure the class to be referenced by the custom aspect
- In which method
22-1. Configuration file
<?xml version="1.0" encoding="UTF-8"?>
<beans xmlns="http://www.springframework.org/schema/beans"
       xmlns:xsi="http://www.w3.org/2001/XMLSchema-instance"
       xmlns:context="http://www.springframework.org/schema/context"
       xmlns:aop="http://www.springframework.org/schema/aop"
       xsi:schemaLocation="http://www.springframework.org/schema/beans
       https://www.springframework.org/schema/beans/spring-beans.xsd
       http://www.springframework.org/schema/context
       https://www.springframework.org/schema/context/spring-context.xsd
       http://www.springframework.org/schema/aop
       https://www.springframework.org/schema/aop/spring-aop.xsd">


    <!--register bean-->
    <bean id="userService" class="cn.bloghut.service.UserServiceImpl"/>
    <bean id="diyPointCut" class="cn.bloghut.diy.DiyPointCut"/>

    <!--Method 1: use native Api Interface-->
    <!--to configure aop-->
    <aop:config>
        <!--1.Configure pointcuts  pointcut breakthrough point expression expression, execution(Location to execute!)-->
        <!-- Where does the pointcut execute your code-->
        <aop:pointcut id="pointcut" expression="execution(* cn.bloghut.service.UserServiceImpl.*(..))"/>

        <!--Self defined section ref Class to reference-->
        <aop:aspect id="aspect" ref="diyPointCut">
            <!--Before method execution method: Cut in method pointcut: breakthrough point -->
            <aop:before method="before" pointcut-ref="pointcut"/>
            <!--After method execution-->
            <aop:after method="after" pointcut-ref="pointcut"/>
        </aop:aspect>

    </aop:config>

</beans>
22-2. Custom section
package cn.bloghut.diy;

/**
 * @Classname DiyPointCut
 * @Description TODO
 * @Date 2021/5/17 17:23
 * @Created by balderdash
 */
public class DiyPointCut {

    public void  before(){
        System.out.println("=======Before method execution===========");
    }

    public void after(){
        System.out.println("=======After method execution===========");
    }

}
22-3.Usersevice interface
package cn.bloghut.service;

/**
 * @Classname UserService
 * @Description TODO
 * @Date 2021/5/17 16:51
 * @Created by balderdash
 */
public interface UserService {
    void add();

    void delete();

    void update();

    void select();
}
22-4.UserServiceImpl implementation class
package cn.bloghut.service;

/**
 * @Classname UserServiceImpl
 * @Description TODO
 * @Date 2021/5/17 16:51
 * @Created by balderdash
 */
public class UserServiceImpl implements UserService {
    public void add() {
        System.out.println("add");
    }

    public void delete() {
        System.out.println("delete");
    }

    public void update() {
        System.out.println("update");
    }

    public void select() {
        System.out.println("select");
    }
}
22-5. Test class
package cn.bloghut.test;

import cn.bloghut.service.UserService;
import org.springframework.context.ApplicationContext;
import org.springframework.context.support.ClassPathXmlApplicationContext;

/**
 * @Classname Test2
 * @Description TODO
 * @Date 2021/5/17 17:24
 * @Created by balderdash
 */
public class Test2 {
    public static void main(String[] args) {

        ApplicationContext ac = new ClassPathXmlApplicationContext("bean2.xml");
        UserService userService = ac.getBean("userService", UserService.class);
        userService.select();
    }
}
22-6. Output
=======Before method execution===========
select
=======After method execution===========
23. Aop implementation mode 3 - annotation mode
23-1.bean configuration file
- Note: enable annotation aop support
- <aop:aspectj-autoproxy/>
<?xml version="1.0" encoding="UTF-8"?>
<beans xmlns="http://www.springframework.org/schema/beans"
       xmlns:xsi="http://www.w3.org/2001/XMLSchema-instance"
       xmlns:context="http://www.springframework.org/schema/context"
       xmlns:aop="http://www.springframework.org/schema/aop"
       xsi:schemaLocation="http://www.springframework.org/schema/beans
       https://www.springframework.org/schema/beans/spring-beans.xsd
       http://www.springframework.org/schema/context
       https://www.springframework.org/schema/context/spring-context.xsd
       http://www.springframework.org/schema/aop
       https://www.springframework.org/schema/aop/spring-aop.xsd">

    <!--register bean-->
    <bean id="userService" class="cn.bloghut.service.UserServiceImpl"/>

    <bean id="annotationPointcut" class="cn.bloghut.annotation.AnnotationPointcut"/>

    <!--open aop Annotation support-->
    <aop:aspectj-autoproxy/>


</beans>
23-2. Custom class
- Note that this is a cut plane
- @Aspect / / indicates that this class is an aspect
public class AnnotationPointcut {
    /**
     * Define pointcuts
     */
    @Pointcut("execution(* cn.bloghut.service.UserServiceImpl.*(..))")
    public void pointcut(){}

    @Before("pointcut()")
    public void  before(){
        System.out.println("=================Before method execution=================");
    }

    @After("pointcut()")
    public void  after(){
        System.out.println("=================After method execution=================");
    }
}
23-3.UserService class:
public interface UserService {
    void add();

    void delete();

    void update();

    void select();
}
23-4.UserServiceImpl class
public class UserServiceImpl implements UserService {
    public void add() {
        System.out.println("add");
    }

    public void delete() {
        System.out.println("delete");
    }

    public void update() {
        System.out.println("update");
    }

    public void select() {
        System.out.println("select");
    }
}
23-5. Test class
public static void main(String[] args) {

    ApplicationContext ac = new ClassPathXmlApplicationContext("bean3.xml");
    UserService userService = ac.getBean("userService", UserService.class);
    userService.delete();
}
23-6. Output results
=================Before method execution=================
delete
=================After method execution=================
24. Spring integrates Mybatis
24-1. Import dependency
<dependencies>
    <!--unit testing -->
    <dependency>
        <groupId>junit</groupId>
        <artifactId>junit</artifactId>
        <version>4.13</version>
        <scope>test</scope>
    </dependency>
    <!--mysql drive-->
    <dependency>
        <groupId>mysql</groupId>
        <artifactId>mysql-connector-java</artifactId>
        <version>5.1.47</version>
    </dependency>
    <!--mybatis package-->
    <dependency>
        <groupId>org.mybatis</groupId>
        <artifactId>mybatis</artifactId>
        <version>3.5.2</version>
    </dependency>
    <!--spring of context core -->
    <dependency>
        <groupId>org.springframework</groupId>
        <artifactId>spring-webmvc</artifactId>
        <version>5.2.0.RELEASE</version>
    </dependency>
    <!--Spring If you operate the database, you also need one spring-jdbc-->
    <dependency>
        <groupId>org.springframework</groupId>
        <artifactId>spring-jdbc</artifactId>
        <version>5.1.9.RELEASE</version>
    </dependency>
    <!--Aop support-->
    <dependency>
        <groupId>org.aspectj</groupId>
        <artifactId>aspectjweaver</artifactId>
        <version>1.9.4</version>
    </dependency>
    <dependency>
        <groupId>org.aspectj</groupId>
        <artifactId>aspectjrt</artifactId>
        <version>1.8.13</version>
    </dependency>
    <!--mybatis integration spring Dependence of-->
    <dependency>
        <groupId>org.mybatis</groupId>
        <artifactId>mybatis-spring</artifactId>
        <version>2.0.2</version>
    </dependency>
    <!--setter Construction method plug-in-->
    <dependency>
        <groupId>org.projectlombok</groupId>
        <artifactId>lombok</artifactId>
        <version>1.16.10</version>
    </dependency>
</dependencies>
24-2. Write data source configuration
<!--
    DataSource: use Spring Data source replacement for Mybatis Configuration of c3p0 dbcp druid
    use Spring Provided JDBC org.springframework.jdbc.datasource.
-->

<!--Configure data sources-->
<bean id="dataSource" class="org.springframework.jdbc.datasource.DriverManagerDataSource">
    <property name="driverClassName" value="com.mysql.jdbc.Driver"/>
    <property name="url" value="jdbc:mysql://localhost:3306/mybatis"/>
    <property name="username" value="root"/>
    <property name="password" value="123"/>
</bean>

2.sqlSessionFactory
<!--to configure sqlSessionFactory factory-->
<bean id="sqlSessionFactory" class="org.mybatis.spring.SqlSessionFactoryBean">
    <property name="dataSource" ref="dataSource"/>
    <!--binding mybatis Configuration file for-->
    <property name="mapperLocations" value="classpath:cn/bloghut/mapper/*Mapper.xml"/>
    <!--Configure alias-->
    <property name="typeAliases" value="cn.bloghut.domain.User"/>
</bean>

3.sqlSessionTemplate
<!--SqlSessionTemplate namely sqlSession-->
<bean id="sqlSession" class="org.mybatis.spring.SqlSessionTemplate">
    <!--Only constructor injection can be used sqlSessionFactory,Because it doesn't set method-->
    <constructor-arg index="0" ref="sqlSessionFactory"/>
</bean>
24-3. It is necessary to add an implementation class to the interface []
public class UserMapperImpl implements UserMapper {

    // All our operations are performed using sqlSession. In the past, we now use SQLSessionTemplate

    private SqlSessionTemplate sqlSession;

    public void setSqlSessionTemplate(SqlSessionTemplate sqlSession){
        this.sqlSession = sqlSession;
    }


    public List<User> findAll() {
        return sqlSession.getMapper(UserMapper.class).findAll();
    }
}
24-4. Inject the implementation class written by yourself into the container
<bean id="userMapper" class="cn.bloghut.mapper.impl.UserMapperImpl">
    <property name="sqlSessionTemplate" ref="sqlSession"/>
</bean>
24-5. Test
@Test
public void test1(){
    ApplicationContext ac = new ClassPathXmlApplicationContext("applicationContext.xml");
    UserMapper userMapper = ac.getBean("userMapper", UserMapper.class);
    List<User> all = userMapper.findAll();
    for (User user : all) {
        System.out.println(user);
    }
}
25. Declarative transaction
25-1. What is a transaction
- Transaction: treat a group of businesses as a business, either all succeed or all fail!
- Transaction is very important in project development. It involves the consistency of data. You can't be careless!
- Ensure integrity and consistency
25-2. Transaction ACID principle:
- Principled
- uniformity
- Isolation
Multiple businesses may operate the same resource to prevent data corruption - persistence
Once the transaction is committed, no matter what happens to the system, the result will not be affected and will be written to the memory persistently!
25-3. Why transactions are needed?
- If transactions are not configured, there may be inconsistent data submission;
- If we do not configure declarative transactions in Spring, we need to manually configure transactions in the code
- Transaction is very important in project development. It involves the consistency and integrity of data. It can't be careless!
26. Declarative transaction code
26-1.spring-dao.xml
<beans xmlns="http://www.springframework.org/schema/beans"
       xmlns:xsi="http://www.w3.org/2001/XMLSchema-instance"
       xmlns:aop="http://www.springframework.org/schema/aop"
       xmlns:tx="http://www.springframework.org/schema/tx"
       xsi:schemaLocation="http://www.springframework.org/schema/beans
        https://www.springframework.org/schema/beans/spring-beans.xsd
        http://www.springframework.org/schema/aop
        https://www.springframework.org/schema/aop/spring-aop.xsd
        http://www.springframework.org/schema/tx
        http://www.springframework.org/schema/tx/spring-tx.xsd">

    <!--
        DataSource: use Spring Data source replacement for Mybatis Configuration of c3p0 dbcp druid
        use Spring Provided JDBC org.springframework.jdbc.datasource.
    -->

    <!--Configure data sources-->
    <bean id="dataSource" class="org.springframework.jdbc.datasource.DriverManagerDataSource">
        <property name="driverClassName" value="com.mysql.jdbc.Driver"/>
        <property name="url" value="jdbc:mysql://localhost:3306/mybatis"/>
        <property name="username" value="root"/>
        <property name="password" value="123"/>
    </bean>

    <!--to configure sqlSessionFactory factory-->
    <bean id="sqlSessionFactory" class="org.mybatis.spring.SqlSessionFactoryBean">
        <property name="dataSource" ref="dataSource"/>
        <!--binding mybatis Configuration file for-->
        <property name="mapperLocations" value="classpath:cn/bloghut/mapper/*Mapper.xml"/>
        <!--Configure alias-->
        <property name="typeAliases" value="cn.bloghut.domain.User"/>
    </bean>

    <!--SqlSessionTemplate namely sqlSession-->
    <bean id="sqlSession" class="org.mybatis.spring.SqlSessionTemplate">
        <!--Only constructor injection can be used sqlSessionFactory,Because it doesn't set method-->
        <constructor-arg index="0" ref="sqlSessionFactory"/>
    </bean>

    <!--==============================Transaction configuration start==============================-->

    <!--Configure declarative transactions-->
    <bean id="transactionManager" class="org.springframework.jdbc.datasource.DataSourceTransactionManager">
        <property name="dataSource" ref="dataSource"/>
    </bean>

    <!--combination AOP Implement transaction weaving-->
    <tx:advice id="txAdvice" transaction-manager="transactionManager">
        <tx:attributes>
           <!--For which methods are transactions configured-->
            <!--To configure the propagation properties of a transaction:
                propagation
                read-only="true" read-only
            -->
            <tx:method name="add" propagation="REQUIRED"/>
            <tx:method name="delete" propagation="REQUIRED"/>
            <tx:method name="update" propagation="REQUIRED"/>
            <tx:method name="find" read-only="true"/>

            <!--Configure transactions for all methods-->
            <tx:method name="*" propagation="REQUIRED"/>
        </tx:attributes>
    </tx:advice>

    <!--Configure transaction entry-->
    <aop:config>
        <!--Configure pointcuts-->
        <aop:pointcut id="txPointcut" expression="execution(* cn.bloghut.mapper.*.*(..))"/>
        <!--Cut in transaction-->
        <aop:advisor advice-ref="txAdvice" pointcut-ref="txPointcut"/>
    </aop:config>

    <!--==============================End of transaction configuration==============================-->

</beans>
26-2.applicationContext.xml
<?xml version="1.0" encoding="UTF-8"?>
<beans xmlns="http://www.springframework.org/schema/beans"
       xmlns:xsi="http://www.w3.org/2001/XMLSchema-instance"
       xmlns:p="http://www.springframework.org/schema/p"
       xmlns:c="http://www.springframework.org/schema/c"
       xsi:schemaLocation="http://www.springframework.org/schema/beans
        https://www.springframework.org/schema/beans/spring-beans.xsd">

    <import resource="spring-dao.xml"/>

   <bean id="userMapper" class="cn.bloghut.mapper.impl.UserMapperImpl">
       <property name="sqlSession" ref="sqlSession"/>
   </bean>


</beans>
26-3.user entity class
@Data
@AllArgsConstructor
@NoArgsConstructor
public class User {

    private int id;
    private String username;
    private String password;
    private String perms;

}
26-4.UserMaper interface
public interface UserMapper {

    List<User> findAll();

    int add(User user);

    int delete(int id);

}
26-5.UserMapper configuration file
<?xml version="1.0" encoding="UTF-8" ?>
<!DOCTYPE mapper
        PUBLIC "-//mybatis.org//DTD Config 3.0//EN"
        "http://mybatis.org/dtd/mybatis-3-mapper.dtd">
<mapper namespace="cn.bloghut.mapper.UserMapper">
    <select id="findAll" resultType="cn.bloghut.domain.User">
        select * from user;
    </select>

    <insert id="add" parameterType="cn.bloghut.domain.User">
    insert into user(username,password,perms) values (#{username},#{password},#{perms})
    </insert>

    <delete id="delete" parameterType="int">
    delete form user where id = #{value}
    </delete>

</mapper>
26-6.UserMapper implementation class
public class UserMapperImpl implements UserMapper {

    private SqlSessionTemplate sqlSession;

    public void setSqlSession(SqlSessionTemplate sqlSession) {
        this.sqlSession = sqlSession;
    }

    public List<User> findAll() {
        UserMapper mapper = sqlSession.getMapper(UserMapper.class);
        User user = new User();
        user.setUsername("balderdash");
        user.setPassword("123");
        user.setPerms("admin");

        mapper.add(user);
        int i = 1 / 0;
        mapper.delete(6);
        return mapper.findAll();
    }

    public int add(User user) {
        return sqlSession.getMapper(UserMapper.class).add(user);
    }

    public int delete(int id) {
        return sqlSession.getMapper(UserMapper.class).delete(id);
    }
}
26-7. Testing
public static void main(String[] args) {

    ApplicationContext ac = new ClassPathXmlApplicationContext("applicationContext.xml");
    UserMapper userMapper = ac.getBean("userMapper", UserMapper.class);
    List<User> users = userMapper.findAll();
    for (User user : users) {
        System.out.println(user);
    }
}