https://www.cnblogs.com/crazymakercircle/p/15187184.html
Current limiting
Current limit is a common interview question in the interview.
Why limit current
In short
Current limiting is used in many scenarios to limit concurrency and requests, such as second killing and rush buying, and to protect their own systems and downstream systems from being overwhelmed by huge traffic.
Take the microblog as an example. For example, a star announced a love affair, and the access increased from 500000 to 5 million. The planning capacity of the system can support up to 2 million accesses. Then, the flow restriction rules should be implemented to ensure that it is an available state, so the server will not crash, so the request is unavailable
Reference link
System architecture knowledge map (a 10w system architecture knowledge map)
https://www.processon.com/view/link/60fb9421637689719d246739
Architecture of seckill system
https://www.processon.com/view/link/61148c2b1e08536191d8f92f
Idea of current limiting:
Under the condition of availability, increase the number of people entering as much as possible, and the rest are waiting in line, or return friendly prompts to ensure that the users of the system inside can use normally and prevent the system avalanche.
In daily life, what places need to be restricted?
For example, there is a national scenic spot next to me, which may not be visited at all at ordinary times, but it will be overcrowded when it comes to May day or the Spring Festival. At this time, the scenic spot managers will implement a series of policies to limit the flow of people.
Why limit the current?
If the scenic spot can accommodate 10000 people, and now 30000 people go in, it is bound to be close to each other. If the rectification is not good, there will be accidents. As a result, everyone's experience is not good. As a result, the scenic spot may have to be closed, resulting in the inability to operate externally. As a result, everyone feels that the experience is terrible.
Current limiting algorithm
There are many current limiting algorithms. There are three common types: counter algorithm, leaky bucket algorithm and token bucket algorithm. They are explained one by one below
Current limiting means usually include counter, leakage bucket and token bucket. Pay attention to the difference between current limit and speed limit (all requests will be processed), depending on the business scenario.
(1) Counter
In a period of time interval (time window, time interval), the maximum number of processing requests is fixed, and the excess part will not be processed
(2) Leaky bucket
The size of the leaky bucket is fixed and the processing speed is fixed, but the request entry speed is not fixed (when there are too many requests in an emergency, too many requests will be discarded)
(3) Token bucket
The size of the token bucket is fixed, and the generation rate of the token is fixed, but the consumption rate of the token (i.e. request) is not fixed (it can deal with some situations where there are too many requests at some time); Each request will take the token from the token bucket. If there is no token, the request will be discarded.
Counter algorithm
Definition of counter current limit:
Within a certain time interval (time window, time interval), the maximum number of processing requests is fixed, and the excess part will not be processed.
Simple and crude, such as specifying the thread pool size, specifying the database connection pool size, and the number of nginx connections, which are all equal to the counter algorithm.
Counter algorithm is the simplest and easiest algorithm in current limiting algorithm/
For example, we stipulate that for interface A, we can't access more than 100 times A minute.
Then we can do this:
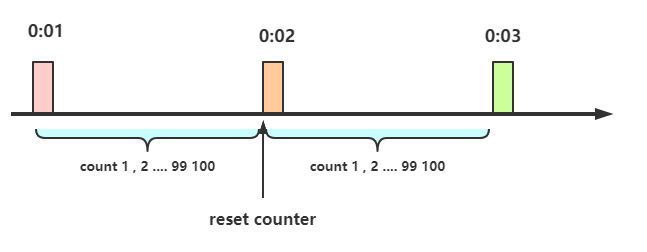
1. At the beginning, we can set a counter. Every time a request comes, the counter will increase by 1. If the value of the counter is greater than 100 and the interval between the request and the first request is still within 1 minute, it indicates that there are too many requests and access is denied.
2. If the interval between the request and the first request is greater than 1 minute and the counter value is still within the current limit, reset the counter, which is so simple
Implementation of counter current limiting:
package com.crazymaker.springcloud.ratelimit;

import lombok.extern.slf4j.Slf4j;
import org.junit.Test;

import java.util.concurrent.CountDownLatch;
import java.util.concurrent.ExecutorService;
import java.util.concurrent.Executors;
import java.util.concurrent.atomic.AtomicInteger;
import java.util.concurrent.atomic.AtomicLong;

// Speedometer speed limit
@Slf4j
public class CounterLimiter
{

    // Start time
    private static long startTime = System.currentTimeMillis();
    // Time interval of time interval ms
    private static long interval = 1000;
    // Limit number per second
    private static long maxCount = 2;
    //accumulator
    private static AtomicLong accumulator = new AtomicLong();

    // Count to determine whether the limit is exceeded
    private static long tryAcquire(long taskId, int turn)
    {
        long nowTime = System.currentTimeMillis();
        //Within the time interval
        if (nowTime < startTime + interval)
        {
            long count = accumulator.incrementAndGet();

            if (count <= maxCount)
            {
                return count;
            } else
            {
                return -count;
            }
        } else
        {
            //Outside the time interval
            synchronized (CounterLimiter.class)
            {
                log.info("The new time zone is here,taskId{}, turn {}..", taskId, turn);
                // Judge again to prevent repeated initialization
                if (nowTime > startTime + interval)
                {
                    accumulator.set(0);
                    startTime = nowTime;
                }
            }
            return 0;
        }
    }

    //Thread pool for multi-threaded simulation test
    private ExecutorService pool = Executors.newFixedThreadPool(10);

    @Test
    public void testLimit()
    {

        // Restricted times
        AtomicInteger limited = new AtomicInteger(0);
        // Number of threads
        final int threads = 2;
        // Number of execution rounds per thread
        final int turns = 20;
        // Synchronizer
        CountDownLatch countDownLatch = new CountDownLatch(threads);
        long start = System.currentTimeMillis();
        for (int i = 0; i < threads; i++)
        {
            pool.submit(() ->
            {
                try
                {

                    for (int j = 0; j < turns; j++)
                    {

                        long taskId = Thread.currentThread().getId();
                        long index = tryAcquire(taskId, j);
                        if (index <= 0)
                        {
                            // Accumulation of restricted times
                            limited.getAndIncrement();
                        }
                        Thread.sleep(200);
                    }


                } catch (Exception e)
                {
                    e.printStackTrace();
                }
                //Wait for all threads to end
                countDownLatch.countDown();

            });
        }
        try
        {
            countDownLatch.await();
        } catch (InterruptedException e)
        {
            e.printStackTrace();
        }
        float time = (System.currentTimeMillis() - start) / 1000F;
        //Output statistical results

        log.info("The number of times Limited is:" + limited.get() +
                ",The number of passes is:" + (threads * turns - limited.get()));
        log.info("The proportion of restrictions is:" + (float) limited.get() / (float) (threads * turns));
        log.info("The running time is:" + time);
    }


}
Serious problem of counter current limiting
Although this algorithm is simple, it is a very fatal problem, that is, the critical problem. Let's see the following figure:
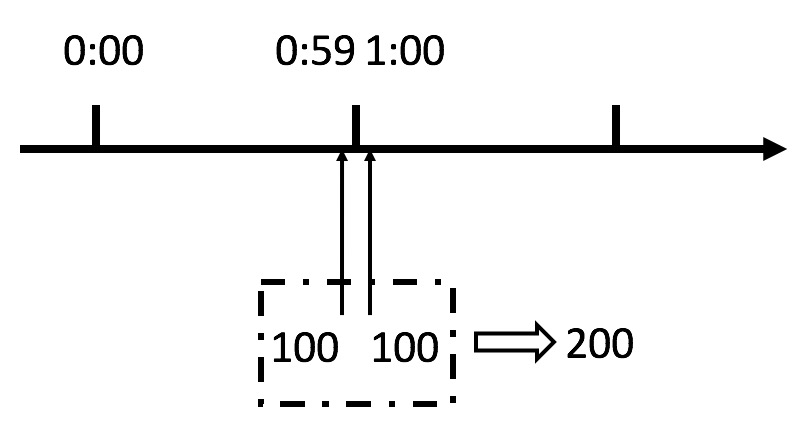
We can see from the above figure that if a malicious user sends 100 requests instantaneously at 0:59 and 100 requests instantaneously at 1:00, the user actually sends 200 requests instantaneously in one second.
What we just specified is a maximum of 100 requests per minute (planned throughput), that is, a maximum of 1.7 requests per second. Users can instantly exceed our rate limit by burst requests at the reset node in the time window.
Users may crush our application in an instant through this loophole in the algorithm.
Leaky bucket algorithm
The basic principle of the leaky bucket algorithm is: water (corresponding to the request) enters the leaky bucket from the water inlet, and the leaky bucket leaves the water at a certain speed (request for release). When the water inflow speed is too large, the total water in the bucket will overflow directly if it is greater than the bucket capacity, as shown in the figure:
The general rules of leakage barrel current limit are as follows:
(1) The water inlet (corresponding to the client request) flows into the water inlet leakage bucket at any rate
(2) The capacity of the leaky bucket is fixed, and the water outlet (release) rate is also fixed.
(3) The capacity of the leaky bucket remains unchanged. If the processing rate is too slow, the water in the bucket will exceed the capacity of the bucket, and the water flowing in later will overflow, indicating that the request is rejected
Principle of leaky bucket algorithm
The idea of leaky bucket algorithm is very simple:
The water (request) enters into the leakage bucket first, and the leakage bucket discharges water at a certain speed. When the water inflow speed exceeds the capacity of the leakage bucket, it will overflow directly/
It can be seen that leaky bucket algorithm can forcibly limit the data transmission rate.
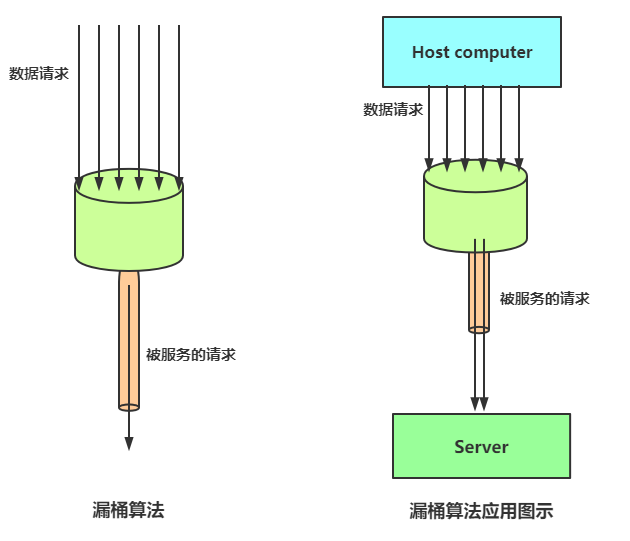
The leaky bucket algorithm is actually very simple. It can be considered as the process of water injection and leakage. Water flows into the bucket at any rate and out at a certain rate. When the water exceeds the capacity of the bucket, it will be discarded, because the bucket capacity is constant to ensure the overall rate
Water flowing out at a certain speed:

Peak shaving: when a large amount of traffic enters, overflow will occur, so that the current limiting protection service is available
Buffering: it does not directly request to the server to buffer the pressure
The consumption speed is fixed because the computing performance is fixed
Implementation of leaky bucket algorithm“
package com.crazymaker.springcloud.ratelimit;

import lombok.extern.slf4j.Slf4j;
import org.junit.Test;

import java.util.concurrent.CountDownLatch;
import java.util.concurrent.ExecutorService;
import java.util.concurrent.Executors;
import java.util.concurrent.atomic.AtomicInteger;

// Leakage barrel current limiting
@Slf4j
public class LeakBucketLimiter {

    // Start time of calculation
    private static long lastOutTime = System.currentTimeMillis();
    // Outflow rate: 2 times per second
    private static int leakRate = 2;

    // Barrel capacity
    private static int capacity = 2;

    //Remaining water
    private static AtomicInteger water = new AtomicInteger(0);

    //Return value Description:
    // false is not restricted to
    // true current limited
    public static synchronized boolean isLimit(long taskId, int turn) {
        // If it is an empty bucket, the current time is used as the leakage time
        if (water.get() == 0) {
            lastOutTime = System.currentTimeMillis();
            water.addAndGet(1);
            return false;
        }
        // Executive leakage
        int waterLeaked = ((int) ((System.currentTimeMillis() - lastOutTime) / 1000)) * leakRate;
        // Calculate the remaining water volume
        int waterLeft = water.get() - waterLeaked;
        water.set(Math.max(0, waterLeft));
        // Update leakTimeStamp again
        lastOutTime = System.currentTimeMillis();
        // Try adding water, and the water is not full, release
        if ((water.get()) < capacity) {
            water.addAndGet(1);
            return false;
        } else {
            // When the water is full, refuse to add water and limit current
            return true;
        }

    }


    //Thread pool for multi-threaded simulation test
    private ExecutorService pool = Executors.newFixedThreadPool(10);

    @Test
    public void testLimit() {

        // Restricted times
        AtomicInteger limited = new AtomicInteger(0);
        // Number of threads
        final int threads = 2;
        // Number of execution rounds per thread
        final int turns = 20;
        // Thread synchronizer
        CountDownLatch countDownLatch = new CountDownLatch(threads);
        long start = System.currentTimeMillis();
        for (int i = 0; i < threads; i++) {
            pool.submit(() ->
            {
                try {

                    for (int j = 0; j < turns; j++) {

                        long taskId = Thread.currentThread().getId();
                        boolean intercepted = isLimit(taskId, j);
                        if (intercepted) {
                            // Accumulation of restricted times
                            limited.getAndIncrement();
                        }
                        Thread.sleep(200);
                    }


                } catch (Exception e) {
                    e.printStackTrace();
                }
                //Wait for all threads to end
                countDownLatch.countDown();

            });
        }
        try {
            countDownLatch.await();
        } catch (InterruptedException e) {
            e.printStackTrace();
        }
        float time = (System.currentTimeMillis() - start) / 1000F;
        //Output statistical results

        log.info("The number of times Limited is:" + limited.get() +
                ",The number of passes is:" + (threads * turns - limited.get()));
        log.info("The proportion of restrictions is:" + (float) limited.get() / (float) (threads * turns));
        log.info("The running time is:" + time);
    }
}
Problems of leaking barrels:
The water outlet speed of the leaky bucket is fixed, that is, when the release speed is requested.
Copy around on the Internet:
The leaky bucket can not effectively deal with the sudden flow, but it can smooth the sudden flow (rectification)
Practical problems:
The rate at the outlet of the leaky bucket is fixed and can not flexibly cope with the improvement of the back-end capacity. For example, through dynamic capacity expansion, the back-end flow is increased from 1000QPS to 1W QPS, and the leaky bucket has no way
Token bucket current limiting algorithm
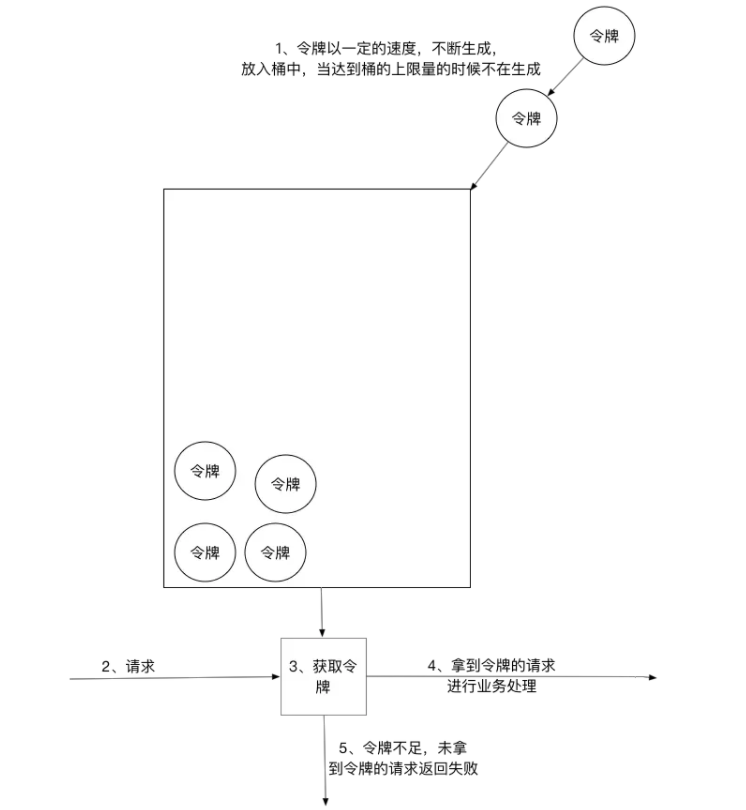
The token bucket algorithm generates tokens at a set rate and puts them into the token bucket. Each user request must apply for a token. If the token is insufficient, the request will be rejected/
In the token bucket algorithm, a token will be taken from the bucket when a new request arrives. If there is no token in the bucket, the service will be rejected. Of course, there is an upper limit on the number of tokens.
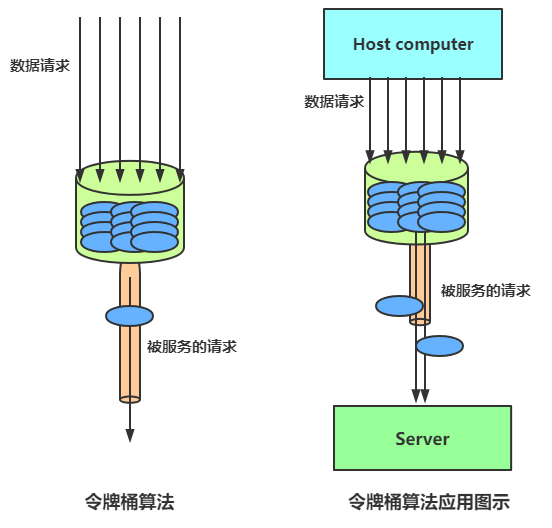
The number of tokens is strongly related to time and sending rate. The longer the time elapses, the more tokens will be added to the bucket. If the sending speed of the token is faster than the application speed, the token bucket will be full of tokens until the token occupies the whole token bucket, as shown in the figure:
The general flow of token bucket current limiting is as follows:
The water inlet puts tokens into the bucket at a certain speed
The capacity of the token is fixed, but the release speed is not fixed, but there are still remaining tokens in the bucket. Once the request comes, the application can be successful and then released
If the sending speed of the token is slower than the arrival speed of the request, no card is available in the bucket and the request will be rejected.
In short, the sending rate of the token can be set, so that it can effectively deal with the sudden exit traffic.
Token bucket algorithm:
The token bucket algorithm is similar to the leaky bucket algorithm. The difference is that there are some tokens in the token bucket. After the service request arrives, we will get the service only after obtaining the token. For example, we usually queue in front of the window in the canteen when we go to the canteen for dinner. This is like the leaky bucket algorithm. A large number of people gather outside the window in the canteen and enjoy the service at a certain speed, If there are too many people pouring in and the canteen can't fit, some people may stand outside the canteen, so they don't enjoy the service of the canteen, which is called overflow. Overflow can continue to request, that is, continue to queue up. What's the problem?
If there are special circumstances at this time, such as some volunteers in a hurry or the college entrance examination in senior three, this is an emergency. If the leaky bucket algorithm is also used, we have to queue slowly, which does not solve our needs. For many application scenarios, in addition to limiting the average data transmission rate, it is also required to allow some degree of burst transmission. At this time, the leaky bucket algorithm may not be suitable, and the token bucket algorithm is more suitable. As shown in the figure, the principle of token bucket algorithm is that the system will put tokens into the bucket at a constant speed. If the request needs to be processed, you need to obtain a token from the bucket first. When there is no token in the bucket, the service will be denied.
Implementation of token bucket algorithm
package com.crazymaker.springcloud.ratelimit;

import lombok.extern.slf4j.Slf4j;
import org.junit.Test;

import java.util.concurrent.CountDownLatch;
import java.util.concurrent.ExecutorService;
import java.util.concurrent.Executors;
import java.util.concurrent.atomic.AtomicInteger;

// Token bucket speed limit
@Slf4j
public class TokenBucketLimiter {
    // Last token issuing time
    public long lastTime = System.currentTimeMillis();
    // Barrel capacity
    public int capacity = 2;
    // Token generation speed / s
    public int rate = 2;
    // Current number of tokens
    public AtomicInteger tokens = new AtomicInteger(0);
    ;

    //Return value Description:
    // false is not restricted to
    // true current limited
    public synchronized boolean isLimited(long taskId, int applyCount) {
        long now = System.currentTimeMillis();
        //Time interval in ms
        long gap = now - lastTime;

        //Count the number of tokens in the time period
        int reverse_permits = (int) (gap * rate / 1000);
        int all_permits = tokens.get() + reverse_permits;
        // Current number of tokens
        tokens.set(Math.min(capacity, all_permits));
        log.info("tokens {} capacity {} gap {} ", tokens, capacity, gap);

        if (tokens.get() < applyCount) {
            // If the token is not available, it is rejected
            // log.info("current limited.." + taskid + ", applycount:" + applycount ");
            return true;
        } else {
            // And a token. Get a token
            tokens.getAndAdd( - applyCount);
            lastTime = now;

            // log.info("remaining tokens.." + tokens);
            return false;
        }

    }

    //Thread pool for multi-threaded simulation test
    private ExecutorService pool = Executors.newFixedThreadPool(10);

    @Test
    public void testLimit() {

        // Restricted times
        AtomicInteger limited = new AtomicInteger(0);
        // Number of threads
        final int threads = 2;
        // Number of execution rounds per thread
        final int turns = 20;


        // Synchronizer
        CountDownLatch countDownLatch = new CountDownLatch(threads);
        long start = System.currentTimeMillis();
        for (int i = 0; i < threads; i++) {
            pool.submit(() ->
            {
                try {

                    for (int j = 0; j < turns; j++) {

                        long taskId = Thread.currentThread().getId();
                        boolean intercepted = isLimited(taskId, 1);
                        if (intercepted) {
                            // Accumulation of restricted times
                            limited.getAndIncrement();
                        }

                        Thread.sleep(200);
                    }


                } catch (Exception e) {
                    e.printStackTrace();
                }
                //Wait for all threads to end
                countDownLatch.countDown();

            });
        }
        try {
            countDownLatch.await();
        } catch (InterruptedException e) {
            e.printStackTrace();
        }
        float time = (System.currentTimeMillis() - start) / 1000F;
        //Output statistical results

        log.info("The number of times Limited is:" + limited.get() +
                ",The number of passes is:" + (threads * turns - limited.get()));
        log.info("The proportion of restrictions is:" + (float) limited.get() / (float) (threads * turns));
        log.info("The running time is:" + time);
    }


}
Benefits of token bucket
One of the advantages of token bucket is that it can easily deal with sudden exit traffic (improvement of back-end capacity).
For example, the issuing speed of tokens can be changed, and the algorithm can increase the number of tokens according to the new sending rate, so that the outlet burst traffic can be processed.
Guava RateLimiter
Guava is an excellent open source project in the Java field. It contains many very practical functions used by Google in Java projects, including collections, caching, concurrency, common annotations, String operation and I/O operation. Guava's RateLimiter provides the implementation of token bucket algorithm: smooth burst and smooth warming up.
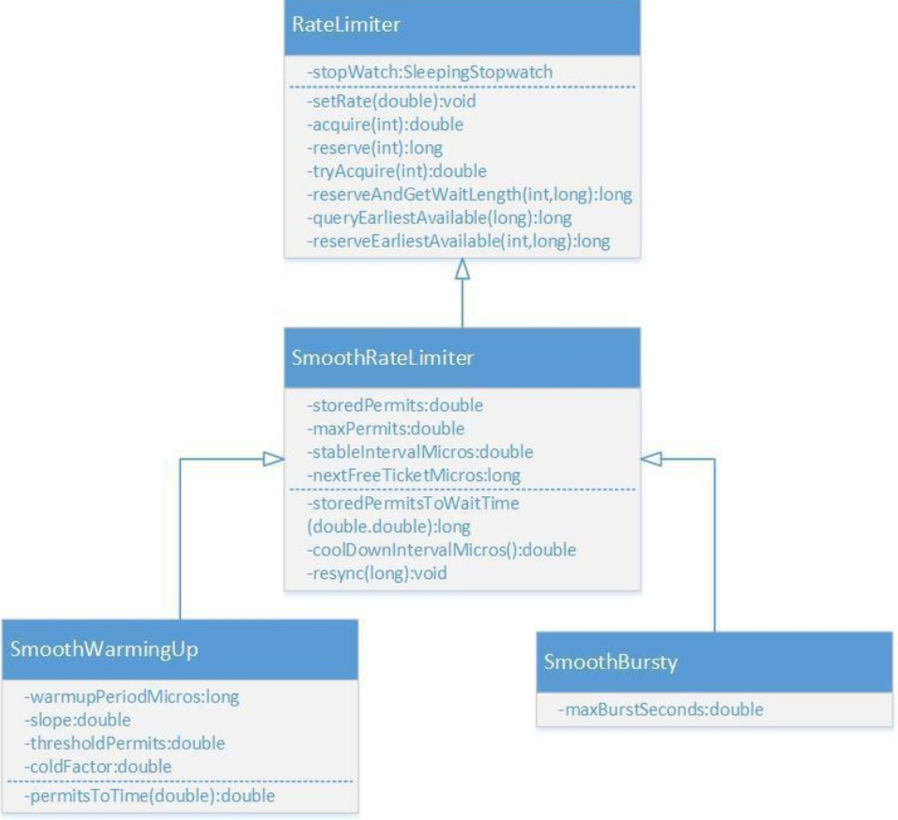
The class diagram of ratelimit is shown above,
Nginx leakage barrel current limit:
Simple demonstration of Nginx current limiting:
Requests are processed only once every six seconds, as follows
  limit_req_zone  $arg_sku_id  zone=skuzone:10m      rate=6r/m;
  limit_req_zone  $http_user_id  zone=userzone:10m      rate=6r/m;
  limit_req_zone  $binary_remote_addr  zone=perip:10m      rate=6r/m;
  limit_req_zone  $server_name        zone=perserver:1m   rate=6r/m;
This is from the request parameters, and the current is limited in advance
This is to count the number of current limiting from the request parameters in advance.
Define the current limited memory zone in the http block.
  limit_req_zone  $arg_sku_id  zone=skuzone:10m      rate=6r/m;
  limit_req_zone  $http_user_id  zone=userzone:10m      rate=6r/m;
  limit_req_zone  $binary_remote_addr  zone=perip:10m      rate=6r/m;
  limit_req_zone  $server_name        zone=perserver:1m   rate=10r/s;
Use the current limiting zone in the location block. Refer to the following:
    #  ratelimit by sku id
    location  = /ratelimit/sku {
      limit_req  zone=skuzone;
      echo "Normal response";
    }
test
[root@cdh1 ~]# /vagrant/LuaDemoProject/sh/linux/openresty-restart.sh
shell dir is: /vagrant/LuaDemoProject/sh/linux
Shutting down openrestry/nginx:  pid is 13479 13485
Shutting down  succeeded!
OPENRESTRY_PATH:/usr/local/openresty
PROJECT_PATH:/vagrant/LuaDemoProject/src
nginx: [alert] lua_code_cache is off; this will hurt performance in /vagrant/LuaDemoProject/src/conf/nginx-seckill.conf:90
openrestry/nginx starting succeeded!
pid is 14197


[root@cdh1 ~]# curl  http://cdh1/ratelimit/sku?sku_id=1
 Normal response
root@cdh1 ~]#  curl  http://cdh1/ratelimit/sku?sku_id=1
 Normal response
[root@cdh1 ~]#  curl  http://cdh1/ratelimit/sku?sku_id=1
 Degraded content after current limiting
[root@cdh1 ~]#  curl  http://cdh1/ratelimit/sku?sku_id=1
 Degraded content after current limiting
[root@cdh1 ~]#  curl  http://cdh1/ratelimit/sku?sku_id=1
 Degraded content after current limiting
[root@cdh1 ~]#  curl  http://cdh1/ratelimit/sku?sku_id=1
 Degraded content after current limiting
[root@cdh1 ~]#  curl  http://cdh1/ratelimit/sku?sku_id=1
 Degraded content after current limiting
[root@cdh1 ~]#  curl  http://cdh1/ratelimit/sku?sku_id=1
 Normal response
Advance parameters from Header header
1. Nginx supports reading non nginx standard user-defined headers, but you need to turn on the underline support of headers under http or server:
underscores_in_headers on;
2. For example, we customize the header as X-Real-IP. When obtaining the header through the second nginx, we need to do the following:
$http_x_real_ip; (all in lowercase and preceded by http_)
 underscores_in_headers on;

  limit_req_zone  $http_user_id  zone=userzone:10m      rate=6r/m;
  server {
    listen       80 default;
    server_name  nginx.server *.nginx.server;
    default_type 'text/html';
    charset utf-8;


#  ratelimit by user id
    location  = /ratelimit/demo {
      limit_req  zone=userzone;
      echo "Normal response";
    }


    location = /50x.html{
      echo "Degraded content after current limiting";
    }

    error_page 502 503 =200 /50x.html;

  }
test
[root@cdh1 ~]# curl -H "USER-ID:1" http://cdh1/ratelimit/demo
 Normal response
[root@cdh1 ~]# curl -H "USER-ID:1" http://cdh1/ratelimit/demo
 Degraded content after current limiting
[root@cdh1 ~]# curl -H "USER-ID:1" http://cdh1/ratelimit/demo
 Degraded content after current limiting
[root@cdh1 ~]# curl -H "USER-ID:1" http://cdh1/ratelimit/demo
 Degraded content after current limiting
[root@cdh1 ~]# curl -H "USER-ID:1" http://cdh1/ratelimit/demo
 Degraded content after current limiting
[root@cdh1 ~]# curl -H "USER-ID:1" http://cdh1/ratelimit/demo
 Degraded content after current limiting
[root@cdh1 ~]# curl -H "USER-ID:1" http://cdh1/ratelimit/demo
 Degraded content after current limiting
[root@cdh1 ~]# curl -H "USER_ID:2" http://cdh1/ratelimit/demo
 Normal response
[root@cdh1 ~]# curl -H "USER_ID:2" http://cdh1/ratelimit/demo
 Degraded content after current limiting
[root@cdh1 ~]#
[root@cdh1 ~]# curl -H "USER_ID:2" http://cdh1/ratelimit/demo
 Degraded content after current limiting
[root@cdh1 ~]# curl -H "USER-ID:3" http://cdh1/ratelimit/demo
 Normal response
[root@cdh1 ~]# curl -H "USER-ID:3" http://cdh1/ratelimit/demo
 Degraded content after current limiting
Detailed explanation of three subdivision types of Nginx leaky bucket current limit, namely burst and nodelay parameters
Requests are processed only once every six seconds, as follows
limit_req_zone $arg_user_id zone=limti_req_zone:10m rate=10r/m;
Leaky bucket current limiting without buffer queue
limit_req zone=limti_req_zone;
In strict accordance with limti_req_zone Configured in rate To process the request
 exceed rate Range of processing capacity, direct drop
 It shows that there is no delay for the received request
Assuming that 10 requests are submitted within 1 second, you can see that a total of 10 requests have failed, and 503 is returned directly,
Then check / var/log/nginx/access.log to confirm that only one request succeeded, and the others directly returned 503, that is, the server rejected the request.

Leaky bucket current limiting with buffer queue
limit_req zone=limti_req_zone burst=5;
According to in limti_req_zone Configured in rate To process the request
 At the same time, a buffer queue with a size of 5 is set, and the requests in the buffer queue will wait for slow processing
 More than burst Buffer queue length and rate Requests for processing power are discarded directly
 It shows that there is a delay for the received request
Assuming that 10 requests are submitted within one second, it can be found that within one second, after the server receives 10 concurrent requests, it processes one request first, and puts five requests into the burst buffer queue for processing. The number of requests exceeding (burst+1) is directly discarded, that is, four requests are directly discarded. The five requests cached by burst are processed every 6s.
Then check the / var/log/nginx/access.log log

Leaky bucket current limiting with instantaneous processing capacity
limit_req zone=req_zone burst=5 nodelay;
If nodelay is set, it will instantly provide the ability to process (burst + rate) requests. When the number of requests exceeds (burst + rate), it will directly return 503. There is no need to wait for requests within the peak range.
Assuming that 10 requests are submitted within one second, it can be found that the server has processed 6 requests within one second (peak speed: one request in burst + 10s). For the remaining four requests, 503 is returned directly. If you continue to send 10 requests to the server in the next second, the server will directly reject the 10 requests and return 503.
Then check the / var/log/nginx/access.log log

It can be found that within 1s, the server processed 6 requests (peak speed: burst + original processing speed). For the remaining four requests, 503 is returned directly.
However, the total quota is consistent with the speed time, that is, the quota is used up. You need to wait until a time period with quota before receiving new requests. If five requests are processed at one time, it is equivalent to taking up the quota of 30s, 65 = 30. Because 6s is set to process one request, it is not until 30
s before another request can be processed, that is, if 10 requests are sent to the server at this time, 9 503 and one 200 will be returned
Distributed current limiting component
why
- However, the current limiting instruction of Nginx can only be valid in the same memory area. In the production scenario, the second kill external gateway is often deployed in multiple nodes, so the distributed current limiting component is required.
Redis+Lua can be used to develop high-performance distributed current limiting components. JD's rush purchase is to use Redis+Lua to complete current limiting. Redis+Lua current limiting component can be used for both Nginx external gateway and Zuul internal gateway.
Theoretically, the current limit of the access layer has multiple dimensions:
(1) User dimension flow restriction: the user is allowed to submit a request only once in a certain period of time. For example, the client IP or user ID can be used as the flow restriction key.
(2) Flow restriction of commodity dimension: for the same rush purchase commodity, only a certain number of requests are allowed to enter in a certain period of time. You can take the second kill commodity ID as the flow restriction key.
When to limit current with nginx:
User dimension current limiting can be performed on ngix, because using nginx current limiting memory to store user id is more efficient than using redis key to store user id.
When to use redis+lua distributed current limiting:
The current limit of commodity dimension can be carried out on redis without a large number of key s for calculating access times. In addition, it can control the total number of access second kill requests of all access layer nodes.
redis+lua distributed current limiting component
--- Environment for this script: redis Internal, not running nginx inside

---Method: request token
--- -1 failed
--- 1 success
--- @param key key Current limiting keyword
--- @param apply  Number of tokens requested
local function acquire(key, apply)
    local times = redis.call('TIME');
    -- times[1] Seconds   -- times[2] Microseconds
    local curr_mill_second = times[1] * 1000000 + times[2];
    curr_mill_second = curr_mill_second / 1000;

    local cacheInfo = redis.pcall("HMGET", key, "last_mill_second", "curr_permits", "max_permits", "rate")
    --- Local variable: time of last application
    local last_mill_second = cacheInfo[1];
    --- Local variable: number of previous tokens
    local curr_permits = tonumber(cacheInfo[2]);
    --- Local variable: bucket capacity
    local max_permits = tonumber(cacheInfo[3]);
    --- Local variable: token issuing rate
    local rate = cacheInfo[4];
    --- Local variable: the number of tokens this time
    local local_curr_permits = 0;

    if (type(last_mill_second) ~= 'boolean' and last_mill_second ~= nil) then
        -- Count the number of tokens in the time period
        local reverse_permits = math.floor(((curr_mill_second - last_mill_second) / 1000) * rate);
        -- Total number of tokens
        local expect_curr_permits = reverse_permits + curr_permits;
        -- Total number of tokens that can be requested
        local_curr_permits = math.min(expect_curr_permits, max_permits);
    else
        -- Get token for the first time
        redis.pcall("HSET", key, "last_mill_second", curr_mill_second)
        local_curr_permits = max_permits;
    end

    local result = -1;
    -- There are enough tokens to apply
    if (local_curr_permits - apply >= 0) then
        -- Save remaining tokens
        redis.pcall("HSET", key, "curr_permits", local_curr_permits - apply);
        -- Save time for the next token acquisition
        redis.pcall("HSET", key, "last_mill_second", curr_mill_second)
        -- Returns that the token was obtained successfully
        result = 1;
    else
        -- Return token acquisition failure
        result = -1;
    end
    return result
end
--eg
-- /usr/local/redis/bin/redis-cli  -a 123456  --eval   /vagrant/LuaDemoProject/src/luaScript/redis/rate_limiter.lua key , acquire 1  1

-- obtain sha Coded command
-- /usr/local/redis/bin/redis-cli  -a 123456  script load "$(cat  /vagrant/LuaDemoProject/src/luaScript/redis/rate_limiter.lua)"
-- /usr/local/redis/bin/redis-cli  -a 123456  script exists  "cf43613f172388c34a1130a760fc699a5ee6f2a9"

-- /usr/local/redis/bin/redis-cli -a 123456  evalsha   "cf43613f172388c34a1130a760fc699a5ee6f2a9" 1 "rate_limiter:seckill:1"  init 1  1
-- /usr/local/redis/bin/redis-cli -a 123456  evalsha   "cf43613f172388c34a1130a760fc699a5ee6f2a9" 1 "rate_limiter:seckill:1"  acquire 1

--local rateLimiterSha = "e4e49e4c7b23f0bf7a2bfee73e8a01629e33324b";

---Method: initialize current limiting Key
--- 1 success
--- @param key key
--- @param max_permits  Barrel capacity
--- @param rate  Token issuance rate
local function init(key, max_permits, rate)
    local rate_limit_info = redis.pcall("HMGET", key, "last_mill_second", "curr_permits", "max_permits", "rate")
    local org_max_permits = tonumber(rate_limit_info[3])
    local org_rate = rate_limit_info[4]

    if (org_max_permits == nil) or (rate ~= org_rate or max_permits ~= org_max_permits) then
        redis.pcall("HMSET", key, "max_permits", max_permits, "rate", rate, "curr_permits", max_permits)
    end
    return 1;
end
--eg
-- /usr/local/redis/bin/redis-cli -a 123456 --eval   /vagrant/LuaDemoProject/src/luaScript/redis/rate_limiter.lua key , init 1  1
-- /usr/local/redis/bin/redis-cli -a 123456 --eval   /vagrant/LuaDemoProject/src/luaScript/redis/rate_limiter.lua  "rate_limiter:seckill:1"  , init 1  1


---Method: delete current limit Key
local function delete(key)
    redis.pcall("DEL", key)
    return 1;
end
--eg
-- /usr/local/redis/bin/redis-cli  --eval   /vagrant/LuaDemoProject/src/luaScript/redis/rate_limiter.lua key , delete


local key = KEYS[1]
local method = ARGV[1]
if method == 'acquire' then
    return acquire(key, ARGV[2], ARGV[3])
elseif method == 'init' then
    return init(key, ARGV[2], ARGV[3])
elseif method == 'delete' then
    return delete(key)
else
    --ignore
end
In redis, in order to avoid wasting network resources by repeatedly sending script data, you can use the script load command to cache script data and return a hash code as the call handle of the script,
Each time you call the script, you only need to send a hash code to call it.
Distributed token current limiting practice
redis+lua can be used, and the simple case below the actual combat ticket:
The token is put into the token bucket at the rate of 1 token per second. The bucket can store up to 2 tokens, so the system will only allow continuous processing of 2 requests per second,
Or every two seconds, after two tokens in the bucket are full, deal with the emergencies of two requests at a time to ensure the stability of the system.
Current limit of commodity dimension
When the flow limit of the second kill commodity dimension, when the traffic of the commodity is far greater than the traffic involved, the request is randomly discarded.
Token bucket current limiting script gettoken of Nginx_ access_ Limit.lua is executed in the access phase of the request. However, the script does not implement the core logic of current limiting, and only calls the rate cached in Redis_ The limiter.lua script limits the current.
getToken_access_limit.lua script and rate_ The relationship between the limiter.lua script is shown in Figure 10-17.
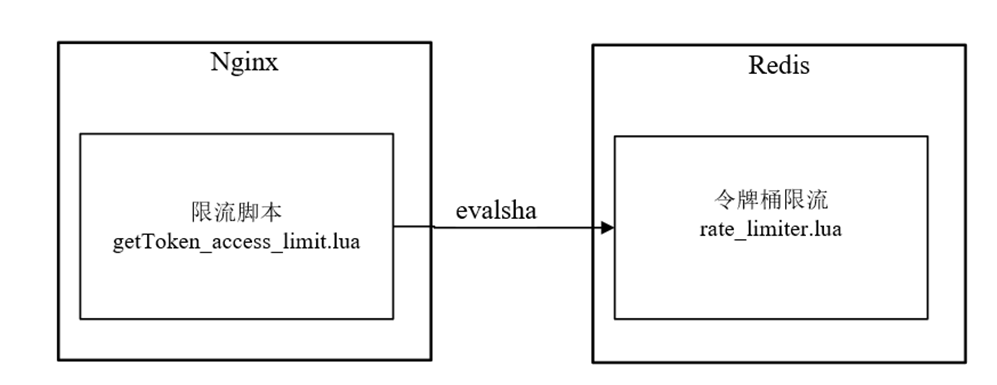
Figure 10-17 getToken_access_limit.lua script and rate_limiter.lua script relationship
When will the rate be loaded in Redis_ What about the limiter.lua script?
Like the second kill script, this script completes the loading and caching of goods in Redis when the Java program starts the second kill.
Another important point is that the Java program will encode the sha1 after the script is loaded and cache it in Redis through a custom key (specifically "lua:sha1:rate_limiter") to facilitate the gettoken of Nginx_ access_ The limit.lua script is used to get the and is used when calling the evalsha method.
Note: using redis cluster, each node needs to cache a copy of script data
/**
* Because redis cluster is used, each node needs to cache a copy of script data
* @param slotKey The slotKey used to locate the corresponding slot
*/
public void storeScript(String slotKey){
if (StringUtils.isEmpty(unlockSha1) || !jedisCluster.scriptExists(unlockSha1, slotKey)){
   //redis supports script caching and returns hash codes, which can be used to call scripts in the future
    unlockSha1 = jedisCluster.scriptLoad(DISTRIBUTE_LOCK_SCRIPT_UNLOCK_VAL, slotKey);
   }
}
Common current limiting components
Redismission distributed current limiting adopts the idea of token bucket and fixed time window. trySetRate method sets the bucket size. redis key expiration mechanism is used to achieve the purpose of time window and control the number of requests allowed to pass in the fixed time window.
spring cloud gateway integrates redis current limiting, but it belongs to gateway layer current limiting
Source: