
At the beginning, I really want to write a recipe, because of the limited cooking ability, so the title is a lie, ha ha^_~
Today, let's talk about the development of command-line tools (CLI: command-line interface, which will replace the long command-line tool terms with CLI).
After reading this article, you will have a more comprehensive understanding of developing a CLI from the beginning to the end.
You can also collect this article. When you want to develop a CLI, you can turn it over and find what you want.
Daniel: Peanut Cola is ready. Wait for the start.
Heller, let's GO
>Step 1: initialize the project
Create an empty project directory (next, we use cook cli as an example, so here we call it cook CLI), and then hit the command under the directory to initialize. The process is as follows:
$ mkdir cook-cli
$ cd cook-cli
$ npm init --yes
Through the npm init command, the directory will be initialized as a Node.js project, which will generate the package.json file in the cook cli directory.
Plus -- yes will automatically answer all the questions asked in the initialization process. You can try to remove this parameter and answer one question by yourself.
>Mainline through: CLI skeleton code
Now that the project is finished, let's add the skeleton code and let the CLI fly for a while.
- Implementer
We create the src/index.js file, which is responsible for the functional logic of CLI. It is actually working. The code is as follows:
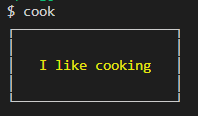
export function cli(args) {
    console.log('I like cooking');
}
- spokesperson
Then create the bin/cook file, which is the executable entry file of CLI and the spokesman of CLI in the executable environment. The code is as follows:
#!/usr/bin/env node

require = require('esm')(module /*, options*/);
require('../src').cli(process.argv);
Careful you will find that the module esm is used here. Its function is to let us directly use ECMAScript modules specification to load modules in JS source code, that is, to directly use import and export. The above src/index.js code can directly write export benefits from this module.
(run npm i esm in the project root to install the module)
- Official announcement
We have spokesmen, but we have to publicize them. So add bin statement in package.json to announce the existence of spokesperson. As follows:
{
  ...
  "bin": {
    "cook": "./bin/cook"
  },
  ...
}
>Time rehearsal: local operation and debugging
Before CLI came into being, local development and debugging were essential, so convenient debugging methods were very necessary.
Daniel: to develop Web applications, I can debug functions through a browser. What about CLI yesterday?
The CLI eventually runs on the terminal, so we need to register it as a local command line first. The method is very simple. Run the following command in the root directory of the project:
$ npm link
This command registers a cook CLI in the local environment and links its execution logic to your project directory, so it takes effect immediately after each modification is saved.
Try the following command:
$ cook

Daniel: Nice! But I have another problem. I want to set breakpoints in vscode to debug, which sometimes makes it easier to troubleshoot problems
You're right. The method is also very simple. Just add the following configuration in vscode: debug > Add configuration. Modify the args value according to the actual command parameters to be debugged.
{
    "configurations": [
        {
            "type": "node",
            "request": "launch",
            "name": "Cook",
            "program": "${workspaceFolder}/bin/cook",
            "args": ["hello"] // Fill in the parameters you want to debug
        }
    ]
}
>Intention recognition: enter parameter analysis
Insert a little episode: Although you may often encounter various CLI in your work, it is necessary to briefly introduce some terms involved in CLI:
- Commands and sub command s
# cook is an order
$ cook

# start is a subcommand of cook
$ cook start
- Command options
# -V is the option of short flag (Note: only one letter, multiple letters represent multiple options)
$ cook -V

# --version is the option of full write mode (long name)
$ cook --version
- Command parameter (argument)
# source.js and target.js are parameters of cp command
$ cp source.js target.js
In fact, subcommands are also parameters of commands
Ok, from the above introduction, we want to implement a CLI. The parsing of input parameters (including subcommand, options, argument) is inevitable. Let's face them directly.
commander: Hey, man, don't be afraid. I'm here!
Yes, brother, it's nice to have you. Next, we use the command module to parse the input parameters. The process and examples are as follows:
- Module installation
$ npm i commander
- src/index.js example
......
import program from 'commander';

export function cli(args) {
    program.parse(args);
}
It's just so crisp and neat.
Daniel: how about joining? How to use it?
In the next example, we will use these parsed input parameters. So, please take a moment.
>Can't do without you: version and help
Version and help information is a necessary part of CLI, otherwise it is not professional. Let's see how to achieve it.
Modify src/index.js as follows:
import program from 'commander';
import pkg from '../package.json';

export function cli(args) {
    program.version(pkg.version, '-V, --version').usage('<command> [options]');

    program.parse(args);
}
Through the chain call of program.version and usage, it's done. It's still so cold.
Try the following command:
$ cook -V

$ cook -h

>Add general: add subcommand
Now let's start to enrich the functions of CLI, starting with the addition of a subcommand start.
It has a parameter food and an option -- fruit. The code is as follows:
......
export function cli(args) {
  .....

  program
    .command('start <food>')
    .option('-f, --fruit <name>', 'Fruit to be added')
    .description('Start cooking food')
    .action(function(food, option) {
      console.log(`run start command`);
      console.log(`argument: ${food}`);
      console.log(`option: fruit = ${option.fruit}`);
    });

  program.parse(args);
}
The above example shows how to get the parsed input parameters. In action, you can get everything you want and what you want to do. It's entirely up to you.
Try to run the subcommand:
$ cook start pizza -f apple

>Seek foreign aid: call external command
Sometimes, we need to call external commands in CLI, such as npm.
execa: it's my turn to play. ┏ (^ω^)=☞
- Module installation
$ npm i execa
- src/index.js example
......
import execa from 'execa';

export function cli(args) {
  .....

  program
    .command('npm-version')
    .description('Display npm version')
    .action(async function() {
      const { stdout } = await execa('npm -v');
      console.log('Npm version:', stdout);
    });

  program.parse(args);
}
The external command npm -v is called through execa. Let's print the version number of npm:
$ cook npm-version

>Facilitating communication: providing human-computer interaction
Sometimes we want the CLI to interact with users through question and answer, and users can provide the information we want through input or selection.
At this time, a strong wind blew by, and Inquirer.js came to us with colorful clouds.
- Module installation
$ npm i inquirer
The most common scenarios are: text input, option, check, radio selection. Examples are as follows:
- src/index.js example
......
import inquirer from 'inquirer';

export function cli(args) {
  ......

  program
    .command('ask')
    .description('Ask some questions')
    .action(async function(option) {
      const answers = await inquirer.prompt([
        {
          type: 'input',
          name: 'name',
          message: 'What is your name?'
        },
        {
          type: 'confirm',
          name: 'isAdult',
          message: 'Are you over 18 years old?'
        },
        {
          type: 'checkbox',
          name: 'favoriteFrameworks',
          choices: ['Vue', 'React', 'Angular'],
          message: 'What are you favorite frameworks?'
        },
        {
          type: 'list',
          name: 'favoriteLanguage',
          choices: ['Chinese', 'English', 'Japanese'],
          message: 'What is you favorite language?'
        }
      ]);
      console.log('your answers:', answers);
    });

  program.parse(args);
}
The code is simple, go to the renderings directly:

>Reduce anxiety: waiting for reminders
Human computer interaction experience is very important. If the work can not be completed immediately, it is necessary to timely feedback the progress of the user's current work, which can reduce the user's waiting anxiety.
ora and listr are shoulder to shoulder, walking in neat steps and coming face to face.
The first player on the court was ora
- Module installation
$ npm i ora
- src/index.js example
......
import ora from 'ora';

export function cli(args) {

  ......

  program
    .command('wait')
    .description('Wait 5 secords')
    .action(async function(option) {
      const spinner = ora('Waiting 5 seconds').start();
      let count = 5;

      await new Promise(resolve => {
        let interval = setInterval(() => {
          if (count <= 0) {
            clearInterval(interval);
            spinner.stop();
            resolve();
          } else {
            count--;
            spinner.text = `Waiting ${count} seconds`;
          }
        }, 1000);
      });
    });

  program.parse(args);
}
If you don't want to say much, just above:

listr followed.
- Module installation
$ npm i listr
- src/index.js example
......
import Listr from 'listr';

export function cli(args) {
  ......

  program
    .command('steps')
    .description('some steps')
    .action(async function(option) {
      const tasks = new Listr([
        {
          title: 'Run step 1',
          task: () =>
            new Promise(resolve => {
              setTimeout(() => resolve('1 Done'), 1000);
            })
        },
        {
          title: 'Run step 2',
          task: () =>
            new Promise((resolve) => {
              setTimeout(() => resolve('2 Done'), 1000);
            })
        },
        {
          title: 'Run step 3',
          task: () =>
            new Promise((resolve, reject) => {
              setTimeout(() => reject(new Error('Oh, my god')), 1000);
            })
        }
      ]);

      await tasks.run().catch(err => {
        console.error(err);
      });
    });

  program.parse(args);
}
I still don't say much, but I'm still directly above:
>Add some color: let life no longer monotonous
chalk: I'm a young man of art. I live for art. It's up to me. < <
- Module installation
$ npm i chalk
- src/index.js example
.....
import chalk from 'chalk';


export function cli(args) {

  console.log(chalk.yellow('I like cooking'));

  .....

}
With the color CLI, do you feel more happy

>Facade decoration: add a border
boxen: This is my favorite. Look at me! > < > >
- Module installation
$ npm i boxen
- src/index.js example
......
import boxen from 'boxen';

export function cli(args) {

  console.log(boxen(chalk.yellow('I like cooking'), { padding: 1 }));

  ......
}
Well, it looks more professional:
>Published results: can be published
If you are publishing as a scope, for example @ Daniel DX / cook cli. Then add the following configuration in package.json to allow you to publish successfully (of course, if you are a paid member of npm, this configuration can be saved)
{
  "publishConfig": {
    "access": "public"
  },
}
Close to the door, launch:
$ npm publish
OK, your CLI has been released all over the world. Now you can go to https://www.npmjs.com/ Go to query the CLI you published.
>Warm reminder: it's time to upgrade
Update notifier: it's finally me. I'll wait until the flowers are gone X X
- Module installation
$ npm i update-notifier
- src/index.js example
......

import updateNotifier from 'update-notifier';

import pkg from '../package.json';

export function cli(args) {
  checkVersion();

  ......
}

function checkVersion() {
  const notifier = updateNotifier({ pkg, updateCheckInterval: 0 });

  if (notifier.update) {
    notifier.notify();
  }
}
For local debugging, we will reduce the local CLI to a version, change the version of package.json to 0.0.9, and then run the cook to check the effect:

o( ̄) o perfect!
The above details some necessary or common steps for developing a CLI.
Of course, if you only want to develop a CLI quickly, as some leaders often say: don't tell me the process, I just want the result. You can use frameworks such as oclif, which are designed for CLI development, out of the box.
As a programmer, we still need to pay some time and energy for the understanding of the origin and development of the solution and the past life and this life, which can make us more practical and go further.
OK, I'll talk about it today. Goodbye to my friends!
Almost forgotten, attach the source code of the example: https://github.com/daniel-dx/cook-cli
┏(^0^)┛ ByeBye!