1. Continuous characteristics:
- Frequent release
- Automated process
- Repeatable
- Fast iteration
2. Purpose of continuous integration:
The team is developed by multiple people. Everyone can submit code independently. Continuous integration can be verified by automatic construction (including compilation, release and automatic testing), so as to find integration errors sooner or later.
3. Continuous integration tools:
Code management tool - > SVN, packaging and compiling tool - > Maven [nodejs], automatic publishing tool jenkins, code static scanning - > sonar, automatic detection tool (JUnit developed by unit test framework Java)
Basic technology:
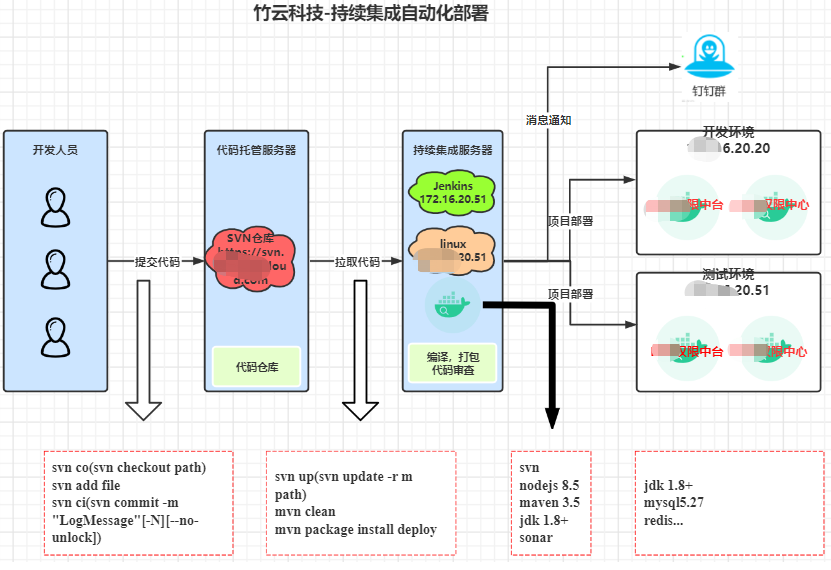
4. Continuous integration deployment diagram:
5. Install configuration deployment
5.1 installation and configuration of sonarqube, tomcat and jenkins
jdk Download: https://www.oracle.com/java/technologies/downloads/archive/ (the current case download is jdk-8u261-linux-x64.tar.gz Version)
sonarqube Download: https://www.sonarqube.org/downloads/ (the current case download is sonarqube-6.7.7.zip Version)
Sonar scanner Download: https://binaries.sonarsource.com/Distribution/sonar-scanner-cli/ (the current case is downloaded from sonar- scanner-cli-3.3.0.1492-linux.zip)
tomcat Download: https://tomcat.apache.org/ (the current instance Downloads apache-tomcat-8.5.72.tar.gz)
jenkins Download: http://updates.jenkins-ci.org/download/war/ (the current instance Downloads 2.315)
nodejs Download: https://nodejs.org/en/download/ (version 12.1. And 14.18.1 are used in this case)
5.1.1 jdk installation configuration
5.1.1.1 # check whether OpenJDK is installed on the server
yum list installed |grep java
or
rpm -qa |grep jdk
If you are installing, you can use the command:
yum -y remove jdk-package-name
or
rpm -e jdk-package-name
5.1.1.2 # upload the downloaded jdk-8u261-linux-x64.tar.gz package to the server and unzip it to the specified directory / usr/local/java
tar -zxvf jdk-8u261-linux-x64.tar.gz -C /usr/local/java
5.1.1.3 # configuring JDK environment variables
echo '''

#JDK global variable configuration
export JAVA_HOME=/usr/local/java
export PATH=$PATH:$JAVA_HOME/bin
''' >> /etc/profile
5.1.1.4 # environmental variables take effect immediately
source /etc/profile
5.1.1.5 # check whether JDK environment variables are effective
#java -version
java version "1.8.0_261"
Java™ SE Runtime Environment (build 1.8.0_261-b12)
Java HotSpot™ 64-Bit Server VM (build 25.261-b12, mixed mode)
5.1.2. sonarqube installation configuration
5.1.2.1 preparation before installation
#-------Create directories, users, user groups, and assign permissions-------------------
mkidr web #Create directory: web
cd web	#Enter the installation directory
unzip sonarqube-6.7.7.zip	#Unzip the uploaded file
groupadd sonarqube	#Create sonarqube group
useradd sonarqube -g sonarqube -p sonarqube	#Create a user with a username of sonarqube and a password of sonarqube belonging to a group of sonarqube
chown -R sonarqube:sonarqube /web/sonarqube-6.7.7	#Assign folder permissions to this user
#-----------------Create a persistent database in mysql----------------------------------
mysql> create database sonar default character set utf8;	-- Create database sonar
mysql>creat user sonar@"%" identified by "Sonar9.1";	-- Create user sonar,Password is Sonar9.1
mysql> grant all privileges on sonar.* to sonar;	-- To users sonar distribution sonar Database operation permission
mysql>flush privileges;	-- Refresh permissions
mysql> update mysql.user set authentication_string=password('Sonar9.1') where user='sonar' and host='%'; 	-- Modify user password
5.1.2.2 editing configuration file
vi /web/sonarqube-6.7.7.zip/conf/sonar.properties
#Set the memory size used by the jvm. The minimum memory used by Xms and the maximum memory used by Xmx can be set according to the actual situation. My current system running memory is 8G
sonar.web.javaOpts=-server -Xms1G -Xmx1G -XX:+HeapDumpOnOutOfMemoryError

#Configure the account password of the persistent database
sonar.jdbc.username=sonar
sonar.jdbc.password=Sonar9.1

#Configure the url. I use mysql here. mysql is no longer supported after version 7.1
sonar.jdbc.url=jdbc:mysql://172.16.20.51:3306/sonar?useUnicode=true&characterEncoding=utf8&rewriteBatchedStatements=true&useConfigs=maxPerformance&useSSL=false
5.1.2.3 configure startup parameters
vim /web/sonarqube-6.7.7/bin/linux-86-64((select here according to system memory)/sonar.sh
Modify RUN_AS_USER=sonarqube
That is, the user we created earlier
#Set the access URL as http://centos:9000/sonar
sonar.web.host=172.16.20.51
sonar.web.port=9000

sonar.web.context=/sonar
5.1.2.4 start sonarqube
#Switch to the sonarqube user first
su sonarqube
#Execute start command
cd /web/sonarqube-6.7.7/bin/linux-86-64/
sh sonar.sh start
Attach sonar startup command:
sh sonar.sh start #Start sonar
sh sonar.sh stop #Safe stop sonar
sh sonar.sh console #Console start sona
r
#View log
cd ../../logs
Logs are divided into sonar.log, es.log and web.log. If startup fails for unknown reasons, you can view these logs in turn.
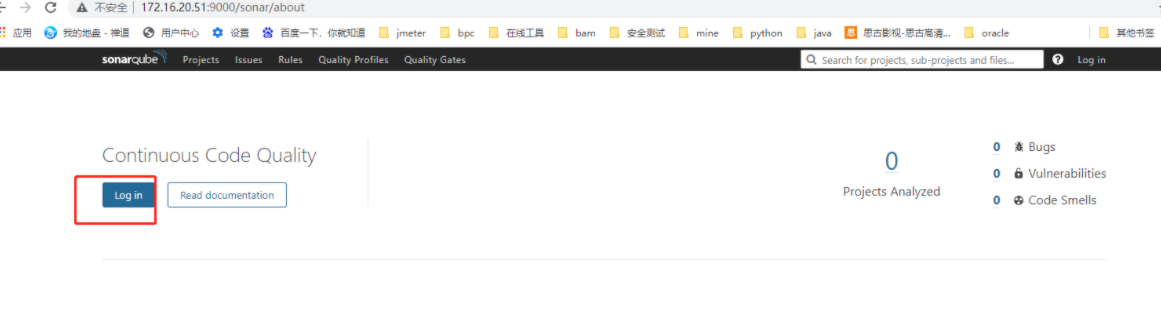
After startup, if there is no error in the log file, you can access it http://localhost:9000/sonar , if successful, the following interface will appear
An error occurs when starting (reason: the version is incompatible. Because jdk1.8 is already installed in the current system, the sonar version is reduced from 9.1 to 6.7.7):
Phenomenon 1:
Launching a JVM...
JVM exited while loading the application.
Unrecognized option: --add-exports=java.base/jdk.internal.ref=ALL-UNNAMED
Error: Could not create the Java Virtual Machine.
Error: A fatal exception has occurred. Program will exit.
JVM Restarts disabled. Shutting down.
<-- Wrapper Stopped
Phenomenon 2:
–> Wrapper Started as Daemon
Launching a JVM...
Wrapper (Version 3.2.3) http://wrapper.tanukisoftware.org
Copyright 1999-2006 Tanuki Software, Inc. All Rights Reserved.
WrapperSimpleApp: Unable to locate the class org.sonar.application.App: java.lang.ClassNotFoundException: org.sonar.application.App
WrapperSimpleApp Usage:
java org.tanukisoftware.wrapper.WrapperSimpleApp {app_class} [app_arguments]
Where:
app_class: The fully qualified class name of the application to run.
app_arguments: The arguments that would normally be passed to the
application.
<-- Wrapper Stopped
5.1.2.5 log in to verify and view sonar service platform
Enter in the browser“ http://172.16.20.51:9000/sonar ”The default username and password is "admin/admin"
Login with user name and password (admin/admin)
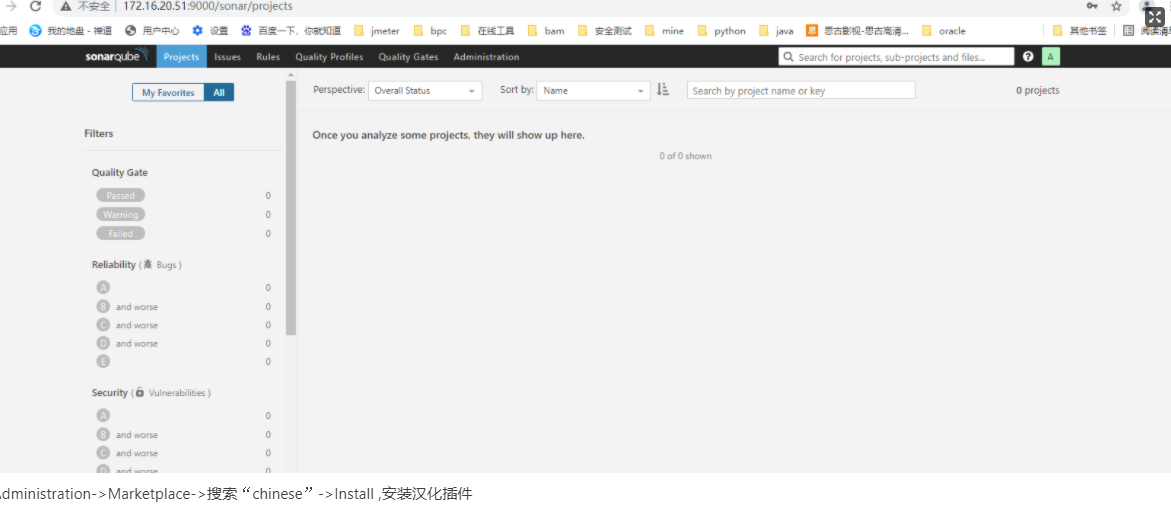
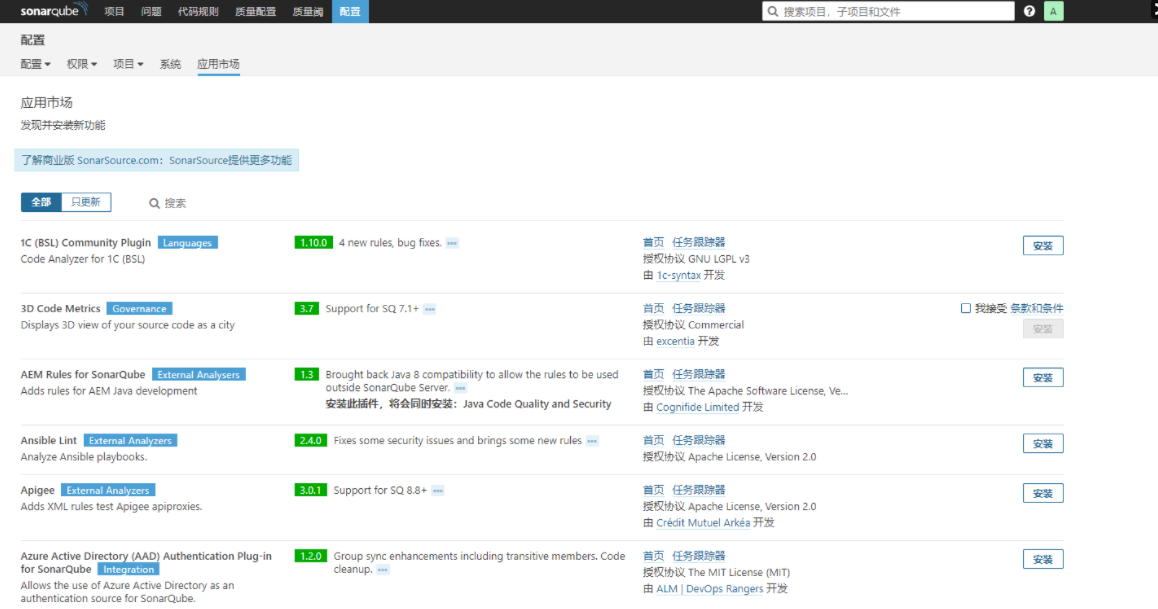
Administration - > Marketplace - > search for "chinese" - > install and install chinese plug-ins
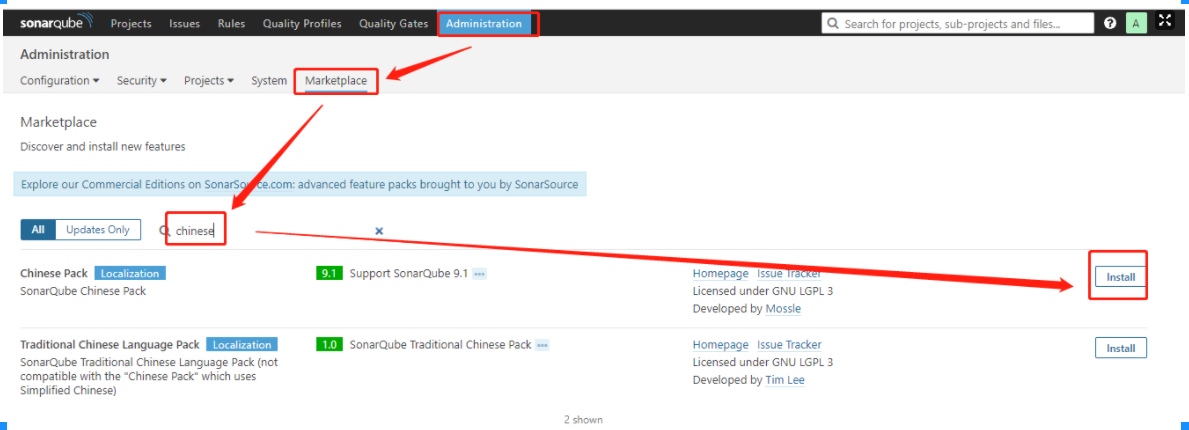
If an error "Error while downloading plugin 'l10nzhtw' with version '1.0'. No compatible plugin found." occurs, it indicates that the version is incompatible. You can find the plug-in of the corresponding version on the Internet, put it in the... /... / extensions/plugins directory, and restart the sonar service [use the command... /... / sonar.sh start] or operate through the page "Configuration - > System - > Restart server"] takes effect. However, if the installed plug-in is lower than the current version, some displays will still be in English.
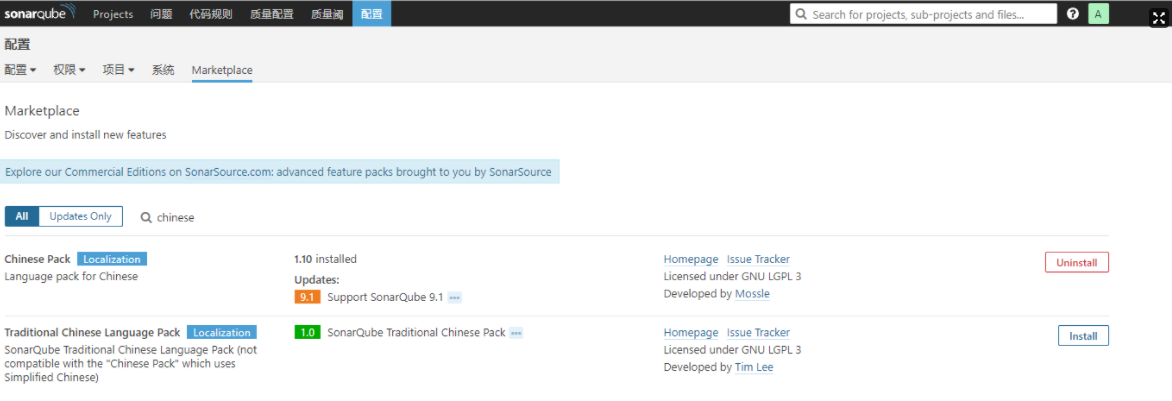
The above figure shows that the plug-in "sonar-l10n-zh-plugin-1.10.jar" is installed, but the corresponding Chinese plug-in version of sonarqube 6.7.7 is sonar-l10n-zh-plugin-1.19.jar. The following figure shows the display after updating the plug-in.
5.1.3. Sonar scanner installation configuration
Upload sonar-scanner-cli-3.3.0.1492-linux.zip to the server and unzip it to the specified directory / web /
unzip sonar-scanner-cli-3.3.0.1492-linux.zip -d /web/
5.1.3.1) modify configuration file
vi sonar-scanner-3.3.0.1492-linux/conf/sonar-scanner.properties
#-----The sonar service url and login user name and password information can also be logged in with a token to ensure security
sonar.host.url=http://172.16.20.51:9000\/sonar
sonar.login=3e83c03c0946102e0106386e7716392293c33625
#sonar.login=admin
#sonar.password=admin
#----- Default source code encoding
#sonar.sourceEncoding=UTF-8
#The project configuration sonar.projectKey is a unique value in sonar
sonar.projectKey=demo
#sonar.projectName the name of the project displayed in sonar
sonar.projectName=HelloWorld
sonar.projectVersion=1.0
#The path of scanning code. If the configuration file is a relative path in the project, it can be an absolute path in the conf of sonar scanner
sonar.sources=/root\/demo\/src
#Scan the path where the code is compiled and stored
sonar.java.binaries=target\/classes
5.1.3.2) configure environment variables
echo '''

#Sonar scanner global variable configuration
export SONAR_RUNNER_HOME=/web/sonar-scanner-3.3.0.1492-linux
export PATH=$PATH:$SONAR_RUNNER_HOME/bin
''' >>/etc/profile
5.1.3.3 immediate effect of environmental variables
source /etc/profile
5.1.3.4 verify whether the installation configuration is successful
sonar-scanner
5.1.3.5 configuration items,
The configuration file sonar-scanner.properties should be placed in the directory of scanning code
#Configure sonar login with user name and password [or token sonar.login=token]
sonar.login=admin
sonar.password=admin

#Set the access URL as http://centos:9000/sonar
sonar.web.host=172.16.20.51:9000/sonar

#Project keywords for sonar
sonar.projectKey=demo

#Project name displayed on sonar
sonar.projectName=demo

#Version number displayed on sonar
sonar.projectVersion=1.0

#Relative directory of maven project containing pom.xml
sonar.sources=src

#java compiled file directory
sonar.java.binaries=target/classes
5.1.3.6 code scanning can be performed under the current code directory
sonar-scanner
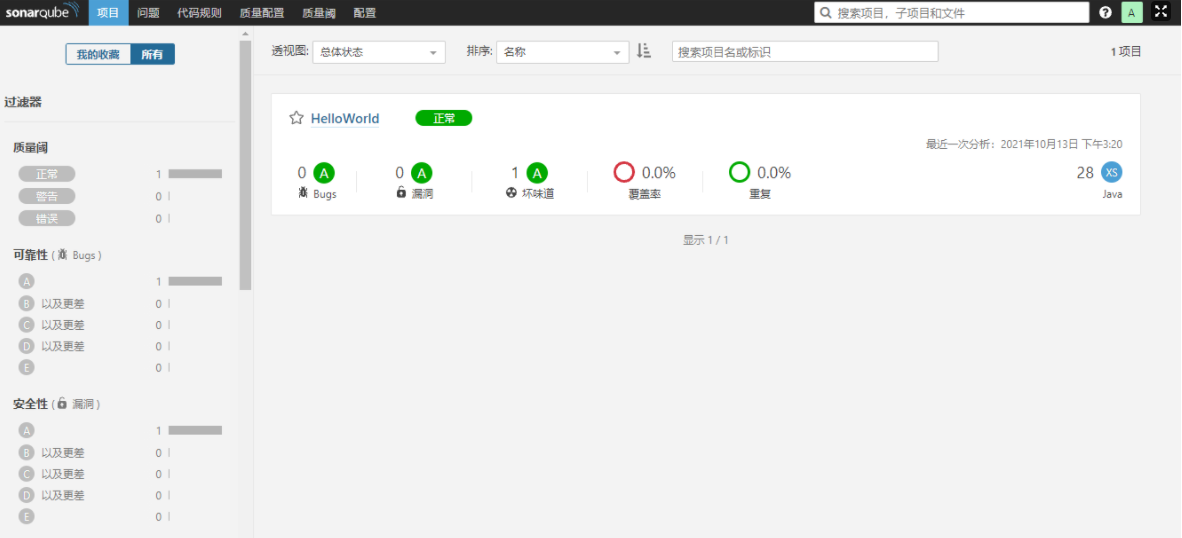
View the scan results on the sonar service platform:
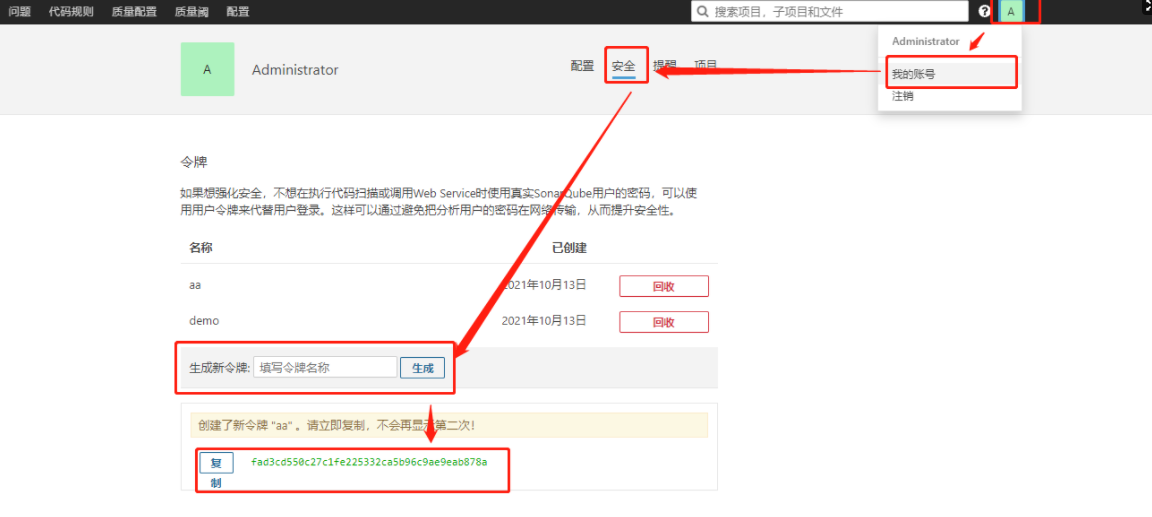
5.1.3.7 generate token on sonar service platform
If tokens are used in the project configuration, tokens need to be generated on the sonar service platform.
Right click the login account - > my account - > Security - > enter and generate a new token, such as "aa", click generate - > copy. If the token of aa is "fad3cd550c27c1fe225332ca5b96c9ae9eab878a", copy the token to "sonar.login=fad3cd550c27c1fe225332ca5b96c9ae9eab878a" in the configuration file. Once you leave this page, the self-made token will not be visible
Problems:
ERROR: SonarQube server [http://172.16.20.51:9000] can not be reached
Reason: the address is not configured correctly. The url address of the server is http://172.16.20.51:9000/sonar The url configured in sonar - scanner. Properties defaults to "sonar"
Solution: change the url address to“ http://172.16.20.51:9000/sonar ”Just.
Note: the path to execute the scanning code and the path to the project code. During execution, the configuration file in the environment variable, that is, the configuration file of sonar-scanner.properties under% SONAR_RUNNER_HOME%conf /, is preferred. If the configuration file under the current execution directory is not used again.
5.1.4 tomcat installation configuration
Note: don't use the latest version of tomcat, otherwise the container will fail to start because it is incompatible with the jenkins version. The current version is Tomcat 8.
5.1.4.1) upload and unzip the file to the specified directory and rename it jenkins folder.
tar -zxvf apache-tomcat-8.5.72.tar.gz -C /usr/local/
mv apache-tomcat-8.5.72 jenkins
5.1.4.2) startup item configuration: since the server has already run a tomcat project, in order not to affect the normal operation of other projects, a tomcat is restarted. This requires configuration of the new startup item. Modify... / bin/catalina.sh
Add jdk path and tomcat startup file path:
export JAVA_HOME=/usr/local/java
export JAVA_BIN=$JAVA_HOME/bin
export PATH=$PATH:$JAVA_HOME/bin
export CATALINA_HOME=/usr/local/jenkins
5.1.4.3) to ensure that the ports do not conflict during startup, you also need to modify the... / conf/server.xml file
<Server port="8890" shutdown="SHUTDOWN">
<Connector port="8888" protocol="HTTP/1.1"
               connectionTimeout="20000"
               redirectPort="8443" />

#Server port, service port, Connector port, client access port.
5.1.4.4) start and verify whether it is normal
#Modify the permissions of the executable first, otherwise the startup will fail
chmod +X /usr/local/jenkins/bin/*.sh
#Start tomcat
cd /usr/local/jenkins/bin
./start.sh
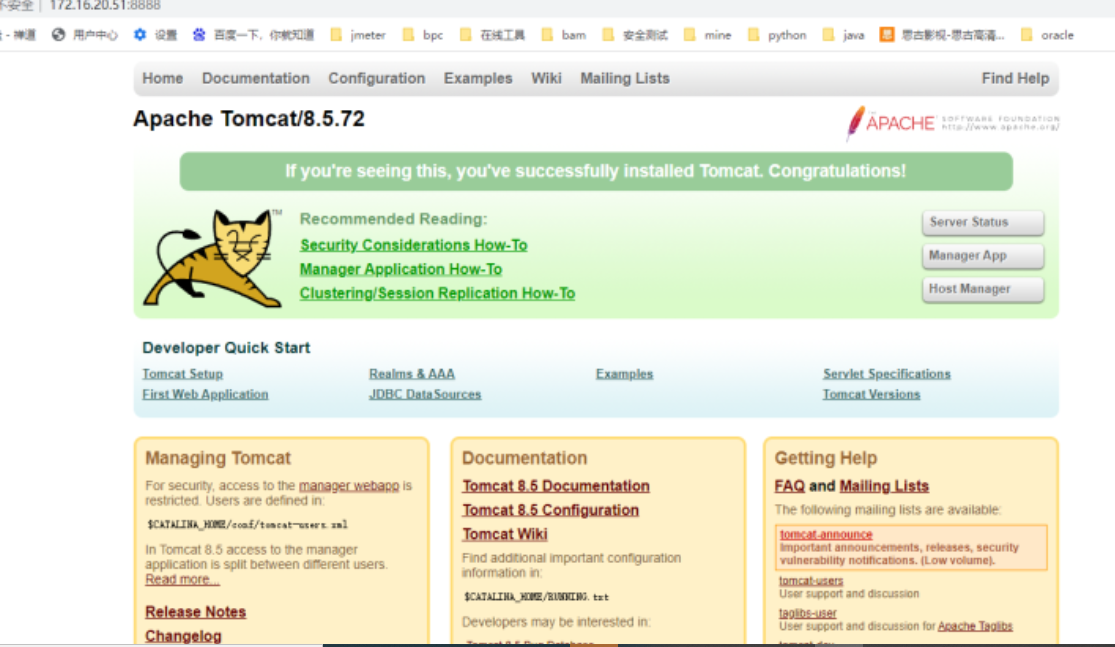
5.1.4.5) verify whether it is normal and enter in the browser“ http://172.16.20.51:8888/jenkins ”, the following interface appears, indicating normal startup.
5.1.4.6) in order to freely publish to the local tomcat in jenkins, it is necessary to modify the tomcat configuration file... / conf / tomcat users.xml and add the following information:
<tomcat-users>
<role rolename="tomcat"/>
<role rolename="admin-gui"/>
<role rolename="admin-script"/>
<role rolename="manager"/>
<role rolename="manager-gui"/>
<role rolename="manager-script"/>
<role rolename="manager-jmx"/>
<role rolename="manager-status"/>
<user name="tomcat" password="tomcat" roles="tomcat,admin-gui,admin-script,manager,manager-gui,manager-script,manager-jmx,manager-status" />
</tomcat-users>
Note: if tomcat is version 8 +, you also need to create a manager.xml file in... / conf/Catalina/localhost. The content is as follows:
<?xml version="1.0" encoding="UTF-8"?>
<Context privileged="true" antiResourceLocking="false"
         docBase="${catalina.home}/webapps/manager">
    <Valve className="org.apache.catalina.valves.RemoteAddrValve" allow="^.*$" />
</Context>
5.1.5 jenkins installation configuration
Because tomcat has been installed earlier, jenkins installation and pairing is relatively simple.
5.1.5.1) upload the file jenkins.war to the webapp directory of tomcat and restart tomcat
5.1.5.2) enter in the browser“ http://172.16.20.51:8888/jenkins ”, the following interface appears, indicating normal
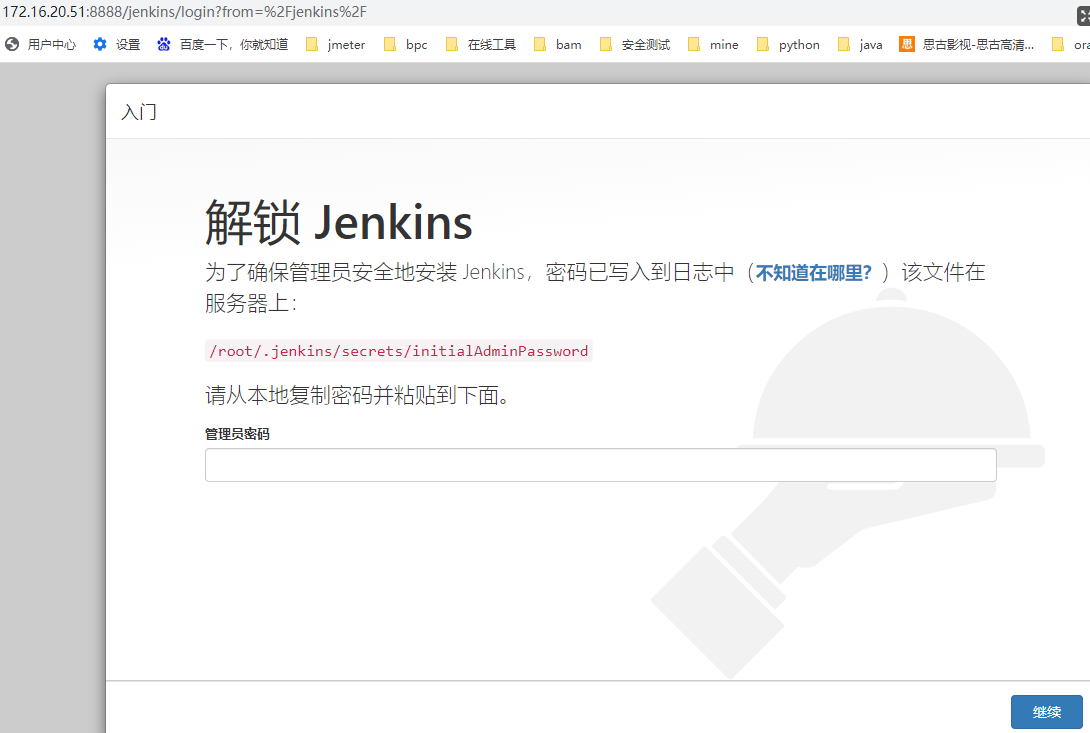
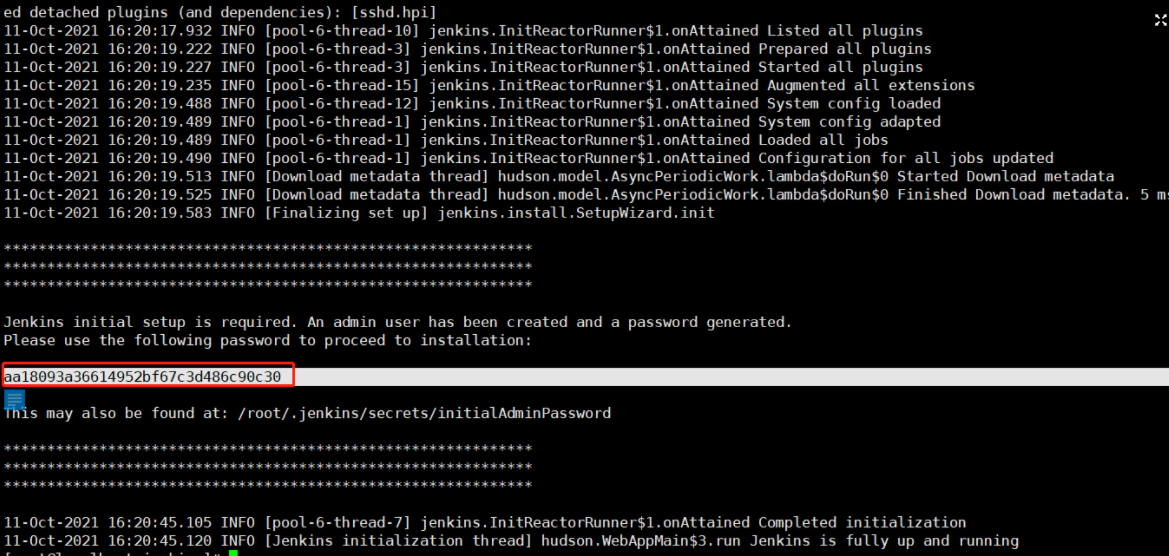
Use this command "tail -n 200... / logs/catalina.out" to view the output log in the log file of tomcat, that is, the information "aa18093a36614952bf67c3d486c90c30" in the following figure
Next, install the recommended plug-ins automatically
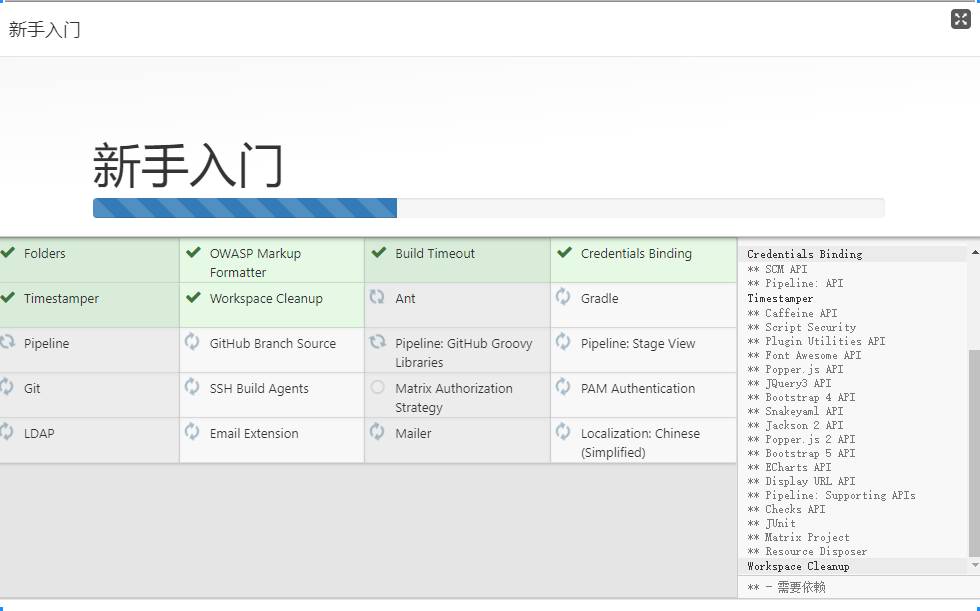
Follow the prompts for the next step until complete.
5.1.5.3) jenkins plug-in installation
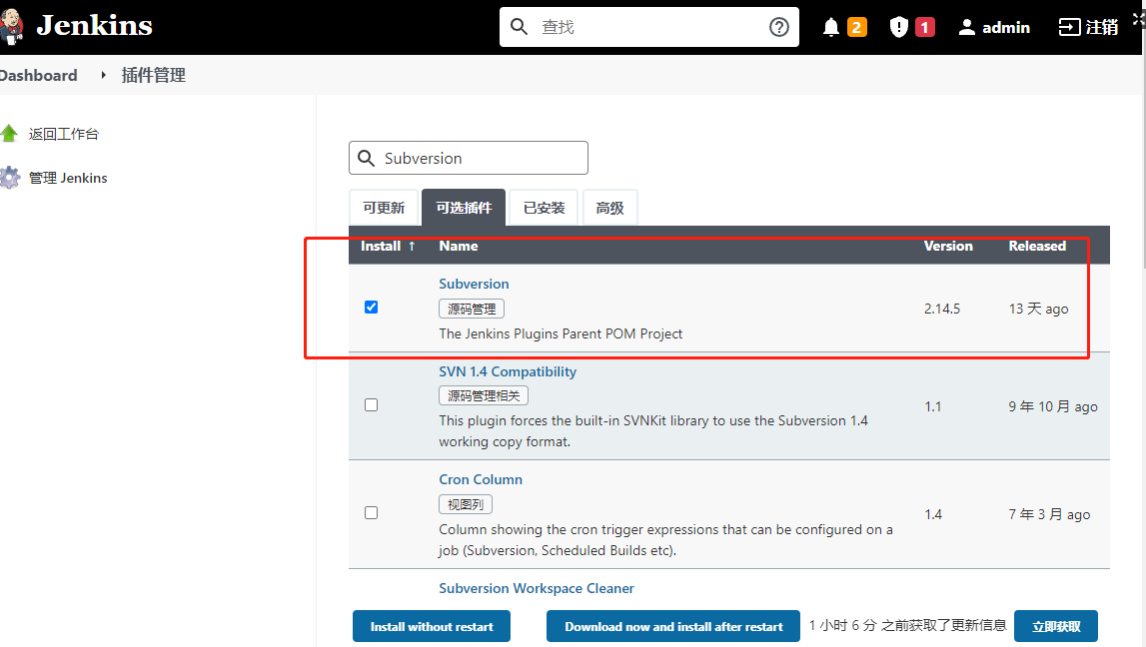
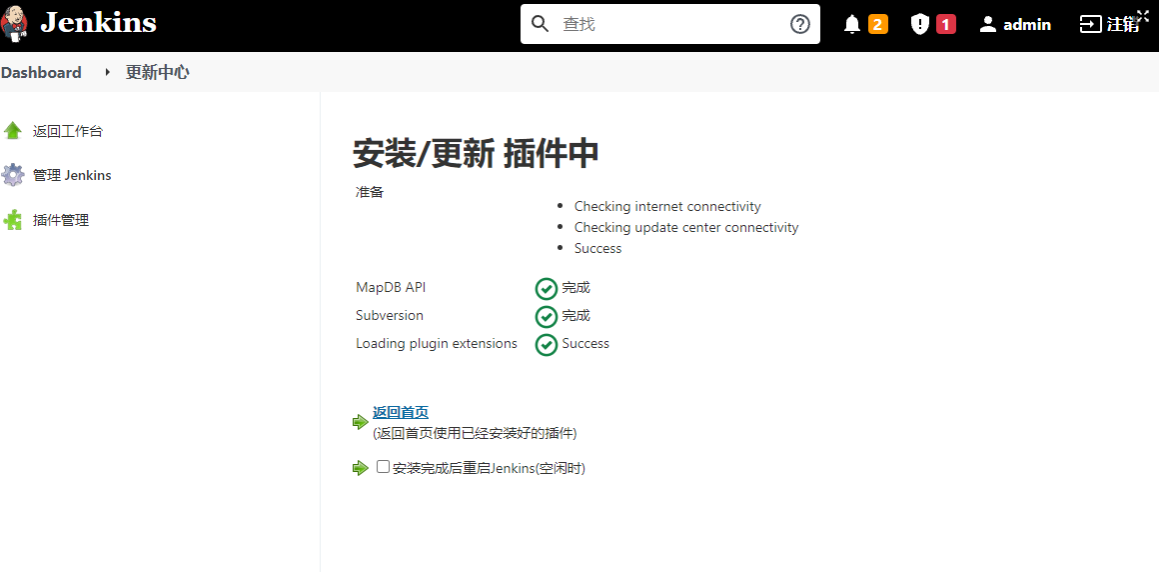
svn plug-in: search for "Subversion", select "Install" and start jenkins together, so click "Install without restart"
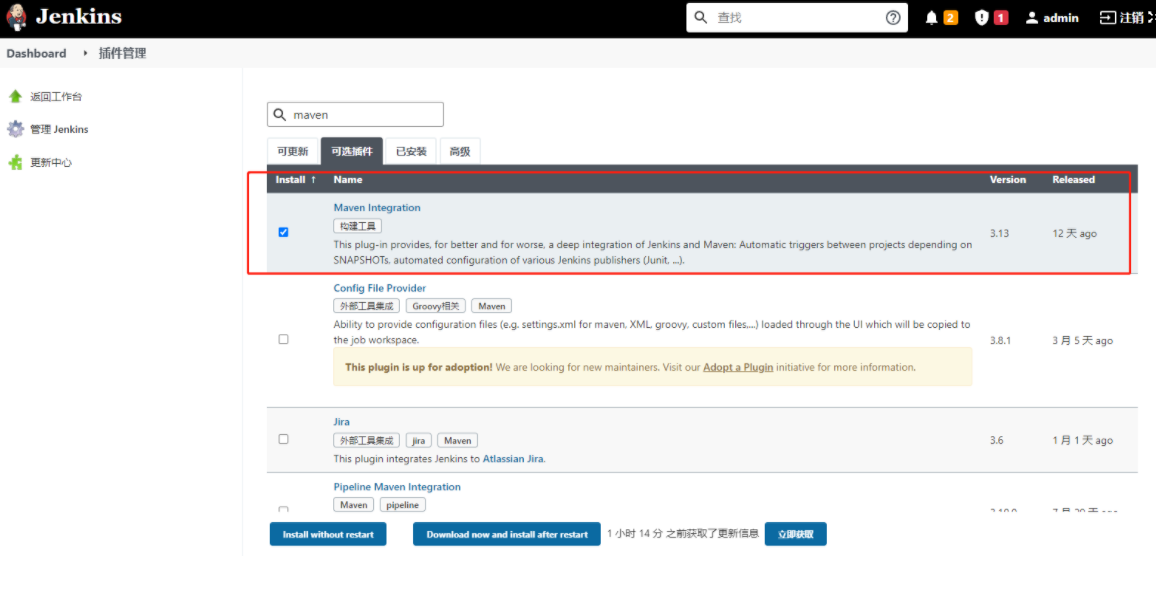
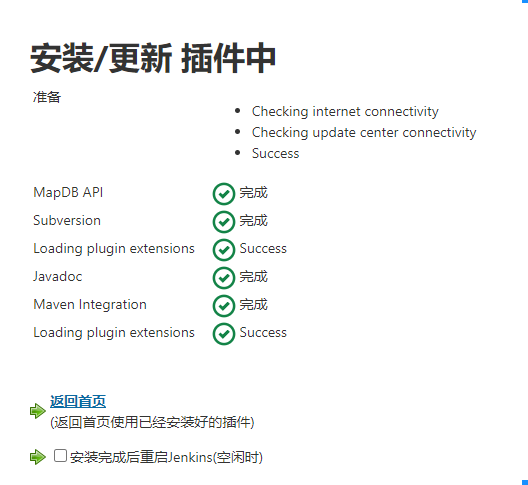
maven plug-in: Search "maven", select "Install" and start jenkins together, so click "Install without restart"
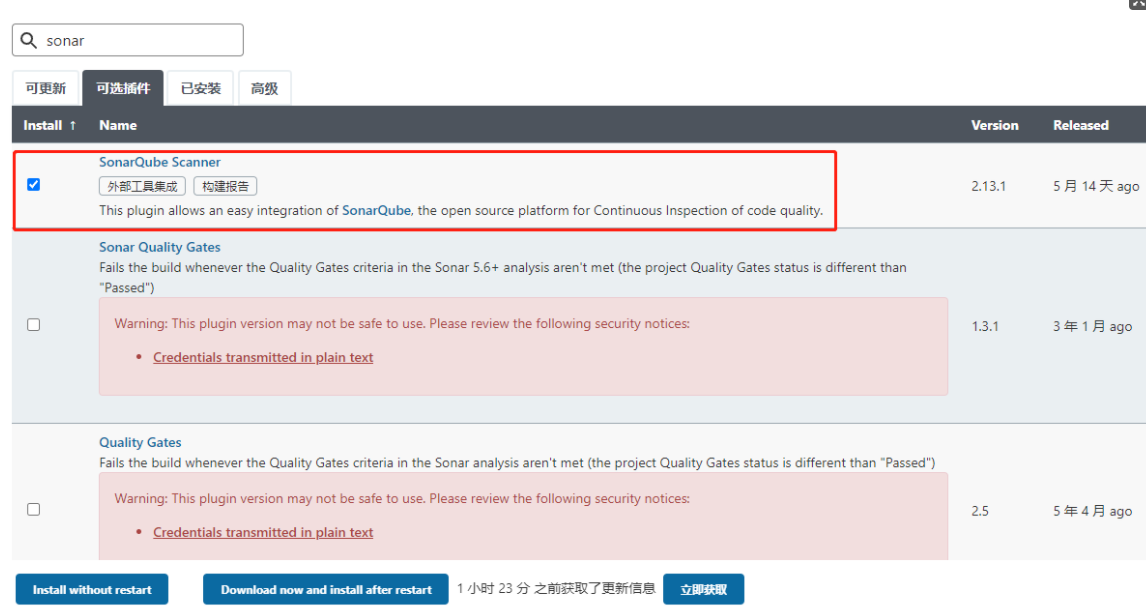
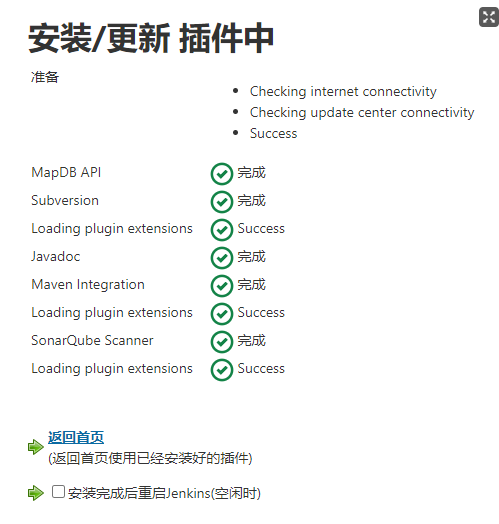
Sonar plug-in: Search "sonar", select "SonarQube Scanner" and then install. Finally, start jenkins together, so click "Install without restart"
yum install subversion -y
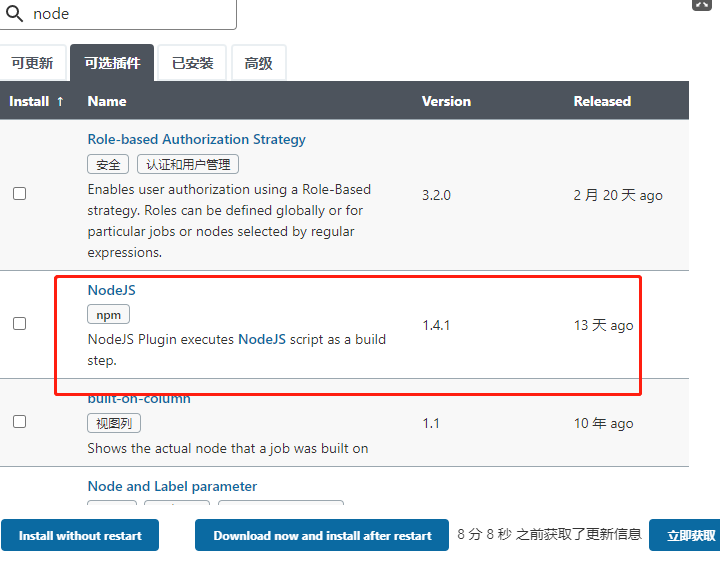
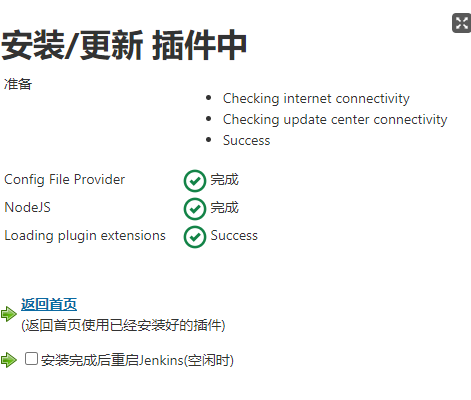
NodeJs plug-in: search for "node", select "NodeJs" and then install. Finally, start jenkins together, so click "Install without restart"
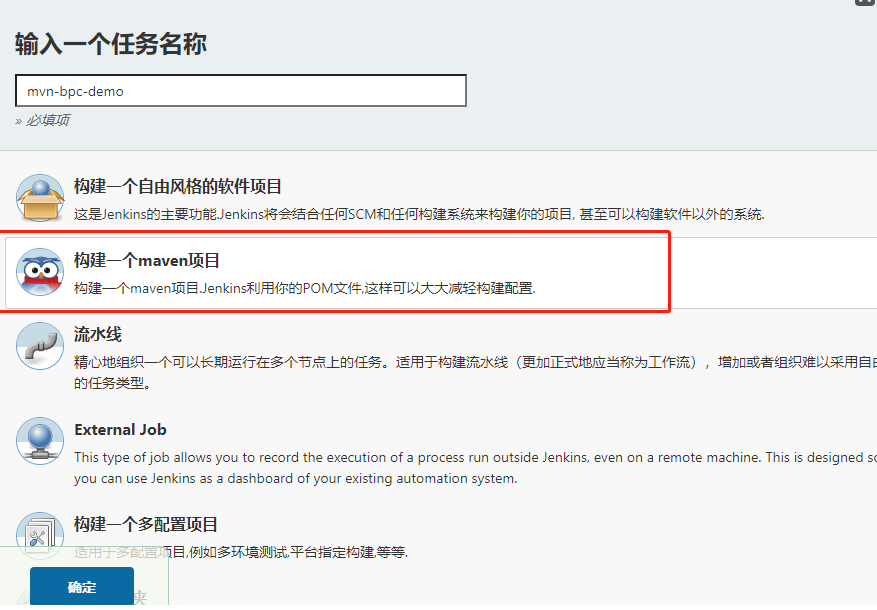
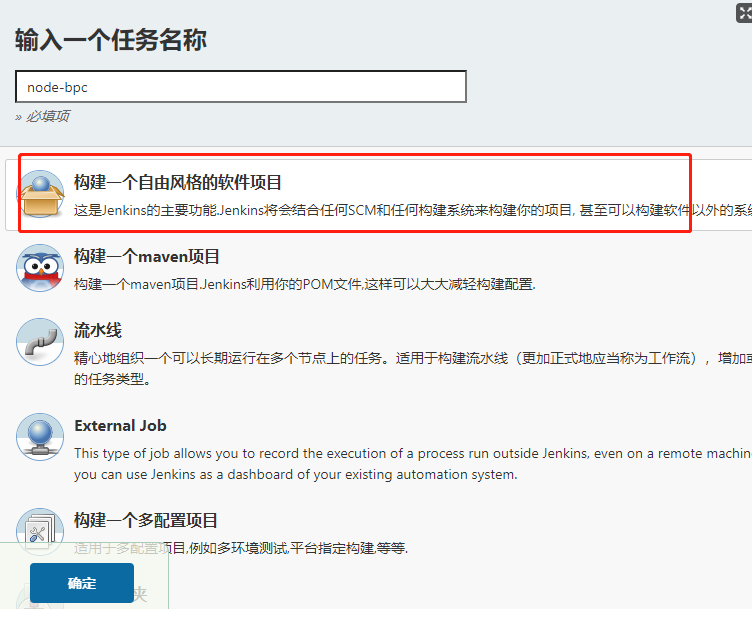
6. jenkins creates mvn project
New task - > create a free style software project
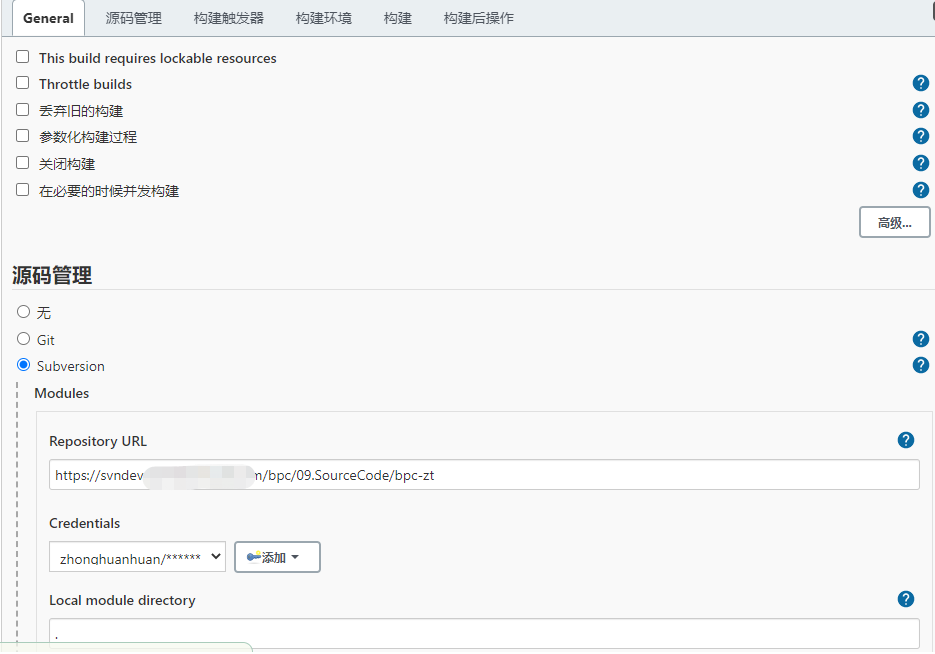
subversion is selected for source code management
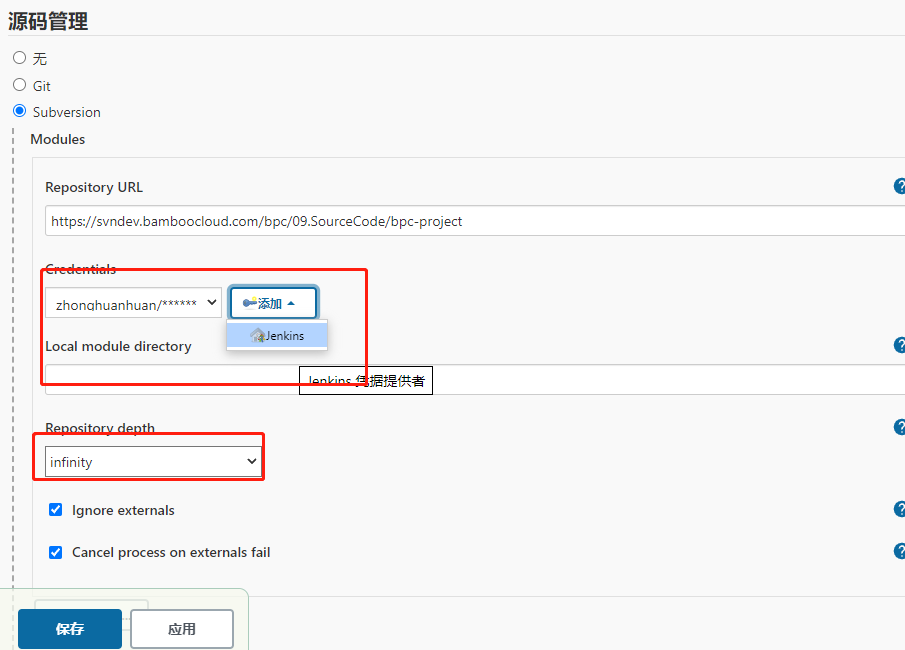
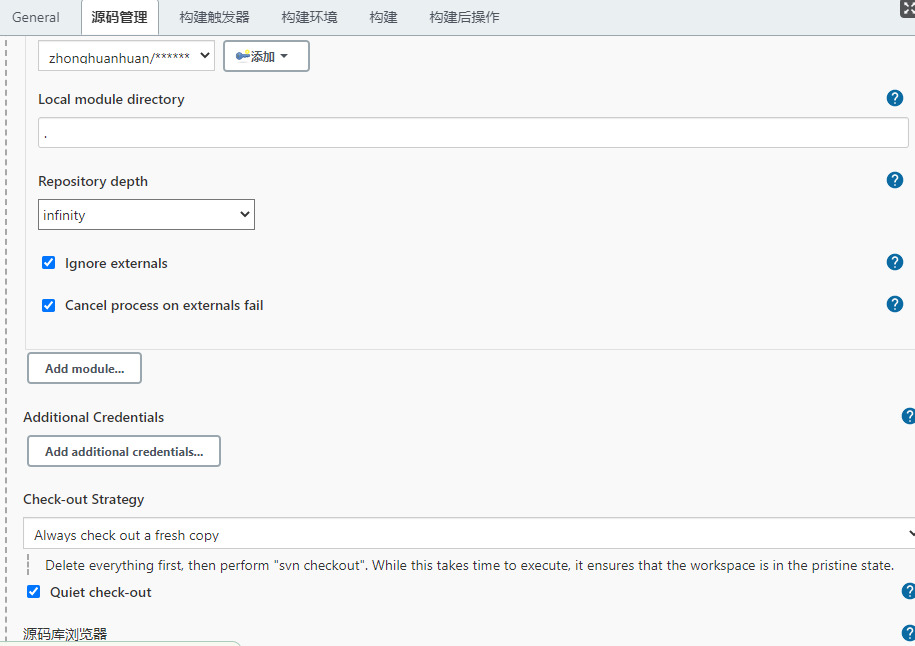
Add an svn account, select the current directory in the Local module directory. "This directory is the relative directory of jenkins spatial tasks, such as" / root /. jenkins / jobs / MVN BPC / workspace ", and select" infinity "for repository depth. The default is full update.
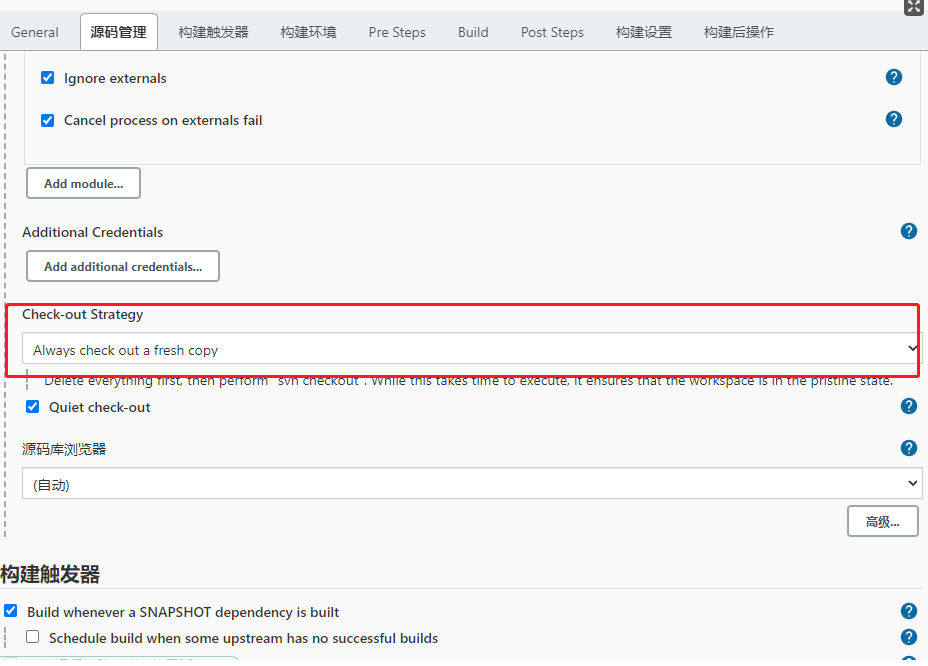
Select "Always check out a fresh copy" when constructing the check out strategy for the first time, otherwise an error will be reported
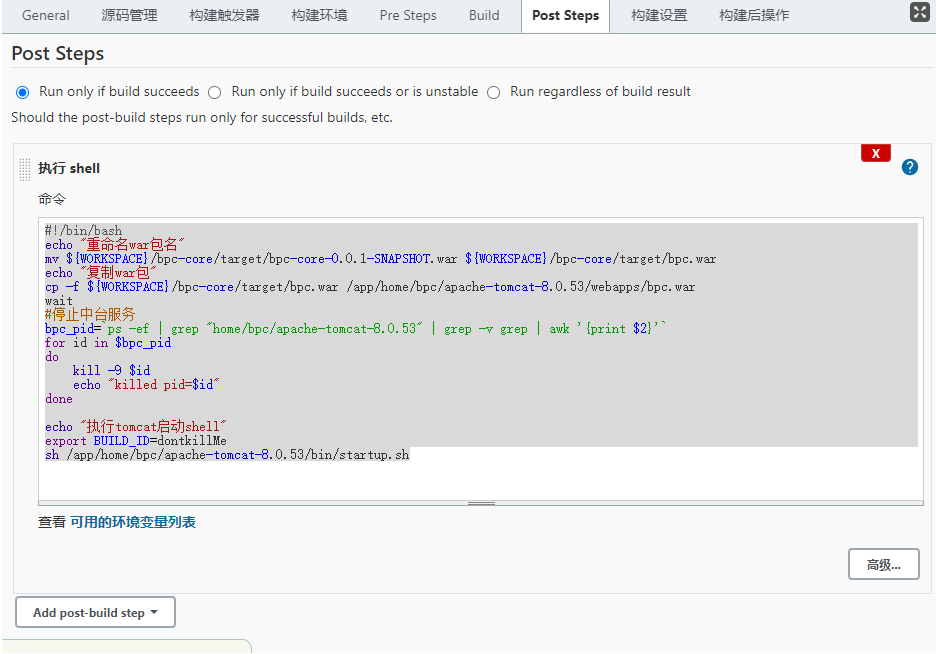
#!/bin/bash
echo "rename war Package name"
mv ${WORKSPACE}/bpc-core/target/bpc-core-0.0.1-SNAPSHOT.war ${WORKSPACE}/bpc-core/target/bpc.war
echo "copy war package"
cp -f ${WORKSPACE}/bpc-core/target/bpc.war /app/home/bpc/apache-tomcat-8.0.53/webapps/bpc.war
wait
#Stop the middle desk service
bpc_pid=`ps -ef | grep "home/bpc/apache-tomcat-8.0.53" | grep -v grep | awk '{print $2}'`
for id in $bpc_pid
do
	kill -9 $id
    echo "killed pid=$id"
done
echo "implement tomcat start-up shell"
export BUILD_ID=dontkillMe
sh /app/home/bpc/apache-tomcat-8.0.53/bin/startup.sh
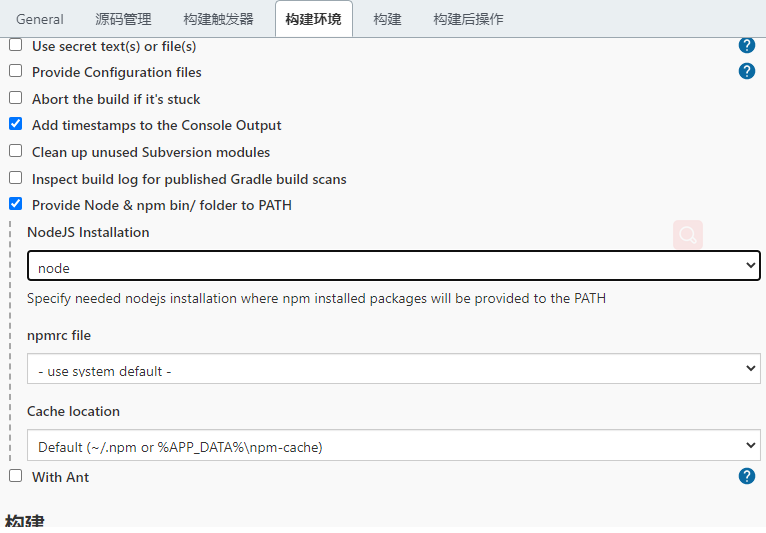
7. jenkins creates nodejs project
Configure the global variables of nodejs in jenkins
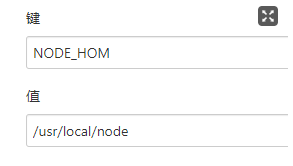
System management - > system configuration - > global attribute "environment variable" add node_ Environment variable for home
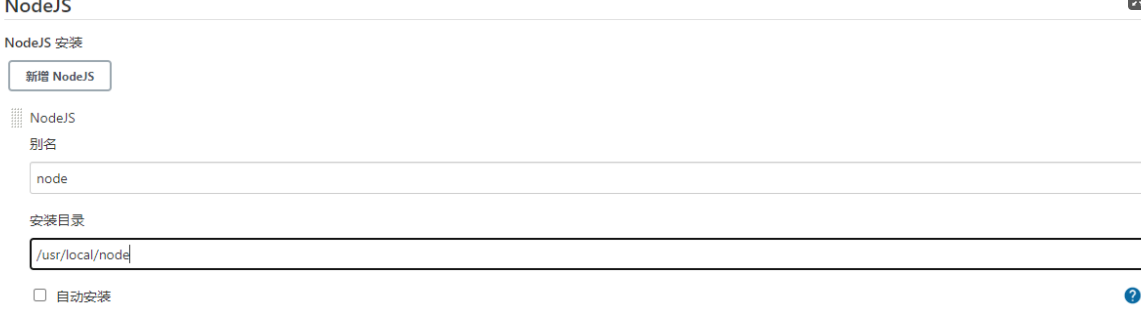
System management - > global tool configuration - > nodejs
Create project task
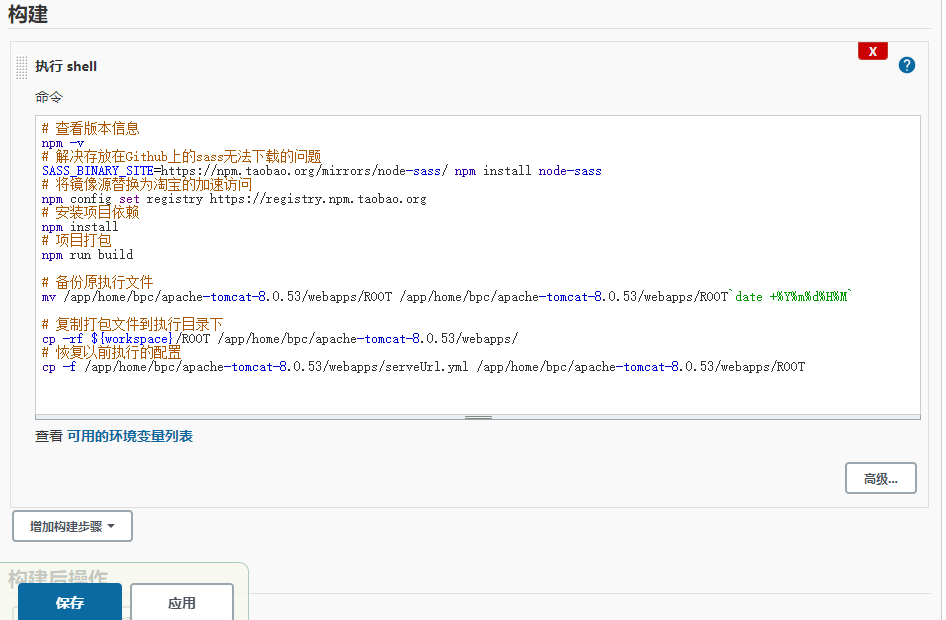
# View version information
npm -v
# Solve the problem that sass stored on Github cannot be downloaded
SASS_BINARY_SITE=https://npm.taobao.org/mirrors/node-sass/ npm install node-sass
# Replace the image source with Taobao's accelerated access
npm config set registry https://registry.npm.taobao.org
# Install project dependencies
npm install
# Pack Project
npm run build
# Back up the original executable
mv /app/home/bpc/apache-tomcat-8.0.53/webapps/ROOT /app/home/bpc/apache-tomcat-8.0.53/webapps/ROOT`date +%Y%m%d%H%M`
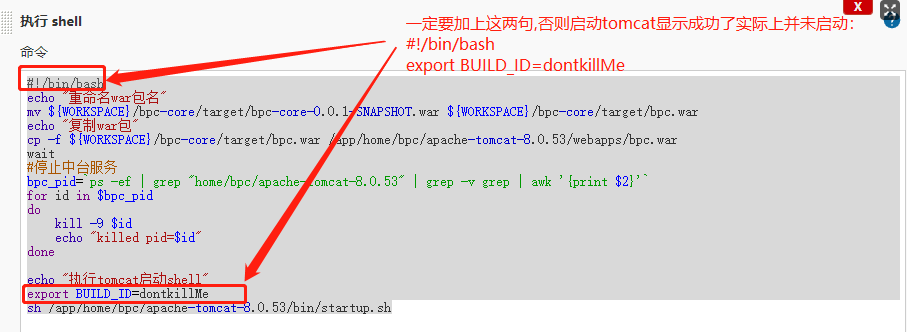
#Be sure to add export BUILD_ID, otherwise the shell execution will be interrupted. It seems that the returned result is successful. In fact, the shell execution is interrupted and does not really take effect.
export BUILD_ID=node-bpc
# Copy the package file to the execution directory
cp -rf ${workspace}ROOT /app/home/bpc/apache-tomcat-8.0.53/webapps/
# Restore previously executed configuration
cp -f /app/home/bpc/apache-tomcat-8.0.53/webapps/serveUrl.yml /app/home/bpc/apache-tomcat-8.0.53/webapps/ROOT
Note: if the configuration parameters in some files in the project need to be modified, you can use sed to add them to the shell script, such as modifying the Vue router version number in the package.json file under the project: from 3.0.7 to 3.5.2. This depends on the specific project.
sed -i "/vue-router/s@3.0.7@3.5.2@" package.json