What is FastDFS
FastDFS is an open source distributed file system written in c language. FastDFS is customized for the Internet. It fully considers the mechanism of redundant backup, load balancing, linear expansion, and pays attention to high availability, high performance and other indicators. Using FastDFS, it is easy to build a high-performance file server cluster to provide file upload and download services.
Explain
The original address of this article is: http://blog.lovefoods.top/201...
-
Downloadable version of word document for this article
LAN Svn address: https://192.168.1.60/svn/resources/linux/FastDFS
 Aliyun code Svn address: http://code.taobao.org/p/FastDFS-INFO/src/trunk/
Github address: https://github.com/guoshiqiufeng/fastDFS
Software Version Description
    Software Name Version Description
    FastDFS v5.05 FastDFS source code
    Fasstdfs-nginx-module v1.16 nginx module source code
    Libfast common v1.0.7 version dependency
    Nginx v1.8.0 nginx server source code
    Nginx-upstream-fair master Nginx upstream fair plug-in source code
    Ngx_cache_purge v2.3 nginx cache purge plug-in source code
    pcre v8.34 nginx-dependent source code of pcre Library
    Zlib v1.2.8 nginx-dependent source code of zlib Library
network structure
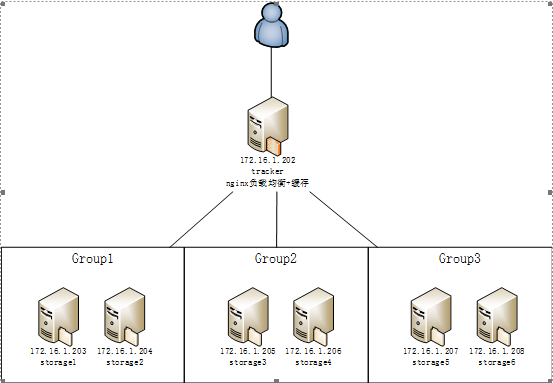
This manual uses CentOS 6.5 x86_64 operating system and deploys according to the following network structure:
Install tracker
install
Verify whether to install gcc, if not, use yum to install it according to the following commands
yum -y install gcc automake autoconf libtool make
yum install gcc gcc-c++
Install the libfast common V1.0.7 Toolkit
decompression
./make.sh
./make.sh install
 Copy / usr/lib64/libfastcommon.so file to / usr/lib /.
cp /usr/lib64/libfastcommon.so /usr/lib
Install FastDFS tracker on 172.16.1.202 using FastDFS_v5.05.tar.gz source code package.
You can download the source code package directly from the Linux system and decompress the installation.
Unzip with tar command
tar zxf FastDFS_v5.05.tar.gz
cd FastDFS
Run make.sh to confirm that make is successful. During this period, if there are errors, there may be a lack of dependent packages, which need to be made again after installation.
./make.sh
Run make.sh install to confirm that the install was successful.
./make.sh install
After installation, all executable files start with fdfs under / usr/local/bin:
[root@storage1 FastDFS]# ll /usr/local/bin/fdfs*
-rwxr-xr-x. 1 root root  522918 3 Month 2514:57 /usr/local/bin/fdfs_appender_test
-rwxr-xr-x. 1 root root  522871 3 Month 2514:57 /usr/local/bin/fdfs_appender_test1
-rwxr-xr-x. 1 root root  514023 3 Month 2514:57 /usr/local/bin/fdfs_append_file
-rwxr-xr-x. 1 root root  513433 3 Month 2514:57 /usr/local/bin/fdfs_crc32
-rwxr-xr-x. 1 root root  513967 3 Month 2514:57 /usr/local/bin/fdfs_delete_file
-rwxr-xr-x. 1 root root  514377 3 Month 2514:57 /usr/local/bin/fdfs_download_file
-rwxr-xr-x. 1 root root  514133 3 Month 2514:57 /usr/local/bin/fdfs_file_info
-rwxr-xr-x. 1 root root  525064 3 Month 2514:57 /usr/local/bin/fdfs_monitor
-rwxr-xr-x. 1 root root 1179682 3 Month 2514:57 /usr/local/bin/fdfs_storaged
-rwxr-xr-x. 1 root root  529845 3 Month 2514:57 /usr/local/bin/fdfs_test
-rwxr-xr-x. 1 root root  527774 3 Month 2514:57 /usr/local/bin/fdfs_test1
-rwxr-xr-x. 1 root root  655809 3 Month 2514:57 /usr/local/bin/fdfs_trackerd
-rwxr-xr-x. 1 root root  514213 3 Month 2514:57 /usr/local/bin/fdfs_upload_appender
-rwxr-xr-x. 1 root root  514999 3 Month 2514:57 /usr/local/bin/fdfs_upload_file
Copy all the configuration files in the FastDFS/conf directory to / etc/fdfs.
cp * /etc/fdfs/
All configuration files are under / etc/fdfs:
[root@tracker FastDFS]# ll /etc/fdfs/
//Total dosage 60
-rw-r--r--. 1 root root  1461 3 Month 1315:15 client.conf
-rw-r--r--. 1 root root   858 3 Month 1315:15 http.conf
-rw-r--r--. 1 root root 31172 3 Month 1315:15 mime.types
-rw-r--r--. 1 root root  3837 3 Month 2510:03 mod_fastdfs.conf
-rw-r--r--. 1 root root  7515 3 Month 2410:36 storage.conf
-rw-r--r--. 1 root root  6989 3 Month 1315:15 tracker.conf
So far, the tracker installation is complete.
To configure
Edit tracker.conf in the configuration file directory, set up relevant information and save it.
vim /etc/fdfs/tracker.conf
Generally, only the following parameters need to be changed:
disabled=false            #Enable configuration files
port=22122                #Setting the port number of tracker
base_path=/fdfs/tracker   #Setting up tracker's data files and log directories (need to be created beforehand)
http.server_port=8080     #Setting the http port number
Function
Before running tracker, open the corresponding port in the firewall (22122 in this case).
[root@tracker FastDFS]# iptables -I INPUT -p tcp -m state --state NEW -m tcp --dport 22122 -j ACCEPT
[root@tracker FastDFS]# /etc/init.d/iptables save
iptables: Save firewall rules to /etc/sysconfig/iptables: [Determine]
Start tracker to confirm that the startup was successful. (See if the corresponding port 22122 starts listening)
[root@tracker FastDFS]# /usr/bin/fdfs_trackerd /etc/fdfs/tracker.conf restart
[root@tracker FastDFS]# netstat -unltp | grep fdfs
tcp    0    0.0.0.0:22122       0.0.0.0:*           LISTEN      1766/fdfs_trackerd
You can also check whether the tracker log started successfully or if there were errors.
cat /home/fastdfs/tracker/logs/trackerd.log
Set the boot to start automatically.
vim /etc/rc.d/rc.local
Add the run command line to the file:
/usr/bin/fdfs_trackerd /etc/fdfs/tracker.conf restart
Install storage
install
Install FastDFS storage on 172.16.1.203 using the FastDFS_v5.05.tar.gz source code package.
You can download the source code package directly from the Linux system and decompress the installation.
Unzip with tar command
tar zxf FastDFS_v5.05.tar.gz
cd FastDFS
Run make.sh to confirm that make is successful. During this period, if there are errors, there may be a lack of dependent packages, which need to be made again after installation.
./make.sh
Run make.sh install to confirm that the install was successful.
./make.sh install
After installation, all executable files start with fdfs under / usr/local/bin:
[root@storage1 FastDFS]# ll /usr/local/bin/fdfs*
-rwxr-xr-x. 1 root root  522918 3 Month 2514:57 /usr/local/bin/fdfs_appender_test
-rwxr-xr-x. 1 root root  522871 3 Month 2514:57 /usr/local/bin/fdfs_appender_test1
-rwxr-xr-x. 1 root root  514023 3 Month 2514:57 /usr/local/bin/fdfs_append_file
-rwxr-xr-x. 1 root root  513433 3 Month 2514:57 /usr/local/bin/fdfs_crc32
-rwxr-xr-x. 1 root root  513967 3 Month 2514:57 /usr/local/bin/fdfs_delete_file
-rwxr-xr-x. 1 root root  514377 3 Month 2514:57 /usr/local/bin/fdfs_download_file
-rwxr-xr-x. 1 root root  514133 3 Month 2514:57 /usr/local/bin/fdfs_file_info
-rwxr-xr-x. 1 root root  525064 3 Month 2514:57 /usr/local/bin/fdfs_monitor
-rwxr-xr-x. 1 root root 1179682 3 Month 2514:57 /usr/local/bin/fdfs_storaged
-rwxr-xr-x. 1 root root  529845 3 Month 2514:57 /usr/local/bin/fdfs_test
-rwxr-xr-x. 1 root root  527774 3 Month 2514:57 /usr/local/bin/fdfs_test1
-rwxr-xr-x. 1 root root  655809 3 Month 2514:57 /usr/local/bin/fdfs_trackerd
-rwxr-xr-x. 1 root root  514213 3 Month 2514:57 /usr/local/bin/fdfs_upload_appender
-rwxr-xr-x. 1 root root  514999 3 Month 2514:57 /usr/local/bin/fdfs_upload_file
Copy all the configuration files in the FastDFS/conf directory to / etc/fdfs.
cp * /etc/fdfs/
All configuration files are under / etc/fdfs:
[root@tracker FastDFS]# ll /etc/fdfs/
//Total dosage 60
-rw-r--r--. 1 root root  1461 3 Month 1315:15 client.conf
-rw-r--r--. 1 root root   858 3 Month 1315:15 http.conf
-rw-r--r--. 1 root root 31172 3 Month 1315:15 mime.types
-rw-r--r--. 1 root root  3837 3 Month 2510:03 mod_fastdfs.conf
-rw-r--r--. 1 root root  7515 3 Month 2410:36 storage.conf
-rw-r--r--. 1 root root  6989 3 Month 1315:15 tracker.conf
So far, the storage installation is complete.
To configure
Edit storage.conf in the configuration file directory, set up relevant information and save it.
vim /etc/fdfs/storage.conf
Generally, only the following parameters need to be changed:
disabled=false                    #Enable configuration files
group_name=group1                 #Group name, change according to actual situation
port=23000                        #Setting the port number of storage
base_path=/fdfs/storage           #Set up the log directory of storage (need to be created beforehand)
store_path_count=1                #Number of storage paths, need to match the number of store_path s
store_path0=/fdfs/storage         #Storage path
tracker_server=172.16.1.202:22122 #IP address and port number of tracker server
http.server_port=8080     #Setting the http port number
Function
Before running storage, open the corresponding ports in the firewall (23000 in this case).
[root@storage1 FastDFS]# iptables -I INPUT -p tcp -m state --state NEW -m tcp --dport 23000 -j ACCEPT
[root@storage1 FastDFS]# /etc/init.d/iptables save
iptables: Save firewall rules to /etc/sysconfig/iptables: [Determine]
Starting storage will automatically create a multi-level storage directory according to the configuration file settings to confirm the success of the startup. (See if the corresponding port 23000 starts listening)
[root@storage1 FastDFS]# /usr/bin/fdfs_storaged /etc/fdfs/storage.conf restart
data path: /fdfs/storage/data, mkdir sub dir...
mkdir data path: 00 ...
mkdir data path: 01 ...
mkdir data path: 02 ...
mkdir data path: 03 ...
...
data path: /fdfs/storage/data, mkdir sub dir done.
[root@storage1 FastDFS]# netstat -unltp | grep fdfs
tcp    0    0.0.0.0:23000       0.0.0.0:*           LISTEN      1766/fdfs_storaged
You can also check whether the storage log started successfully or if there were any errors.
cat /home/fastdfs/storage/logs/storaged.log
After confirming that the startup is successful, you can run fdfs_monitor to see if the storage server has registered with the tracker server.
[root@storage1 FastDFS]# /usr/bin/fdfs_monitor /etc/fdfs/storage.conf
[2014-03-26 01:51:20] DEBUG - base_path=/fdfs/storage, connect_timeout=30, network_timeout=60, tracker_server_count=1, anti_steal_token=0, anti_steal_secret_key length=0, use_connection_pool=0, g_connection_pool_max_idle_time=3600s, use_storage_id=0, storage server id count: 0

server_count=1, server_index=0

tracker server is 172.16.1.202:22122

group count: 1

Group 1:
group name = group1
disk total space = 27789 MB
disk free space = 23920 MB
trunk free space = 0 MB
storage server count = 1
active server count = 1
storage server port = 23000
storage HTTP port = 8080
store path count = 1
subdir count per path = 256
current write server index = 0
current trunk file id = 0

    Storage 1:
        id = 172.16.1.203
        ip_addr = 172.16.1.203  ACTIVE
        http domain =
        version = 5.01
        join time = 2014-03-26 01:48:19
        up time = 2014-03-26 01:48:19
        total storage = 27789 MB
        free storage = 23920 MB
        upload priority = 10
        store_path_count = 1
        subdir_count_per_path = 256
        storage_port = 23000
        storage_http_port = 8080
        current_write_path = 0
        source storage id=
        if_trunk_server= 0
        total_upload_count = 0
        success_upload_count = 0
        total_append_count = 0
        success_append_count = 0
        total_modify_count = 0
        success_modify_count = 0
        total_truncate_count = 0
        success_truncate_count = 0
        total_set_meta_count = 0
        success_set_meta_count = 0
        total_delete_count = 0
        success_delete_count = 0
        total_download_count = 0
        success_download_count = 0
        total_get_meta_count = 0
        success_get_meta_count = 0
        total_create_link_count = 0
        success_create_link_count = 0
        total_delete_link_count = 0
        success_delete_link_count = 0
        total_upload_bytes = 0
        success_upload_bytes = 0
        total_append_bytes = 0
        success_append_bytes = 0
        total_modify_bytes = 0
        success_modify_bytes = 0
        stotal_download_bytes = 0
        success_download_bytes = 0
        total_sync_in_bytes = 0
        success_sync_in_bytes = 0
        total_sync_out_bytes = 0
        success_sync_out_bytes = 0
        total_file_open_count = 0
        success_file_open_count = 0
        total_file_read_count = 0
        success_file_read_count = 0
        total_file_write_count = 0
        success_file_write_count = 0
        last_heart_beat_time = 2014-03-26 01:51:03
        last_source_update = 1970-01-01 08:00:00
        last_sync_update = 1970-01-01 08:00:00
        last_synced_timestamp = 1970-01-01 08:00:00
Seeing "172.16.1.203 ACTIVE" can confirm that storage is running normally.
Set the boot to start automatically.
vim /etc/rc.d/rc.local
Add the run command line to the file:
/usr/bin/fdfs_storaged /etc/fdfs/storage.conf restart
storage was installed on 172.16.1.204-208 and the operation was confirmed. Note that the group name parameter in the configuration file needs to be adjusted according to the actual situation. In this case, the group is allocated as follows:
group1: 172.16.1.203,172.16.1.204
group2: 172.16.1.205,172.16.1.206
group3: 172.16.1.207,172.16.1.208
In addition, the port numbers of all storage s in each group must be the same.
Install nginx on storage
nginx installed on storage is mainly to provide http access services, and to solve the synchronization delay problem of storage server in group.
install
First, install nginx on 172.16.1.203, using nginx-1.8.0.tar.gz source code package and FastDFS nginx plug-in fastdfs-nginx-module_v1.16.tar.gz.
decompression
tar zxf nginx-1.8.0.tar.gz
tar zxf fastdfs-nginx-module_v1.16.tar.gz
Run. / configure to set up the installation path, FastDFS plug-in module directory, pcre library directory, zlib library directory.
If the prompt is wrong, there may be a lack of dependent packages. Dependent packages need to be installed first.
yum install pcre-devel
yum install make zlib zlib-devel gcc-c++ libtool
config under configuration fastdfs-nginx-module is modified to the following path
Run again. / configure
[root@storage1 nginx-1.8.0]# ./configure --add-module=/root/fastDFS/fastdfs-nginx-module/src
Run make to compile and install to ensure successful compilation and installation.
make
make install
copy the configuration file of the nginx plug-in module of FastDFS to the FastDFS configuration file directory.
cp /root/fastdfs-nginx-module/src/mod_fastdfs.conf /etc/fdfs/
After installation, all nginx files are in / usr/local/nginx:
[root@storage nginx-1.8.0]# ll /usr/local/nginx/
//Total dosage 16
drwxr-xr-x. 2 root root 4096 3 Month 2603:11 conf
drwxr-xr-x. 2 root root 4096 3 Month 2603:11 html
drwxr-xr-x. 2 root root 4096 3 Month 2603:11 logs
drwxr-xr-x. 2 root root 4096 3 Month 2603:11 sbin
So far, the nginx plug-in module and FastDFS nginx plug-in module have been installed.
To configure
Edit nginx.conf in the / usr/local/nginx/conf configuration file directory, set up to add storage information and save it.
vim /usr/local/nginx/conf/nginx.conf
Change the listen port number in the server segment to 8080:
listen 8080;
In the server section, add:
location ~/group1/M00 {
    root /fdfs/storage/data;
    ngx_fastdfs_module;
}
Enter / root/fastDFS/fastdfs-nginx-module/src copy mod_fastdfs.conf to / etc/fdfs
cp mod_fastdfs.conf /etc/fdfs
Edit mod_fastdfs.conf in the / etc/fdfs configuration file directory, set storage information and save it.
vim /etc/fdfs/mod_fastdfs.conf
Generally, only the following parameters need to be changed:
base_path=/home/fastdfs/storage           #Save Log Directory
tracker_server=172.16.1.202:22122 #IP address and port number of tracker server
storage_server_port=23000         #Port number of storage server
group_name=group1                 #group name of the current server
url_have_group_name = true        #Does the group name exist in the file url?
store_path_count=1                #Number of storage paths, need to match the number of store_path s
store_path0=/home/fastdfs/storage        #Storage path
http.need_find_content_type=true  #Find the file type from the file extension (true when nginx)
group_count = 3                   #Set the number of groups
At the end, add three groups of specific information:
[group1]
group_name=group1
storage_server_port=23000
store_path_count=1
store_path0=/home/fastdfs/storage

 [group2]
group_name=group2
storage_server_port=23000
store_path_count=1
store_path0=/home/fastdfs/storage

[group3]
group_name=group3
storage_server_port=23000
store_path_count=1
store_path0=/home/fastdfs/storage
Create a symbolic connection from M00 to the storage directory.
[root@storage1 nginx-1.8.0]# ln -s /home/fastdfs/storage/data /home/fastdfs/storage/data/M00
[root@storage1 nginx-1.8.0]# ll /fdfs/storage/data/M00
lrwxrwxrwx. 1 root root 19 3 Month 2603:44 /fdfs/storage/data/M00 -> /fdfs/storage/data/
So far, the nginx and FastDFS plug-in modules are set up.
Function
Before running nginx, open the corresponding port in the firewall (8080 in this case). Before proceeding with nginx, open the corresponding port in the firewall (8080 in this case).
[root@storage1 nginx-1.8.0]# iptables -I INPUT -p tcp -m state --state NEW -m tcp --dport 8080 -j ACCEPT
[root@storage1 nginx-1.8.0]# /etc/init.d/iptables save
iptables: Save firewall rules to /etc/sysconfig/iptables: [Determine]
Start nginx to confirm that the startup was successful. (See if the corresponding port 8080 starts listening)
[root@storage1 nginx-1.8.0]# /usr/local/nginx/sbin/nginx
ngx_http_fastdfs_set pid=40638
[root@storage1 nginx-1.8.0]# netstat -unltp | grep nginx
tcp    0    0.0.0.0:8080            0.0.0.0:*              LISTEN      40639/nginx
You can also check whether the log of nginx has been successfully started or has errors.
cat /usr/local/nginx/logs/error.log
There are no errors in error.log, and the startup is successful. Browsers can be opened for direct access http://172.16.1.203:8080 To see if the nginx welcome page pops up.
Set the boot to start automatically.
[root@storage1 nginx-1.8.0]# vim /etc/rc.d/rc.local
 Add the run command line to the file: / usr/local/nginx/sbin/nginx
After that, nginx was installed on 172.16.1.204-208 and the operation was confirmed.
Install nginx on tracker
nginx installed on tracker mainly provides reverse proxy, load balancing and caching services for http access.
install
First decompress the code packages and plug-ins
Run. / configure to set up the installation path, nginx cache purge plug-in module directory, pcre library directory, zlib library directory.
If the prompt is wrong, there may be a lack of dependent packages. You need to install the dependent packages first and run it again. / configure
./configure --add-module=/root/fastDFS/ngx_cache_purge-2.3 --add-module=/root/fastDFS/nginx-upstream-fair-master
Run make to compile and install to ensure successful compilation and installation.
make
make install
So far, the installation of nginx and nginx cache purge plug-in module has been completed.
To configure
Edit nginx.conf in the / usr/local/nginx/conf configuration file directory to set load balancing and caching.
vim /usr/local/nginx/conf/nginx.conf

worker_processes  4;                  #Depending on the number of CPU cores
events {
    worker_connections  65535;        #Maximum number of links
    use epoll;                        #New versions of Linux can use epoll to speed up processing performance
}
http {
    #Setting cache parameters
    server_names_hash_bucket_size 128;
    client_header_buffer_size 32k;
    large_client_header_buffers 4 32k;
    client_max_body_size 300m;
    sendfile        on;
    tcp_nopush      on;
    proxy_redirect off;
    proxy_set_header Host $http_host;
    proxy_set_header X-Real-IP $remote_addr;
    proxy_set_header X-Forwarded-For $proxy_add_x_forwarded_for;
    proxy_connect_timeout 90;
    proxy_send_timeout 90;
    proxy_read_timeout 90;
    proxy_buffer_size 16k;
    proxy_buffers 4 64k;
    proxy_busy_buffers_size 128k;
    proxy_temp_file_write_size 128k;
    #Setting cache storage path, storage mode, allocation of memory size, disk maximum space, cache duration
    proxy_cache_path /var/cache/nginx/proxy_cache levels=1:2 keys_zone=http-cache:500m max_size=10g inactive=30d;
    proxy_temp_path /var/cache/nginx/proxy_cache/tmp;
    #Setting up the server for group1
upstream fdfs_group1 {
    fair;
        server 192.168.126.139:8080 weight=1 max_fails=2 fail_timeout=30s;
        server 192.168.126.140:8080 weight=1 max_fails=2 fail_timeout=30s;
    }
    #Setting up the server of group 2
    upstream fdfs_group2 {
        server 192.168.126.141:8080 weight=1 max_fails=2 fail_timeout=30s;
        server 192.168.126.142:8080 weight=1 max_fails=2 fail_timeout=30s;
    }
    #Setting up the server of group 3
    upstream fdfs_group3 {
        server 172.16.1.207:8080 weight=1 max_fails=2 fail_timeout=30s;
        server 172.16.1.208:8080 weight=1 max_fails=2 fail_timeout=30s;
    }

   server {
        #Setting up the server port
        listen       8080;
        #Setting load balancing parameters for group 1
        location /group1/M00 {
            proxy_next_upstream http_502 http_504 error timeout invalid_header;
            proxy_cache http-cache;
            proxy_cache_valid  200 304 12h;
            proxy_cache_key $uri$is_args$args;
            proxy_pass http://fdfs_group1;
            expires 30d;
        }
        #Setting load balancing parameters for group 2
        location /group2/M00 {
            proxy_next_upstream http_502 http_504 error timeout invalid_header;
            proxy_cache http-cache;
            proxy_cache_valid  200 304 12h;
            proxy_cache_key $uri$is_args$args;
            proxy_pass http://fdfs_group2;
            expires 30d;
        }
        #Setting load balancing parameters for group 3
        location /group3/M00 {
            proxy_next_upstream http_502 http_504 error timeout invalid_header;
            proxy_cache http-cache;
            proxy_cache_valid  200 304 12h;
            proxy_cache_key $uri$is_args$args;
            proxy_pass http://fdfs_group3;
            expires 30d;
        }
        #Setting access rights to clear caches
        location ~ /purge(/.*) {
            allow 127.0.0.1;
            allow 172.16.1.0/24;
            deny all;
            proxy_cache_purge http-cache  $1$is_args$args;
        }
At this point, the nginx and nginx cache purge plug-in modules are set up.
Function
Before running nginx, open the corresponding port in the firewall (8080 in this case).
[root@tracker nginx-1.8.0]# iptables -I INPUT -p tcp -m state --state NEW -m tcp --dport 8080 -j ACCEPT
[root@tracker nginx-1.8.0]# /etc/init.d/iptables save
iptables: Save firewall rules to /etc/sysconfig/iptables: [Determine]
Start nginx to confirm that the startup was successful. (See if the corresponding port 8080 starts listening)
[root@tracker nginx-1.8.0]# /usr/local/nginx/sbin/nginx
ngx_http_fastdfs_set pid=40638
[root@tracker nginx-1.8.0]# netstat -unltp | grep nginx
tcp    0    0.0.0.0:8080            0.0.0.0:*              LISTEN      40639/nginx
Try uploading a file to FastDFS and then visit it. Configure the client.conf file first.
vim /etc/fdfs/client.conf
Modify the following parameters:
base_path=/fdfs/tracker                    #Log Storage Path
tracker_server=172.16.1.202:22122          #tracker server IP address and port number
http.tracker_server_port=8080              #http port number of tracker server
Upload a file using / usr/local/bin/fdfs_upload_file, and the program automatically returns the URL of the file.
[root@tracker nginx-1.8.0]# /usr/bin/fdfs_upload_file /etc/fdfs/client.conf /mnt/monk.jpg
group3/M00/00/00/rBABz1MzKG6Ad_hBAACKLsUDM60560.jpg
Then use the browser to access, you can see that the file has been correctly read out.
Looking at nginx's access.log log, you can see that the access returned 200 successfully.
[root@tracker nginx-1.8.0]# tail -n 10 -f /usr/local/nginx/logs/access.log
172.16.1.201 - - [26/Mar/2014:13:15:00 +0800] "GET /group3/M00/00/00/rBABz1MzKG6Ad_hBAACKLsUDM60560.jpg HTTP/1.1" 200 35374 "-" "Mozilla/5.0 (Windows NT 6.1; WOW64; Trident/7.0; rv:11.0) like Gecko"
Looking at the cache directory of nginx, you can see that the cache file has been generated.
[root@tracker nginx-1.8.0]# ll /var/cache/nginx/proxy_cache/ -R
/var/cache/nginx/proxy_cache/:
//Total dosage 8
drwx------. 3 nobody nobody 4096 3 Month 2612:57 6
drwxr-xr-x. 2 nobody root   4096 3 Month 2613:14 tmp

/var/cache/nginx/proxy_cache/6:
//Total dosage 4
drwx------. 2 nobody nobody 4096 3 Month 2613:08 11

/var/cache/nginx/proxy_cache/6/11:
//Total dosage 36
-rw-------. 1 nobody nobody 35686 3 Month 2613:08 b1f6fb1f7266f796765b6d6965021116
If you want to clear the cache manually, you can add purge before the file URL:
Set the boot to start automatically.
vim /etc/rc.d/rc.local
Add the run command line to the file: / usr/local/nginx/sbin/nginx
So far, the http reverse proxy + load balancing + cache on the tracker server has been installed.