Construction of centos7 Nacos service registry
Since the spring cloud registry Eureka has long stopped maintenance, we use Nacos
official: https://nacos.io/zh-cn/docs/what-is-nacos.html
Welcome to the world of Nacos!
Nacos is dedicated to helping you discover, configure, and manage microservices. Nacos provides a set of easy-to-use feature sets to help you quickly realize dynamic service discovery, service configuration, service metadata and traffic management.
Nacos helps you build, deliver, and manage microservice platforms more quickly and easily. Nacos is a service infrastructure for building "service" centered modern application architecture (such as micro service paradigm and cloud native paradigm).
See the figure below to understand Nacos. The architecture will be described in detail below.

Just say a word, which simplifies our previous eureka operation and the integration with the configuration center
Manually install Nacos (stand-alone version)
Close the firewall or open 8848 port. There is a tutorial below
https://github.com/alibaba/nacos/releases The official compiled Nacos download address may not be accessible due to network reasons
Or Baidu network disk
Link: https://pan.baidu.com/s/18GYgaGOp5qmZtDWPsM9ZNw
Extraction code: 1234
Before installation, linux must have JDK8 + and configured environment variables, otherwise Nacos cannot be started
linux download. tar.gz windows download zip I downloaded nacos-server-2.0.1.tar.gz myself
Then extract it to the specified directory. This can be arbitrary, such as mkdir -p /root/nacos cd /root/nacos
tar -xvf nacos-server-2.0.1.tar.gz
Then go to the executable directory
cd nacos/bin
Are you done? Of course not. There is a problem with the above configuration. When we start Nacos with the default configuration, all configuration files are saved in the built-in database by Nacos.
In stand-alone mode, nacos uses embedded database to store data, which is inconvenient to observe the basic situation of data storage.
If an embedded database is used, there is bound to be a storage limit. This article will take you to realize the persistence of the data in Nacos
Then create a database on the server... I use mysql5.7
Then initialize the SQL file with the nacos-mysql.sql database, and create the database name: Nacos after the local Navicat connects to the remote database_ Config, and then import the SQL initialization file into the database
Nacos mysql.sql file
Link: https://pan.baidu.com/s/1HMECC18VunixlT7bo9OAkA
Extraction code: 1234
– sharing from Baidu online disk super member V5
After that, we need to modify the content of application.properties in the conf directory under the nacos file
Before modification, we need to copy application.properties.example, and then delete application.properties and application.properties.example in config
Then modify the downloaded application.properties.example, which is about 30
Remove the annotation, and then change the database ip address to your own account and password
#*************** Config Module Related Configurations ***************#
### If use MySQL as datasource:
spring.datasource.platform=mysql

### Count of DB:
db.num=1

### Connect URL of DB:
db.url.0=jdbc:mysql://192.168.81.1:3306/nacos_config?characterEncoding=utf8&connectTimeout=1000&socketTimeout=3000&autoReconnect=true&useUnicode=true&useSSL=false&serverTimezone=Asia/Shanghai
db.user=root
db.password=root
Before filling in the database ip address, you need to check whether you can ping under the service ping 172.29.204.221, otherwise an error will be reported
After modification, change application.properties.example to application.properties and upload it to conf
Normally, there is no problem connecting the local machine to root, but we can't praise the platform, so we need to change it from "localhost" to "%"
-
Login to mysql
mysql -u root -p
-
Enter the mysql name database
use mysql;
-
Query the usage scope and permissions of root
select host from user where user='root';
If the result is: localhost, you don't need to modify it
-
Change the default "localhost" to "%"
update user set host = '%' where user ='root';
-
Refresh mysql configuration
flush privileges;
Start Nacos in stand-alone version (about 3 minutes)
sh startup.sh -m standalone
If necessary, close the currently running Nacos service
sh shutdown.sh
Query logs in real time (be sure to use it quickly after starting Nacos, otherwise you won't know the reason after the error is reported. Generally, it is the first error that causes a series of errors, so you should check it carefully)
After the above command is started, the log location will be displayed, and then replace the following path
tail -f /root/nacos/nacos/logs/start.out
If the log is OK, you can access it. If an error is reported, it must be a database problem. Don't think about it
Then we can log in to the Nacos console for management. Address: http: / / your ip:8848/nacos/
For example: http://192.168.232.130:8848/nacos/
If the access fails, check whether the firewall is closed or whether the 8848 port is released
Then we can find that the page content is empty, so how to test it?
Service registration: (simulate a service, because it is an empty service. After a period of time, Nacos will find that it is false, just for testing)
curl -X POST 'http://127.0.0.1:8848/nacos/v1/ns/instance?serviceName=nacos.naming.serviceName&ip=20.18.7.10&port=8080'
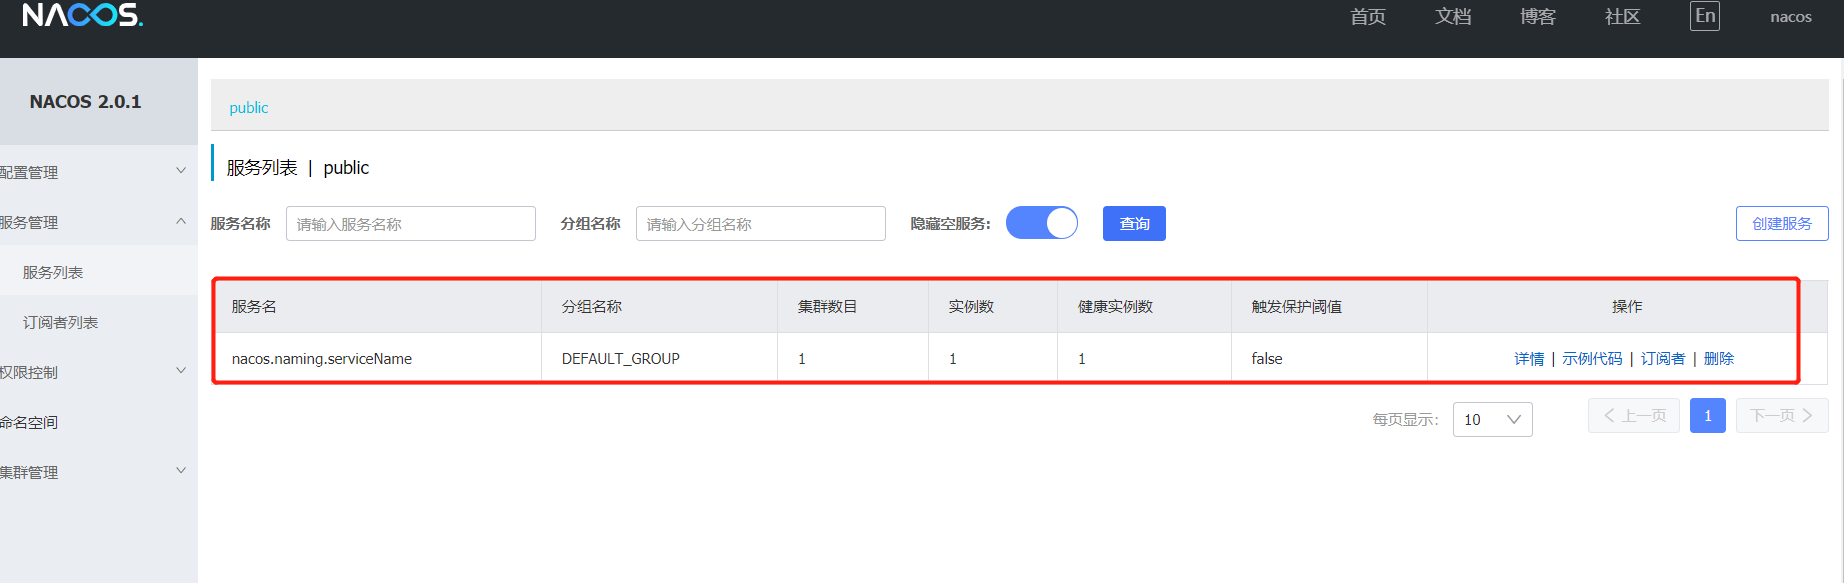
Service discovery: (obtain the service information registered above through Git request)
curl -X GET 'http://127.0.0.1:8848/nacos/v1/ns/instance/list?serviceName=nacos.naming.serviceName'
{
    "name":"DEFAULT_GROUP@@nacos.naming.serviceName",
    "groupName":"DEFAULT_GROUP",
    "clusters":"",
    "cacheMillis":10000,
    "hosts":[
        {
            "instanceId":"20.18.7.10#8080#DEFAULT#DEFAULT_GROUP@@nacos.naming.serviceName",
            "ip":"20.18.7.10",
            "port":8080,
            "weight":"1.0",
            "healthy":true,
            "enabled":true,
            "ephemeral":true,
            "clusterName":"DEFAULT",
            "serviceName":"DEFAULT_GROUP@@nacos.naming.serviceName",
            "metadata":{

            },
            "instanceHeartBeatInterval":5000,
            "instanceIdGenerator":"simple",
            "ipDeleteTimeout":30000,
            "instanceHeartBeatTimeOut":15000
        }
    ],
    "lastRefTime":1621161362425,
    "checksum":"",
    "allIPs":false,
    "reachProtectionThreshold":false,
    "valid":true
}
Publish configuration
curl -X POST "http://127.0.0.1:8848/nacos/v1/cs/configs?dataId=nacos.cfg.dataId&group=test&content=helloWorld"
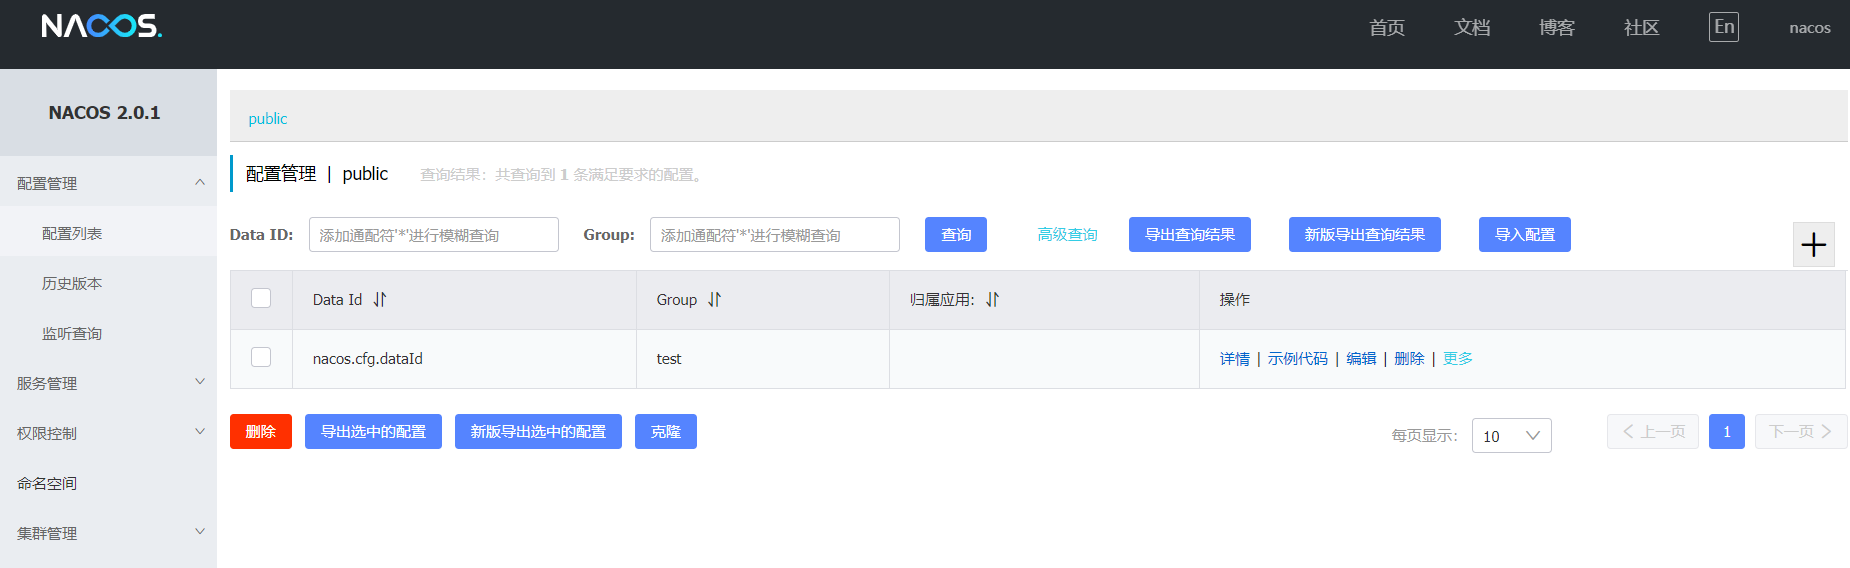
Get configuration:
curl -X GET "http://127.0.0.1:8848/nacos/v1/cs/configs?dataId=nacos.cfg.dataId&group=test"
helloWorld
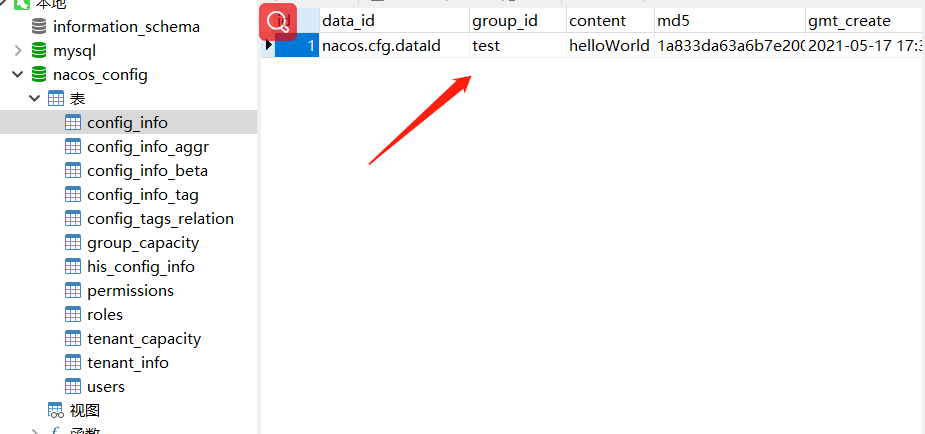
Use the above test url to add a configuration, and then we can go to the database to see if it is entered,
Manually install the Nacos cluster
Before clustering, we need to prepare the minimum cluster standard of three nodes
192.168.81.128 (primary) nocos server
192.168.81.129 (secondary) nocos server
192.168.81.130 (secondary) nocos server
You also need to install JDK on each node and configure environment variables
And we also need to prepare a Nacos shared database
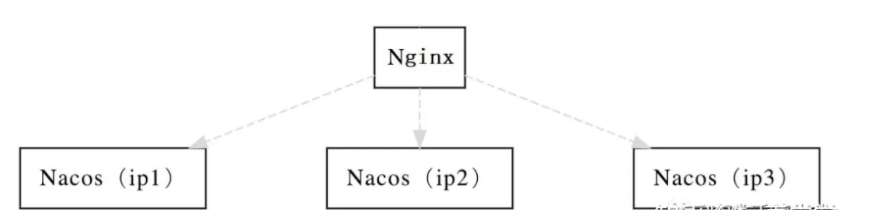
You also need to prepare nginx for the nacos group proxy server
192.168.81.100 nginx server
In the following installation process, the same configuration should be deployed in all three nodes
Close the firewall of each node or open 8848 port. There is a tutorial below
https://github.com/alibaba/nacos/releases The official compiled Nacos download address may not be accessible due to network reasons
Before installation, linux must have JDK8 + and configured environment variables, otherwise Nacos cannot be started
linux download. tar.gz windows download zip I downloaded nacos-server-2.0.1.tar.gz myself
Or Baidu network disk
Link: https://pan.baidu.com/s/18GYgaGOp5qmZtDWPsM9ZNw
Extraction code: 1234
Then extract it to the specified directory. This can be arbitrary, such as mkdir -p /root/nacos cd /root/nacos
tar -xvf nacos-server-2.0.1.tar.gz
Are you done? Of course not. There is a problem with the above configuration. When we start Nacos with the default configuration, all configuration files are saved in the built-in database by Nacos.
The cluster must be configured with a unified database, otherwise the data of each node is different
Then create a database on the server... I use mysql5.7
Use the nacos-mysql.sql database to initialize the SQL file, and then create the database name after the local Navicat connects to the remote database: nacos_config, and then import the SQL initialization file into the database
Nacos mysql.sql file
Link: https://pan.baidu.com/s/1HMECC18VunixlT7bo9OAkA
Extraction code: 1234
– sharing from Baidu online disk super member V5
After that, we need to modify the content of application.properties in the conf directory under the nacos file
Before modification, we need to copy application.properties.example, and then delete application.properties and application.properties.example in config
Then modify the downloaded application.properties.example, which is about 30
Remove the annotation, and then change the database ip address to your own account and password
#*************** Config Module Related Configurations ***************#
### If use MySQL as datasource:
spring.datasource.platform=mysql

### Count of DB:
db.num=1

### Connect URL of DB:
db.url.0=jdbc:mysql://192.168.81.1:3306/nacos_config?characterEncoding=utf8&connectTimeout=1000&socketTimeout=3000&autoReconnect=true&useUnicode=true&useSSL=false&serverTimezone=Asia/Shanghai
db.user=root
db.password=root
Before filling in the database ip address, you need to check whether you can ping under the service ping 172.29.204.221, otherwise an error will be reported
After modification, change application.properties.example to application.properties and upload it to conf
Just do the following operation once. If the root is changed to "%" before, it doesn't matter
Normally, there is no problem connecting the local machine to root, but we can't praise the platform, so we need to change it from "localhost" to "%"
-
Login to mysql
mysql -u root -p
-
Enter the mysql name database
use mysql;
-
Query the usage scope and permissions of root
select host from user where user='root';
If the result is: "%", no modification is required
-
Change the default "localhost" to "%"
update user set host = '%' where user ='root';
-
Refresh mysql configuration
flush privileges;
Modify the contents of conf/cluster.conf.example (the cluster must be configured)
192.168.81.128:8848
192.168.81.129:8848
192.168.81.130:8848
After modification, the file name is changed to cluster.conf
The default Xms and Xmx of cluster Nacos are 2g. If the server memory of a single node is less than 3G, it needs to be adjusted. Otherwise, Nacos will not start
Modify the corresponding cd /root/nacos/nacos/bin
vi startup.sh
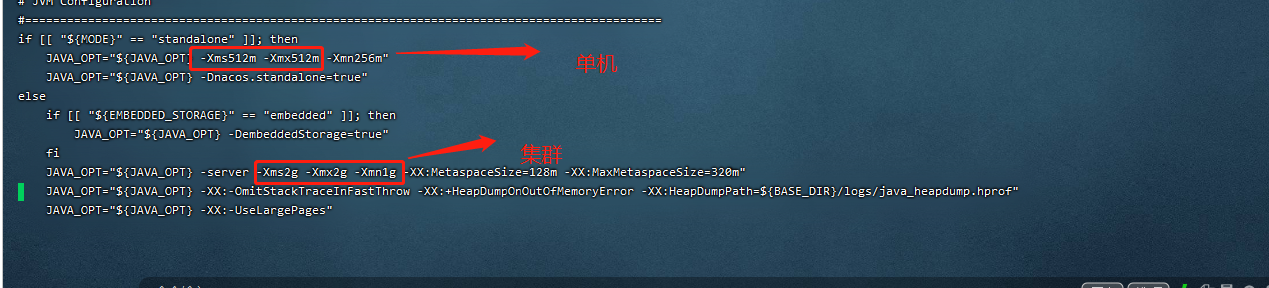
The test is changed to 512M, 512M and 256M, which is the same as that of a single machine
Cluster office starts Nacos (about 3 minutes)
sh startup.sh
Query logs in real time (be sure to use it quickly after starting Nacos, otherwise you won't know the reason after the error is reported. Generally, it is the first error that causes a series of errors, so you should check it carefully)
After the above command is started, the log location will be displayed, and then replace the following path
tail -f /root/nacos/nacos/logs/start.out
If the log is OK, you can access it. If an error is reported, it must be a database problem. Don't think about it
If necessary, close the currently running Nacos service
sh shutdown.sh
Then test ip one by one
http://192.168.81.128:8848/nacos/
http://192.168.81.129:8848/nacos/
http://192.168.81.130:8848/nacos/
Enter the default account password: nacos, nacos
If the access fails, check whether the firewall is closed or whether the 8848 port is released
Publish the configuration on any node (if there are three nodes at the same time, it will succeed)
curl -X POST "http://127.0.0.1:8848/nacos/v1/cs/configs?dataId=nacos.cfg.dataId&group=test&content=helloWorld"
Nginx forwarding
Start another server 192.168.81.100, install Nginx, and configure proxy forwarding rules.
Add the following code to the http tag in nginx.conf:
   upstream cluster {
        server 192.168.81.128:8848 weight=1 max_fails=2 fail_timeout=10s;
        server 192.168.81.129:8848 weight=1 max_fails=2 fail_timeout=10s;
        server 192.168.81.130:8848 weight=1 max_fails=2 fail_timeout=10s;
    }

    server{
        listen  80;
        server_name localhost;
        location /nacos {
            proxy_pass http://cluster/nacos;
            proxy_set_header Host $host;
            proxy_set_header X-Real-IP $remote_addr;
            proxy_set_header X-Forwarded-For $proxy_add_x_forwarded_for;
            proxy_set_header REMOTE-HOST $remote_addr;
            add_header X-Cache $upstream_cache_status;
            add_header Cache-Control no-cache;
        }
    }
Common Nginx commands:
Reload takes effect after modifying the configuration
/usr/local/nginx/sbin/nginx -s reload
Start nginx:
/usr/local/nginx/sbin/nginx -c /usr/local/nginx/conf/nginx.conf
Then we can use nginx's address http://192.168.81.100/nacos Visited
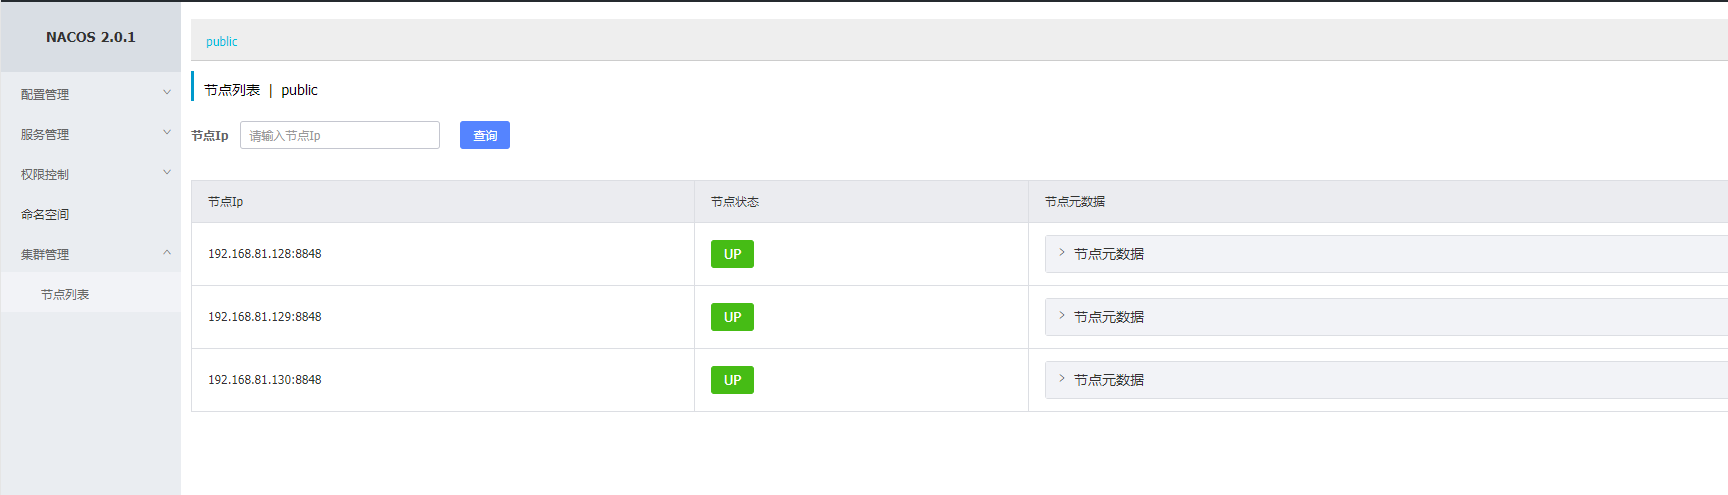
You can see that the services of the three nodes are displayed normally
Then we use nginx agent to register the service
curl -X POST 'http://192.168.81.100:80/nacos/v1/ns/instance?serviceName=nacos.naming.serviceName&ip=20.18.7.10&port=8080'
Then enter the service list to view. If it exists, it will refresh the page. If it still exists, it means that the cluster deployment is successful
Spring Cloud Alibaba connects to the Nacos cluster
spring:
  application:
    name: nacos-provider
  cloud:
    nacos:
      discovery:
        server-addr: 192.168.81.100:80 #Nginx Nacos registry address
server:
  port: 17357
docker installation of Nacos (stand-alone version)
Close the firewall or open 8848 port. There is a tutorial below
Then create a nacos_config database, and then import the following configuration file
Database initialization file
Link: https://pan.baidu.com/s/1XcmYGfwyk5nDG8UD6wvq1A
Extraction code: 1234
My database ip is 192.168.81.1:3306
Just do the following operation once. If the root is changed to "%" before, it doesn't matter
Normally, there is no problem connecting the local machine to root, but we can't praise the platform, so we need to change it from "localhost" to "%"
-
Login to mysql
mysql -u root -p
-
Enter the mysql name database
use mysql;
-
Query the usage scope and permissions of root
select host from user where user='root';
If the result is: "%", no modification is required
-
Change the default "localhost" to "%"
update user set host = '%' where user ='root';
-
Refresh mysql configuration
flush privileges;
mkdir -p /home/nacos/logs & mkdir -p /home/nacos/init.d & mkdir -p /home/nacos/conf
vi  /home/nacos/conf/application.properties
spring.datasource.platform=mysql
db.num=1
db.url.0=jdbc:mysql://192.168.81.1:3306/nacos_config?characterEncoding=utf8&connectTimeout=1000&socketTimeout=3000&autoReconnect=true&useUnicode=true&useSSL=false&serverTimezone=Asia/Shanghai
db.user=root
db.password=root


nacos.naming.empty-service.auto-clean=true
nacos.naming.empty-service.clean.initial-delay-ms=50000
nacos.naming.empty-service.clean.period-time-ms=30000
management.endpoints.web.exposure.include=*
management.metrics.export.elastic.enabled=false
management.metrics.export.influx.enabled=false
server.tomcat.accesslog.enabled=true
server.tomcat.accesslog.pattern=%h %l %u %t "%r" %s %b %D %{User-Agent}i %{Request-Source}i
server.tomcat.basedir=
nacos.security.ignore.urls=/,/error,/**/*.css,/**/*.js,/**/*.html,/**/*.map,/**/*.svg,/**/*.png,/**/*.ico,/console-ui/public/**,/v1/auth/**,/v1/console/health/**,/actuator/**,/v1/console/server/**
nacos.core.auth.system.type=nacos
nacos.core.auth.enabled=false
nacos.core.auth.default.token.expire.seconds=18000
nacos.core.auth.default.token.secret.key=SecretKey012345678901234567890123456789012345678901234567890123456789
nacos.core.auth.caching.enabled=true
nacos.core.auth.enable.userAgentAuthWhite=false
nacos.core.auth.server.identity.key=serverIdentity
nacos.core.auth.server.identity.value=security
nacos.istio.mcp.server.enabled=false
Replace db.url.0 in the file with your database address and account password, and nothing else will change
Start container
docker run -d --name nacos  \
-e MODE=standalone \
--privileged=true \
--network=host \
--restart=always \
-e JVM_XMS=256m \
-e JVM_XMX=256m \
-e JVM_XMN=128m	 \
-e TIME_ZONE='Asia/Shanghai' \
-v /home/nacos/logs:/home/nacos/logs \
-v /home/nacos/conf/application.properties:/home/nacos/conf/application.properties \
nacos/nacos-server:2.0.1
If nacos needs to be restarted after the server goes down
docker restart nacos-cluster
view log
cd /home/nacos/logs
Then visit http://192.168.81.128:8848/nacos/
Then we can find that they are all empty, so how to test them?
Service registration: (simulate a service, because it is an empty service. After a period of time, Nacos will find that it is false, just for testing)
curl -X POST 'http://127.0.0.1:8848/nacos/v1/ns/instance?serviceName=nacos.naming.serviceName&ip=20.18.7.10&port=8080'
Service discovery: (obtain the service information registered above through Git request)
curl -X GET 'http://127.0.0.1:8848/nacos/v1/ns/instance/list?serviceName=nacos.naming.serviceName'
{
    "name":"DEFAULT_GROUP@@nacos.naming.serviceName",
    "groupName":"DEFAULT_GROUP",
    "clusters":"",
    "cacheMillis":10000,
    "hosts":[
        {
            "instanceId":"20.18.7.10#8080#DEFAULT#DEFAULT_GROUP@@nacos.naming.serviceName",
            "ip":"20.18.7.10",
            "port":8080,
            "weight":"1.0",
            "healthy":true,
            "enabled":true,
            "ephemeral":true,
            "clusterName":"DEFAULT",
            "serviceName":"DEFAULT_GROUP@@nacos.naming.serviceName",
            "metadata":{

            },
            "instanceHeartBeatInterval":5000,
            "instanceIdGenerator":"simple",
            "ipDeleteTimeout":30000,
            "instanceHeartBeatTimeOut":15000
        }
    ],
    "lastRefTime":1621161362425,
    "checksum":"",
    "allIPs":false,
    "reachProtectionThreshold":false,
    "valid":true
}
Publish configuration
curl -X POST "http://127.0.0.1:8848/nacos/v1/cs/configs?dataId=nacos.cfg.dataId&group=test&content=helloWorld"
Get configuration:
curl -X GET "http://127.0.0.1:8848/nacos/v1/cs/configs?dataId=nacos.cfg.dataId&group=test"
helloWorld
docker installation of Nacos (cluster version)
Before clustering, we need to prepare the minimum cluster standard of three nodes
192.168.81.128 (primary) nocos server
192.168.81.129 (secondary) nocos server
192.168.81.130 (secondary) nocos server
And we also need to prepare a Nacos shared database
You also need to prepare nginx for the nacos group proxy server
192.168.81.100 nginx server
The others are said later
Create a nacos_config database, and then import the following configuration file
Database initialization file
Link: https://pan.baidu.com/s/1XcmYGfwyk5nDG8UD6wvq1A
Extraction code: 1234
My database ip is 192.168.81.1:3306
Just do the following operation once. If the root is changed to "%" before, it doesn't matter
Normally, there is no problem connecting the local machine to root, but we can't praise the platform, so we need to change it from "localhost" to "%"
-
Login to mysql
mysql -u root -p
-
Enter the mysql name database
use mysql;
-
Query the usage scope and permissions of root
select host from user where user='root';
If the result is: "%", no modification is required
-
Change the default "localhost" to "%"
update user set host = '%' where user ='root';
-
Refresh mysql configuration
flush privileges;
The following steps are performed on all 3 nodes (the content remains unchanged)
mkdir -p /home/nacos/logs & mkdir -p /home/nacos/init.d & mkdir -p /home/nacos/conf
vi /home/nacos/conf/application.properties
spring.datasource.platform=mysql
db.num=1
db.url.0=jdbc:mysql://192.168.81.1:3306/nacos_config?characterEncoding=utf8&connectTimeout=1000&socketTimeout=3000&autoReconnect=true&useUnicode=true&useSSL=false&serverTimezone=Asia/Shanghai

db.user=root
db.password=root


nacos.naming.empty-service.auto-clean=true
nacos.naming.empty-service.clean.initial-delay-ms=50000
nacos.naming.empty-service.clean.period-time-ms=30000
management.endpoints.web.exposure.include=*
management.metrics.export.elastic.enabled=false
management.metrics.export.influx.enabled=false
server.tomcat.accesslog.enabled=true
server.tomcat.accesslog.pattern=%h %l %u %t "%r" %s %b %D %{User-Agent}i %{Request-Source}i
server.tomcat.basedir=
nacos.security.ignore.urls=/,/error,/**/*.css,/**/*.js,/**/*.html,/**/*.map,/**/*.svg,/**/*.png,/**/*.ico,/console-ui/public/**,/v1/auth/**,/v1/console/health/**,/actuator/**,/v1/console/server/**


nacos.core.auth.system.type=nacos
nacos.core.auth.enabled=false
nacos.core.auth.default.token.expire.seconds=18000

nacos.core.auth.default.token.secret.key=SecretKey012345678901234567890123456789012345678901234567890123456789

nacos.core.auth.caching.enabled=true
nacos.core.auth.enable.userAgentAuthWhite=false
nacos.core.auth.server.identity.key=serverIdentity
nacos.core.auth.server.identity.value=security
nacos.istio.mcp.server.enabled=false
Replace db.url.0 in the file with your database address and account password, and nothing else will change
(in the key places of the cluster) start the container (somewhat different from the stand-alone version)
docker run -d --name nacos-cluster  \
--network host \
-e PREFER_HOST_MODE=hostname \
-e NACOS_SERVER_IP=192.168.81.128 \
--privileged=true \
--restart=always \
-e NACOS_SERVERS=192.168.81.128:8848,192.168.81.129:8848,192.168.81.130:8848 \
-e JVM_XMS=256m \
-e JVM_XMX=256m \
-e JVM_XMN=128m	 \
-e TIME_ZONE='Asia/Shanghai' \
-e TOMCAT_ACCESSLOG_ENABLED=false \
-v /home/nacos/logs:/home/nacos/logs \
-v /home/nacos/conf/application.properties:/home/nacos/conf/application.properties \
nacos/nacos-server:2.0.1
be careful:
-e NACOS_ SERVER_ Replace the ip with the ip of the current node (otherwise, the nodes of the cluster are not connected to each other)
-e NACOS_SERVERS corresponds to the ip address of each node that needs to be clustered
If nacos needs to be restarted after the server goes down
docker restart nacos-cluster
view log
cd /home/nacos/logs
If no error is reported in start.out, it means success
Then visit http://192.168.81.128:8848/nacos/
Then visit http://192.168.81.129:8848/nacos/
Then visit http://192.168.81.130:8848/nacos/
Nginx forwarding
Start another server 192.168.81.100, install Nginx, and configure proxy forwarding rules.
Add the following code to the http tag in nginx.conf:
   upstream cluster {
        server 192.168.81.128:8848 weight=1 max_fails=2 fail_timeout=10s;
        server 192.168.81.129:8848 weight=1 max_fails=2 fail_timeout=10s;
        server 192.168.81.130:8848 weight=1 max_fails=2 fail_timeout=10s;
    }

    server{
        listen  80;
        server_name localhost;
        location /nacos {
            proxy_pass http://cluster/nacos;
            proxy_set_header Host $host;
            proxy_set_header X-Real-IP $remote_addr;
            proxy_set_header X-Forwarded-For $proxy_add_x_forwarded_for;
            proxy_set_header REMOTE-HOST $remote_addr;
            add_header X-Cache $upstream_cache_status;
            add_header Cache-Control no-cache;
        }
    }
Common Nginx commands:
Reload takes effect after modifying the configuration
/usr/local/nginx/sbin/nginx -s reload
Start nginx:
/usr/local/nginx/sbin/nginx -c /usr/local/nginx/conf/nginx.conf
Then we can use nginx's address http://192.168.81.100/nacos Visited
You can see that the services of the three nodes are displayed normally
Then we use nginx agent to register the service
curl -X POST 'http://192.168.81.100:80/nacos/v1/ns/instance?serviceName=nacos.naming.serviceName&ip=20.18.7.10&port=8080'
Then enter the service list to view. If it exists, it will refresh the page. If it still exists, it means that the cluster deployment is successful
Spring Cloud Alibaba connects to the Nacos cluster
spring:
  application:
    name: nacos-provider
  cloud:
    nacos:
      discovery:
        server-addr: 192.168.81.100:80 #Nginx Nacos registry address
server:
  port: 17357
Problems with Nacos deployment
Error 1:
Most of the various versions of Nacos 0~2.xx are database errors. If your database is mysql8, install a new mysql7. Don't ask why
Error 2
If an error like this occurs
1,org.springframework.jdbc.CannotGetJdbcConnectionException: Failed to obtain JDBC Connection;
nested exception is org.apache.commons.dbcp.SQLNestedException:
Cannot create PoolableConnectionFactory (Could not create connection to database server. Attempted reconnect 3 times. Giving up.)
2,Caused by: java.lang.NullPointerException
        at com.mysql.jdbc.ConnectionImpl.getServerCharset(ConnectionImpl.java:29
        at com.mysql.jdbc.MysqlIO.sendConnectionAttributes(MysqlIO.java:1873)
        at com.mysql.jdbc.MysqlIO.proceedHandshakeWithPluggableAuthentication(My
        at com.mysql.jdbc.MysqlIO.doHandshake(MysqlIO.java:1206)
        at com.mysql.jdbc.ConnectionImpl.coreConnect(ConnectionImpl.java:2234)
        at com.mysql.jdbc.ConnectionImpl.connectWithRetries(ConnectionImpl.java:
        ... 28 more
Tracing the source code, we can see that the error is because the character cannot be obtained from com.mysql.jdbc.ConnectionImpl.getServerCharset_ set_ Caused by server parameter
Solution:
Find your mysql configuration file my.cnf or my.ini
Add coding configuration under [mysqld], as shown below:
[mysqld]
character_set_server=utf8
Restart mysql
systemctl restart mysqld
Error 3
If an error like the following occurs
null, message from server: "Host 'DESKTOP-R0PPSGR' is not allowed to connect to this MySQL server"
The exception is that the database only allows localhost or 127.0.0.1 access, and remote access is not allowed. I can't use the native IP.
Solution: modify the access permission.
mysql -uroot -p Password login to data:

use mysql;
select host,user from user;
Can see user by root,host by localhost If so, explain mysql Only local connections are allowed, so the external network and local software clients cannot be connected.
Adjustment method:
Execution: update user set host='%' where user ='root';
Execute refresh permission: flush privileges;
You can test the Internet connection mysql The server.
Error 4
If your database is mysql8, an error will be reported
terms of settlement
Create a new plugins/mysql folder in the Nacos installation directory, put mysql-connector-java-8.0.xx.jar of version 8.0 +, and restart Nacos. When starting, you will be prompted to replace the driver class class of MySQL.
Error 5
If you can't start Nacos or Nacos hangs up after running for some time, first check whether the local server memory is too small. If the local server memory is less than 3g
Then it may cause Nacos to hang up, because Nacos occupies 2g by default
The modification method is shown at the end of the article. Nacos JVM optimization has
Error 6
If none of the above problems can be solved, and the error reported is still mysql connection failure, then check the application.properties configuration file. If it doesn't work, write a new one and delete the original one (that's how I solved the problem)
Nacos MySQL master-slave node (cluster)
It is officially recommended to use highly available Mysql. Mysql also meets the requirements. The MHA architecture has one master, one standby and two slave. It is generally used in production. In that sentence, it is recommended to use msql5.7, which will reduce many problems. The database account and password of each node are the same
Modify the application.properties content of each node and keep the others unchanged
db.num=3
db.url.0=jdbc:mysql://192.168.174.1:3306/nacos_config?characterEncoding=utf8&connectTimeout=1000&socketTimeout=3000&autoReconnect=true&useUnicode=true&useSSL=false&serverTimezone=UTC&serverTimezone=UTC

db.url.1=jdbc:mysql://192.168.174.2:3306/nacos_config?characterEncoding=utf8&connectTimeout=1000&socketTimeout=3000&autoReconnect=true&useUnicode=true&useSSL=false&serverTimezone=UTC&serverTimezone=UTC

db.url.2=jdbc:mysql://192.168.174.3:3306/nacos_config?characterEncoding=utf8&connectTimeout=1000&socketTimeout=3000&autoReconnect=true&useUnicode=true&useSSL=false&serverTimezone=UTC&serverTimezone=UTC
If the 0.1.2 database passwords are different, you can specify the account password
db.user.0=root
db.password.0=root
firewall
View firewall status
systemctl status firewalld
Temporarily turn off the firewall (fail after restarting the virtual machine)
systemctl stop firewalld
Permanently turn off the firewall
systemctl disable firewalld
Turn on the firewall
systemctl start firewalld
Open port
firewall-cmd --zone=public --add-port=8848/tcp --permanent
Restart the firewall (restart the firewall after opening the port, otherwise it will not work)
firewall-cmd --reload
View port number
netstat -ntlp
View all 8848 port usage
netstat -ntulp |grep 8848
Nacos JVM optimization
If the virtual machine memory is small or the service memory is small, it is recommended to modify the jvm parameters
The default Xms and Xmx of cluster Nacos are 2g. If the memory of your virtual machine is less than 3G, you need to adjust it. Otherwise, Nacos will not start
Modify the corresponding bin/startup.sh
vi startup.sh
The test is changed to 512M, 512M and 256M, which is the same as that of a single machine
According to your own server size, if a server has no other services, only Nacos, then jVM can be set to account for 80%
If there are other services, you need to test how much memory each service occupies, and then run the remaining 10% inside the service, and all the other memory is given to Nacos
Like - collect - pay attention - easy to review in the future