Using StrongSwan to study IPSec is a good practice to understand IPSec. However, there are so many pits in the process of using Strong Swan, and there are so many incomplete online tutorials that I can hardly explain every step thoroughly, which leads me to scratch my ears and cheeks in the process of using Strong Swan. Programmers naturally want to benefit programmers. Here we will record the complete steps encountered in StrongSwan's use. I hope it will be helpful.
Dead work
Preparations are not simply done by pretending to be Strong Swan. I don't know what to prepare. Look directly at the configuration of Strong Swan. In fact, it's a waste of time. In the end, I can't get anything out of it, and I'm busy. In fact, the workload of preparatory work is still quite large:
Prepare one: Scene
To know how to configure StrongSwan, you first need to know what scenario you want to build. stay Strong Swan's official website On the left, we can find TestScenarios. There are many scenes here. We need to decide which one we want to reproduce. Enter and click strongSWan test suits. There are many lists in https://www.strongswan.org/testresults.html. Let's open ikev2 and select one of them. net2net-psk and net2net-rsa Scene reproduction.
Preparations 2: Networking
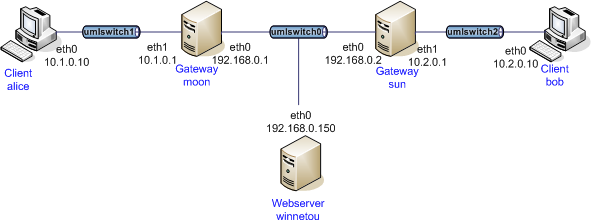
From the net2net-psk networking diagram, we can see that we need at least two clients, Alice and Bob, two gateways, Moon and Sun. net2net-rsa networking is the same. Therefore, four virtual machines ABCD can be created, in which BC serves as two gateways and AD serves as the client of left and right subnets.
Overall: A -- subnet 1-- B = subnet 2 = C -- subnet 3-- D
The virtual machine is created using VMware, which uses Vmware 12 and Ubuntu 16.10.
Steps:
install equipment
Install a virtual machine;Clone
After creating virtual machine A, BCD is cloned directly using VMware's Clone, which is more convenient.Adjust network card
BC exists as a gateway, so it needs two network cards, so it is necessary to add another network card to BC in the settings.Configure network segment
In the Edit option of VMware, select Virtual Network Editor, add three virtual segments vmnet2/vmnet3/vmnet4, type Host-Only, add segments as subnet 123 of the above figure; DHCP option is turned off and IP is not allowed to be allocated independently;Virtual Machine Access Subnet
If the network card type of virtual machine A is set to Custom and vmnet2 is selected, then A is connected to subnet 1. If B's two network cards are set to vmnet2 and vmnet3, then B is connected to subnet 1 and subnet 2 at the same time. Similarly, C and D are set.Configuring Virtual Machines
Four machines are booted, using the graphical interface, according to the above figure to configure the machine's IP address and subnet mask, A and D do not forget to configure the default gateway for B and C's IP, after all, B and C are gateways;Open Forwarding
Very important, since B and C act as gateways, it is necessary to modify the / etc/sysctl.conf file in B and C, and cancel the annotation of the line net.ipv4.ip_forward=1, so as to play its router function.
Preparations 3: Install StrongSwan
After the networking is completed, it's time to install StrongSwan. Ubuntu loading StrongSwan is very simple, just sudo apt-get install strongswan.
So far, the preparatory work has been completed. Among them, optical networking takes a lot of effort.
Tips:
Don't forget to configure four Ubuntu virtual machines and two-way copy and paste between hosts. Don't forget to set up a shared folder with the host, or it will be very painful to add something to the virtual machine next. It is recommended to install the enhanced tools provided by VMware, which can be searched by itself. If you still can't forget sudo apt-get install open-vm-tools-desktop.
To configure
Configure net2net-psk
Let's start with the configuration of psk, because the configuration of PSK is very simple. Just use Pre-Shared-Key to authenticate. This pre-set key is placed in ipsec.secrets.
configuration file
- Configuration Gateway B
Simply put the ipsec.conf, ipsec.secrets and strongswan.conf configuration files of the moon provided on https://www.strongswan.org/test/test results/ikev2/net2net-psk/index.html into the location of gateway B/etc/ipsec.conf, /etc/ipsec.secrets and/etc/strongswan.conf respectively. - Configuration Gateway C
Same as B. It's just using sun's configuration file this time.
start-up
Before startup, A and D are separately under different subnets, which is obviously impossible to ping.
- Gateway Bsudo ipsec start or sudo ipsec restart, start/restart StrongSwan, C is the same;
- Running sudo ipsec up net-net in gateway B or C opens a connection named net-net, and net-net is configured in ipsec.conf.
If nothing unexpected happens, it will show the prompt of successful tunnel establishment. At this time, using sudo iptables-nvL--line-numbers, you can see that there are two more forwarding rules in the gateway's iptables:
lgl@A ~> sudo iptables -nvL --line-numbers
Chain INPUT (policy ACCEPT 26 packets, 2100 bytes)
num   pkts bytes target     prot opt in     out     source               destination

Chain FORWARD (policy ACCEPT 0 packets, 0 bytes)
num   pkts bytes target     prot opt in     out     source               destination
1        0     0 ACCEPT     all  --  ens38  *       10.1.0.0/24          10.2.0.0/24          policy match dir in pol ipsec reqid 1 proto 50
2        0     0 ACCEPT     all  --  *      ens38   10.2.0.0/24          10.1.0.0/24          policy match dir out pol ipsec reqid 1 proto 50

Chain OUTPUT (policy ACCEPT 27 packets, 3056 bytes)
num   pkts bytes target     prot opt in     out     source               destination
It is precisely with these two rules, and then try to take host A to ping host D, both can pass.
Configure net2net-rsa
It is more troublesome to configure rsa. The main reason is that RSA needs authentication of public key and private key, and CA also needs to issue certificates. Specific principles need to learn "asymmetric encryption", here only how to configure.
Generate the necessary certificates
It is recommended that the host be generated into a shared folder with the virtual machine, and then the file be placed in the appropriate location in the virtual machine. All of the following commands require root privileges, or they will report an error: command not found: ipsec.
Generating CA Certificate
Generate a private key:
ipsec pki --gen --outform pem > ca.pemSelf-issued CA certificate:
ipsec pki --self --in ca.pem --dn "C=CN, O=NetworkLab, CN=NetworkLab CA" --ca --outform pem > ca.cert.pemHere self denotes the self visa, in is the input private key, dn is the discriminant name, CA denotes the generation of CA, and the others are the same.
- C denotes the name of the country, as well as ST prefecture/province, L area, STREET Street.
- O denotes the organization name
- CN is a generic name
Generating server certificates
In fact, it is to generate certificates for our gateway B and C. Here, let's make B stand for moon and C stand for sun.
Take sun for example
Private key:
ipsec pki --gen --outform pem > sun.server.pemIssuing server certificates:
ipsec pki --pub --in sun.server.pem | ipsec pki --issue --cacert ca.cert.pem --cakey ca.pem --dn "C=CN, O=NetworkLab, CN=sun.com" --san="sun.com" --flag serverAuth --flag ikeIntermediate --outform pem > sun.server.cert.pemmoon
Same as Sun, but replace all the strings sun with moon.
IPSec PKI - pub - in sun. server. PEM extracts the public key from the newly generated private key. Then we use the public key to issue the following server certificates.
Generating Client Certificate
Corresponding to the certificate of the generating server, it is also divided into B and C. Here we still take sun as an example.
sun
Private key:
ipsec pki --gen --outform pem > sun.client.pemIssuing Client Certificate:
ipsec pki --pub --in sun.client.pem | ipsec pki --issue --cacert ca.cert.pem --cakey ca.pem --dn "C=CN, O=NetworkLab, CN=client" --outform pem > sun.client.cert.pemmoon
Same as Sun, but replace all the strings sun with moon.
So far, we have generated the following documents:
ca.cert.pem
ca.pem

moon.client.pem
moon.server.cert.pem
moon.server.pem
moon.client.cert.pem

sun.client.pem
sun.client.cert.pem
sun.server.pem
sun.server.cert.pem
configuration file
Installation Certificate
B and C gateways are server s and client s, so for B, it needs:
1. CA Certificate (for Certification)
2. The server private key of moon, the server certificate of moon (because B serves as the server of C and receives the request of C)
3. sun's client private key and sun's client certificate (because B is also a C client and requests C)
C is similar, but on the contrary: CA certificate, sun's server private key and certificate, moon's client private key and certificate.
After we have sorted out this relationship, we put the certificate in its place.
For B:
cp -r ca.cert.pem /etc/ipsec.d/cacerts/
cp -r moon.server.cert.pem /etc/ipsec.d/certs/
cp -r moon.server.pem /etc/ipsec.d/private/
cp -r sun.client.cert.pem /etc/ipsec.d/certs/
cp -r sun.client.pem /etc/ipsec.d/private/
The same is true for C.
Setting up configuration files
This step is the same as the placement of the configuration file of psk, and it will not be repeated, but here we need to modify a few places, because our certificate name and @id name are slightly different from the official website, for convenience of reference, the revised file will be pasted out:
B:
lgl@A ~/s/n2n-rsa> cat /etc/ipsec.conf
# /etc/ipsec.conf - strongSwan IPsec configuration file

config setup

conn %default
    ikelifetime=60m
    keylife=20m
    rekeymargin=3m
    keyingtries=1
    keyexchange=ikev2
    mobike=no

conn net-net
    left=192.168.0.1
    leftcert=moon.server.cert.pem
    leftsubnet=10.1.0.0/24
    leftid=@moon.com
    leftfirewall=yes
    right=192.168.0.2
    rightsubnet=10.2.0.0/24
    rightid=@sun.com
    auto=add
lgl@A ~/s/n2n-rsa> cat /etc/ipsec.secrets
# /etc/ipsec.secrets - strongSwan IPsec secrets file

: RSA moon.server.pem
lgl@A ~/s/n2n-rsa> cat /etc/strongswan.conf
# /etc/strongswan.conf - strongSwan configuration file

charon {
  load = aes des sha1 sha2 md5 pem pkcs1 gmp random nonce x509 curl revocation hmac stroke kernel-netlink socket-default updown
  multiple_authentication = no
  signature_authentication = no
}
C:
lgl@A ~> cat /etc/ipsec.conf
# /etc/ipsec.conf - strongSwan IPsec configuration file

config setup

conn %default
    ikelifetime=60m
    keylife=20m
    rekeymargin=3m
    keyingtries=1
    keyexchange=ikev2
    mobike=no

conn net-net
    left=192.168.0.2
    leftcert=sun.server.cert.pem
    leftsubnet=10.2.0.0/24
    leftid=@sun.com
    leftfirewall=yes
    right=192.168.0.1
    rightsubnet=10.1.0.0/24
    rightid=@moon.com
    auto=add
lgl@A ~> cat /etc/ipsec.secrets
# /etc/ipsec.secrets - strongSwan IPsec secrets file

: RSA sun.server.pem
lgl@A ~> cat /etc/strongswan.conf
# /etc/strongswan.conf - strongSwan configuration file

charon {
  load = aes des sha1 sha2 md5 pem pkcs1 gmp random nonce x509 curl revocation hmac stroke kernel-netlink socket-default updown
  multiple_authentication = no
  signature_authentication = no
}
start-up
The startup mode is the same as that of psk.
1. Gateway Bsudo ipsec start or sudo ipsec restart, start StrongSwan, C is the same;
2. Run sudo ipsec up net-net in gateway B or C, that is, open a connection named net-net, and the specific configuration of net-net is in ipsec.conf.
Successful words, roughly as follows:
bishe2016@A ~/s/n2n-rsa> sudo ipsec up net-net
initiating IKE_SA net-net[1] to 192.168.0.2
generating IKE_SA_INIT request 0 [ SA KE No N(NATD_S_IP) N(NATD_D_IP) ]
sending packet: from 192.168.0.1[500] to 192.168.0.2[500] (668 bytes)
received packet: from 192.168.0.2[500] to 192.168.0.1[500] (457 bytes)
parsed IKE_SA_INIT response 0 [ SA KE No N(NATD_S_IP) N(NATD_D_IP) CERTREQ ]
received cert request for "C=CN, O=NetworkLab, CN=NetworkLab CA"
sending cert request for "C=CN, O=NetworkLab, CN=NetworkLab CA"
authentication of 'moon.com' (myself) with RSA signature successful
sending end entity cert "C=CN, O=NetworkLab, CN=moon.com"
establishing CHILD_SA net-net
generating IKE_AUTH request 1 [ IDi CERT N(INIT_CONTACT) CERTREQ IDr AUTH SA TSi TSr N(EAP_ONLY) ]
sending packet: from 192.168.0.1[500] to 192.168.0.2[500] (1484 bytes)
received packet: from 192.168.0.2[500] to 192.168.0.1[500] (1292 bytes)
parsed IKE_AUTH response 1 [ IDr CERT AUTH SA TSi TSr N(AUTH_LFT) ]
received end entity cert "C=CN, O=NetworkLab, CN=sun.com"
  using certificate "C=CN, O=NetworkLab, CN=sun.com"
  using trusted ca certificate "C=CN, O=NetworkLab, CN=NetworkLab CA"
checking certificate status of "C=CN, O=NetworkLab, CN=sun.com"
certificate status is not available
  reached self-signed root ca with a path length of 0
authentication of 'sun.com' with RSA signature successful
IKE_SA net-net[1] established between 192.168.0.1[moon.com]...192.168.0.2[sun.com]
scheduling reauthentication in 3289s
maximum IKE_SA lifetime 3469s
connection 'net-net' established successfully
Similarly, we can view iptables and use A to successfully ping with D.
You can also use sudo IPSec status sall to view the connection status:
lgl@A ~/s/n2n-rsa> sudo ipsec statusall
Status of IKE charon daemon (strongSwan 5.3.5, Linux 4.8.0-41-generic, x86_64):
  uptime: 3 hours, since Mar 22 11:33:30 2017
  malloc: sbrk 2420736, mmap 0, used 241824, free 2178912
  worker threads: 11 of 16 idle, 5/0/0/0 working, job queue: 0/0/0/0, scheduled: 3
  loaded plugins: charon aes sha1 sha2 md5 pem pkcs1 gmp random nonce x509 revocation hmac stroke kernel-netlink socket-default updown
Listening IP addresses:
  192.168.90.130
  10.1.0.1
  192.168.0.1
Connections:
     net-net:  192.168.0.1...192.168.0.2  IKEv2
     net-net:   local:  [moon.com] uses public key authentication
     net-net:    cert:  "C=CN, O=NetworkLab, CN=moon.com"
     net-net:   remote: [sun.com] uses public key authentication
     net-net:   child:  10.1.0.0/24 === 10.2.0.0/24 TUNNEL
Security Associations (1 up, 0 connecting):
     net-net[4]: ESTABLISHED 25 minutes ago, 192.168.0.1[moon.com]...192.168.0.2[sun.com]
     net-net[4]: IKEv2 SPIs: 6fba3bd57680d6d4_i* 17339e6111cf6564_r, public key reauthentication in 28 minutes
     net-net[4]: IKE proposal: AES_CBC_128/HMAC_SHA1_96/PRF_HMAC_SHA1/MODP_2048
     net-net{14}:  INSTALLED, TUNNEL, reqid 4, ESP SPIs: ceac4ddb_i c9645c64_o
     net-net{14}:  AES_CBC_128/HMAC_SHA1_96, 0 bytes_i, 0 bytes_o, rekeying in 4 minutes
     net-net{14}:   10.1.0.0/24 === 10.2.0.0/24