The Purest Android Live Broadcasting Technology Combats the Compilation and Operation of 01-FFmpeg
The latest practical course, Android Automation Brush Quantity, Cheating and Cheating Prevention, Case: Brush Alliance Statistics, Batch Registration of Apple Accounts
This series of articles will study the most pure implementation of Android live broadcasting, and not with the current integrated SDK to achieve live broadcasting technology implementation, but from a relatively low-level live broadcasting implementation to explore this technology, so as to optimize the technology, debugging and so on have a deep understanding.
First: the process of video playback
Now some video files are encoding --> encapsulated, such as a mp4 video file mp4 is its encapsulation format, h.264 is its encoding format (h.264 is the most widely encoding format now, most of the video files are encoding with it), then our video playback will be the following process:
mp4 file --> H.264 file (generated after unpacking) - > YUV file (generated after decoding)
yuv is a relatively original video file. It is very large. Compared with h.264 file, it can reach 1:100, that is to say, the yuv file generated after decoding the 10M h.264 file will reach more than 100M. So our video files will go through a coding process.
In turn, when we generate a video file, we will go through:
yuv file (h.264 encoding) - > H.264 file (mp4 encapsulation) - > MP4 file
For example, our Android default Camera preview data is a kind of yuv data, so we get the yuv data from Camera, and then through an h.264 encoding, and then can be encapsulated or transmitted.
Then the process of live broadcasting may be as follows:
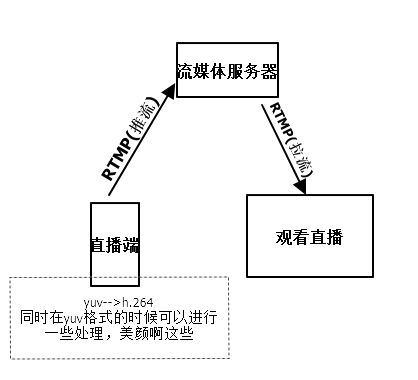
This series of articles will mainly study the technology of live broadcasting and watching live broadcasting on Android. Live broadcasting is not only RTMP protocol, but also RTP protocol. RTMP is commonly used. The encapsulation format used is FLV, TCP, mpegts and UDP. RTMP is used here.
In that picture, you can see that before the push-flow, the main task is to complete the generation of a video file yuv -> H. 264. In the yuv data obtained by Camera, in fact, we can add the facial care ah, special effects superimposed these functions, and then coding. Sounds can also be processed, such as doll sounds.
Note: Sound is added only when the video is encapsulated. Image data and audio data are separated when the video is unpackaged.
Note that there are many kinds of encoding and encapsulation formats. This series of articles will not study this in detail, but will only explain these knowledge when needed, so if you want to know these encoding and encapsulation knowledge in detail, you can go to Google first. Next, we will enter the actual battle of our article. First, we will introduce the platform and tools.
Windows7
MinGW
AndroidStudio 2.2
NDK(r13b)
FFmpeg 3.4
libx264
Because I compiled on Windows platform, so I need MinGW, the installation of MinGW must install msys, otherwise there is no way to compile.
In the development process, we recommend Android Studio version 2.2 or more, because after 2.2, support for NDK has been greatly improved. For example, we don't need our own javah to generate the corresponding C method of native method. AS will help us generate native method automatically. This function is worth using, of course, there are other powerful NDK support.
The version of NDK I use is r13b. It's better to use a newer version of NDK, because Android Studio uses 2.2 already.
In the process of live broadcasting, we can see that we need to encoding, encapsulating and other operations for video. If we do these operations, we need the library of FFmpeg to complete. FFmpeg's processing of audio and video is very powerful. Let's put it this way. Common players, QQ videos, storm videos, all use FFmpeg for core decoding, encoding and other operations, format factory.
These conversion software are also, and now some integrated live programs, the vast majority of them are also packaged FFmpeg. So in this series, FFmpeg will be used to restore the most pure live technology, so that we can know how to implement the packaged live technology. PS:FFmpeg pronunciation is: F MPEG rather than a letter-by-letter reading
libx264 It's an h.264 encoder. When using the AV_CODEC_ID_H264 encoder of FFmpeg to encode, we need to use this library. So when encoding FFmpeg, we will add libx264.
The default Android development environment has been configured, the NDK environment is ready, after the installation of MinGW, we can download FFmpeg and libx264, and then decompress.
Then we modify the configure file so that the compiled file will not have strange names and will not be recognized by Android. Just put
SLIBNAME_WITH_MAJOR='$(SLIBNAME).$(LIBMAJOR)'
LIB_INSTALL_EXTRA_CMD='$$(RANLIB) "$(LIBDIR)/$(LIBNAME)"'
SLIB_INSTALL_NAME='$(SLIBNAME_WITH_VERSION)'
SLIB_INSTALL_LINKS='$(SLIBNAME_WITH_MAJOR) $(SLIBNAME)'
Modified into
SLIBNAME_WITH_MAJOR='$(SLIBPREF)$(FULLNAME)-$(LIBMAJOR)$(SLIBSUF)'
LIB_INSTALL_EXTRA_CMD='$$(RANLIB)"$(LIBDIR)/$(LIBNAME)"'
SLIB_INSTALL_NAME='$(SLIBNAME_WITH_MAJOR)'
SLIB_INSTALL_LINKS='$(SLIBNAME)'
After the modification is completed, we will create a new. sh file in the current directory, which is the shell script.
#!/bin/bash
NDK=E:/Programs/android-ndk-r13b
SYSROOT=$NDK/platforms/android-19/arch-arm/
TOOLCHAIN=$NDK/toolchains/arm-linux-androideabi-4.9/prebuilt/windows-x86_64
function build_one {
./configure \
     --prefix=$PREFIX \
     --enable-asm \
     --enable-neon \
     --enable-static \
     --enable-small \
     --disable-shared \
     --disable-ffmpeg \
     --disable-ffplay \
     --disable-ffprobe \
     --disable-ffserver \
     --disable-avdevice \
     --disable-doc \
     --disable-symver \
     --cross-prefix=$TOOLCHAIN/bin/arm-linux-androideabi- \
     --target-os=linux \
     --arch=arm \
     --cpu=armv7-a \
     --enable-cross-compile \
     --sysroot=$SYSROOT \
     --extra-cflags="-fPIC -DANDROID -mfpu=neon -mfloat-abi=softfp -I$NDK/platforms/android-19/arch-arm/usr/include" \
     --extra-ldflags="$ADDI_LDFLAGS"

     make clean
     make
     make install
 }
 CPU=arm
 PREFIX=$(pwd)/android/$CPU
 ADDI_CFLAGS="-marm"
 build_one
In front of this script, I configure three variables, all of which specify some tools and directories of NDK. It should be noted that in SYSROOT, the platform I compiled is android-19, because NDK sometimes has some impact on the platform. Students who have done in-depth NDK development should be clear, so this depends on what specific changes need to be made.
- enable-asm opens assembly
- enable-neon optimizes the exclusive instruction set of armv7-a platform to improve coding efficiency
- enable-small can minimize the size of compiled libraries as much as possible. For example, I didn't open it. a has more than 80 M and only about 57 M after opening.
- disable-ffmpeg does not need ffmpeg. ffmpeg is a command-line tool that is very powerful and can be seen on the official website, but we don't need it through code development.
- disable-ffplay-disable-ffprobe-disable-ffserver are all unnecessary tools, but they can also be compiled to see
- disable-avdevice library is used to operate some hardware devices, such as cameras, but Android doesn't need it. It can also be compiled to try to use it on Android.
- disable-symver disables symbol versioning
- PREFIX=(pwd)/android/CPU specifies the directory where the compiled libraries are located. This configuration is under the specified cpu platform directory in the Android directory under the current directory.
enable-static disable-shared is a static library (. a) or a dynamic library (. so), if you want to compile it into a dynamic library enable-shared disable-static. Or both are compiled.
The dynamic library is that as long as the Android device has this so exposed, then APP can be used, that is, as long as one installation, other APPs can be used.
But the so packaged in APP is in the current APP private directory and can not be used by other APPs, so the advantages of dynamic libraries disappear.
And it exposes its shortcomings, that is, when so is very large, it will form a very large Apk package.
Static libraries pack the required code into their own so, so this can solve the shortcoming of dynamic libraries.
So what we compiled here is the static library, because the compiled library has more than 50 M, so using the static library can minimize the packaged apk.
The other configurations are relatively easy to understand, so there is no more explanation. The above script compiles a full-featured FFmpeg library, so we can open MinGW's msys.
Open msys.bat, then cd to the root directory of FFmpeg, and execute. / build_script.sh, which is to execute the script we wrote above.
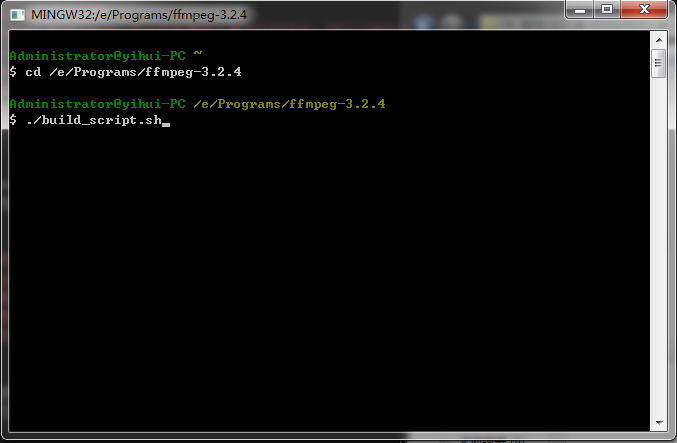
To open a disk: If you open the E disk, cd/e will do.
Running that script will make a compilation. Sometimes there is no response during compilation. Don't think it's not running. Stop it, because compilation is time-consuming. It's normal to compile for 20 minutes. Computer performance is good, it will be fast, and the bad half an hour is normal. To determine whether it's compiling, you can check the utilization rate of cpu. That's all right.
After a period of compilation, we can see the compiled Library in the directory defined in the script. In the current directory there will be a directory of android, click inside, you will see the compiled libraries.
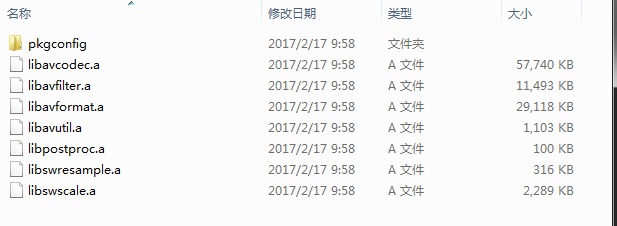
You can see about seven libraries. There may be different libraries with different versions or configurations, and libavcodec libavfilter libavformat libavutil libswscale is commonly used.
The functions of these libraries are very complete, including a large number of codecs and decoders, but sometimes we do not need to be so multi-functional, so that we can reduce the size of some libraries by disabling some functions.
For example, this configuration can be added to the above compiler script without the need for decoder - disable-decoders. If you only need a decoder, you can specify disable-decoders enable-decoder=h264. That is to disable the decoder first, and then specify a decoder, that is, you only need the decoder of h264.
So it's possible to get the size of the streamlined library through the file above, as follows:
#!/bin/bash
NDK=E:/Programs/android-ndk-r13b
SYSROOT=$NDK/platforms/android-19/arch-arm/
TOOLCHAIN=$NDK/toolchains/arm-linux-androideabi-4.9/prebuilt/windows-x86_64
function build_one {
./configure \
     --prefix=$PREFIX \
     --enable-asm \
     --enable-neon \
     --enable-static \
     --enable-small \
     --disable-shared \
     --disable-doc \
     --disable-ffmpeg \
     --disable-ffplay \
     --disable-ffprobe \
     --disable-ffserver \
     --disable-avdevice \
     --disable-symver \
     --disable-muxers \
     --enable-muxer=mov \
     --enable-muxer=mp4 \
     --enable-muxer=avi \
     --disable-decoders \
     --enable-decoder=aac \
     --enable-decoder=h264 \
     --enable-decoder=mpeg4 \
     --disable-demuxers \
     --enable-demuxer=h264 \
     --enable-demuxer=avi \
     --disable-parsers \
     --enable-parser=aac \
     --enable-parser=h264 \
     --cross-prefix=$TOOLCHAIN/bin/arm-linux-androideabi- \
     --target-os=linux \
     --arch=arm \
     --cpu=armv7-a \
     --enable-cross-compile \
     --sysroot=$SYSROOT \
     --extra-cflags="-fPIC -DANDROID -mfpu=neon -mfloat-abi=softfp -I$NDK/platforms/android-19/arch-arm/usr/include" \
     --extra-ldflags="$ADDI_LDFLAGS"

     make clean
     make
     make install
 }
 CPU=arm
 PREFIX=$(pwd)/android/$CPU
 ADDI_CFLAGS="-marm"
 build_one
In this way, the size of the library can be greatly reduced.
Then, we need to compile the FFmpeg library which contains libx264. First, we need to compile libx264. First, we need to go under the directory of libx264 in msys, and then create a new shell script:
#!/bin/bash
NDK=E:/Programs/android-ndk-r13b
SYSROOT=$NDK/platforms/android-19/arch-arm/
TOOLCHAIN=$NDK/toolchains/arm-linux-androideabi-4.9/prebuilt/windows-x86_64
function build_one {
./configure \
     --prefix=$PREFIX \
     --enable-static \
     --enable-pic \
     --disable-asm \
     --disable-cli \
     --host=arm-linux \
     --cross-prefix=$TOOLCHAIN/bin/arm-linux-androideabi- \
     --sysroot=$SYSROOT

     make clean
     make
     make install
 }
PREFIX=$(pwd)/android-lib/
build_one
Configuration is basically the same, in fact, these configurations can be found in the configure file, you can see. Here, we also compile into static libraries.
Once the compilation is successful, we will see the results of the compilation in the android-lib directory in the current directory.
So we're going to copy the entire android-lib directory to the root directory of FFmpeg, and then we're going to compile FFmpeg.
In fact, it's very simple, just add something to the compiled file above.
#!/bin/bash
NDK=E:/Programs/android-ndk-r13b
SYSROOT=$NDK/platforms/android-19/arch-arm/
TOOLCHAIN=$NDK/toolchains/arm-linux-androideabi-4.9/prebuilt/windows-x86_64
EXTRA_LIB=E:/Programs/FFmpeg-3.2.4/android-lib
function build_one {
./configure \
     --prefix=$PREFIX \
     --enable-asm \
     --enable-neon \
     --enable-static \
     --enable-small \
     --enable-libx264 \
     --enable-gpl \
     --enable-encoder=libx264 \
     --disable-shared \
     --disable-doc \
     --disable-ffmpeg \
     --disable-ffplay \
     --disable-ffprobe \
     --disable-ffserver \
     --disable-avdevice \
     --disable-symver \
     --cross-prefix=$TOOLCHAIN/bin/arm-linux-androideabi- \
     --target-os=linux \
     --arch=arm \
     --cpu=armv7-a \
     --enable-cross-compile \
     --sysroot=$SYSROOT \
     --extra-cflags="-I$EXTRA_LIB/include -fPIC -DANDROID -mfpu=neon -mfloat-abi=softfp -I$NDK/platforms/android-19/arch-arm/usr/include" \
     --extra-ldflags="-L$EXTRA_LIB/lib -lx264 $ADDI_LDFLAGS"

     make clean
     make
     make install
 }
 CPU=arm
 PREFIX=$(pwd)/android/x264_lib/$CPU
 ADDI_CFLAGS="-marm"
build_one- EXTRA_LIB specifies the directory of libx264 just compiled
- enable-libx264-enable-gpl is to enable libx264, both of which need to be added
- - extra-cflags-extra-ldflags need to specify the lib file to compile the header file generated by libx264
In this way, we can compile a FFmpeg library with libx264 encoder.
Using FFmpeg in Android
First, create a new Android Studio project
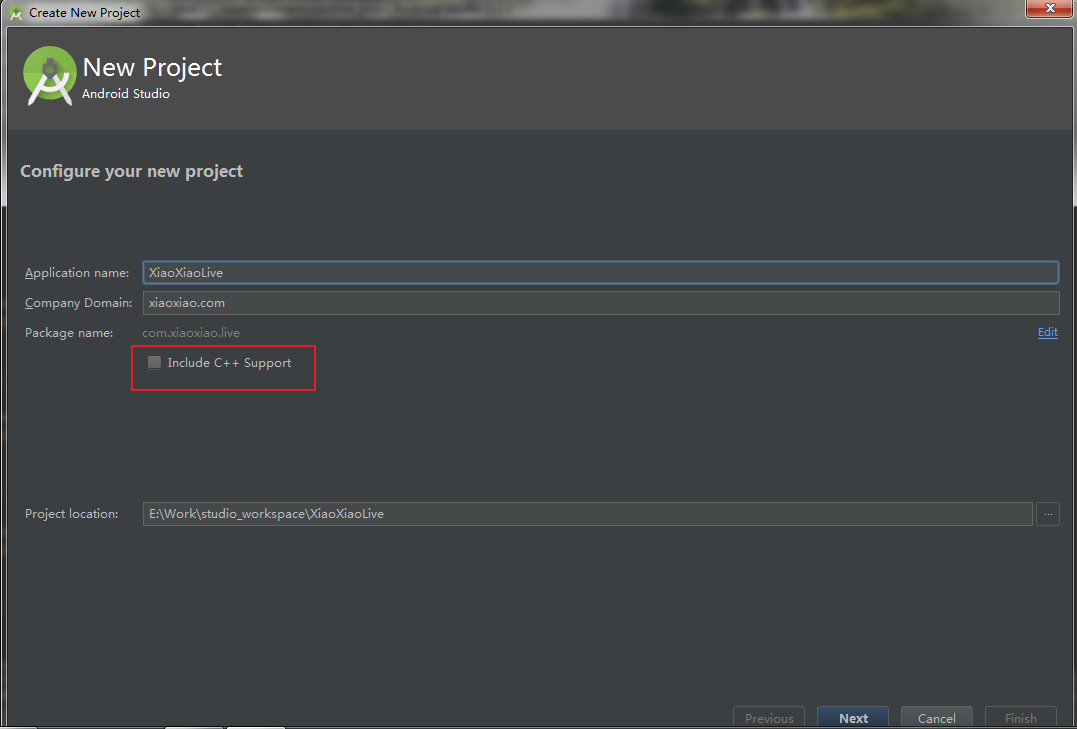
When building a new project, it is better not to check * Include C++ Support, because it is compiled by cmake by default, so we need to modify the configuration when we think of ndk_build, so it is better not to check unless you use cmake.
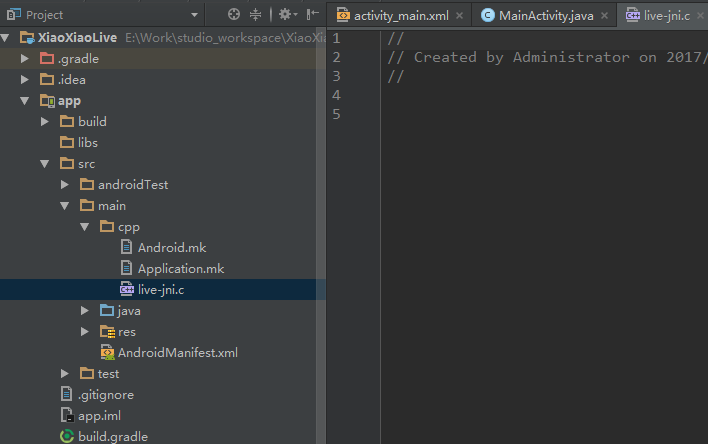
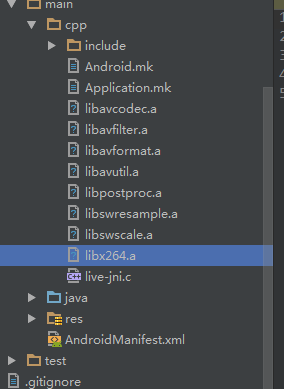
After the new project is completed, we select the view as the project, and then create a new cpp directory in the main directory.
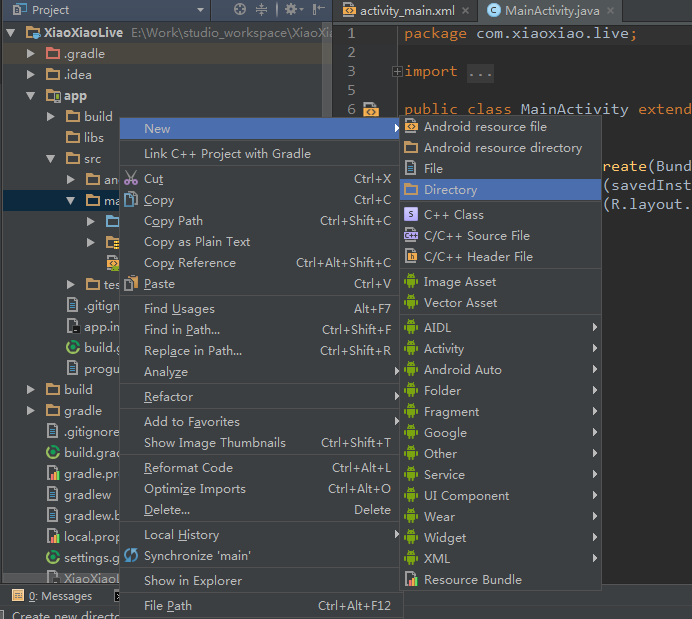
Once the new cpp directory is complete, you can copy or add Android.mk and Application.mk files to the directory, and then create a new c source file.
Note: The new file here is the. c source file. Why not create the. cpp source file?
Because when using the source file of. cpp, it will compile and fail, because FFmpeg is a pure c language project.
It may also be my project configuration problem, so here I am new. c file.
You can also tell me if you find a reason or a solution.
I can't compile extern "C" in. cpp.
After that, you can configure Gradle and right-click on the main directory
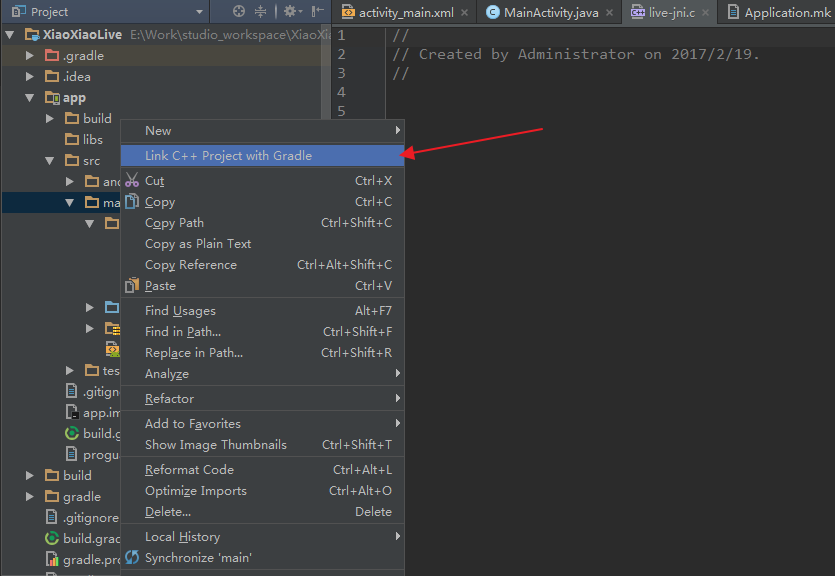
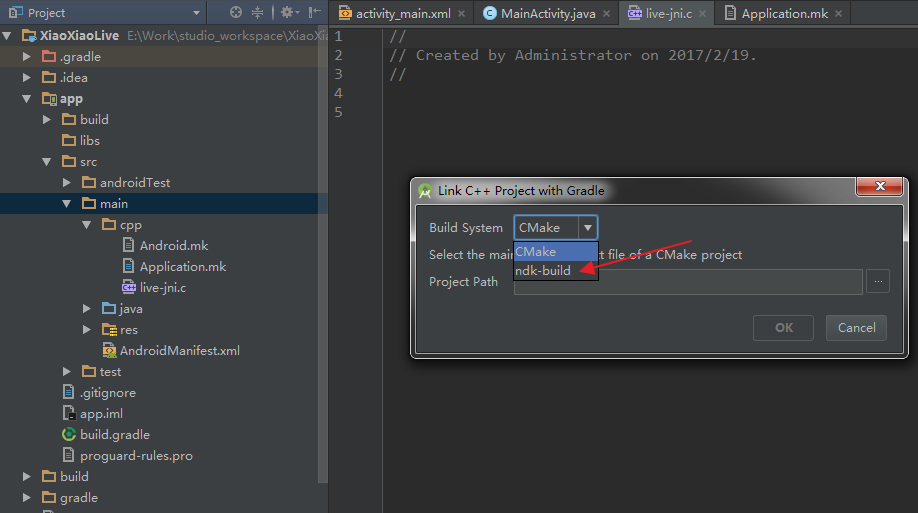
Note that the choice here is ndk_build, unless you want to use cmake, after you select this, you will specify the Android.mk file we added above to the Project Path below. Once it's done, Gradle automatically adds some compiled ones. In this way, the project can become an NDK project.
Next, we will copy the FFmpeg, libx264 libraries and header files we just compiled into the cpp directory.
Then you're going to write the Android.mk file.
LOCAL_PATH := $(call my-dir)

# prepare libX
include $(CLEAR_VARS)
TARGET_ARCH_ABI := armeabi-v7a
LOCAL_EXPORT_C_INCLUDES := $(LOCAL_PATH)/include
LOCAL_MODULE    := avcodec
LOCAL_SRC_FILES := libavcodec.a
include $(PREBUILT_STATIC_LIBRARY)

# prepare libX
include $(CLEAR_VARS)
TARGET_ARCH_ABI := armeabi-v7a
LOCAL_EXPORT_C_INCLUDES := $(LOCAL_PATH)/include
LOCAL_MODULE    := avfilter
LOCAL_SRC_FILES := libavfilter.a
include $(PREBUILT_STATIC_LIBRARY)

# prepare libX
include $(CLEAR_VARS)
TARGET_ARCH_ABI := armeabi-v7a
LOCAL_EXPORT_C_INCLUDES := $(LOCAL_PATH)/include
LOCAL_MODULE    := avformat
LOCAL_SRC_FILES := libavformat.a
include $(PREBUILT_STATIC_LIBRARY)

# prepare libX
include $(CLEAR_VARS)
TARGET_ARCH_ABI := armeabi-v7a
LOCAL_EXPORT_C_INCLUDES := $(LOCAL_PATH)/include
LOCAL_MODULE    := avutil
LOCAL_SRC_FILES := libavutil.a
include $(PREBUILT_STATIC_LIBRARY)

# prepare libX
include $(CLEAR_VARS)
TARGET_ARCH_ABI := armeabi-v7a
LOCAL_EXPORT_C_INCLUDES := $(LOCAL_PATH)/include
LOCAL_MODULE    := postproc
LOCAL_SRC_FILES := libpostproc.a
include $(PREBUILT_STATIC_LIBRARY)

# prepare libX
include $(CLEAR_VARS)
TARGET_ARCH_ABI := armeabi-v7a
LOCAL_EXPORT_C_INCLUDES := $(LOCAL_PATH)/include
LOCAL_MODULE    := swresample
LOCAL_SRC_FILES := libswresample.a
include $(PREBUILT_STATIC_LIBRARY)

# prepare libX
include $(CLEAR_VARS)
TARGET_ARCH_ABI := armeabi-v7a
LOCAL_EXPORT_C_INCLUDES := $(LOCAL_PATH)/include
LOCAL_MODULE    := swscale
LOCAL_SRC_FILES := libswscale.a
include $(PREBUILT_STATIC_LIBRARY)

# prepare libX
include $(CLEAR_VARS)
TARGET_ARCH_ABI := armeabi-v7a
LOCAL_EXPORT_C_INCLUDES := $(LOCAL_PATH)/include
LOCAL_MODULE    := x264
LOCAL_SRC_FILES := libx264.a
include $(PREBUILT_STATIC_LIBRARY)

include $(CLEAR_VARS)

TARGET_ARCH_ABI := armeabi-v7a

LOCAL_MODULE     := live_jni
LOCAL_SRC_FILES  := live_jni.c
LOCAL_C_INCLUDES += $(LOCAL_PATH)/include
LOCAL_CFLAGS     := -D__STDC_CONSTANT_MACROS -Wno-sign-compare -Wno-switch -Wno-pointer-sign -DHAVE_NEON=1 -mfpu=neon -mfloat-abi=softfp -fPIC -DANDROID

LOCAL_STATIC_LIBRARIES := avfilter avformat avcodec postproc swresample swscale avutil x264
LOCAL_LDLIBS     := -L$(NDK_ROOT)/platforms/$(APP_PLATFORM)/arch-arm/usr/lib -L$(LOCAL_PATH) -llog -ljnigraphics -lz -ldl


include $(BUILD_SHARED_LIBRARY)
Some of this Android.mk is not necessary, and some of the trampling may be repetitive. So you need to adjust.
- TARGET_ARCH_ABI: = armeabi-v7a, it's better to specify a platform. Sometimes when ndk prebuild, it may compile the whole platform, and there will be the problem of not finding the corresponding library.
LOCAL_STATIC_LIBRARIES := avfilter avformat avcodec postproc swresample swscale avutil x264
This is very important. The order of the following libraries is exquisite. If there is a problem with the order, the problem of missing links may be reported.
Because each version of FFmpeg may be different, to know the order, you can go to the Makefile file file in the FFmpeg directory.
# $(FFLIBS-yes) needs to be in linking order
FFLIBS-$(CONFIG_AVDEVICE)   += avdevice
FFLIBS-$(CONFIG_AVFILTER)   += avfilter
FFLIBS-$(CONFIG_AVFORMAT)   += avformat
FFLIBS-$(CONFIG_AVCODEC)    += avcodec
FFLIBS-$(CONFIG_AVRESAMPLE) += avresample
FFLIBS-$(CONFIG_POSTPROC)   += postproc
FFLIBS-$(CONFIG_SWRESAMPLE) += swresample
FFLIBS-$(CONFIG_SWSCALE)    += swscale
After the Android.mk file is written, we will write the Application.mk file.
APP_STL := gnustl_static
APP_LDFLAGS := -latomic
APP_ABI := armeabi-v7a
APP_PLATFORM := android-19- APP_LDFLAGS This is best specified otherwise undefined reference to'_atomic_fetch_add_4 error may be reported
After writing Application.mk, we'd better configure the build.gradle of app.
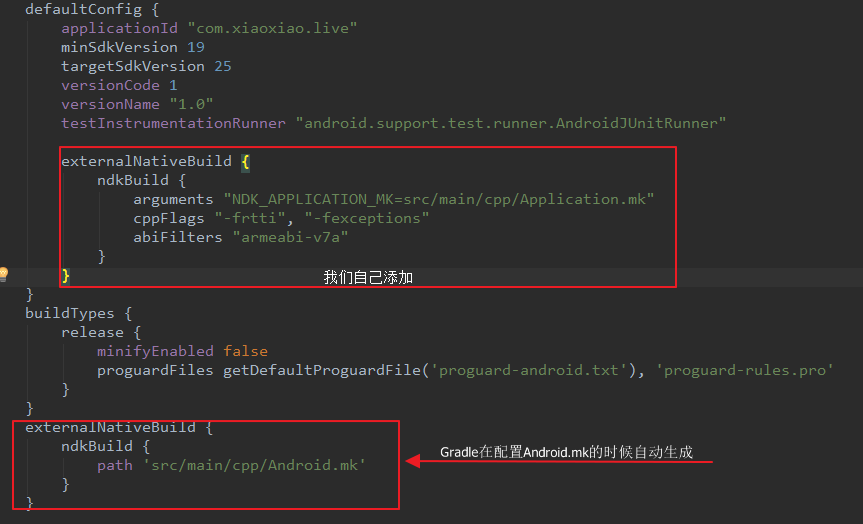
externalNativeBuild {
ndkBuild {
arguments "NDK_APPLICATION_MK=src/main/cpp/Application.mk"
cppFlags "-frtti", "-fexceptions"
abiFilters "armeabi-v7a"
}
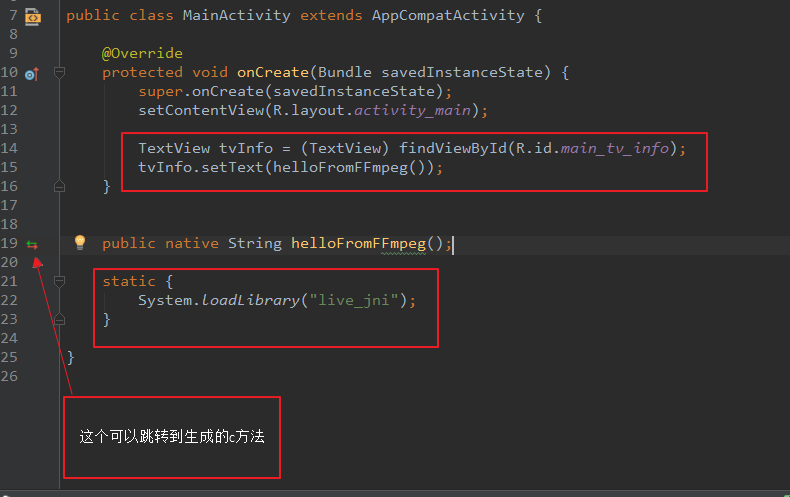
}So far, our entire configuration can be completed. Now you can go back to MainActivity, add a native method, and then Alt+Enter on the method, which will prompt you, and Enter will let it generate the corresponding c method of the native method.
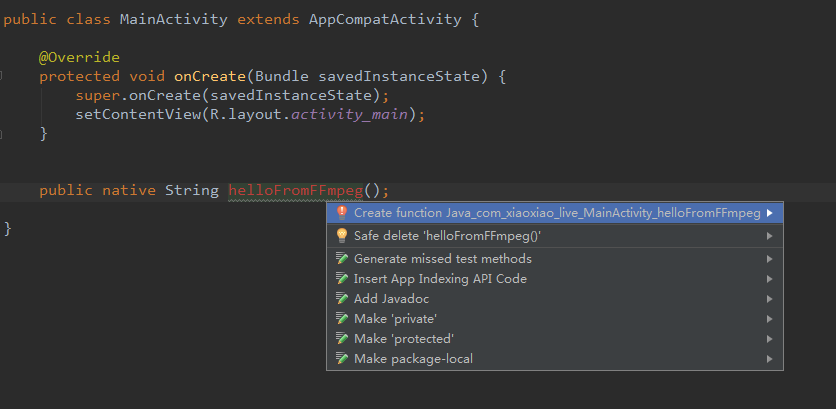
However, when the corresponding native method is first generated, it may be a bit problematic
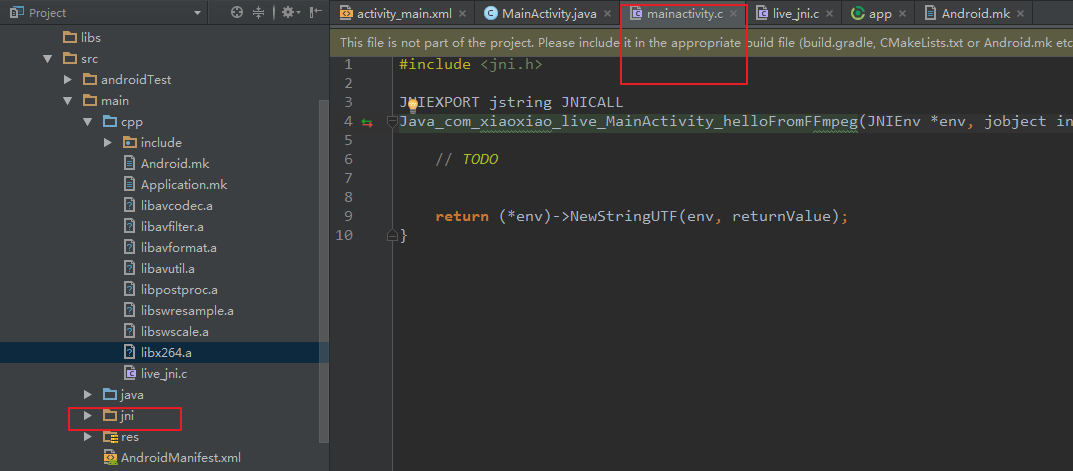
It will create a new jni directory, which will create a new c file, generated in it, we just need to copy this generated method to our new c file, we can automatically establish the association, so that the method will be automatically generated in the new file in the future. Then we delete the jni directory.

In this way, we can write our FFmpeg code.
#include <jni.h>

#include "libavcodec/avcodec.h"

JNIEXPORT jstring JNICALL
Java_com_xiaoxiao_live_MainActivity_helloFromFFmpeg(JNIEnv *env, jobject instance) {

    // TODO
    char info[10000] = {0};
    sprintf(info, "%s\n", avcodec_configuration());

    return (*env)->NewStringUTF(env, info);
}
Then load so into MainActivity
After that, we can run our project.
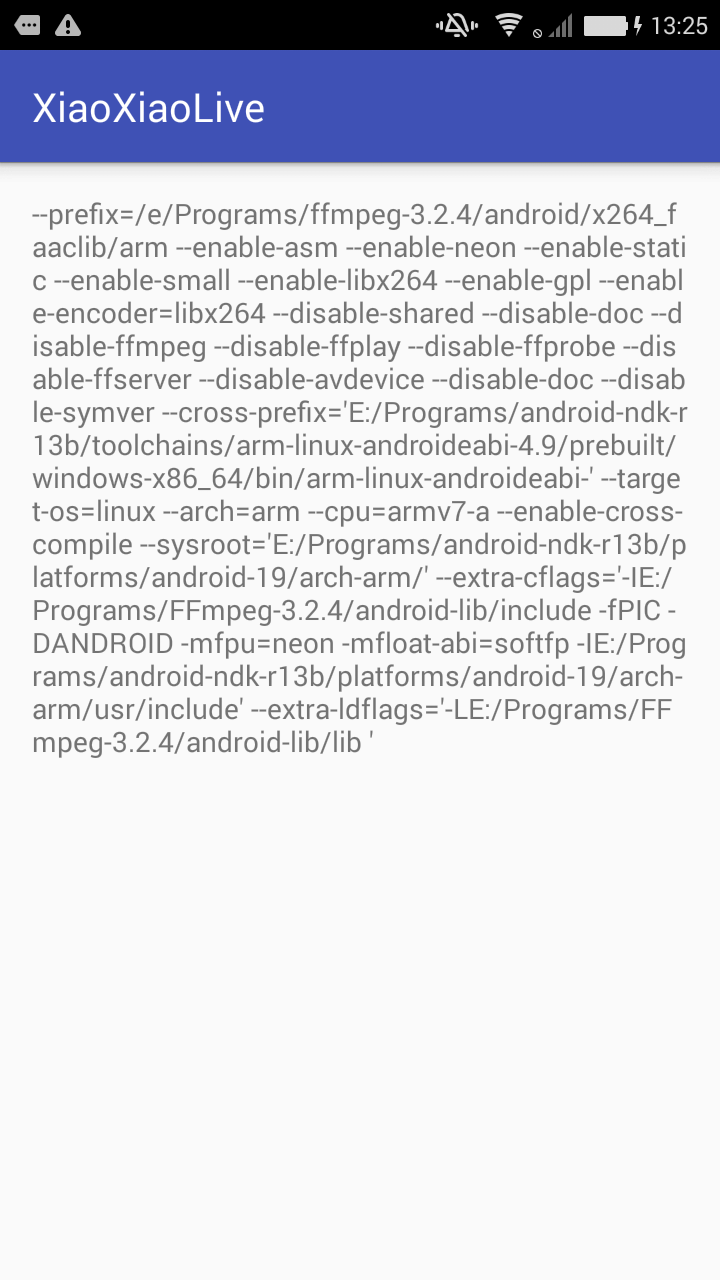
This result shows that our FFmpeg compilation is successful, and we can use it on Android.
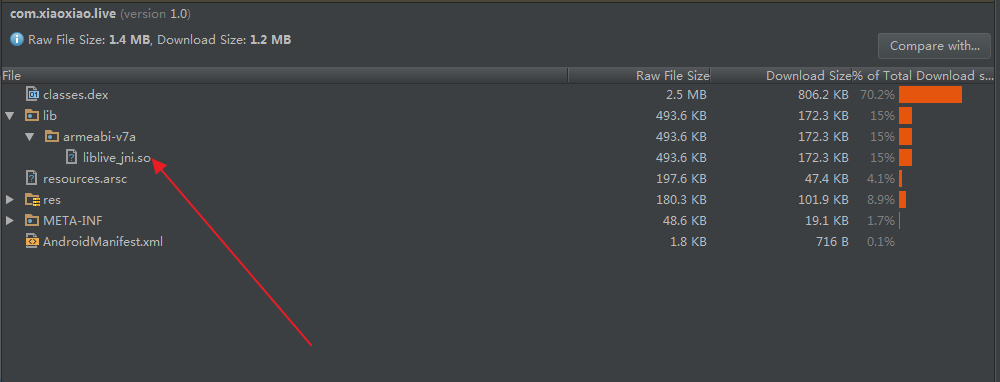
And as you can see from the above, the so we packed is very small, which can greatly reduce the size of our apk package.
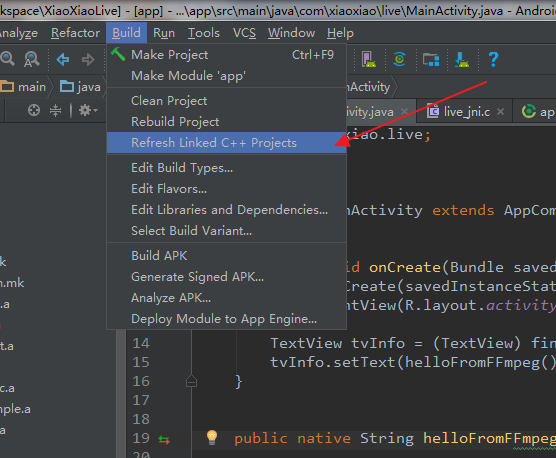
Tip: If you modify the Android.mk or build.gradle file, you are advised to do the following
summary
At this point, our compilation and operation have been completed, so next, we have to deal with Android's Camera, and complete the coding, pushing and other operations.