Write in front
On Purpose
This is an introduction to how to build an LNMP environment on cloud servers.
Content is based on my recent study and practice, so some content will be repeated with other articles online, so the purpose of this article is to pass the knowledge of the predecessors, and try to summarize a set of effective methods as clearly as possible.
On LNMP
LNMP = Linux + Nginx + MySQL + PHP
In fact, we can see what LNMP is, so I won't say much about it.~
I really don't know. LNMP.
Operating environment
- Server: Baidu Cloud (1 Core/1GB/20GB/Ordinary)
- Operating system: CentOS 7.2
- Local computer: Windows 7 + putty
With regard to the above:
About cloud servers: Baidu's cheapest cloud servers for 9.9 yuan in the first month are used. In fact, no matter what servers are operated on, there is no difference.
About Server Operating System: This may have some effect. This article is only suitable for operating in the version of CentOS 7 or above. What other Ubuntu or something is not applicable, and there are some differences in operation instructions for CentOS 6.X.
About local computers: Ordinary Windows 7, putty (as I'll say below) doesn't matter.~
Let's begin with the text.~
Get ready
Server
First of all, you need a cloud server. It doesn't make any difference which company you are using.

I'm going to expire()
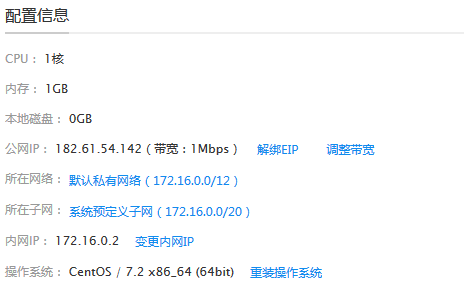
Then confirm the operating system: CentOS / 7.2 x86_64 (64bit)
Each cloud server provider's console can reinstall the system, such as:
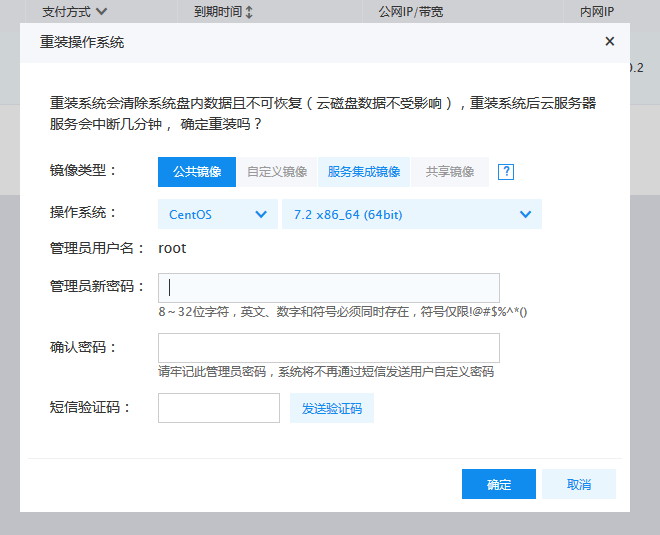
In this way, we can ensure that we have a most basic server environment.~
local
Once we have a cloud server, we need to link and operate the server locally, and how to achieve that?~
There are many software that can link servers remotely, such as xshell, putty, etc.
Here I choose putty. It's very small and doesn't need to be installed. It's ready for decompression.~
There are many downloadable links on the Internet. After decompression, this is the case:
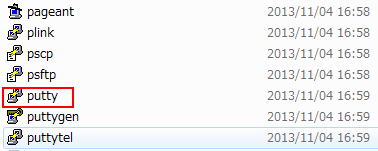
The icon red above is what we want to use. Open it like this:
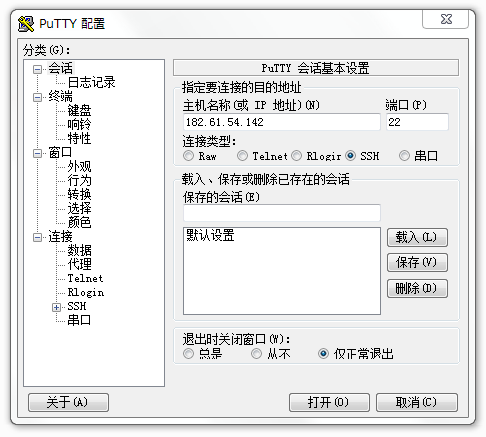
Enter your public IP in the host name, mine is 182.61.54.142 (you can get it from the cloud server provider)
Enter 22 at the port (22 is ssh port)
Click Open
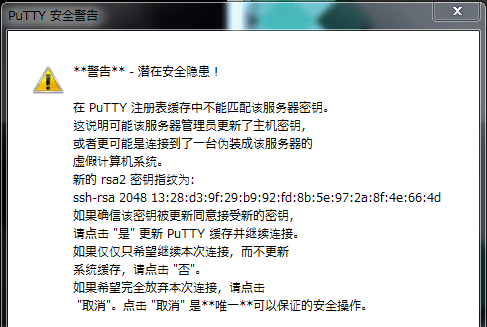
The first landing will be accompanied by a security alert. Click on:
Then enter the username and password as prompted (the username and password are the system settings above)~
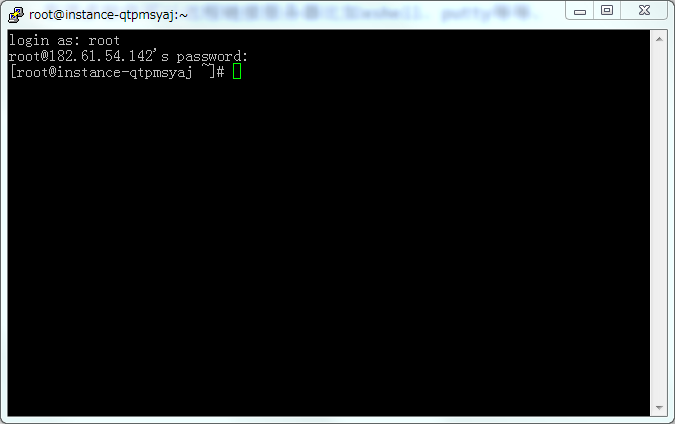
This successfully links to the cloud server~
Let's say more about it. Sometimes, there may be scrambling code on the putty terminal, like this:

Because the character set does not match, in order to prevent this, we can modify the character set to UTF-8.
The method is to select the transformation of the left border. 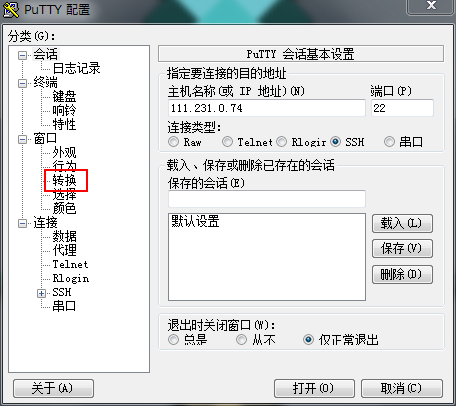
Then select UTF-8 in the right remote character set 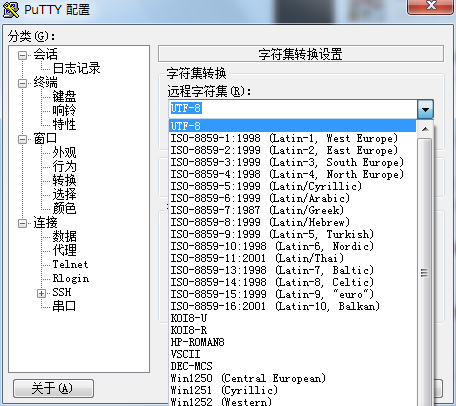
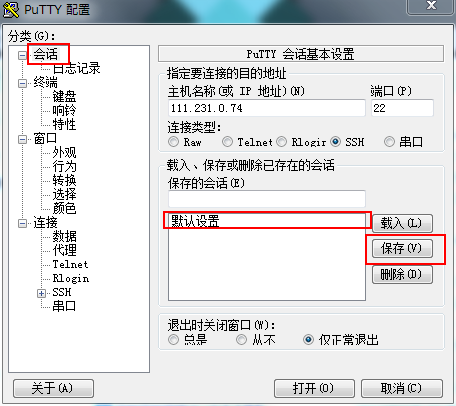
Then go back to the "Session" interface and click on "Default Settings" and then click "Save" so that you don't scramble.
install
Nginx
Let's go into the formal building process. The first step is to install N-Nginx.
I can also refer to another blog about Nginx: Installation and Configuration of Nginx (PHP)
On CentSO, I'm used to using yum to install programs.
For yum, you can refer to another blog of mine Take a place before uploading This article only describes the parts involved.
First install Nginx through yum:
#Using yum to install, -y means to answer "yes" to all questions and install as installation instructions
yum -y install nginx
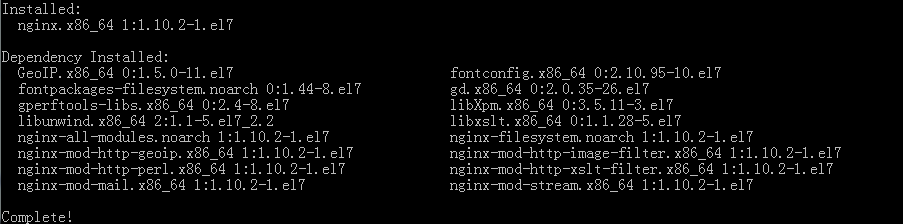
Successful installation~
Next, test the status of Nginx:
- Start Nginx first:
# Start the nginx service
systemctl start nginx.service
- Check whether nginx.service is started
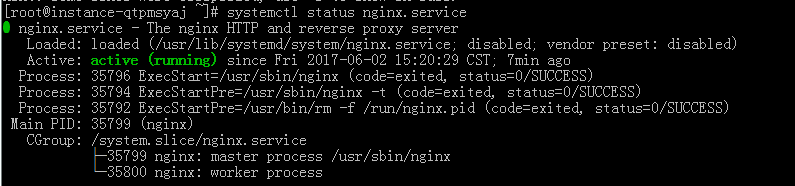
# Check service status
systemctl status nginx.service
The following shows that Nginx started successfully:
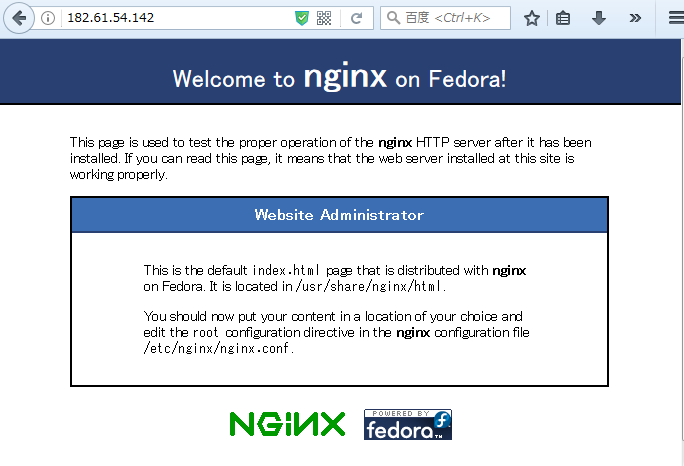
At this point, entering your public network ip address in the browser will display the Nginx welcome page.~
MySQL
Next comes M-MySQL
Because version 7 of CentOS removes MySQL database software from the default program list, using Yum directly can't install MySQL properly. We need to import the yum source of MySQL by ourselves.
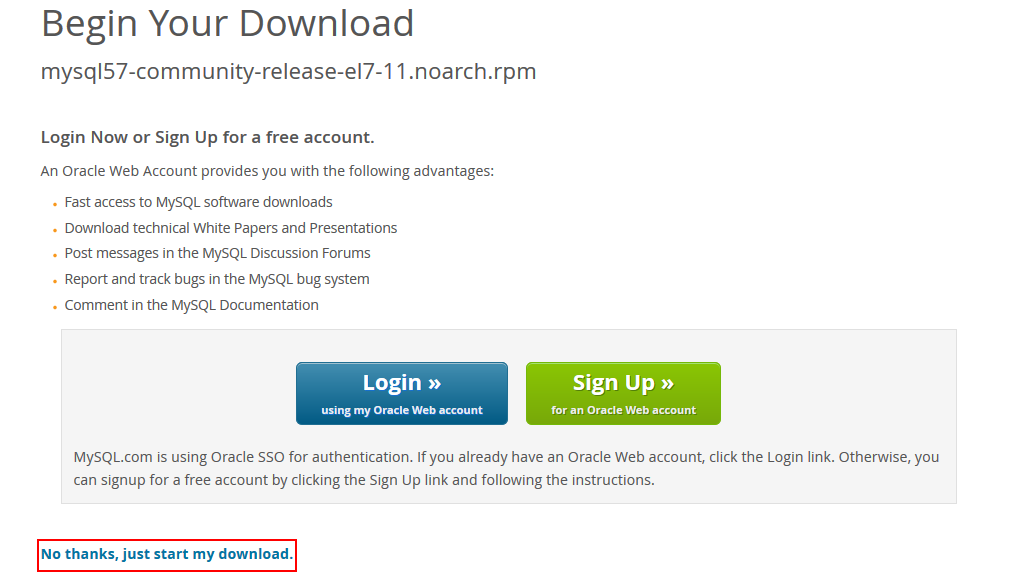
On MySQL, we can find links to yum sources:
Select a version of rpm file:

Right-click to copy the link address:
Then enter in putty:
# wget downloads files with links that you copy
wget https://dev.mysql.com/get/mysql57-community-release-el7-11.noarch.rpm
Download success:
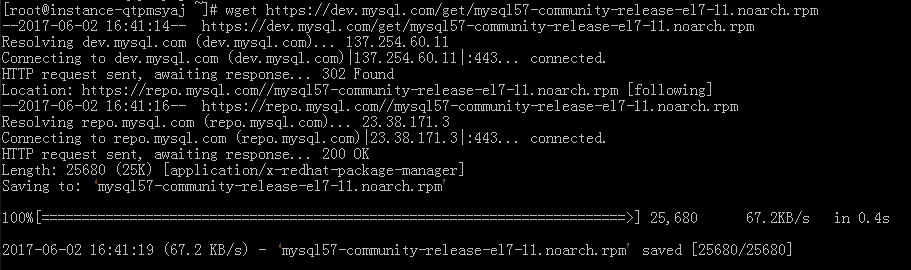
You can see that the downloaded file is mysql57-community-release-el7-11.noarch.rpm
Then import the source (actually installing the package)
# The local install installs the local rpm package followed by the package name
yum -y localinstall mysql57-community-release-el7-11.noarch.rpm
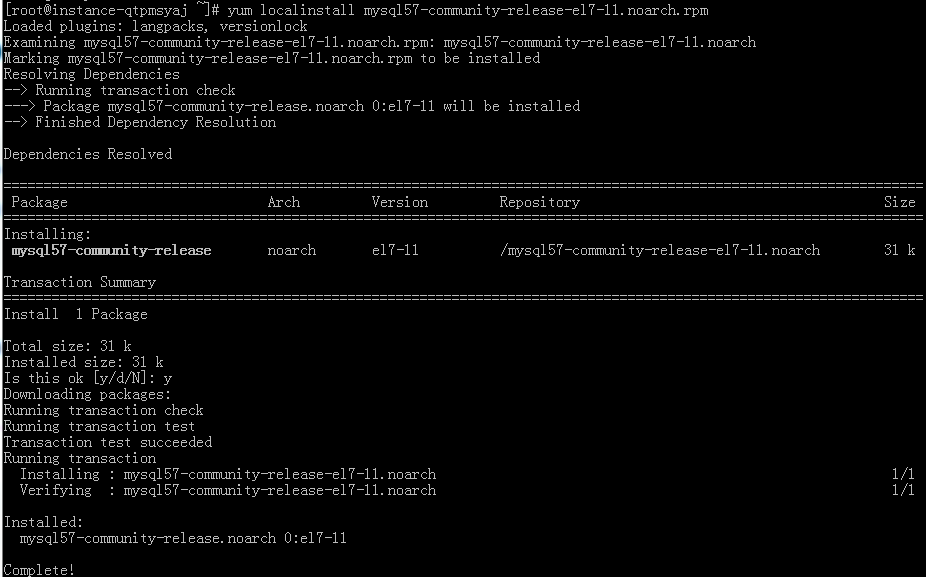
So yum's MySQL library is imported successfully ~we can install MySQL from this source
# mysql-community-server is the name of the library
yum -y install mysql-community-server
This is very slow. Wait slowly.
After the installation is complete, we will configure MySQL user information.
# Start MySQL Service
systemctl start mysqld
After starting, we need the initial password of MySQL.
MySQL 5.7, unlike before, produces a. mysql_secret in the root directory to place random initial passwords, but a more convenient way to get them is to search in the log file.
grep 'temporary password' /var/log/mysqld.log

Then you get the root password (mine is 78NLh3:DGh2), and then we reset it:
# Use MySQL Security Configuration Wizard
mysql_secure_install
Then you will see the following process:
[root@instance-qtpmsyaj bin]# mysql_secure_installation

Securing the MySQL server deployment.

Enter password for user root:                # Here you need to enter a random password for the process.

The existing password for the user account root has expired. Please set a new password.

New password:                               # Set a new password

Re-enter new password:                     # Enter the password again
#This is a password verification prompt to verify the strength of your password
The 'validate_password' plugin is installed on the server.
The subsequent steps will run with the existing configuration
of the plugin.
Using existing password for root.
# Here is your password strength, mine is100
Estimated strength of the password: 100
# Ask if you want to change your password y is to change, and the rest is not to change.
# (The meaning of not changing here is to use the password you just entered)
Change the password for root ? ((Press y|Y for Yes, any other key for No) : n
#  No change

 ... skipping.

By default, a MySQL installation has an anonymous user,
allowing anyone to log into MySQL without having to have
a user account created for them. This is intended only for
testing, and to make the installation go a bit smoother.
You should remove them before moving into a production
environment.

Remove anonymous users? (Press y|Y for Yes, any other key for No) : y
 # Whether to delete anonymous users or not, the production environment suggests deleting y
 ... skipping.


Normally, root should only be allowed to connect from
'localhost'. This ensures that someone cannot guess at
the root password from the network.

Disallow root login remotely? (Press y|Y for Yes, any other key for No) : n
# Do you prohibit root remote login and n
 ... skipping.
By default, MySQL comes with a database named 'test' that
anyone can access. This is also intended only for testing,
and should be removed before moving into a production
environment.


Remove test database and access to it? (Press y|Y for Yes, any other key for No) : y    # Whether to delete test database, delete y
 - Dropping test database...
Success.

 - Removing privileges on test database...
Success.

Reloading the privilege tables will ensure that all changes
made so far will take effect immediately.

Reload privilege tables now? (Press y|Y for Yes, any other key for No) : y
Success.  # Whether to reload permission table y

All done!
That's it. To sum up, it's input.
Random password - > new password - > new password - > n - > y - > n - > y - > y - > y
So MySQL is installed and configured successfully.~
PHP
Next, install P - PHP.
Like MySQL, yum has no PHP 5.6 or PHP 7 source and needs to be downloaded by itself.
We can use the source of webstatic.
Above is the official document. ~According to what is said in it, the following installation is carried out: __________
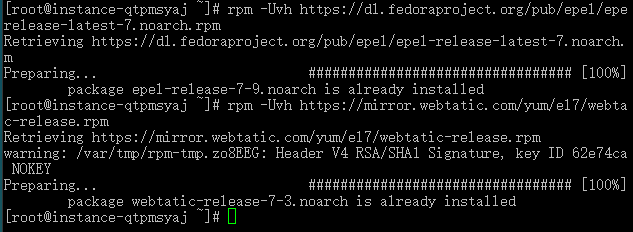
# Introducing Source
rpm -Uvh https://dl.fedoraproject.org/pub/epel/epel-release-latest-7.noarch.rpm
rpm -Uvh https://mirror.webtatic.com/yum/el7/webtatic-release.rpm
# Install PHP7
yum -y install php70w php70w-opcache
# Install php-fpm
yum -y install php70w-fpm php70w-opcache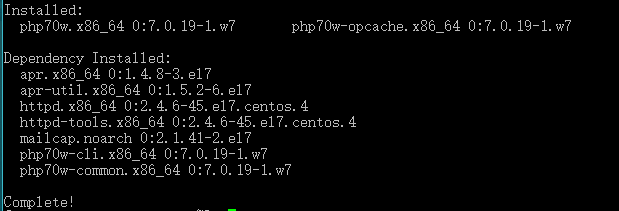

Next, let's test whether the installation is successful:
First, PHP
# View the php version
php -v

Successful~
Then php-fpm
# Start up service
systemctl start php-fpm.service

# View the status of php-fpm.service
systemctl status php-fpm.service
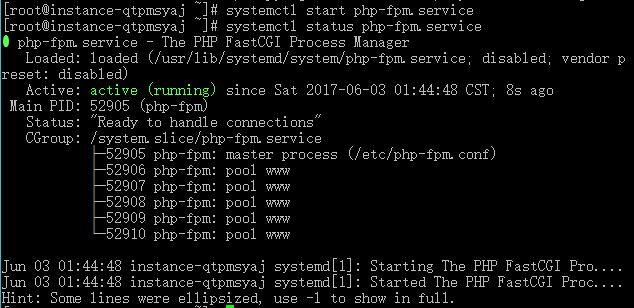
It's also successful.~
So all the parts of the LNMP have been installed, and the next step is to link them up.~~
linkage
Nginx+PHP
First, we lock all the services needed by the environment into boot-up automatically.
systemctl enable nginx.service
systemctl enable php-fpm.service
systemctl enable mysqld.service
Then let's modify the configuration file for Nginx
# Open nginx.conf using vim (this is the configuration file for nginx, default path)
vim /etc/nginx/nginx.conf

# You can also search for location locate nginx.conf and open it again.

This is what happens when you open it: (Notes I added)
Detailed installation and configuration of nginx can be seen Configuration of Nginx
# User name of nginx running
user nginx;
# nginx starts the process, which is usually set to equal the number of cpu s. Here it is automatic
worker_processes auto;

# Erorlog file location
error_log /var/log/nginx/error.log;
# pid file address, recording the pid of nginx, facilitating process management
pid /run/nginx.pid;

# Load dynamic modules. See /usr/share/nginx/README.dynamic.
# Configuration for loading other dynamic modules
include /usr/share/nginx/modules/*.conf;

# Working Mode and Connection Number Upper Limit
events {
    # Maximum number of concurrent links per worker_processes
    # Total concurrency: worker_processes*worker_connections
    worker_connections 1024;
}

# Similar to some configuration parameters associated with providing http services are mail
http {
    # Setting the format of the log
    log_format  main  '$remote_addr - $remote_user [$time_local] "$request" '
                      '$status $body_bytes_sent "$http_referer" '
                      '"$http_user_agent" "$http_x_forwarded_for"';

    # access_log records accessed users, pages, browsers, ip s, and other access information
    access_log  /var/log/nginx/access.log  main;

    # This section is explained separately below.
    # Set whether nginx uses sendfile function to output files
    sendfile            on;
    # Packet when the packet is maximum (using Nagle algorithm)
    tcp_nopush          on;
    # Send Packets Immediately (Disable Nagle Algorithms)
    tcp_nodelay         on;
    # Link timeout
    keepalive_timeout   65;
    # I don't know that either.
    types_hash_max_size 2048;

    # Introducing File Extensions and File Type Mapping Table
    include             /etc/nginx/mime.types;
    # Default file type
    default_type        application/octet-stream;

    # Load modular configuration files from the /etc/nginx/conf.d directory.
    # See http://nginx.org/en/docs/ngx_core_module.html#include
    # for more information.
    include /etc/nginx/conf.d/*.conf;

    # Several virtual hosts are supported on http services.
    # A corresponding server configuration item for each virtual host
    # The configuration item contains the configuration related to the virtual host.
    server {
        # port
        listen       80 default_server;
        listen       [::]:80 default_server;
        # Accessed domain name
        server_name  _;
        # Default website root directory (www directory)
        root         /usr/share/nginx/html;

        # Load configuration files for the default server block.

        include /etc/nginx/default.d/*.conf;

        # Default request
        location / {
        }

        # Error Page (404)
        error_page 404 /404.html;
            location = /40x.html {
        }

        # Error Page (50X)
        error_page 500 502 503 504 /50x.html;
            location = /50x.html {
        }
    }
}
Here we just need to change the server section:
First enter'i'into editing mode, then change your server section according to the information marked below.
If you really don't know the vim editor, you can check the method online.
server {
        listen       80 default_server;
        listen       [::]:80 default_server;
        # You can also write your domain name if you change it here.
        server_name  localhost;
        root         /usr/share/nginx/html;

        # Load configuration files for the default server block.
        include /etc/nginx/default.d/*.conf;

        location / {
            # Here the name of the index file defining the home page has been changed
            index index.php index.html index.htm;
        }

        error_page 404 /404.html;
            location = /40x.html {
        }

        error_page 500 502 503 504 /50x.html;
            location = /50x.html {
        }

        # New here
        # PHP script requests are all forwarded to FastCGI processing. Use the default configuration of FastCGI protocol.
        # A protocol for communication between Fastcgi servers and programs (PHP,Python).
        location ~ \.php$ {
            # Setting up a listening port
            fastcgi_pass   127.0.0.1:9000;
            # Setting the path of script file request
            fastcgi_param  SCRIPT_FILENAME  $document_root$fastcgi_script_name;
            # Introducing fastcgi configuration file
            include        fastcgi_params;
        }
    }
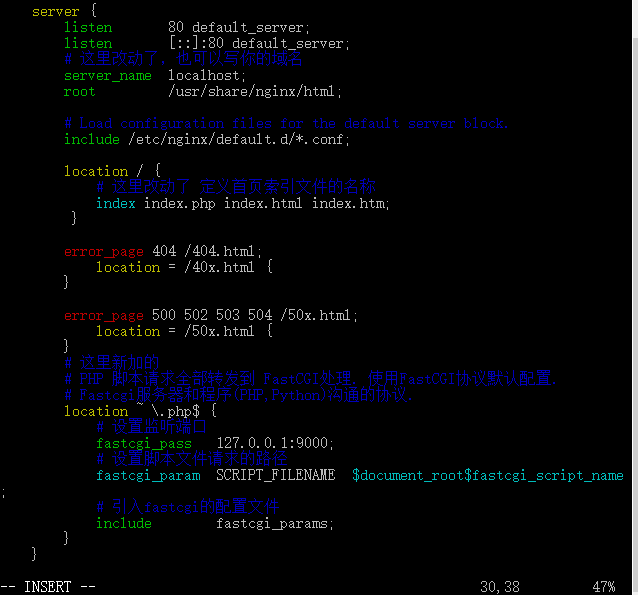
After the modification is completed, click the'Esc'key to enter the general mode, and then enter the': wq' to save the information and exit.
Then verify that the Nginx configuration is correct
# Restart nginx
systemctl restart nginx.service
# Verify configuration files
nginx -t

The figure shows that the configuration was successful.~~
Next, we need to verify that the php file can really run in our environment.
As mentioned above, / usr/share/nginx/html is the root directory of Nginx.
So we create a php file in this directory:
# create file
# phpinfo.php is the name of the file I want to create
vim /usr/share/nginx/html/phpinfo.php
Enter the vim interface and enter'i'into editing mode
Then enter the following information:
<?php

phpinfo();
Note: phpinfo(); you can display php information on the page.
Then click on the'Esc'key to enter the general mode, and enter the': wq' message to save information and exit.
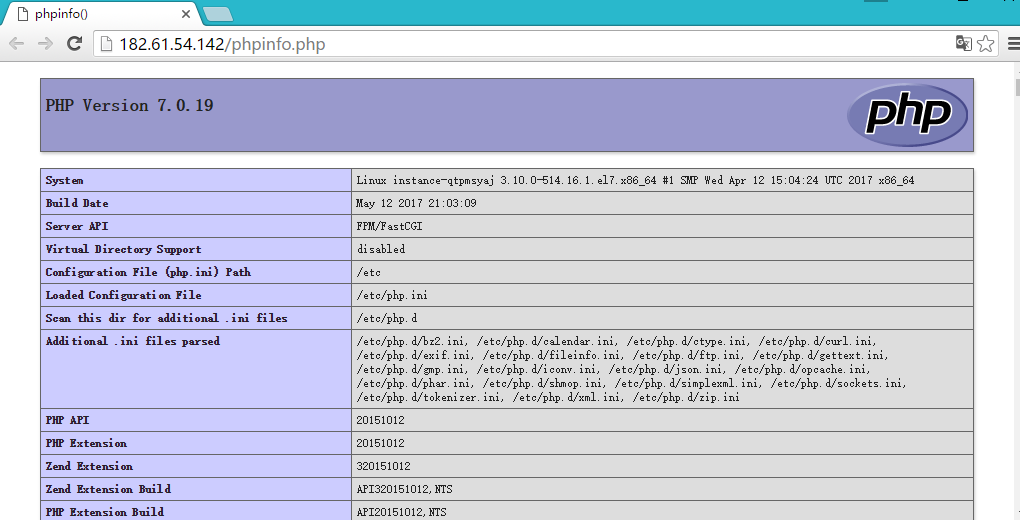
Open the browser and enter the server public IP/phpinfo.php in the address bar.
The following page shows the successful configuration:
MySQL+PHP
Here, in order to facilitate the management of the database, I am used to using phpMyAdmin to manage the database.
# First installing phpmyadmin is a simple yum installation
yum -y install phpmyadmin

Here you can see that the phpMyAdmin installation also installs a lot of php modules, which is the benefit of yum.~
Since MySQL database is controlled and operated by web, we need to put it in the directory of our website.
# Soft connect phpMyAdmin directory to the site root directory (similar to shortcuts)
ln -s /usr/share/phpMyAdmin/ /usr/share/nginx/html/phpmyadmin
# Check to see if it's successful
ls /usr/share/nginx/html/

As shown in the figure, the connection is successful.
Next you need to modify the configuration of PHP to open the session service
# Open the php.ini file
vim /etc/php.ini
Enter'/ session.save_path'to search for information
(In the general pattern of vim,'/XXX'means search XXX)
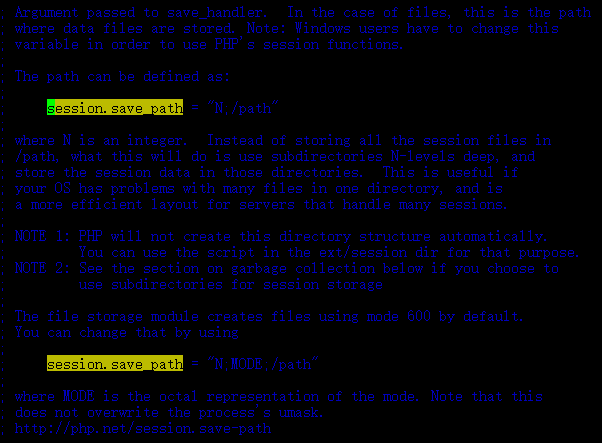
According to the information we find, we enter'i'into editing mode.
take
; session.save_path = "N;/path"
Change to
session.save_path = "/var/lib/php/session"Pay attention to the front semicolon!!!!
Then click on the'Esc'key to enter the general mode, and enter the': wq' message to save information and exit.
Because our server is Nginx, we need to change the owner of the directory to nginx and then change the folder permissions.
# chown Change File Owner-R Recursively Change Account Name: Group Name Directory
chown -R nginx:nginx /var/lib/php/session
# Permission to open folders
chmod 777 /var/lib/php/session/
Restart service after success:
systemctl restart nginx.service
systemctl restart php-fpm.service
Open browser and enter server public IP/phpmyadmin/
The following page appears~~
It can be used to manage the database, user name password and mysql the same.
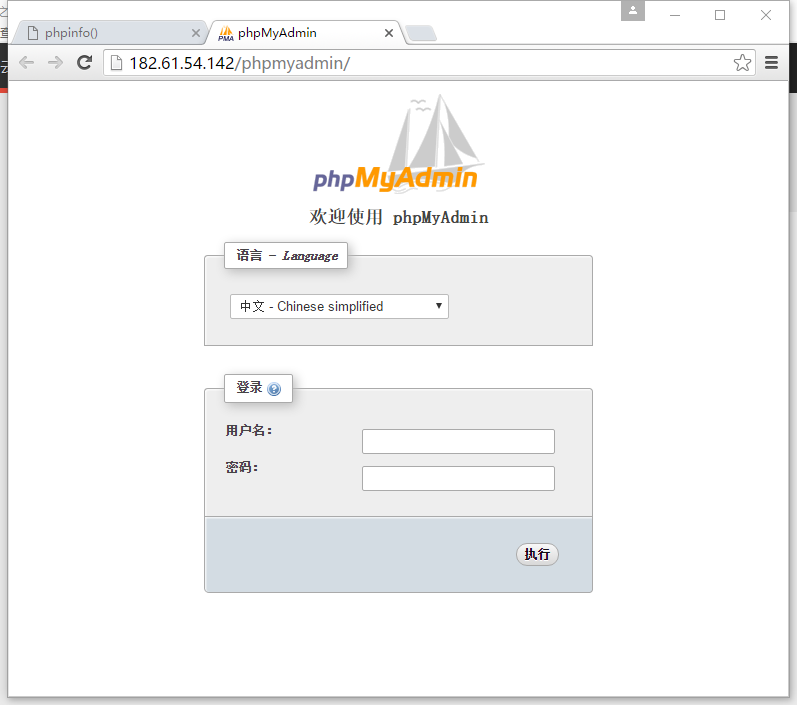
Successful~~
Write it in the back
After the above operation, we successfully built the LNMP environment on the cloud server.
| project | value |
|---|---|
| operating system | CentOS 7 |
| PHP Version | 7.0 |
| MySQL version | 5.7 |
| Database Management | phpMyAdmin |
| Websites and Catalogues | /usr/share/nginx/html/ |
Hope to help the people who see this blog to solve the problem, personal feelings write too long, after reading the students are tired...