Introduction: excerpt from Yu que document of Lei Fengyang, a teacher from Shangsi Valley
Cloud platform
Learn to use pay as you go cloud servers for cost-effective development and testing
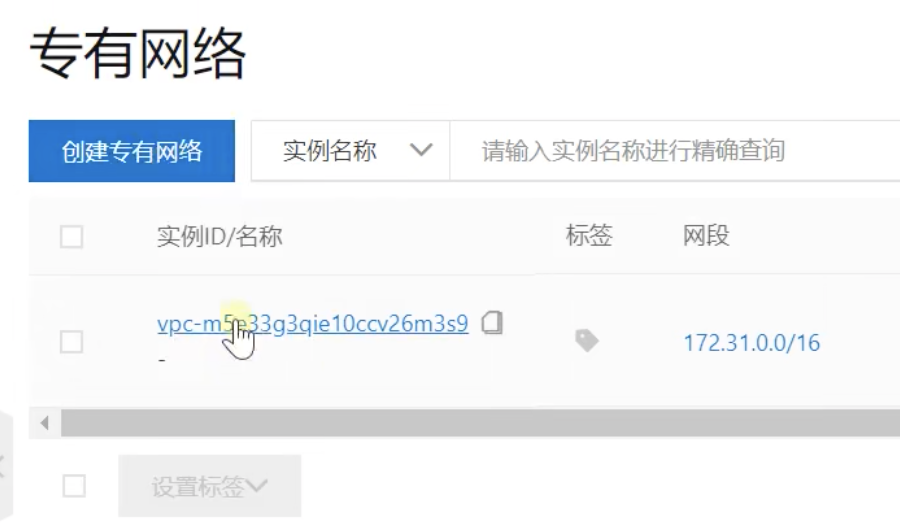
Private network VPC
Network related concepts, how to open a cluster on ECS
An ECS has two IPS: public IP and private IP
Public IP: the access to exposed resources may change, and the pay as you go server may change every time it is started
Private IP: the IP used by the internal network card of the server, which needs to be fixed and used for internal interaction of the cluster
Subnet calculation of VPC
VPC: private network, VPC
Concept of network segment
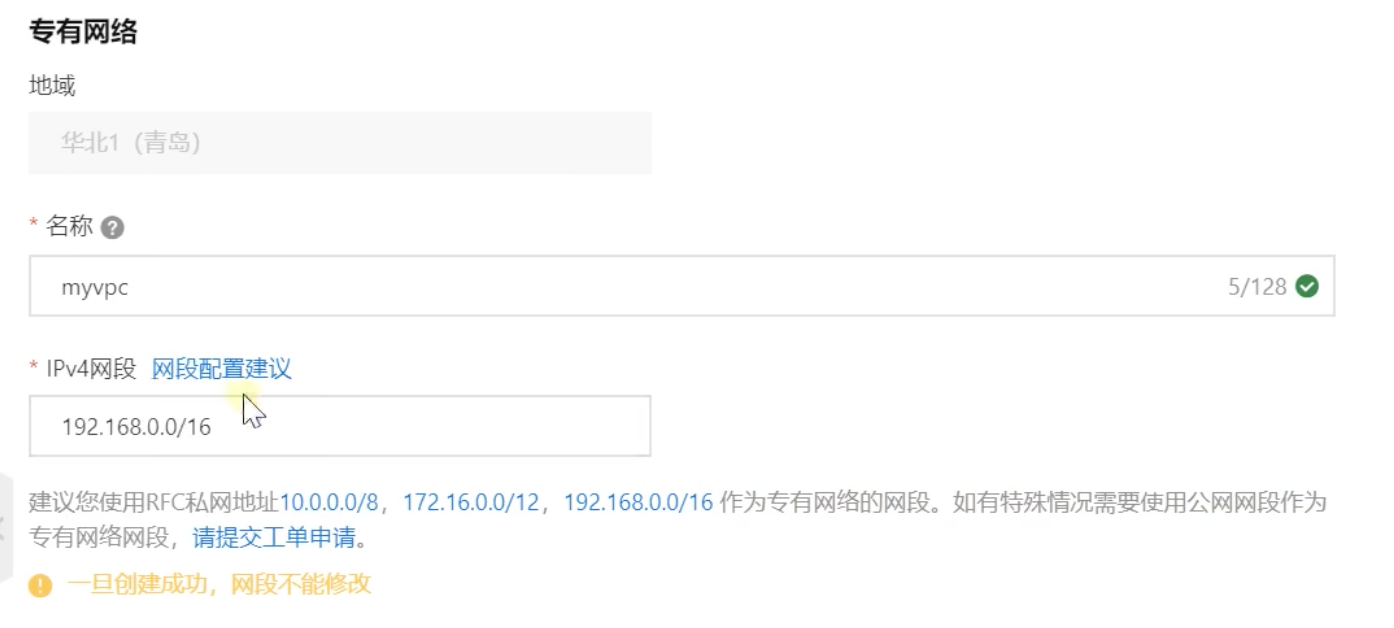
The conversion of the IP address into binary is as follows. Each segment has eight bits of binary. The 16 mask means that the first 16 bits are masked, and only the last 16 bits change. The conversion of the 8-bit maximum binary 11111111 into hexadecimal is 256, and the IP includes a zero, that is 255, so the change of this network segment is
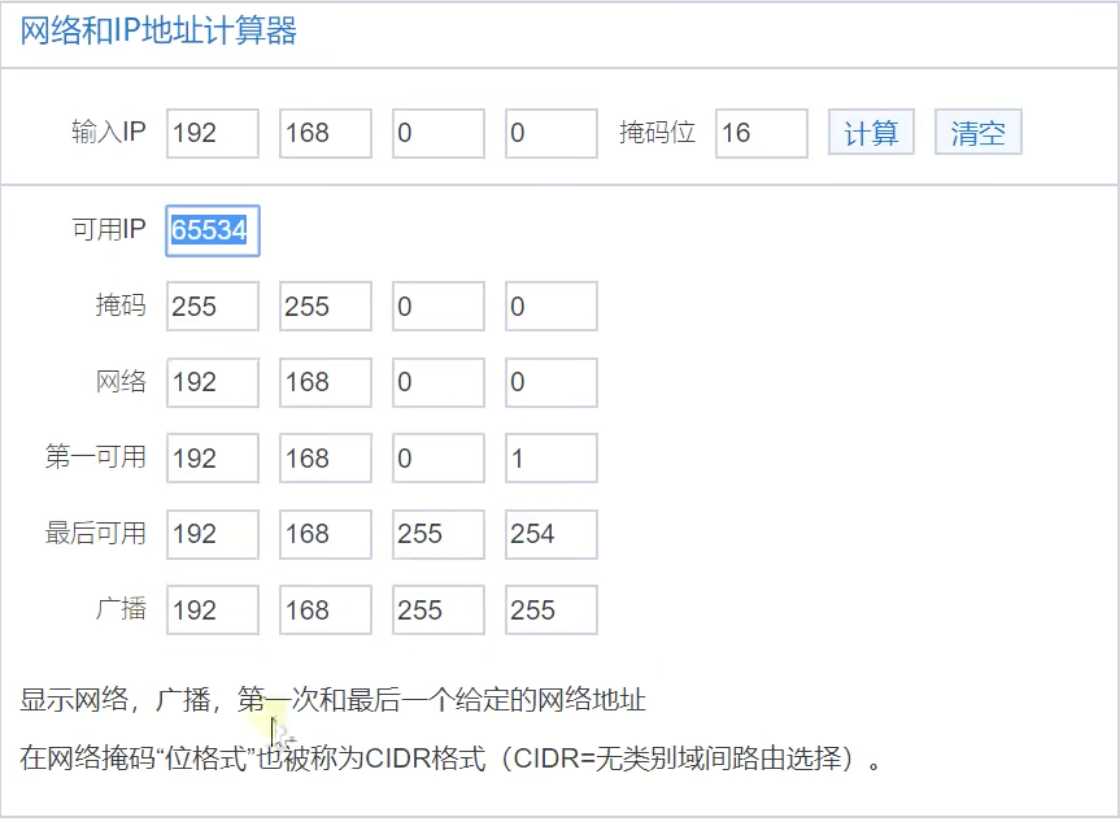
There are 65536 IP S from 192.168.0.0 to 192.168.255.255
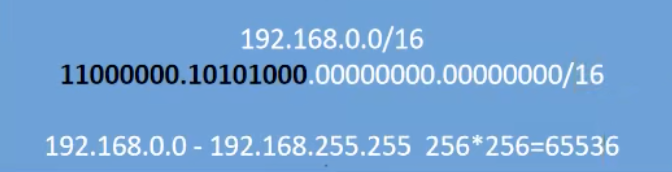
According to the subnet calculation, 65534 can actually be used
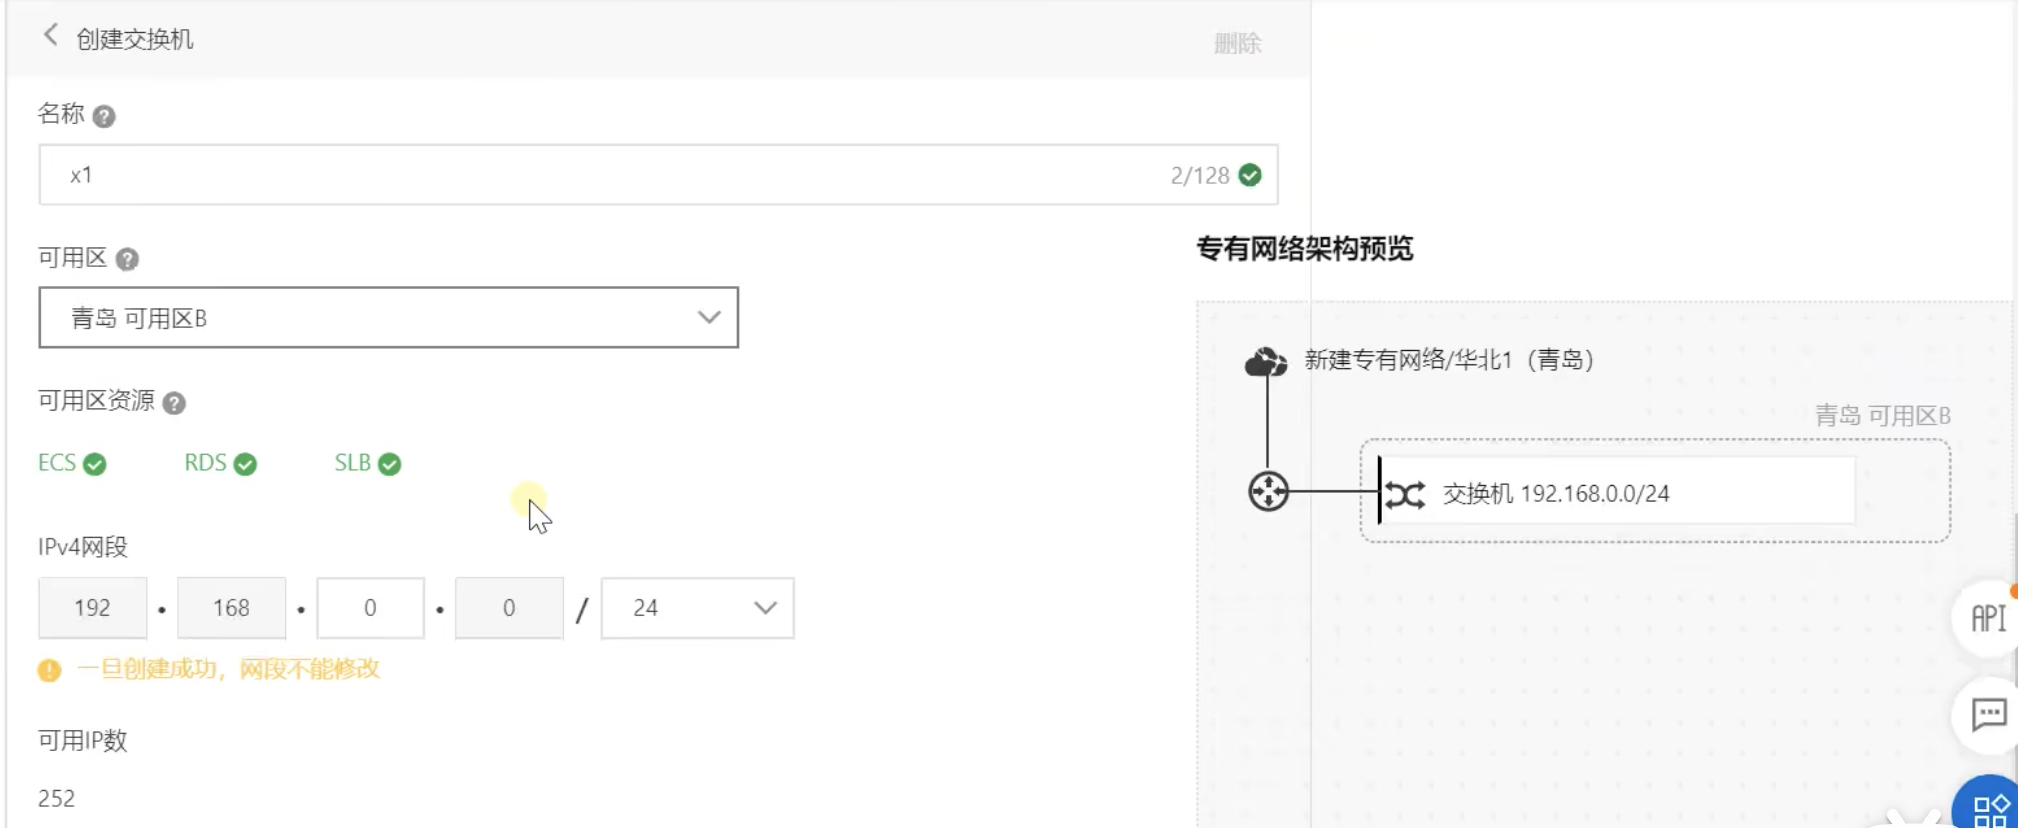
VPC switch
Because there are too many IP addresses available for VPCs, it is difficult to distinguish. There are 65534 IP addresses with a single 16 bit mask. Therefore, the function of the switch is to specify which IP addresses can be used under the VPC to avoid too chaotic use of the VPC
When creating a VPC, make or create a switch at the same time, as shown in the following figure, which means to create a 24 bit mask and specify the number segment of the third segment, then the available IP will change in segment 4, reducing the available IP from 65534 to 252, avoiding confusion
Important concepts
Under different VPC networks, even if the private network IP is the same, they cannot be connected internally, so a VPC is equivalent to the isolation of a LAN,
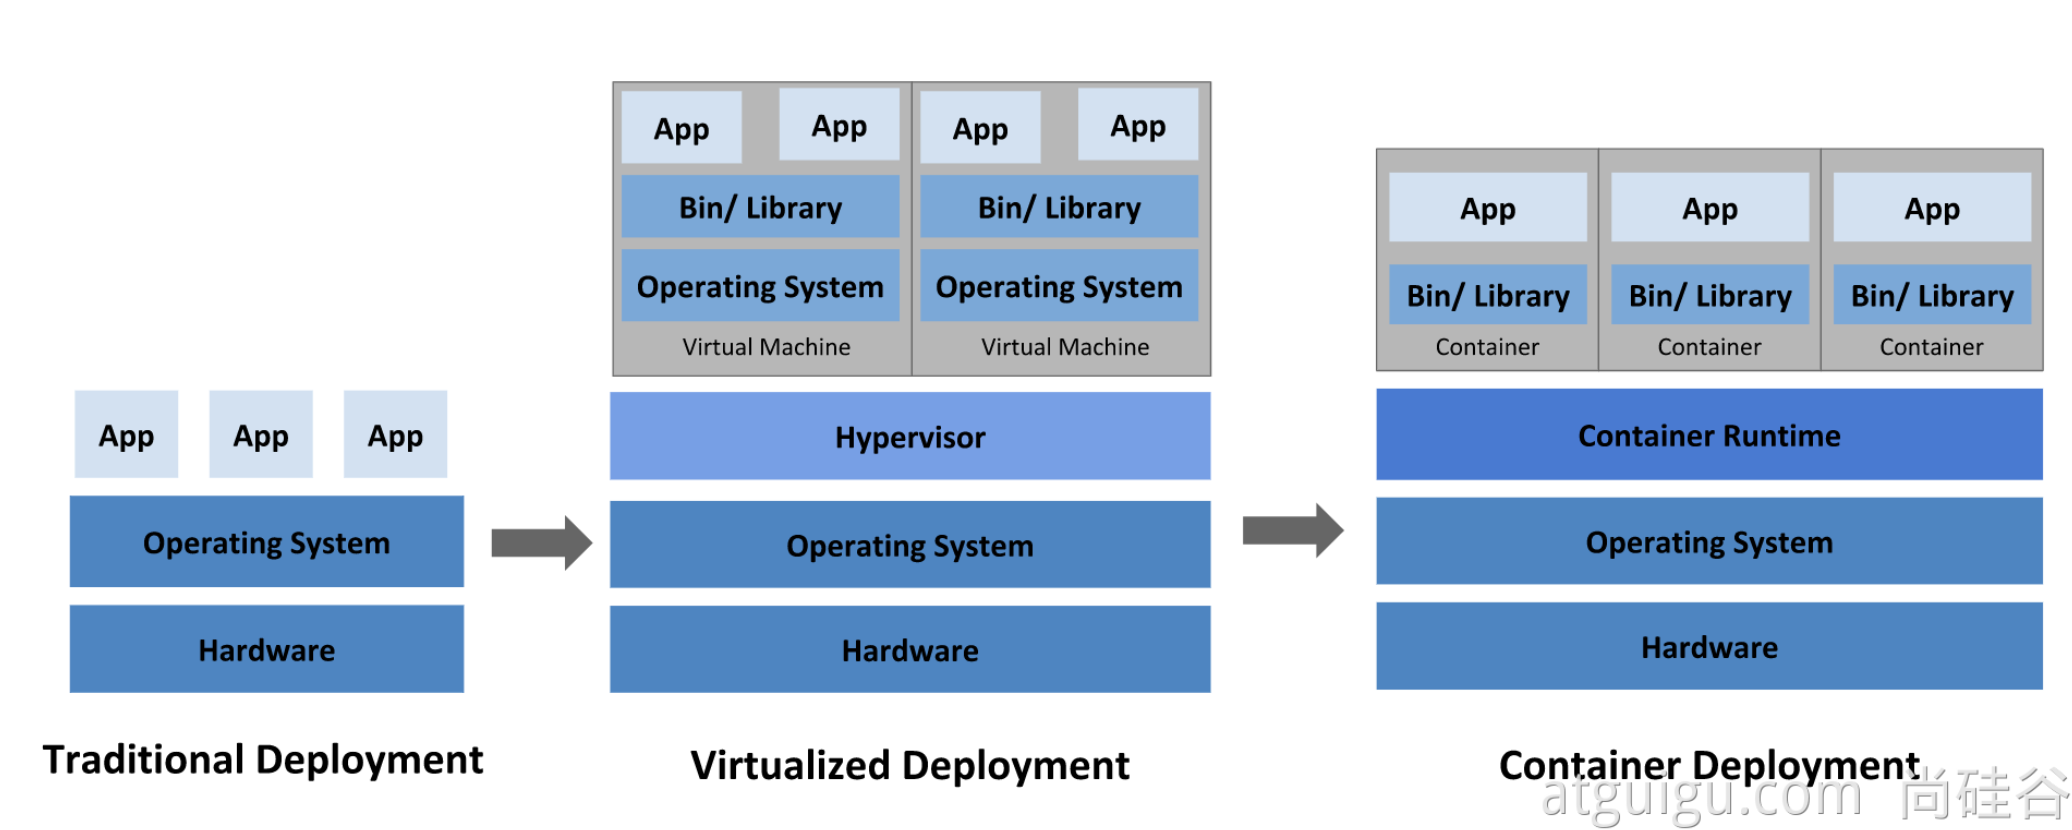
Containerization
docker concept
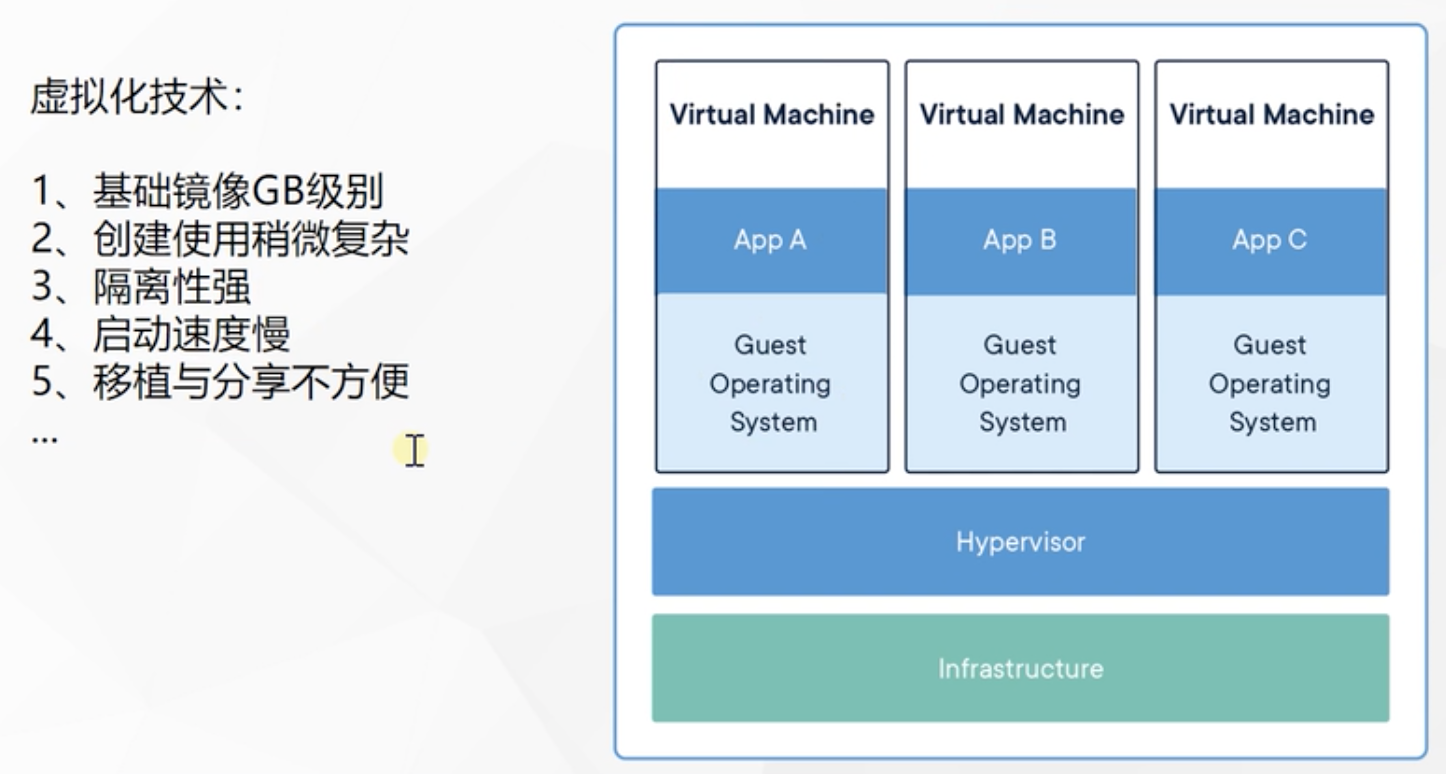
Differential preservation

Resource isolation
● isolation and limitation of cpu and memory resources
● isolation and restriction of access equipment
● network isolation and restriction
● user and user group isolation restrictions
framework
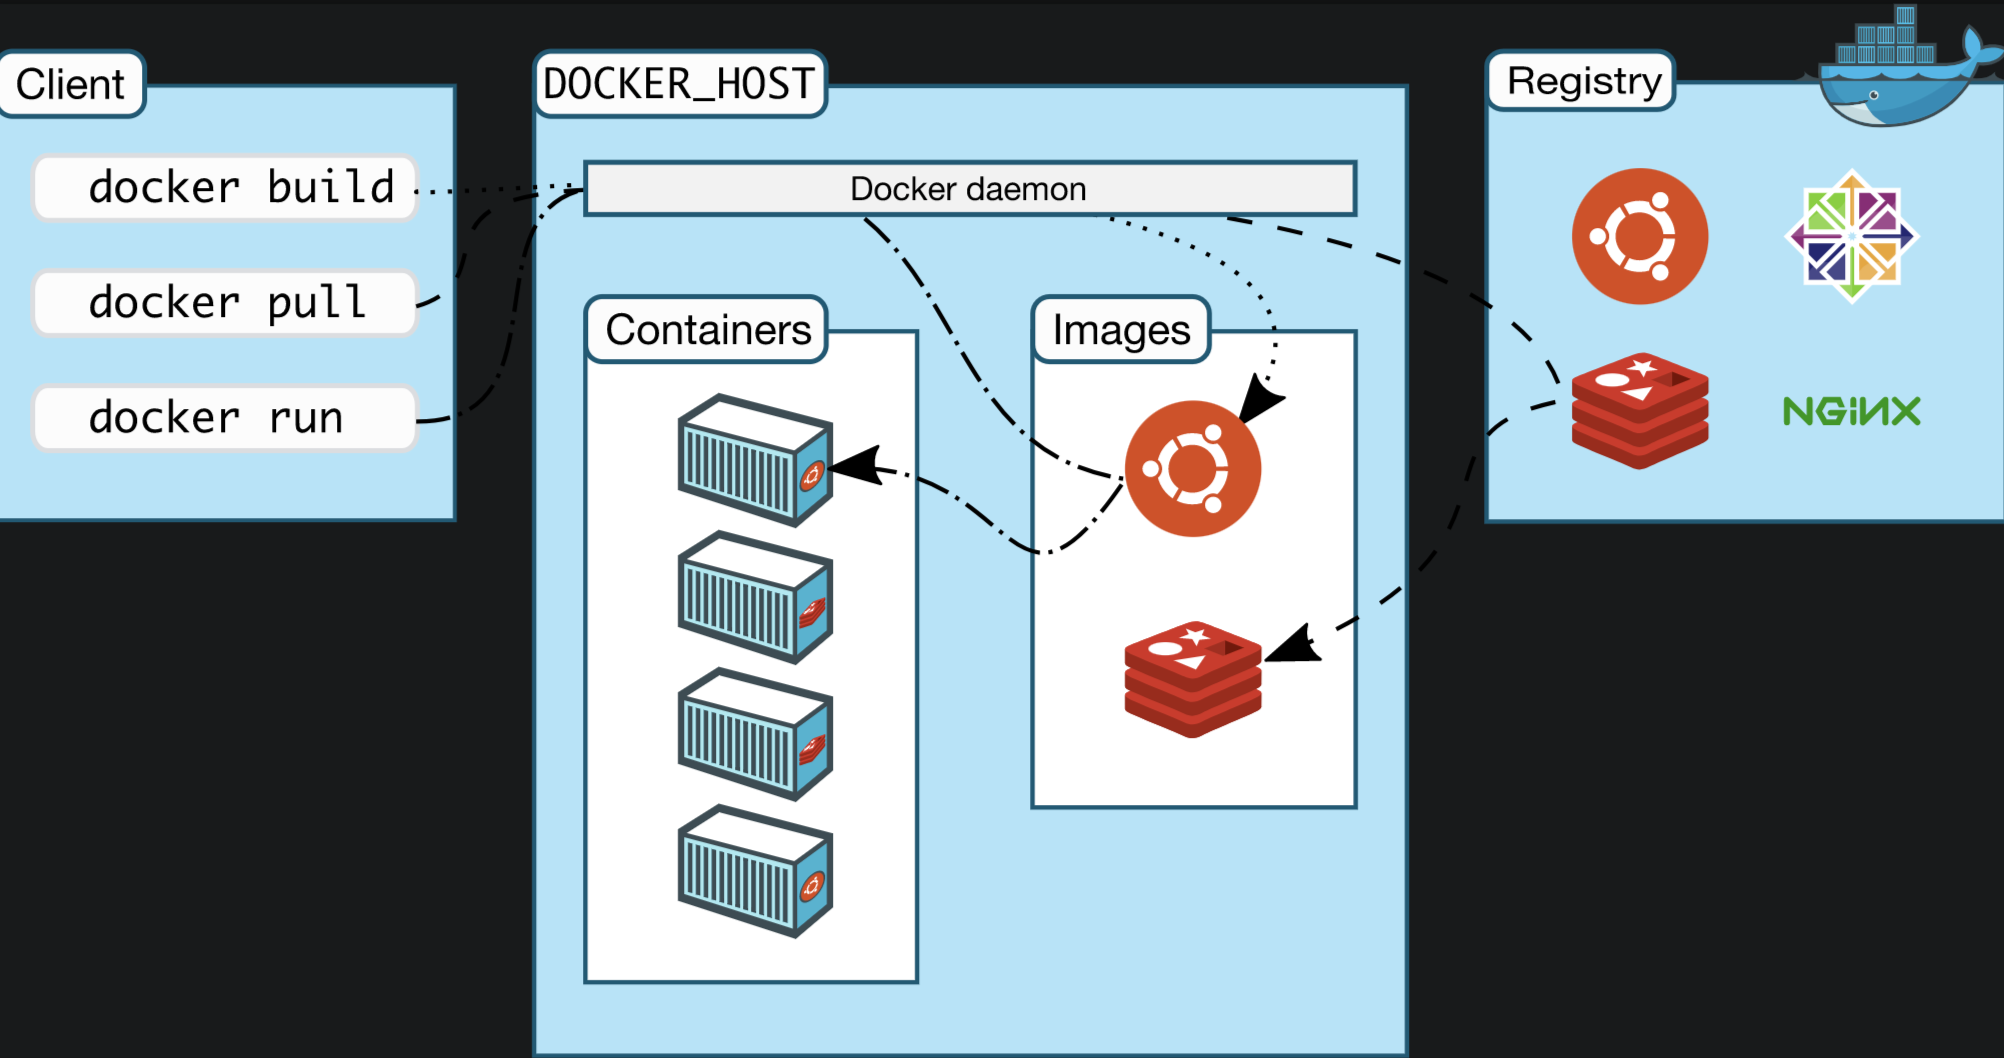
- Docker_Host:
○ host where Docker is installed - Docker Daemon:
○ Docker background process running on Docker host - Client:
○ client for operating Docker host (command line, UI, etc.) - Registry:
○ mirror warehouse
○ Docker Hub - Images:
○ image, packaged program with environment, can be started and run directly - Containers:
○ container, a running program started by the image
Qingyun server
centos installation docker
1. Remove previous docker related packages
sudo yum remove docker \
                  docker-client \
                  docker-client-latest \
                  docker-common \
                  docker-latest \
                  docker-latest-logrotate \
                  docker-logrotate \
                  docker-engine
2. Configure yum source
sudo yum install -y yum-utils
sudo yum-config-manager \
--add-repo \
http://mirrors.aliyun.com/docker-ce/linux/centos/docker-ce.repo
3. Install docker
sudo yum install -y docker-ce docker-ce-cli containerd.io


#The following is the version specified for installation k8s
yum install -y docker-ce-20.10.7 docker-ce-cli-20.10.7  containerd.io-1.4.6
4. Startup and startup
systemctl enable docker --now
5. Configuration acceleration
sudo mkdir -p /etc/docker
sudo tee /etc/docker/daemon.json <<-'EOF'
{
  "registry-mirrors": ["https://vgcihl1j.mirror.aliyuncs.com"]
}
EOF
sudo systemctl daemon-reload
sudo systemctl restart docker
docker actual combat
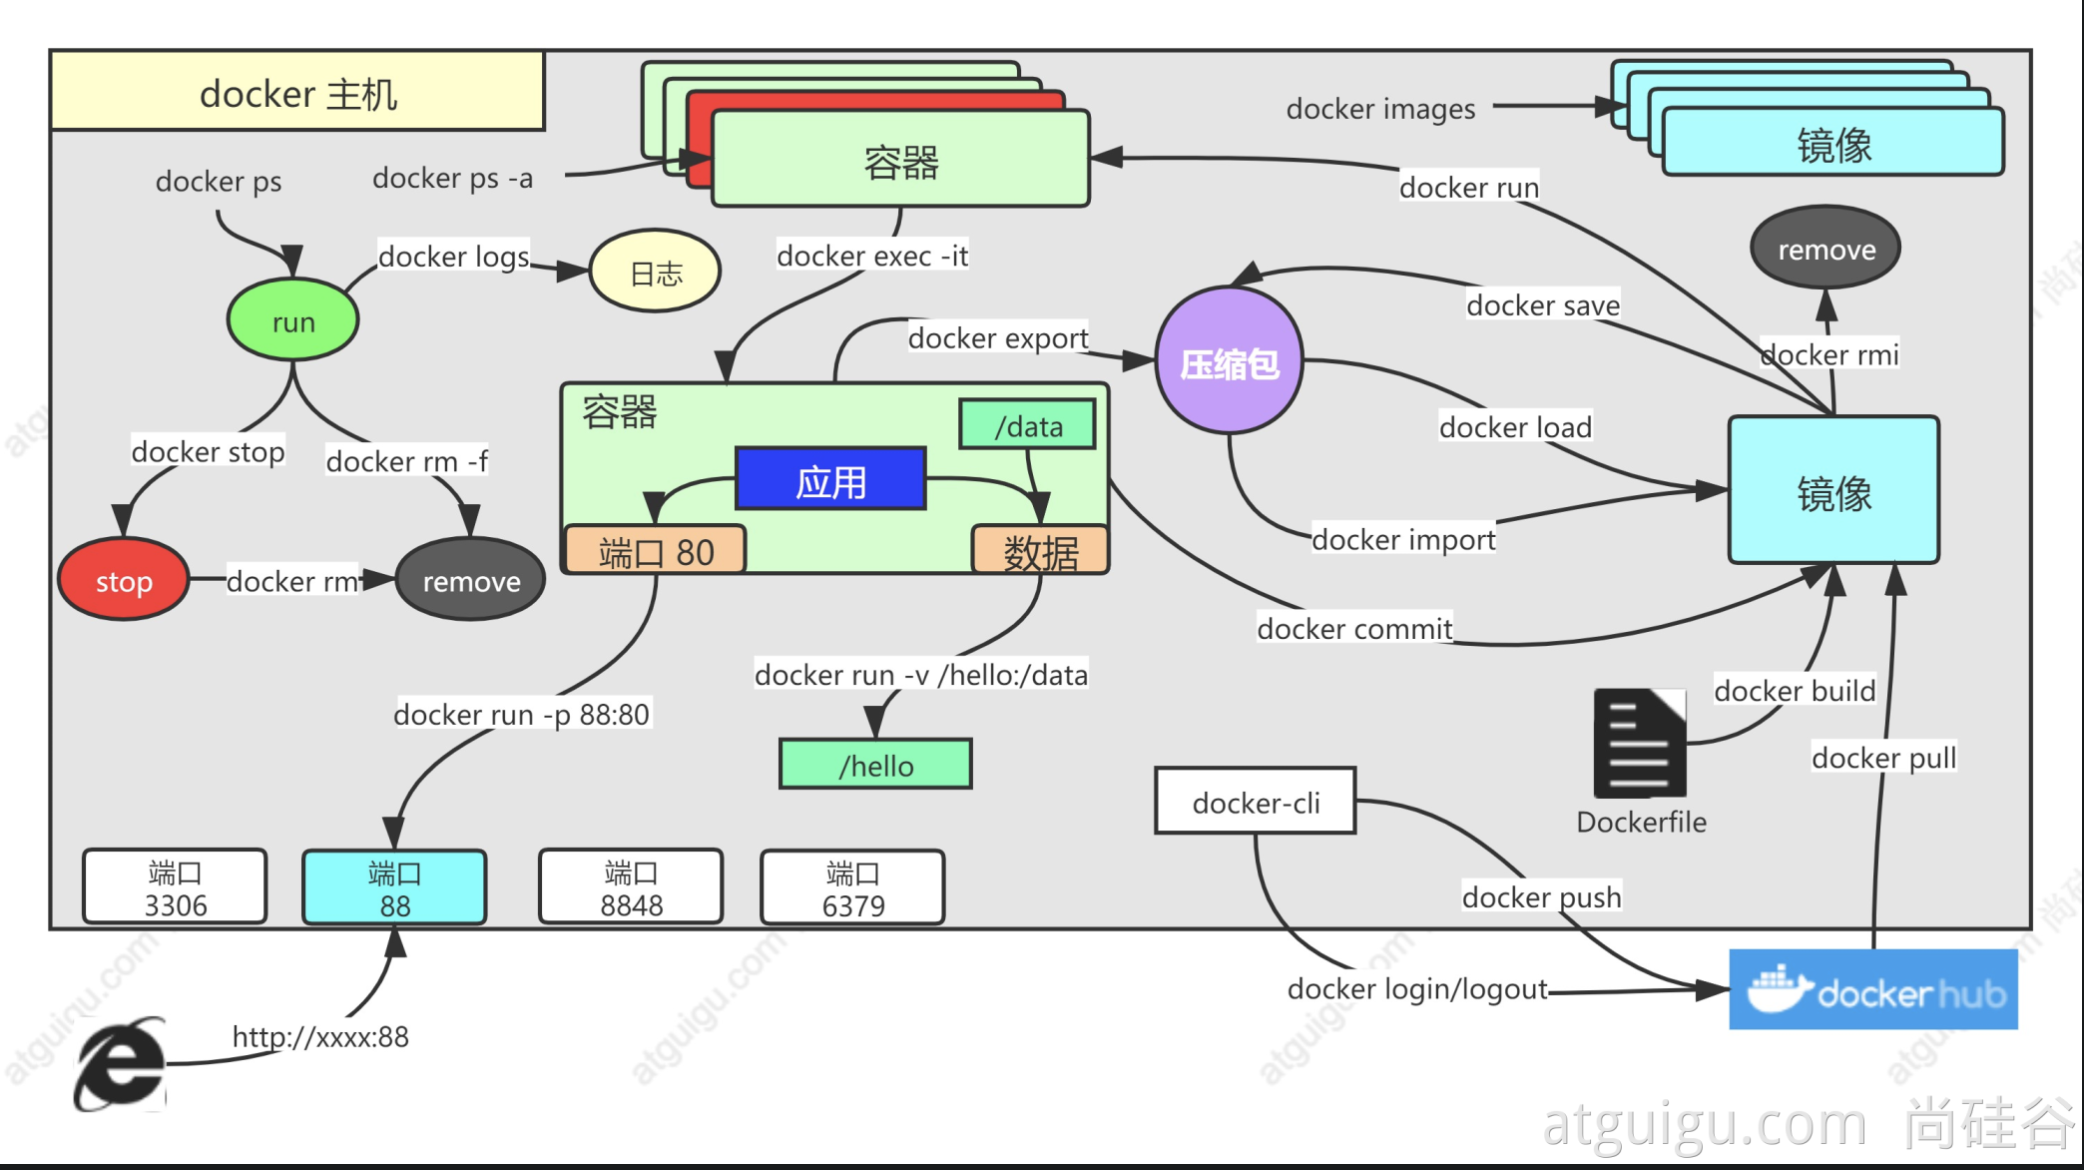
1. Find image
docker pull nginx  #Download the latest version

Image name:Version name (label)

docker pull nginx:1.20.1


docker pull redis  #Download the latest
docker pull redis:6.2.4

## The downloaded images are all local
docker images  #View all mirrors

redis = redis:latest

docker rmi Image name:Version number/image id
2. Start container
Start the nginx application container, map port 88, and test access
docker run [OPTIONS] IMAGE [COMMAND] [ARG...]

[docker run  Setting item [image name] the command to start and run the image (there is one in the image by default, and it is generally not written)

# -d: Background operation
# --restart=always: start automatically
docker run --name=mynginx   -d  --restart=always -p  88:80   nginx
# Port mapping [- p host port: container port]


# View running containers
docker ps
# View all
docker ps -a
# Delete stopped container
docker rm  container id/name
docker rm -f mynginx   #Force deletion of running

#Stop container
docker stop container id/name
#Restart
docker start container id/name

#Application startup
docker update container id/name --restart=always
3. Enter the container to modify the content
[root@i-r686cdnl ~] docker ps
CONTAINER ID   IMAGE     COMMAND                  CREATED         STATUS         PORTS                               NAMES
33040453a360   nginx     "/docker-entrypoint...."   2 minutes ago   Up 2 minutes   0.0.0.0:88->80/tcp, :::88->80/tcp   mynginx
[root@i-r686cdnl ~] docker exec -it 33040453a360 /bin/sh
root@33040453a360:/bin] cd /usr/share/nginx/html
root@33040453a360:/usr/share/nginx/html] echo "<h1>hello atguigu</h1>" > index.html
docker run --name=mynginx   \
-d  --restart=always \
-p  88:80 \
-v /data/html:/usr/share/nginx/html:ro  \
nginx

# -v Host Directory: container Directory: read and write permissions
# To modify the page, you only need to go to / data/html of the host
4. Submit changes
Submit the specified container as a new container
[root@i-r686cdnl ~]# docker ps
CONTAINER ID   IMAGE     COMMAND                  CREATED          STATUS          PORTS                               NAMES
33040453a360   nginx     "/docker-entrypoint...."   12 minutes ago   Up 12 minutes   0.0.0.0:88->80/tcp, :::88->80/tcp   mynginx
[root@i-r686cdnl ~]# docker commit --help

Usage:  docker commit [OPTIONS] CONTAINER [REPOSITORY[:TAG]]

Create a new image from a container's changes

Options:
  -a, --author string    Author (e.g., "John Hannibal Smith <hannibal@a-team.com>")
  -c, --change list      Apply Dockerfile instruction to the created image
  -m, --message string   Commit message
  -p, --pause            Pause container during commit (default true)
[root@i-r686cdnl ~] docker commit -a "author" -m "describe" 33040453a360 gugunginx:v1.0
sha256:50eecfacab35a36f8dfd3aefd205e04dfe5742e590fdc6061aaf490ecedfa3bf

[root@i-r686cdnl ~] docker images
REPOSITORY   TAG       IMAGE ID       CREATED         SIZE
gugunginx    v1.0      50eecfacab35   6 seconds ago   133MB
nginx        latest    87a94228f133   9 days ago      133MB
Mirror transmission
# Save the image as a compressed package
docker save -o abc.tar guignginx:v1.0

# Another machine loads this image
docker load -i abc.tar


# Offline installation
5. Push remote warehouse
Push the image to the docker hub; Application market
docker tag local-image:tagname new-repo:tagname
docker push new-repo:tagname


# Change the name of the old image to the new name required by the warehouse
docker tag guignginx:v1.0 leifengyang/guignginx:v1.0

# Log in to docker hub
docker login


docker logout((exit after image pushing)

# Push
docker push leifengyang/guignginx:v1.0


# Download from other machines
docker pull leifengyang/guignginx:v1.0
6. Supplement
docker logs Container name/id   Troubleshooting

docker exec -it container id /bin/bash


# docker often modifies nginx configuration files
docker run -d -p 80:80 \
-v /data/html:/usr/share/nginx/html:ro \
-v /data/conf/nginx.conf:/etc/nginx/nginx.conf \
--name mynginx-02 \
nginx


#Copy what is in the designated position of the container
docker cp 5eff66eec7e1:/etc/nginx/nginx.conf  /data/conf/nginx.conf
#Copy the outside contents into the container
docker cp  /data/conf/nginx.conf  5eff66eec7e1:/etc/nginx/nginx.conf
docker advanced
Deploy redis
Deploy a Redis + application and try to apply Redis to generate data
Note: first create the file mount directory and configuration file of the host
mkdir -p /data/redis/
vi redis.conf
appendonly yes

-------------------------------

docker run [OPTIONS] IMAGE [COMMAND] [ARG...]

#redis starts using a custom configuration file

docker run \
-v /data/redis/redis.conf:/etc/redis/redis.conf \
-v /data/redis/data:/data \
-d --name myredis \
-p 6379:6379 \
redis:latest  redis-server /etc/redis/redis.conf #During startup, the additional command redis server is loaded and started with the / etc/redis/redis.conf configuration file
Set redis password login
vi redis.conf
requirepass 123xxx
docker restart myredis #Restart redis
Creating Java applications
1. Simple statistical function with redis
@RestController
public class CounterController {

    @Autowired
    StringRedisTemplate redisTemplate;

    @GetMapping("/hello")
    public String count(){

        Long increment = redisTemplate.opsForValue().increment("count-people");
        return "have"+ increment +" Page visited";
    }

}
2. Package the application as a mirror
Previously: Java as an example
- Spring boot is packaged as an executable jar
- Upload the jar package to the service
- The server runs java -jar
Now: Docker is installed on all machines, any application is an image, and all machines can run
3. How to package - Dockerfile
FROM openjdk:8-jdk-slim	#The basic operating environment is quite free of duoker pull
LABEL maintainer=leifengyang #author

COPY target/*.jar   /app.jar	# Copy the current project directory to the of the container

ENTRYPOINT ["java","-jar","/app.jar"] # Mirror start command
Package the two files into one file and upload it to the server

Run Dockerfile and package it into an image. By default, you don't need to enter Dockerfile. Note that there is a point at the end, indicating that it works in the current directory
docker build -t java-demo:v1.0 .
3. Start container
docker run -d -p 8080:8080 --name myjava-app java-demo:v1.0
docker logs container id to view the log. The container and project are started successfully and accessed normally on the network
Share image
# Log in to docker hub
docker login

#Name the old image
docker tag java-demo:v1.0  leifengyang/java-demo:v1.0

# Push to docker hub
docker push leifengyang/java-demo:v1.0

# Other machines
docker pull leifengyang/java-demo:v1.0

# Other machines are running
docker run -d -p 8080:8080 --name myjava-app java-demo:v1.0
Kubernetes
Basic concepts
brief introduction
What is it?
kubernetes has the following features:
- Service discovery and load balancing
Kubernetes can use DNS name or its own IP address to expose the container. If the traffic entering the container is large, kubernetes can load balance and distribute network traffic, so as to stabilize the deployment. - Storage orchestration
Kubernetes allows you to automatically mount the storage system of your choice, such as local storage, public cloud providers, etc. - Automatic deployment and rollback
You can use Kubernetes to describe the required state of deployed containers, which can change the actual state to the desired state at a controlled rate. For example, you can automate Kubernetes to create new containers for your deployment, delete existing containers and use all their resources for the new container. - Automatically complete packing calculation
Kubernetes allows you to specify the CPU and memory (RAM) required for each container. When the container specifies a resource request, kubernetes can make better decisions to manage the container's resources. - Self repair
Kubernetes restarts failed containers, replaces containers, kills containers that do not respond to user-defined health checks, and does not advertise them to clients until the service is ready. - Key and configuration management
Kubernetes allows you to store and manage sensitive information, such as passwords, OAuth tokens, and ssh keys. You can deploy and update the key and application configuration without rebuilding the container image, and you don't need to expose the key in the stack configuration.
Kubernetes provides you with a framework for flexibly running distributed systems. Kubernetes will meet your expansion requirements, failover, deployment patterns, etc. For example, kubernetes can easily manage the Canary deployment of the system.
Cluster approach
framework
1. Working mode
Kubernetes Cluster = N Master Node + N Worker Node: n master node + n worker node; N>=1
2. Component architecture
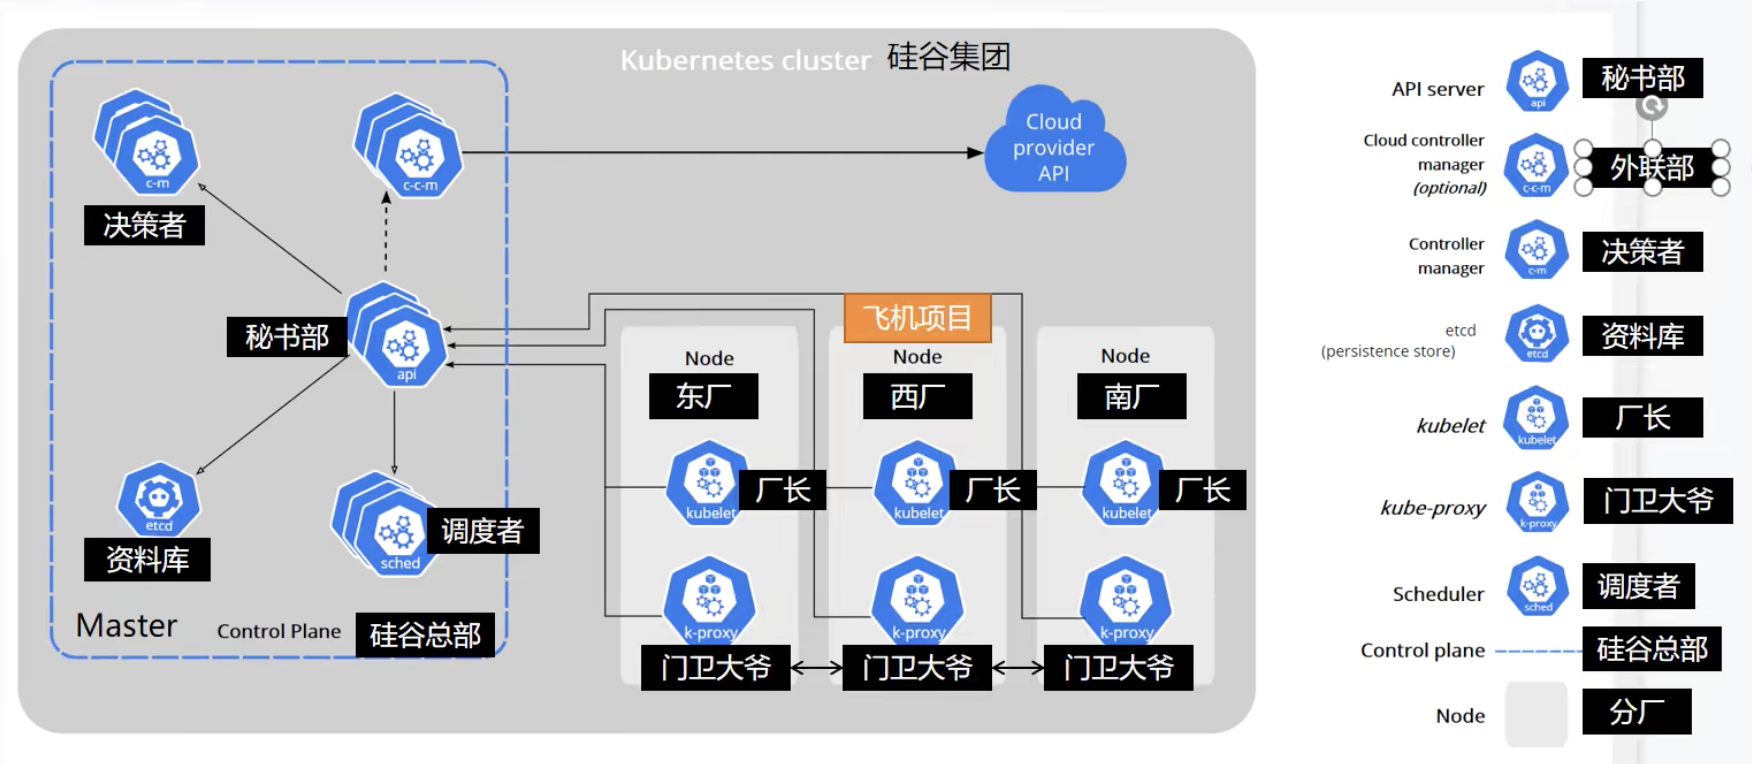
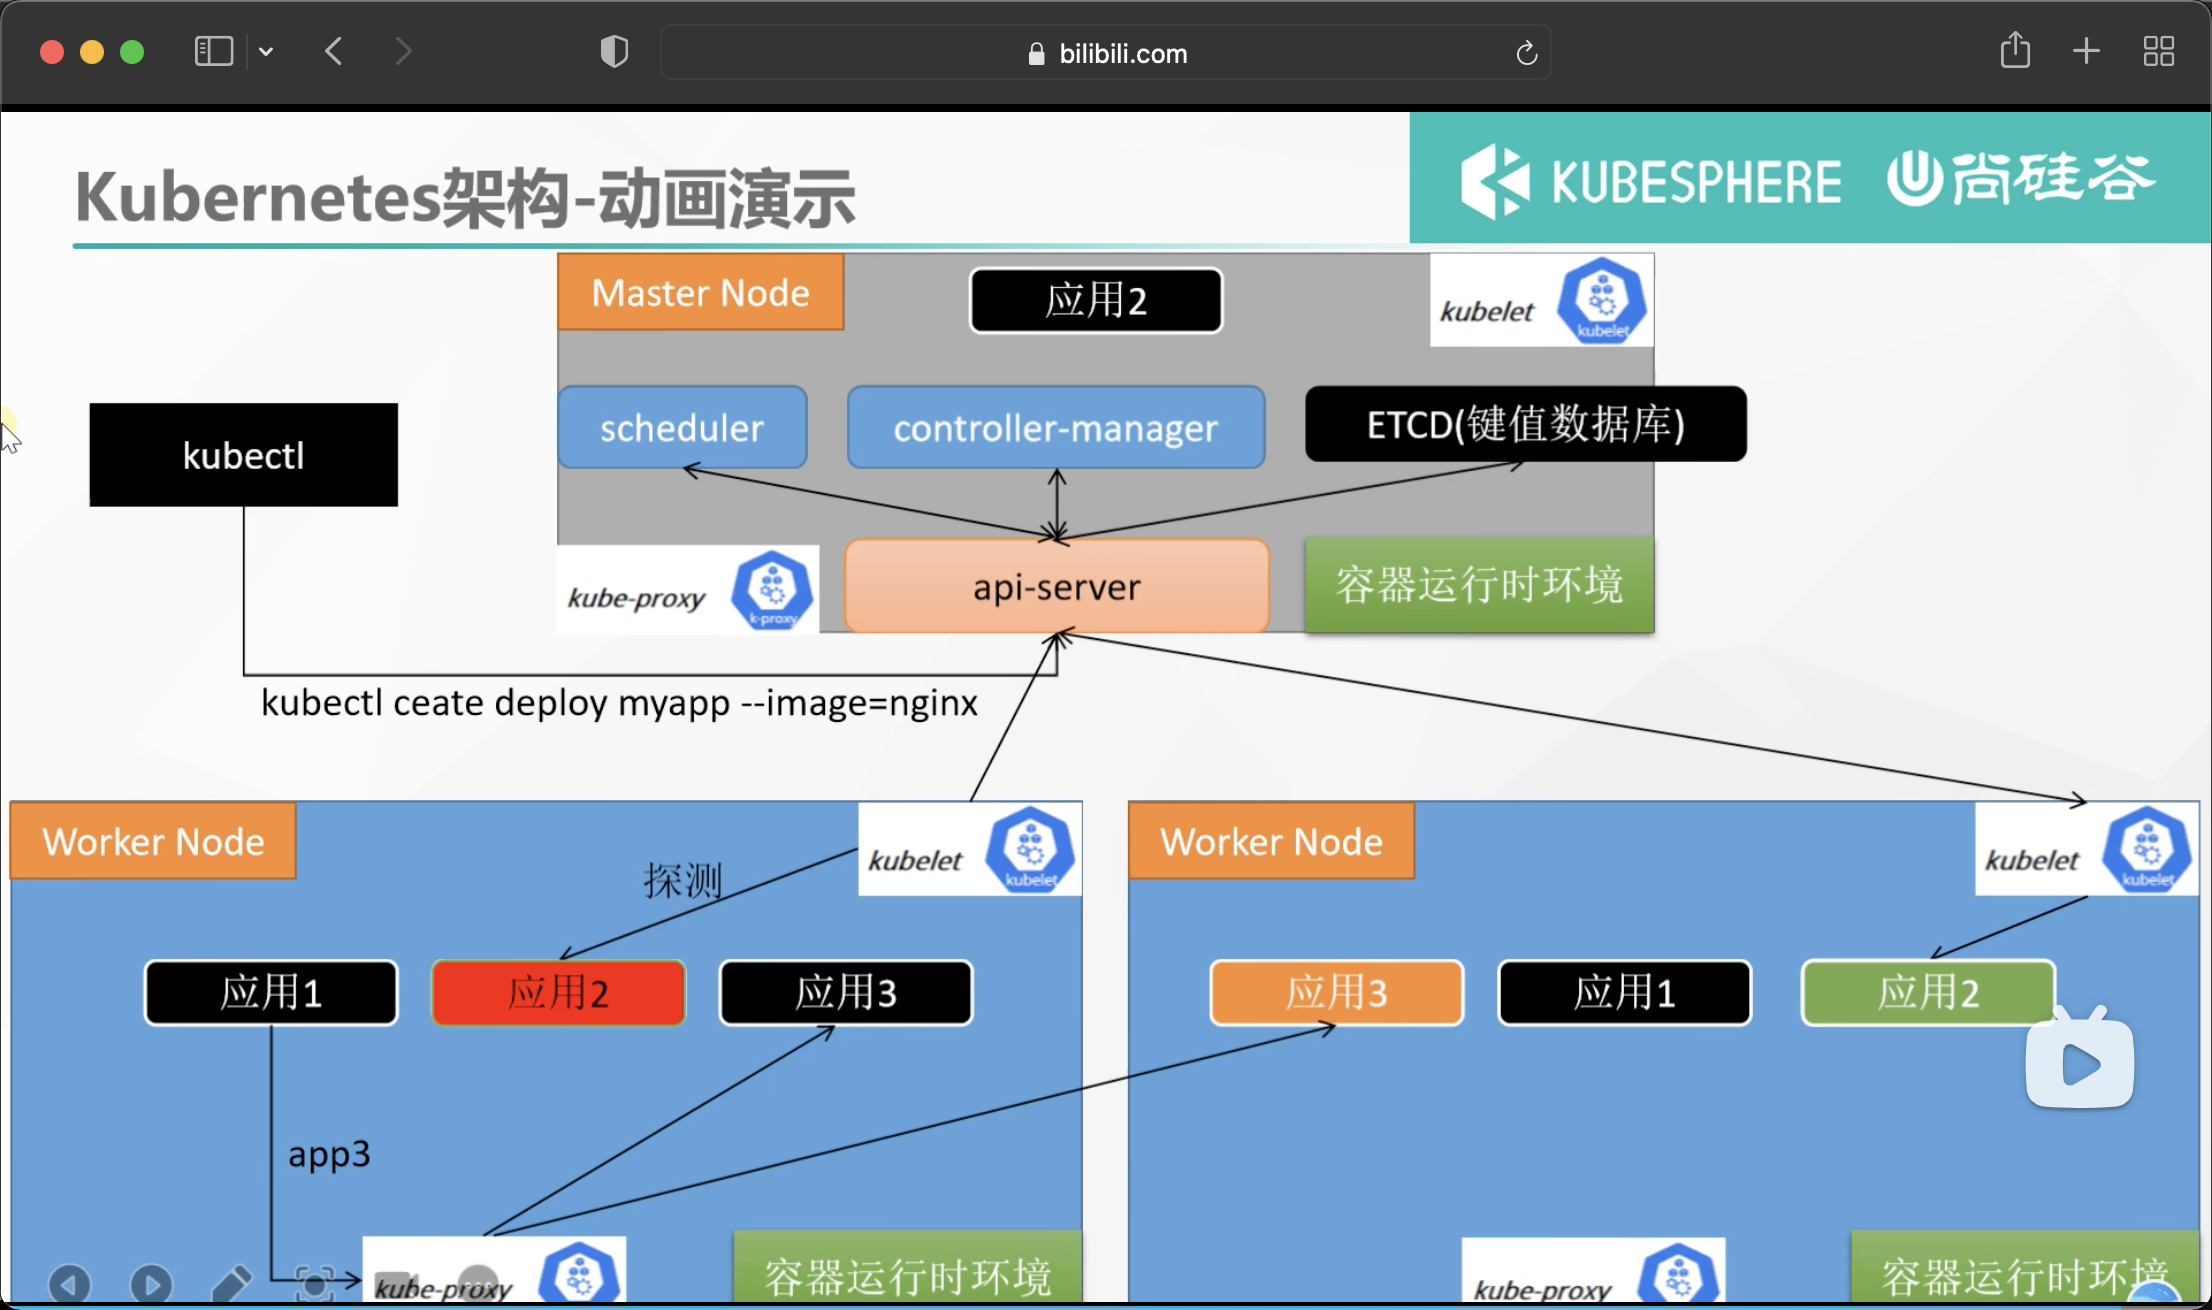
1. Control Plane Components
The components of the control plane make global decisions on the cluster (such as scheduling), and detect and respond to cluster events (for example, start a new pod when the replicas field of the deployment is not satisfied).
The control plane component can run on any node in the cluster. However, for simplicity, setup scripts typically start all control plane components on the same computer and do not run the user container on that computer. See the example of multi VM control plane setup in building a high availability cluster using kubedm.
kube-apiserver
The API server is a component of the Kubernetes control surface, which exposes the Kubernetes API. The API server is the front end of the Kubernetes control surface.
The main implementation of Kubernetes API server is Kube apiserver. Kube apiserver is designed to scale horizontally, that is, it can scale by deploying multiple instances. You can run multiple instances of Kube apiserver and balance traffic between these instances.
etcd
etcd is a key value database with consistency and high availability. It can be used as a background database to store all cluster data of Kubernetes.
The etcd database of your Kubernetes cluster usually needs a backup plan.
For further information on etcd, refer to the etcd documentation.
kube-scheduler
The control plane component is responsible for monitoring the newly created Pods that do not specify a running node, and selecting the node to let the Pod run on it.
The factors considered in the scheduling decision include the resource requirements of a single Pod and Pod set, hardware / software / policy constraints, affinity and anti affinity specifications, data location, interference between workloads and deadline.
kube-controller-manager
Run the components of the controller on the master node.
Logically, each controller is a separate process, but in order to reduce complexity, they are compiled into the same executable and run in a process.
These controllers include:
● Node Controller: it is responsible for notifying and responding when a node fails
● Job controller: monitor Job objects representing one-time tasks, and then create Pods to run these tasks until they are completed
● Endpoints Controller: fill in endpoints objects (i.e. add Service and Pod)
● service account & token controllers: create a default account and API access token for the new namespace
cloud-controller-manager
A cloud controller manager is a control plane component that embeds the control logic of a specific cloud. The cloud controller manager allows you to link the cluster to the application programming interface of the cloud provider and separate the components that interact with the cloud platform from those that only interact with your cluster.
Cloud controller manager runs only cloud platform specific control loops. If you run Kubernetes in your own environment or run the learning environment on your local computer, the deployed environment does not need a cloud controller manager.
Similar to Kube controller manager, cloud controller manager combines several logically independent control loops into the same executable file for you to run in the same process. You can scale it horizontally (running more than one copy) to improve performance or enhance fault tolerance.
The following controllers include dependencies on cloud platform drivers:
● Node Controller: used to check the cloud provider after the node terminates the response to determine whether the node has been deleted
● Route Controller: used to set routes in the underlying cloud infrastructure
● Service Controller: used to create, update and delete cloud provider load balancers
2. Node component
Node components run on each node, maintain the running Pod and provide Kubernetes running environment.
kubelet
An agent running on each node in the cluster. It ensures that containers are running in the Pod.
kubelet receives a set of PodSpecs provided to it through various mechanisms to ensure that the containers described in these PodSpecs are running and healthy. kubelet does not manage containers that were not created by Kubernetes.
kube-proxy
Kube proxy is a network proxy running on each node in the cluster, which implements part of the concept of Kubernetes Service.
Kube proxy maintains network rules on nodes. These network rules allow network communication with the Pod from network sessions inside or outside the cluster.
If the operating system provides a packet filter layer and is available, Kube proxy will use it to implement network rules. Otherwise, Kube proxy forwards only the traffic itself.
Architecture diagram to be built
Cluster construction
Create server
Creating vpc and its private network
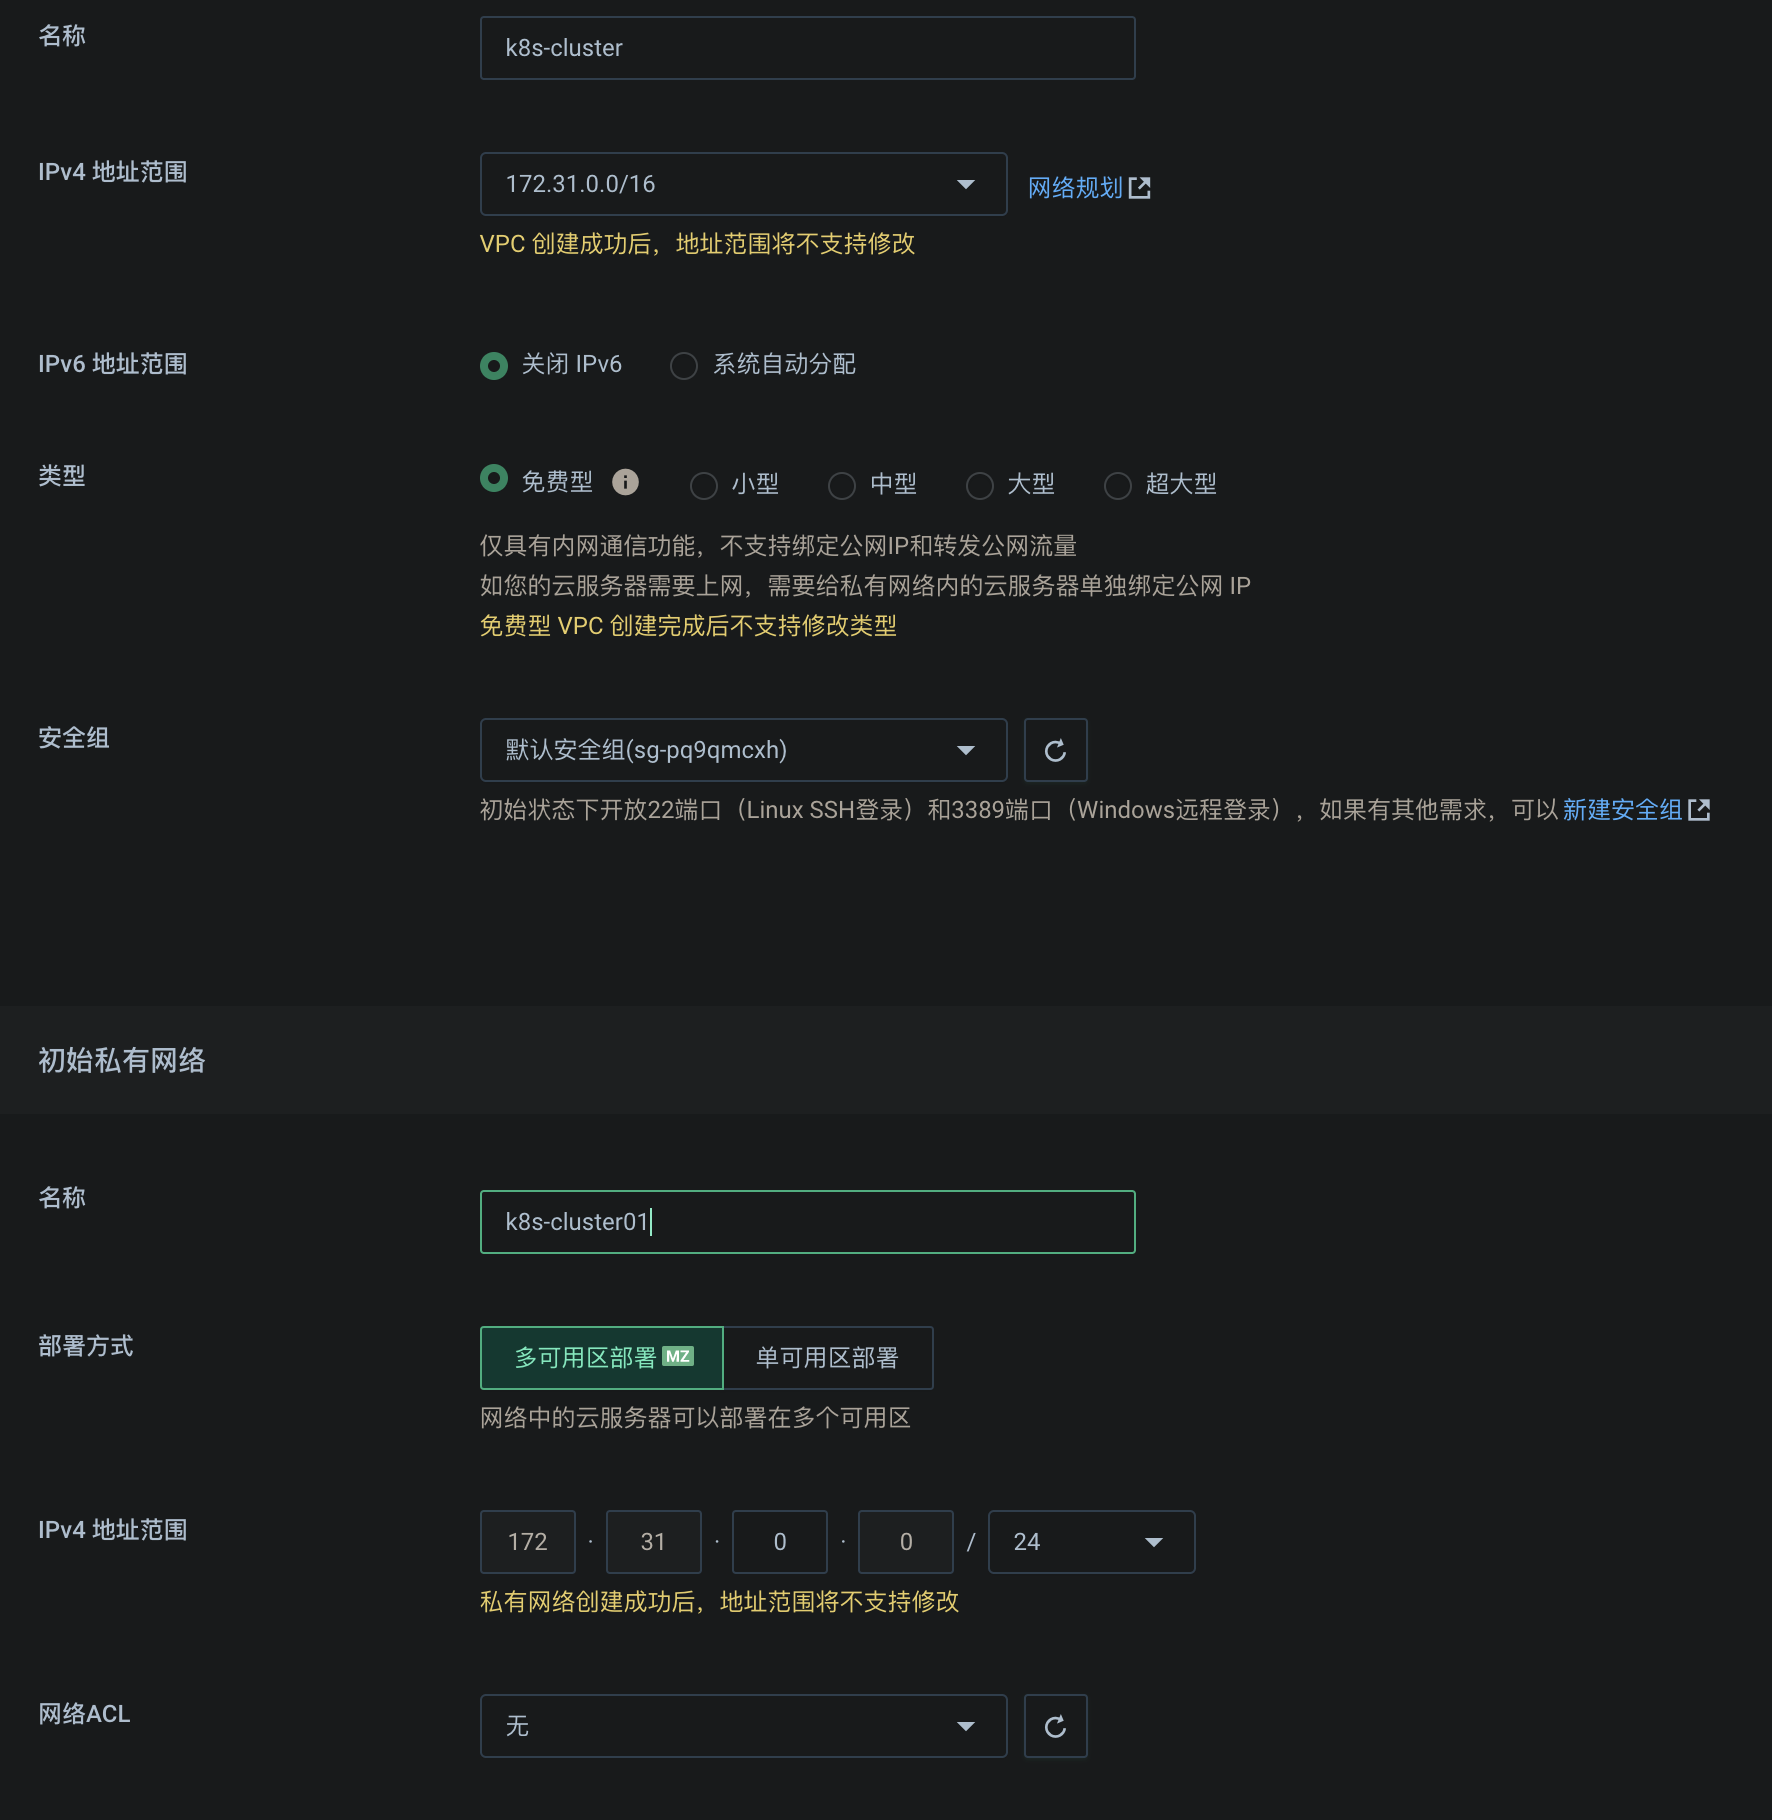
Create three pay as you go servers 2c4t, specify the newly created vpc network, allocate three public IP addresses, and turn on mutual trust within the security group, so that internal IP interworking can bypass the firewall
ssh tool connection, specify one as the master
One master and two node s
docker container environment installation
Refer to docker installation above
Preparation environment creation
- A compatible Linux host. The Kubernetes project provides general instructions for Debian and Red Hat based Linux distributions and some distributions that do not provide a package manager
- 2 GB or more RAM per machine (less than this number will affect the running memory of your application)
- 2 CPU cores or more
- The networks of all machines in the cluster can be connected to each other (both public network and intranet)
○ set firewall release rules - Nodes cannot have duplicate host names, MAC addresses, or product_uuid s. See here for more details.
○ set different hostname - Open some ports on the machine. See here for more details.
○ intranet mutual trust - Disable the swap partition. In order for kubelet to work properly, you must disable the swap partition.
○ permanently closed
#Each machine sets its own domain name
hostnamectl set-hostname xxxx


# Setting SELinux to permissive mode (equivalent to disabling it) disables security mode
sudo setenforce 0
sudo sed -i 's/^SELINUX=enforcing$/SELINUX=permissive/' /etc/selinux/config

#close swap # free -m view swap
swapoff -a
sed -ri 's/.*swap.*/#&/' /etc/fstab

#Allow iptables to check bridge traffic
cat <<EOF | sudo tee /etc/modules-load.d/k8s.conf
br_netfilter
EOF

cat <<EOF | sudo tee /etc/sysctl.d/k8s.conf
net.bridge.bridge-nf-call-ip6tables = 1
net.bridge.bridge-nf-call-iptables = 1
EOF

# Make configuration effective
sudo sysctl --system
Install the three major components of the cluster
Install kubelet, kubedm, kubectl
# Set mirror source
cat <<EOF | sudo tee /etc/yum.repos.d/kubernetes.repo
[kubernetes]
name=Kubernetes
baseurl=http://mirrors.aliyun.com/kubernetes/yum/repos/kubernetes-el7-x86_64
enabled=1
gpgcheck=0
repo_gpgcheck=0
gpgkey=http://mirrors.aliyun.com/kubernetes/yum/doc/yum-key.gpg
   http://mirrors.aliyun.com/kubernetes/yum/doc/rpm-package-key.gpg
exclude=kubelet kubeadm kubectl
EOF

# Pull three large pieces
sudo yum install -y kubelet-1.20.9 kubeadm-1.20.9 kubectl-1.20.9 --disableexcludes=kubernetes

# Startup and self startup
sudo systemctl enable --now kubelet
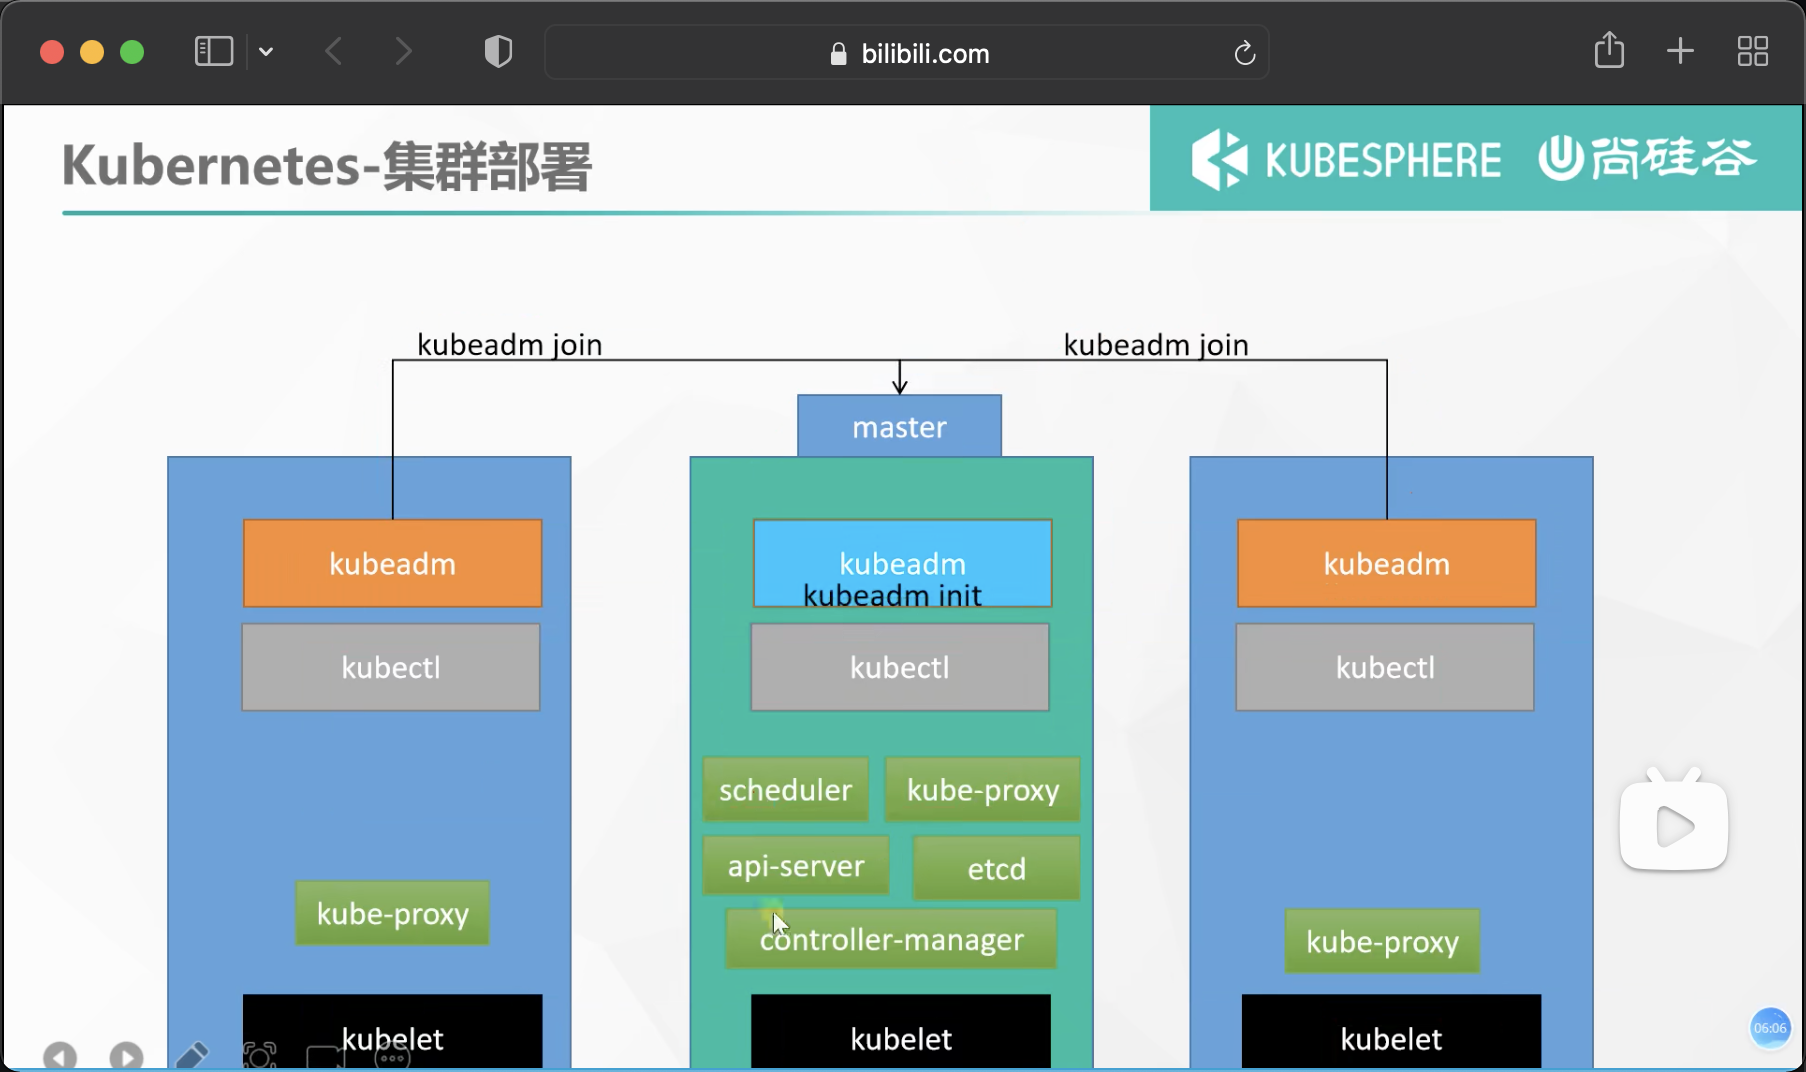
Boot the cluster using kubedm
1. Download the images required by each machine in advance to avoid installation failure due to network reasons
# Generate an sh file and download the defined image circularly
sudo tee ./images.sh <<-'EOF'
#!/bin/bash
images=(
kube-apiserver:v1.20.9
kube-proxy:v1.20.9
kube-controller-manager:v1.20.9
kube-scheduler:v1.20.9
coredns:1.7.0
etcd:3.4.13-0
pause:3.2
)
for imageName in ${images[@]} ; do
docker pull registry.cn-hangzhou.aliyuncs.com/lfy_k8s_images/$imageName
done
EOF

# Give the file permission and execute
chmod +x ./images.sh && ./images.sh
2. Initialize master node
#Add master domain name mapping to all machines. The following needs to be modified to the private IP of their own master node
# Let all nodes know the location IP of the primary node
echo "172.31.0.2  cluster-endpoint" >> /etc/hosts


#Master node initialization
kubeadm init \
--apiserver-advertise-address=172.31.0.2 \
--control-plane-endpoint=cluster-endpoint \
--image-repository registry.cn-hangzhou.aliyuncs.com/lfy_k8s_images \
--kubernetes-version v1.20.9 \
--service-cidr=10.96.0.0/16 \
--pod-network-cidr=192.168.0.0/16

#All network ranges do not overlap
Information returned after initialization
Your Kubernetes control-plane has initialized successfully!

# The first step to use this cluster is to perform the following steps. It needs to be implemented immediately
To start using your cluster, you need to run the following as a regular user:

  mkdir -p $HOME/.kube
  sudo cp -i /etc/kubernetes/admin.conf $HOME/.kube/config
  sudo chown $(id -u):$(id -g) $HOME/.kube/config


Alternatively, if you are the root user, you can run:

  export KUBECONFIG=/etc/kubernetes/admin.conf

# You should also deploy a pod network plug-in, which will connect the machines between clusters and communicate with each other
You should now deploy a pod network to the cluster.
Run "kubectl apply -f [podnetwork].yaml" with one of the options listed at:
  https://kubernetes.io/docs/concepts/cluster-administration/addons/

# You can join as many master nodes as you want
You can now join any number of control-plane nodes by copying certificate authorities
and service account keys on each node and then running the following as root:

  kubeadm join cluster-endpoint:6443 --token 2n4gns.e3n0mqlip1nmbbqa \
    --discovery-token-ca-cert-hash sha256:786bc6e4ac9d96e6d6764d94b16e4cd40e599669e4824ebba5a7eba31bb2a983 \
    --control-plane

# You can also join as many work nodes as you want. Run kubedm below to join child nodes
Then you can join any number of worker nodes by running the following on each as root:

kubeadm join cluster-endpoint:6443 --token epjqlx.25mfge9y4rgw1n4o \
    --discovery-token-ca-cert-hash sha256:5298e8db61faebe5eca8bfc5ec788d5f9bb4bad16dbe924027d33c05416c3738
Run the first step above to complete the creation of the master node
Some commands that can be used now
#View all nodes of the cluster
kubectl get nodes

#Create resources for the cluster according to the configuration file
kubectl apply -f xxxx.yaml

#View which applications are deployed in the cluster?
docker ps   ===   kubectl get pods -A
# Running applications are called containers in docker and pods in k8s
kubectl get pods -A
3. Installing network components
curl https://docs.projectcalico.org/manifests/calico.yaml -O

kubectl apply -f calico.yaml
4. Join node
On the child node, run the command generated when initializing the master node above. This command is valid within 24 hours
kubeadm join cluster-endpoint:6443 --token 2n4gns.e3n0mqlip1nmbbqa \
    --discovery-token-ca-cert-hash sha256:786bc6e4ac9d96e6d6764d94b16e4cd40e599669e4824ebba5a7eba31bb2a983
If the token expires, the master node creates a new token
kubeadm token create --print-join-command
Wait for a while to check the node readiness. So far, the k8s cluster is ready
[root@k8s-master ~] kubectl get nodes
NAME         STATUS   ROLES                  AGE   VERSION
k8s-master   Ready    control-plane,master   34m   v1.20.9
k8s-node1    Ready    <none>                 83s   v1.20.9
k8s-node2    Ready    <none>                 78s   v1.20.9
Deploy dashboard
1. Deploy
kubectl apply -f https://raw.githubusercontent.com/kubernetes/dashboard/v2.3.1/aio/deploy/recommended.yaml
# Copyright 2017 The Kubernetes Authors.
#
# Licensed under the Apache License, Version 2.0 (the "License");
# you may not use this file except in compliance with the License.
# You may obtain a copy of the License at
#
#     http://www.apache.org/licenses/LICENSE-2.0
#
# Unless required by applicable law or agreed to in writing, software
# distributed under the License is distributed on an "AS IS" BASIS,
# WITHOUT WARRANTIES OR CONDITIONS OF ANY KIND, either express or implied.
# See the License for the specific language governing permissions and
# limitations under the License.

apiVersion: v1
kind: Namespace
metadata:
  name: kubernetes-dashboard

---

apiVersion: v1
kind: ServiceAccount
metadata:
  labels:
    k8s-app: kubernetes-dashboard
  name: kubernetes-dashboard
  namespace: kubernetes-dashboard

---

kind: Service
apiVersion: v1
metadata:
  labels:
    k8s-app: kubernetes-dashboard
  name: kubernetes-dashboard
  namespace: kubernetes-dashboard
spec:
  ports:
    - port: 443
      targetPort: 8443
  selector:
    k8s-app: kubernetes-dashboard

---

apiVersion: v1
kind: Secret
metadata:
  labels:
    k8s-app: kubernetes-dashboard
  name: kubernetes-dashboard-certs
  namespace: kubernetes-dashboard
type: Opaque

---

apiVersion: v1
kind: Secret
metadata:
  labels:
    k8s-app: kubernetes-dashboard
  name: kubernetes-dashboard-csrf
  namespace: kubernetes-dashboard
type: Opaque
data:
  csrf: ""

---

apiVersion: v1
kind: Secret
metadata:
  labels:
    k8s-app: kubernetes-dashboard
  name: kubernetes-dashboard-key-holder
  namespace: kubernetes-dashboard
type: Opaque

---

kind: ConfigMap
apiVersion: v1
metadata:
  labels:
    k8s-app: kubernetes-dashboard
  name: kubernetes-dashboard-settings
  namespace: kubernetes-dashboard

---

kind: Role
apiVersion: rbac.authorization.k8s.io/v1
metadata:
  labels:
    k8s-app: kubernetes-dashboard
  name: kubernetes-dashboard
  namespace: kubernetes-dashboard
rules:
  # Allow Dashboard to get, update and delete Dashboard exclusive secrets.
  - apiGroups: [""]
    resources: ["secrets"]
    resourceNames: ["kubernetes-dashboard-key-holder", "kubernetes-dashboard-certs", "kubernetes-dashboard-csrf"]
    verbs: ["get", "update", "delete"]
    # Allow Dashboard to get and update 'kubernetes-dashboard-settings' config map.
  - apiGroups: [""]
    resources: ["configmaps"]
    resourceNames: ["kubernetes-dashboard-settings"]
    verbs: ["get", "update"]
    # Allow Dashboard to get metrics.
  - apiGroups: [""]
    resources: ["services"]
    resourceNames: ["heapster", "dashboard-metrics-scraper"]
    verbs: ["proxy"]
  - apiGroups: [""]
    resources: ["services/proxy"]
    resourceNames: ["heapster", "http:heapster:", "https:heapster:", "dashboard-metrics-scraper", "http:dashboard-metrics-scraper"]
    verbs: ["get"]

---

kind: ClusterRole
apiVersion: rbac.authorization.k8s.io/v1
metadata:
  labels:
    k8s-app: kubernetes-dashboard
  name: kubernetes-dashboard
rules:
  # Allow Metrics Scraper to get metrics from the Metrics server
  - apiGroups: ["metrics.k8s.io"]
    resources: ["pods", "nodes"]
    verbs: ["get", "list", "watch"]

---

apiVersion: rbac.authorization.k8s.io/v1
kind: RoleBinding
metadata:
  labels:
    k8s-app: kubernetes-dashboard
  name: kubernetes-dashboard
  namespace: kubernetes-dashboard
roleRef:
  apiGroup: rbac.authorization.k8s.io
  kind: Role
  name: kubernetes-dashboard
subjects:
  - kind: ServiceAccount
    name: kubernetes-dashboard
    namespace: kubernetes-dashboard

---

apiVersion: rbac.authorization.k8s.io/v1
kind: ClusterRoleBinding
metadata:
  name: kubernetes-dashboard
roleRef:
  apiGroup: rbac.authorization.k8s.io
  kind: ClusterRole
  name: kubernetes-dashboard
subjects:
  - kind: ServiceAccount
    name: kubernetes-dashboard
    namespace: kubernetes-dashboard

---

kind: Deployment
apiVersion: apps/v1
metadata:
  labels:
    k8s-app: kubernetes-dashboard
  name: kubernetes-dashboard
  namespace: kubernetes-dashboard
spec:
  replicas: 1
  revisionHistoryLimit: 10
  selector:
    matchLabels:
      k8s-app: kubernetes-dashboard
  template:
    metadata:
      labels:
        k8s-app: kubernetes-dashboard
    spec:
      containers:
        - name: kubernetes-dashboard
          image: kubernetesui/dashboard:v2.3.1
          imagePullPolicy: Always
          ports:
            - containerPort: 8443
              protocol: TCP
          args:
            - --auto-generate-certificates
            - --namespace=kubernetes-dashboard
            # Uncomment the following line to manually specify Kubernetes API server Host
            # If not specified, Dashboard will attempt to auto discover the API server and connect
            # to it. Uncomment only if the default does not work.
            # - --apiserver-host=http://my-address:port
          volumeMounts:
            - name: kubernetes-dashboard-certs
              mountPath: /certs
              # Create on-disk volume to store exec logs
            - mountPath: /tmp
              name: tmp-volume
          livenessProbe:
            httpGet:
              scheme: HTTPS
              path: /
              port: 8443
            initialDelaySeconds: 30
            timeoutSeconds: 30
          securityContext:
            allowPrivilegeEscalation: false
            readOnlyRootFilesystem: true
            runAsUser: 1001
            runAsGroup: 2001
      volumes:
        - name: kubernetes-dashboard-certs
          secret:
            secretName: kubernetes-dashboard-certs
        - name: tmp-volume
          emptyDir: {}
      serviceAccountName: kubernetes-dashboard
      nodeSelector:
        "kubernetes.io/os": linux
      # Comment the following tolerations if Dashboard must not be deployed on master
      tolerations:
        - key: node-role.kubernetes.io/master
          effect: NoSchedule

---

kind: Service
apiVersion: v1
metadata:
  labels:
    k8s-app: dashboard-metrics-scraper
  name: dashboard-metrics-scraper
  namespace: kubernetes-dashboard
spec:
  ports:
    - port: 8000
      targetPort: 8000
  selector:
    k8s-app: dashboard-metrics-scraper

---

kind: Deployment
apiVersion: apps/v1
metadata:
  labels:
    k8s-app: dashboard-metrics-scraper
  name: dashboard-metrics-scraper
  namespace: kubernetes-dashboard
spec:
  replicas: 1
  revisionHistoryLimit: 10
  selector:
    matchLabels:
      k8s-app: dashboard-metrics-scraper
  template:
    metadata:
      labels:
        k8s-app: dashboard-metrics-scraper
      annotations:
        seccomp.security.alpha.kubernetes.io/pod: 'runtime/default'
    spec:
      containers:
        - name: dashboard-metrics-scraper
          image: kubernetesui/metrics-scraper:v1.0.6
          ports:
            - containerPort: 8000
              protocol: TCP
          livenessProbe:
            httpGet:
              scheme: HTTP
              path: /
              port: 8000
            initialDelaySeconds: 30
            timeoutSeconds: 30
          volumeMounts:
          - mountPath: /tmp
            name: tmp-volume
          securityContext:
            allowPrivilegeEscalation: false
            readOnlyRootFilesystem: true
            runAsUser: 1001
            runAsGroup: 2001
      serviceAccountName: kubernetes-dashboard
      nodeSelector:
        "kubernetes.io/os": linux
      # Comment the following tolerations if Dashboard must not be deployed on master
      tolerations:
        - key: node-role.kubernetes.io/master
          effect: NoSchedule
      volumes:
        - name: tmp-volume
          emptyDir: {}
2. Set access port
You need to modify the resources in the cluster
kubectl edit svc kubernetes-dashboard -n kubernetes-dashboard
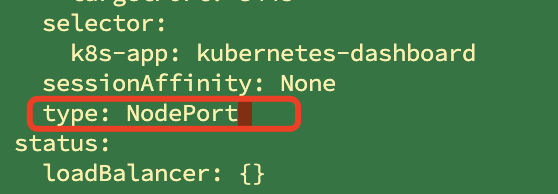
Change the value of type to NodePort
kubectl get svc -A |grep kubernetes-dashboard
## Find the port and release it in the security group

Access: https: / / cluster any IP port:
3. Create access account
#Create an access account and prepare a yaml file; vi dash.yaml
apiVersion: v1
kind: ServiceAccount
metadata:
  name: admin-user
  namespace: kubernetes-dashboard
---
apiVersion: rbac.authorization.k8s.io/v1
kind: ClusterRoleBinding
metadata:
  name: admin-user
roleRef:
  apiGroup: rbac.authorization.k8s.io
  kind: ClusterRole
  name: cluster-admin
subjects:
- kind: ServiceAccount
  name: admin-user
  namespace: kubernetes-dashboard
kubectl apply -f dash.yaml
4. Token access
#access token
kubectl -n kubernetes-dashboard get secret $(kubectl -n kubernetes-dashboard get sa/admin-user -o jsonpath="{.secrets[0].name}") -o go-template="{{.data.token | base64decode}}"
You can log in by copying the returned key
Core practice
Action NameSpace
Namespaces are used to isolate resources. By default, only resources are isolated, not networks
Create or delete namespaces
kubectl create ns hello
kubectl delete ns hello
Creating namespaces from files
apiVersion: v1
kind: Namespace
metadata:
  name: hello
The ns created through the file is also deleted through the file
kubectl apply -f hello.yml
kubectl delete -f hello.yml
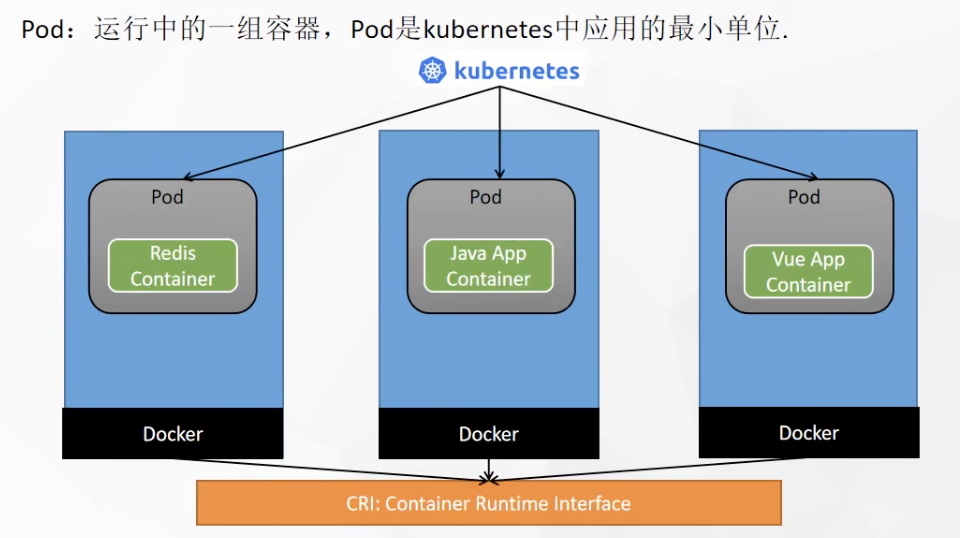
Understand Pod
A set of containers in operation. Pod is the smallest unit applied in kubernetes. A pod may contain multiple docker s
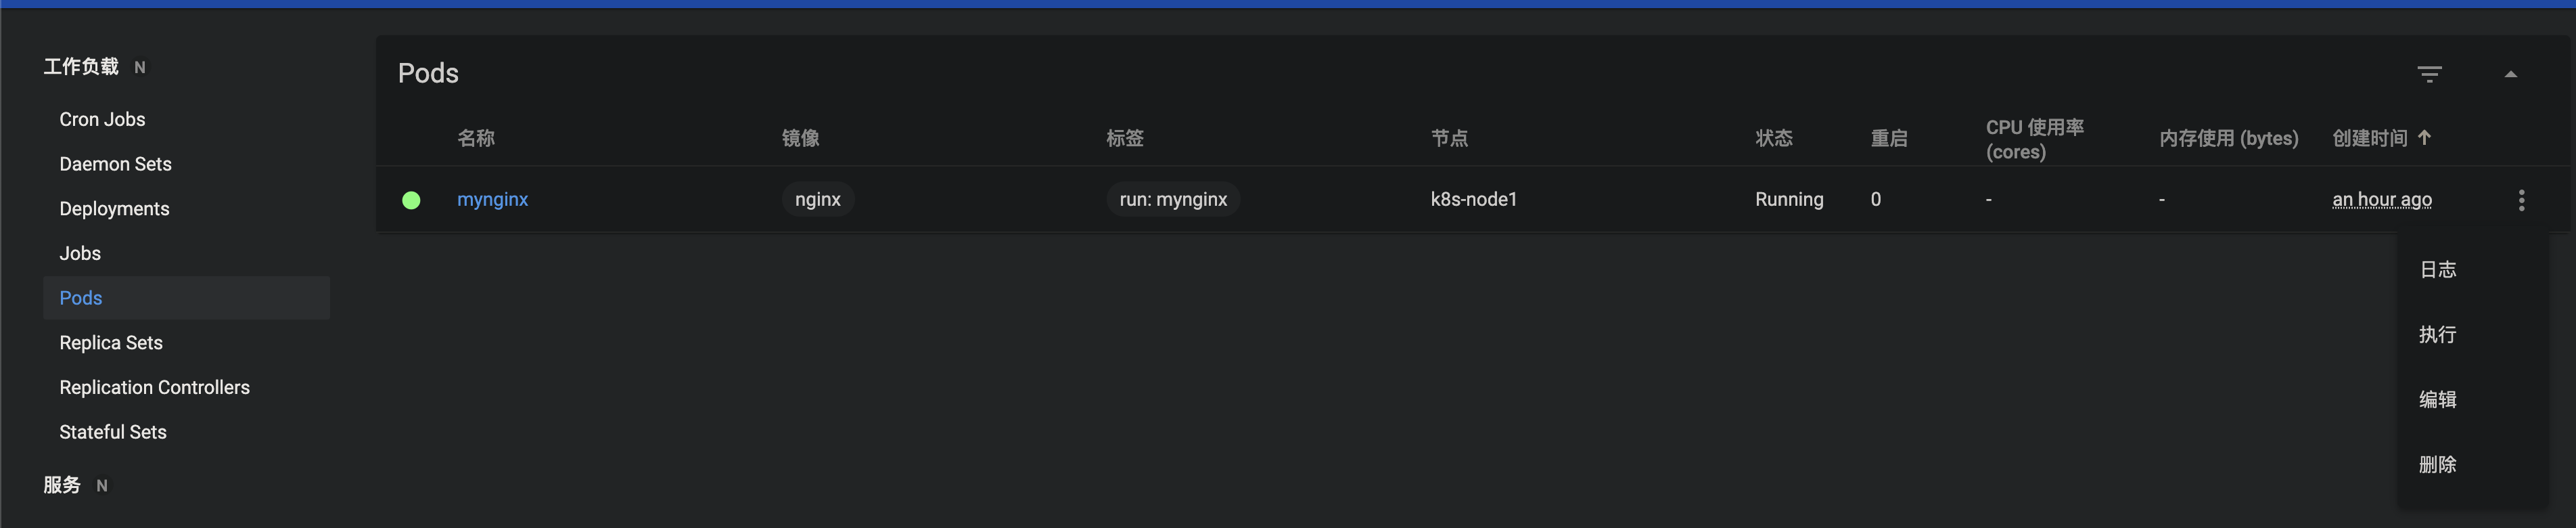
Check the pod to see ready, the number of prepared containers / the total number of containers

Create the first pod from the kubectl command line
# Run a container named mynginx to mirror nginx
kubectl run mynginx --image=nginx

# View the Pod for the default namespace
kubectl get pod
# describe
kubectl describe pod Your own Pod name
# delete
kubectl delete pod Pod name
# View the operation log of Pod
kubectl logs Pod name

# Each Pod - k8s is assigned an ip address
kubectl get pod -owide
# Use the IP of Pod + the port of the running container in Pod
curl 192.168.169.136

# Any machine and any application in the cluster can access the Pod through the ip assigned by the Pod
Create with profile
apiVersion: v1
kind: Pod
metadata:
  labels:
    run: mynginx
  name: mynginx
#  namespace: default
spec:
  containers:
  - image: nginx
    name: mynginx
kubectl apply -f configuration file
kubectl delete -f configuration file
Operate pod and pod details visually
The visual console directly views the container log and enters the interior of the container, which is equivalent to docker exec -it /bin/bash
# Enter container, interactive mode
kubectl exec -it myapp -- /bin/bash
# Each Pod - k8s is assigned an ip address
kubectl get pod -owide
# Use the IP of Pod + the port of the running container in Pod; Intra cluster access
curl 192.168.169.136
Start two containers in a pod
apiVersion: v1
kind: Pod
metadata:
  labels:
    run: myapp
  name: myapp
spec:
  containers:
  - image: nginx
    name: nginx
  - image: tomcat:8.5.68
    name: tomcat
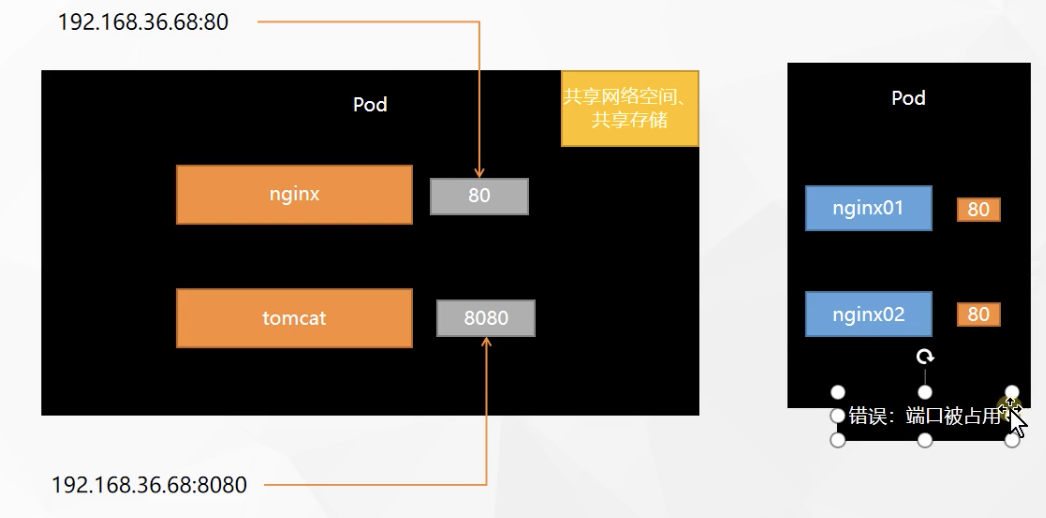
At this time, the applications cannot be accessed externally and can only be called internally
Deploying applications using Deployment
Control the Pod so that the Pod can have multiple copies, self-healing, capacity expansion, etc,
Even if the active command kubectl delete pod xxx is executed, the cluster will recover the pod, which is self-healing
# Clear all pods and compare the effects of the following two commands?
kubectl run mynginx --image=nginx

kubectl create deployment mytomcat --image=tomcat:8.5.68
# Self healing ability
Multi replica deployment
kubectl create deployment my-dep --image=nginx --replicas=3
apiVersion: apps/v1
kind: Deployment
metadata:
  labels:
    app: my-dep
  name: my-dep
spec:
  replicas: 3
  selector:
    matchLabels:
      app: my-dep
  template:
    metadata:
      labels:
        app: my-dep
    spec:
      containers:
      - image: nginx
        name: nginx
View deployment
kubectl get deploy xxxx
Deployment expansion capacity
kubectl scale --replicas=5 deployment/my-dep
Self Healing & failover
A deployment has been started. There are three container deployments, including two node2 and one node1
We shut down the node2 server, and the cluster will fail over after 5 minutes by default
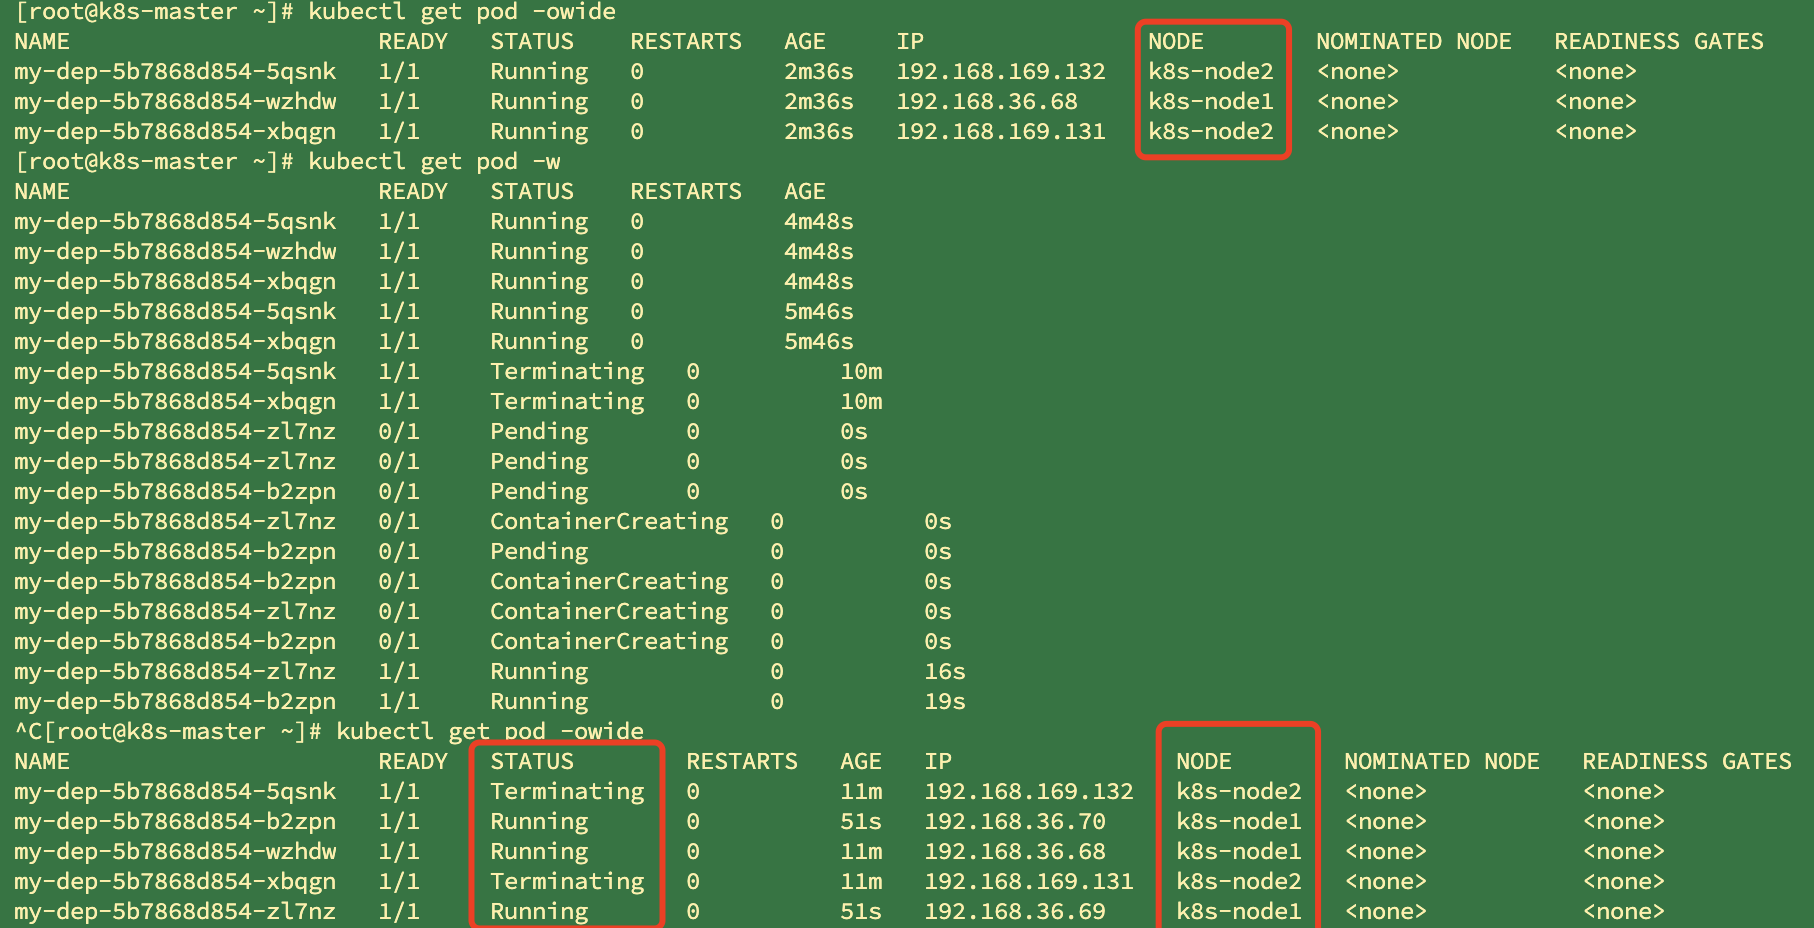
# View pod details
kubectl get pod -owide

# Monitoring pod
kubectl get pod -w
4. Rolling update
The cluster will update the deploy image by changing the deploy image without stopping the update. The old image container will not stop immediately. Instead, the old image container will be replaced after the new image container is successfully started, and the non-stop update and rolling deployment are completed
# Get the yaml information of deploy deployment, and check the specific image used in detail
kubectl get deploy my-dep -oyaml

# Modify the image of dep and start rolling deployment immediately after modification
kubectl set image deployment/my-dep nginx=nginx:1.16.1 --record


kubectl rollout status deployment/my-dep
5. Version fallback
#Historical records
kubectl rollout history deployment/my-dep


#View a history detail
kubectl rollout history deployment/my-dep --revision=2

#Rollback (back to last)
kubectl rollout undo deployment/my-dep

#Rollback (back to specified version)
kubectl rollout undo deployment/my-dep --to-revision=2


# Gets information about the deployment to yml output the filtered image
kubectl get deploy/my-dep -oyaml|grep image
In addition to Deployment, k8s there are StatefulSet, daemon set, Job and other types of resources. We are all called workloads.
Stateful applications are deployed using StatefulSet, while stateless applications are deployed using Deployment
https://kubernetes.io/zh/docs/concepts/workloads/controllers/
Other workloads

service network
Service
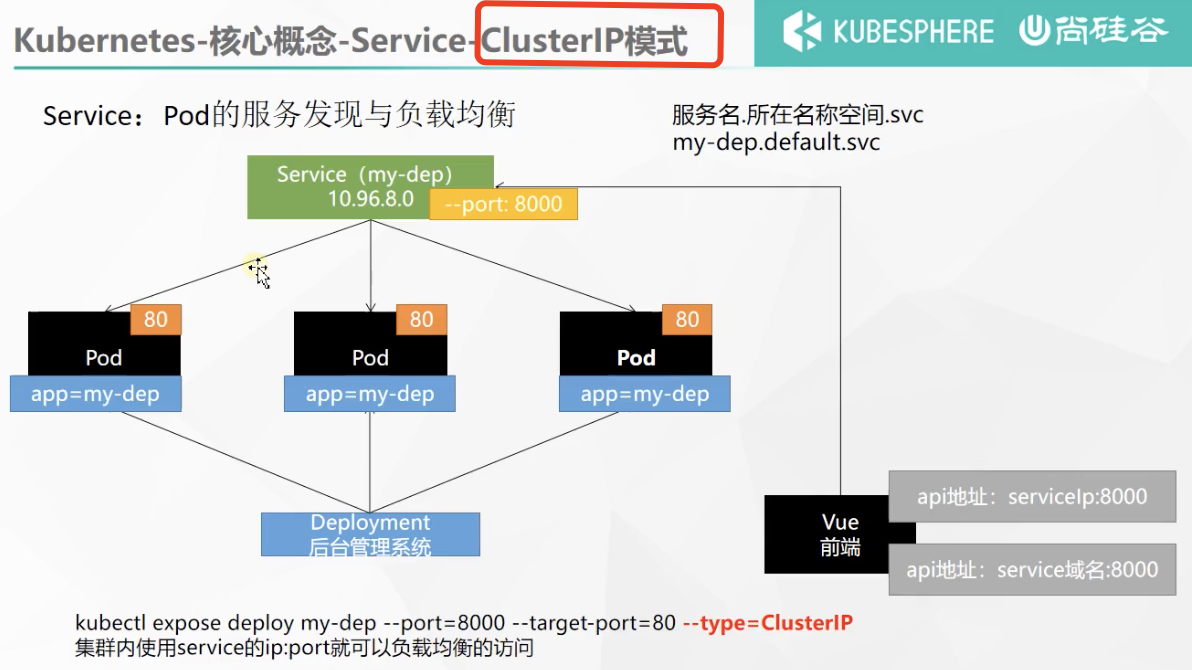
An abstract method of exposing a set of Pods as network services.
#Expose Deploy specifies that the external port 8000 is mapped to the cluster internal port 80
kubectl expose deployment my-dep --port=8000 --target-port=80 --type=ClusterIP
# Query the ip exposed by the service
kubectl get svc


#Retrieve Pod using tag
kubectl get pod -l app=my-dep
The server can be accessed internally with exposed IP

Additionally, service name. Namespace. svc: port can be used inside the cluster
curl my-dep.default.svc:8000
However, at this time, outside the cluster, the server cannot be accessed directly with the service name
The service found that the offline pod traffic will be automatically transferred to the pods of other services, which will not affect access. Adding a pod will also automatically load balance
1,ClusterIP
# It is equivalent to no default clusterIP without -- type, which can be accessed in the cluster
kubectl expose deployment my-dep --port=8000 --target-port=80 --type=ClusterIP
2,NodePort
kubectl expose deployment my-dep --port=8000 --target-port=80 --type=NodePort
Delete the previous clusterip type and expose it as nodeport. A port 315868000 is randomly assigned for intra cluster access and a random port is used for public network access

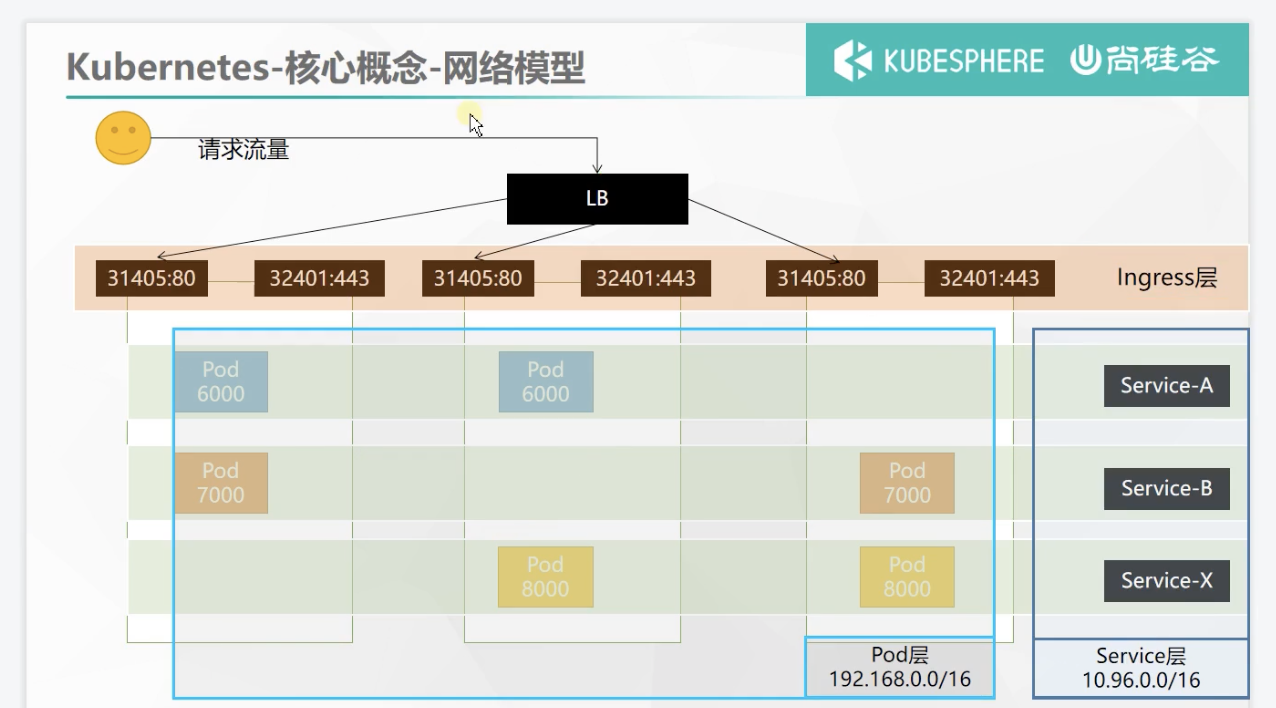
Ingress

1. Installation
wget https://raw.githubusercontent.com/kubernetes/ingress-nginx/controller-v0.47.0/deploy/static/provider/baremetal/deploy.yaml
#Modify mirror
vi deploy.yaml

#Change the image address of line 323 to the alicloud image address
image: k8s.gcr.io/ingress-nginx/controller:v0.46.0@sha256:52f0058bed0a17ab0fb35628ba97e8d52b5d32299fbc03cc0f6c7b9ff036b61a
----Change to
image: registry.cn-hangzhou.aliyuncs.com/lfy_k8s_images/ingress-nginx-controller:v0.46.0

# Check the results of the installation
kubectl get pod,svc -n ingress-nginx

# Finally, don't forget to release the port exposed by svc
After installation
# The installation of ingress will generate a service. Ingress will undertake all traffic,
# Therefore, a service is generated to expose the port to receive traffic
# View svc details
kubectl get svc -A

ingress-nginx          ingress-nginx-controller             NodePort    10.96.189.29    <none>        80:31735/TCP,443:31607/TCP   88s

# Port 80 accessed by http and port 443 accessed by https are exposed and randomly mapped to nodeport port in the cluster
# The port range of nodeport is
30000 - 32767
The public IP of any cluster server can access ingress through these two ports
Use of Ingress
Official website address: https://kubernetes.github.io/ingress-nginx/
That's what nginx did
Apply the following yaml to prepare the test environment
apiVersion: apps/v1
kind: Deployment
metadata:
  name: hello-server
spec:
  replicas: 2
  selector:
    matchLabels:
      app: hello-server
  template:
    metadata:
      labels:
        app: hello-server
    spec:
      containers:
      - name: hello-server
        image: registry.cn-hangzhou.aliyuncs.com/lfy_k8s_images/hello-server
        ports:
        - containerPort: 9000
---
apiVersion: apps/v1
kind: Deployment
metadata:
  labels:
    app: nginx-demo
  name: nginx-demo
spec:
  replicas: 2
  selector:
    matchLabels:
      app: nginx-demo
  template:
    metadata:
      labels:
        app: nginx-demo
    spec:
      containers:
      - image: nginx
        name: nginx
---
apiVersion: v1
kind: Service
metadata:
  labels:
    app: nginx-demo
  name: nginx-demo
spec:
  selector:
    app: nginx-demo
  ports:
  - port: 8000
    protocol: TCP
    targetPort: 80
---
apiVersion: v1
kind: Service
metadata:
  labels:
    app: hello-server
  name: hello-server
spec:
  selector:
    app: hello-server
  ports:
  - port: 8000
    protocol: TCP
    targetPort: 9000
The action of this yml file is. The first two parts are: two deployment s are generated, and two pod s are deployed for each.
In the latter two parts, two services are generated. The service selector selects the pod deployed in the previous two times, and the newly opened port is mapped to the port targetPort of the pod to achieve load balancing
Deployment: the function of deployment is to achieve the self-healing of pod
service: load balancing
Add the domain name access rule of Ingress, which is equivalent to the GateWay of Spring cloud
apiVersion: networking.k8s.io/v1
kind: Ingress
metadata:
  name: ingress-host-bar
spec:
  ingressClassName: nginx
  rules:
  - host: "hello.atguigu.com"
    http:
      paths:
      - pathType: Prefix
        path: "/"
        backend:
          service:
            name: hello-server
            port:
              number: 8000
  - host: "demo.atguigu.com"
    http:
      paths:
      - pathType: Prefix
        path: "/nginx"  # The request will be transferred to the following service. The following service must be able to handle this path. If it cannot handle it, it is 404
        backend:
          service:
            name: nginx-demo  ## java, for example, use path rewriting to remove the prefix nginx
            port:
              number: 8000
Modify the local host file because the public IP of any server in the cluster can access the cluster

Pass at this time
# View the exposed port of Ingress to access Ingress
kubectl get svc -A

http://hello.atguigu.com:31735/
http://demo.atguigu.com:31735/nginx
Successfully load balanced access to the pod under the service
Path rewriting for Ingress
apiVersion: networking.k8s.io/v1
kind: Ingress
metadata:
  annotations:   # Path rewriting
    nginx.ingress.kubernetes.io/rewrite-target: /$2
  name: ingress-host-bar
spec:
  ingressClassName: nginx
  rules:
  - host: "hello.atguigu.com"
    http:
      paths:
      - pathType: Prefix
        path: "/"
        backend:
          service:
            name: hello-server
            port:
              number: 8000
  - host: "demo.atguigu.com"
    http:
      paths:
      - pathType: Prefix
        path: "/nginx(/|$)(.*)"  #(path rewriting) the request will be transferred to the following services. The following services must be able to handle this path. If not, it is 404
        backend:
          service:
            name: nginx-demo  ## java, for example, use path rewriting to remove the prefix nginx
            port:
              number: 8000
apiVersion: networking.k8s.io/v1
kind: Ingress
metadata:
  name: ingress-limit-rate
  annotations:
    nginx.ingress.kubernetes.io/limit-rps: "1"
spec:
  ingressClassName: nginx
  rules:
  - host: "haha.atguigu.com"
    http:
      paths:
      - pathType: Exact
        path: "/"
        backend:
          service:
            name: nginx-demo
            port:
              number: 8000
Summary of Ingress network model
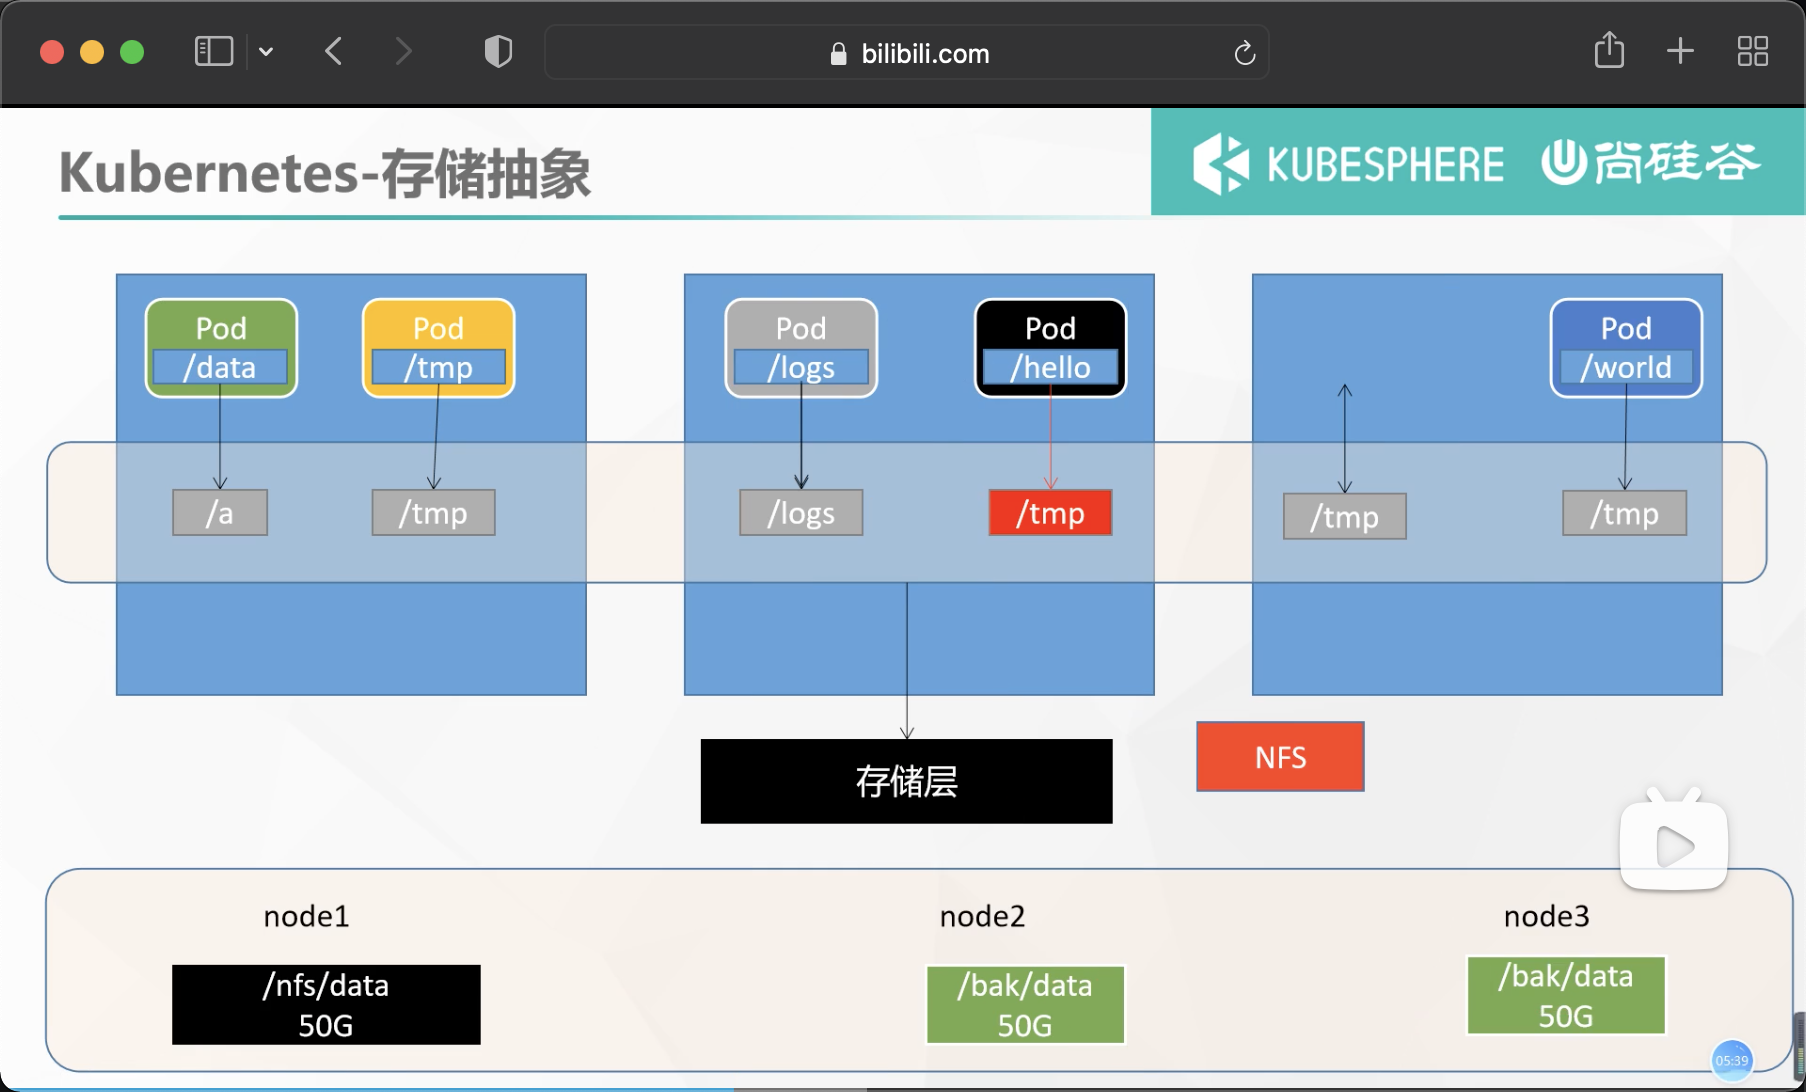
Storage abstraction
Environmental preparation
1. All nodes
#Installation of all machines
yum install -y nfs-utils
2. Master node
#The nfs master node exposes the / nfs/data / directory * owner. Non secure, read-write
echo "/nfs/data/ *(insecure,rw,sync,no_root_squash)" > /etc/exports

# Which directory does the master node create
mkdir -p /nfs/data
systemctl enable rpcbind --now
systemctl enable nfs-server --now
#Configuration effective
exportfs -r
3. Slave node
#  View master node mounting details master node IP
showmount -e 172.31.0.2

#Execute the following command to mount the shared directory on the nfs server to the local path / root/nfsmount
mkdir -p /nfs/data

mount -t nfs 172.31.0.2:/nfs/data /nfs/data
# Write a test file
echo "hello nfs server" > /nfs/data/test.txt
4. Deployment uses NFS mount
apiVersion: apps/v1
kind: Deployment
metadata:
  labels:
    app: nginx-pv-demo
  name: nginx-pv-demo
spec:
  replicas: 2
  selector:
    matchLabels:
      app: nginx-pv-demo
  template:
    metadata:
      labels:
        app: nginx-pv-demo
    spec:
      containers:
      - image: nginx
        name: nginx
        volumeMounts:
        - name: html
          mountPath: /usr/share/nginx/html
      volumes:
        - name: html
          nfs:
            server: 172.31.0.2
            path: /nfs/data/nginx-pv
When created
# View container operation
kubectl get pod -A

# View container description
kubectl describe NAME
It is found that the container creation error does not specify a directory. We delete this deployment and redeploy. Note: create the mount directory first
PV&PVC
PV: Persistent Volume, which saves the application data that needs to be persisted to the specified location (site)
PVC: Persistent Volume Claim, stating the persistent volume specification to be used (site declaration)
PVC will automatically and reasonably select the PV with appropriate size
1. Create pv pool
#nfs master
mkdir -p /nfs/data/01
mkdir -p /nfs/data/02
mkdir -p /nfs/data/03
Create PV
The file is divided into three pieces, so it will state three PVS,
apiVersion: v1
kind: PersistentVolume # Resource type, pv
metadata:
  name: pv01-10m #alias
spec:
  capacity:
    storage: 10M #Limit capacity size
  accessModes:
    - ReadWriteMany #Read / write mode: read / write, multi node
  storageClassName: nfs # class alias
  nfs:
    path: /nfs/data/01
    server: 172.31.0.2 # Current node address master
---
apiVersion: v1
kind: PersistentVolume
metadata:
  name: pv02-1gi
spec:
  capacity:
    storage: 1Gi
  accessModes:
    - ReadWriteMany
  storageClassName: nfs
  nfs:
    path: /nfs/data/02
    server: 172.31.0.2
---
apiVersion: v1
kind: PersistentVolume
metadata:
  name: pv03-3gi
spec:
  capacity:
    storage: 3Gi
  accessModes:
    - ReadWriteMany
  storageClassName: nfs
  nfs:
    path: /nfs/data/03
    server: 172.31.0.2
View creation
kubectl get persistentvolume(pv)
2. PVC creation and binding
Create pvc
kind: PersistentVolumeClaim
apiVersion: v1
metadata:
  name: nginx-pvc
spec:
  accessModes:
    - ReadWriteMany
  resources:
    requests:
      storage: 200Mi
  storageClassName: nfs
In actual use, pod is no longer bound to nfs but to pvc
Create Pod binding PVC
apiVersion: apps/v1
kind: Deployment
metadata:
  labels:
    app: nginx-deploy-pvc
  name: nginx-deploy-pvc
spec:
  replicas: 2
  selector:
    matchLabels:
      app: nginx-deploy-pvc
  template:
    metadata:
      labels:
        app: nginx-deploy-pvc
    spec:
      containers:
      - image: nginx
        name: nginx
        volumeMounts:
        - name: html
          mountPath: /usr/share/nginx/html
      volumes: # pvc is specified here
        - name: html
          persistentVolumeClaim:
            claimName: nginx-pvc
# After modifying the contents of the mounted volume, enter the container to see if the contents change together
kubectl exec -ti nginx-deploy-pvc-79fc8558c7-hmhq2 /bin/bash
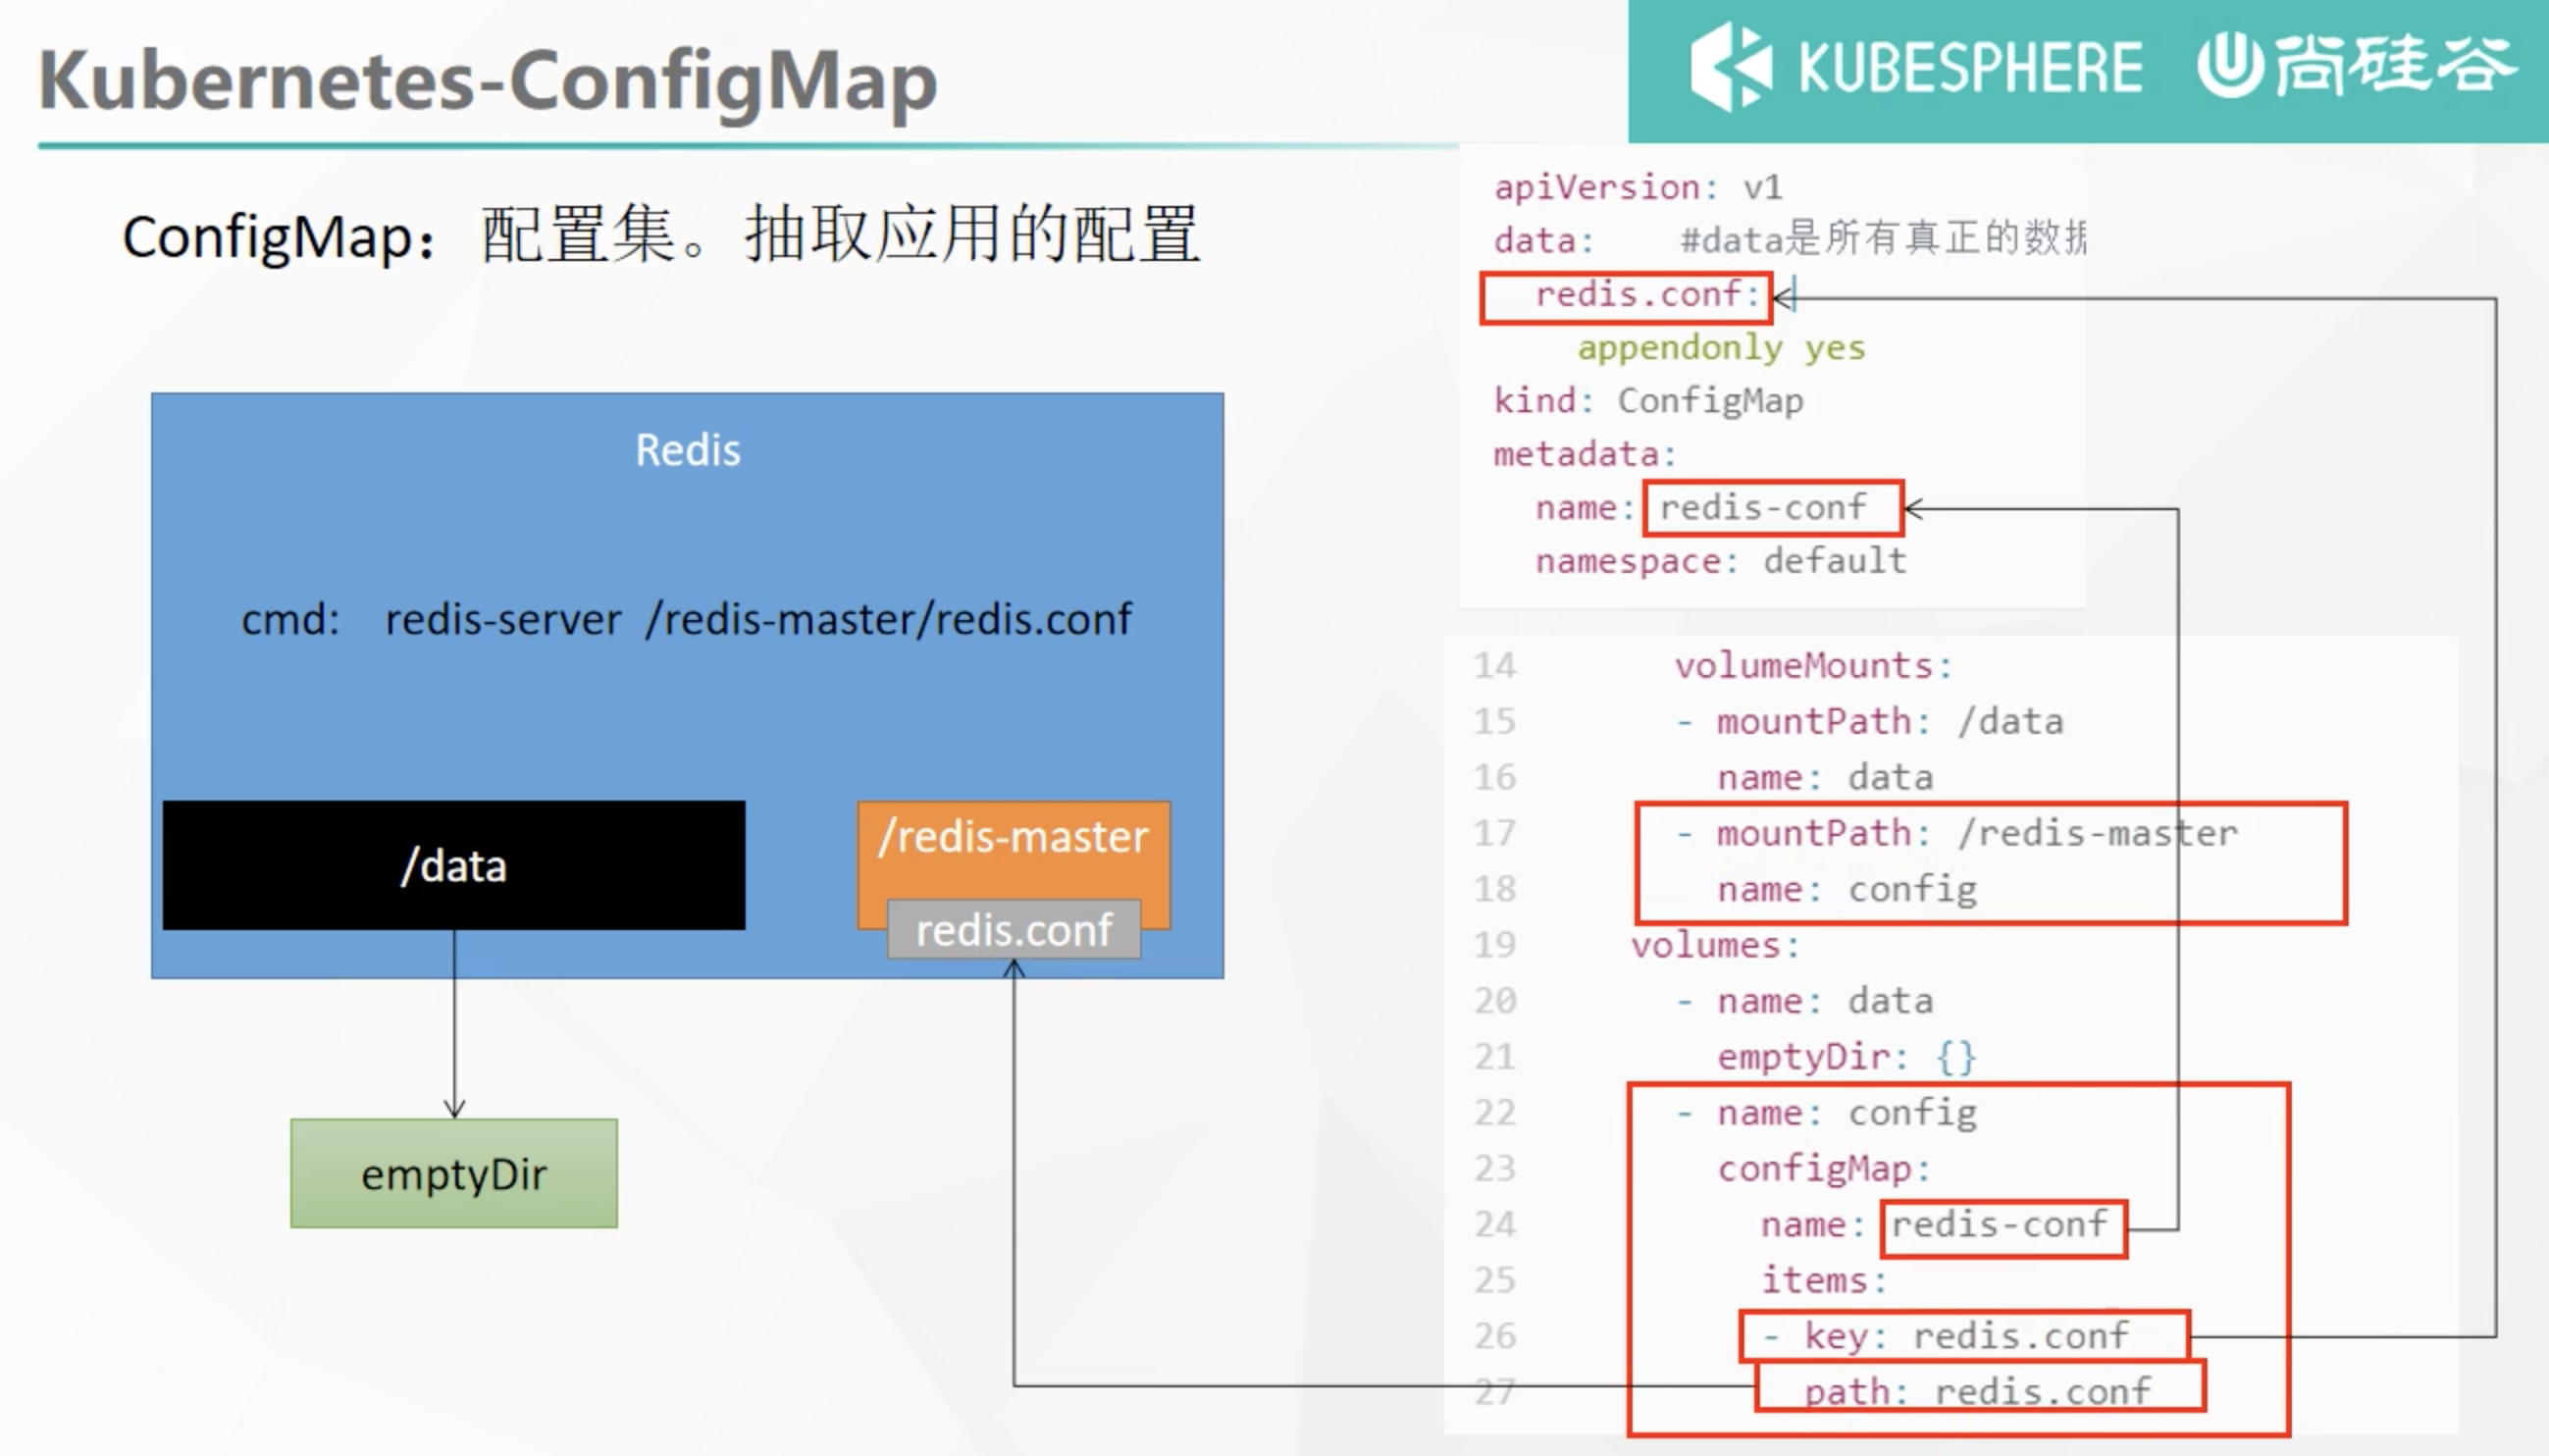
ConfigMap
Extract the application configuration and update it automatically
redis example
1. Set the pre created configuration file as the configuration set
# Create the configuration, and redis saves it to k8s etcd;
kubectl create cm redis-conf --from-file=redis.conf
kubectl get cm redis-conf -oyml
Get generated profile content
apiVersion: v1
data:    #Data is all real data. key: the default is the file name. value: the content of the configuration file
  redis.conf: |
    appendonly yes
kind: ConfigMap
metadata:
  name: redis-conf
  namespace: default
2. Create Pod
apiVersion: v1
kind: Pod
metadata:
  name: redis
spec:
  containers:
  - name: redis
    image: redis
    command:
      - redis-server
      - "/redis-master/redis.conf"  #It refers to the location inside the redis container
    ports:
    - containerPort: 6379
    volumeMounts:
    - mountPath: /data
      name: data
    - mountPath: /redis-master
      name: config
  volumes:
    - name: data
      emptyDir: {}
    - name: config
      configMap:
        name: redis-conf
        items:
        - key: redis.conf
          path: redis.conf
3. Check default configuration
kubectl exec -it redis -- redis-cli

127.0.0.1:6379> CONFIG GET appendonly
127.0.0.1:6379> CONFIG GET requirepass
4. Modify ConfigMap
kubectl edit cm redis-conf
apiVersion: v1
kind: ConfigMap
metadata:
  name: example-redis-config
data:
  redis-config: |
    appendonly yes
    requirepass 123123
Check the configuration again
Some configurations need to restart the pod to take effect
Secret
The secret object type is used to hold sensitive information, such as passwords, OAuth tokens, and SSH keys. Putting this information in secret is more secure and flexible than in the definition of Pod or container image.
kubectl create secret docker-registry leifengyang-docker \
--docker-username=leifengyang \
--docker-password=Lfy123456 \
--docker-email=534096094@qq.com

##Command format
kubectl create secret docker-registry regcred \
  --docker-server=<Your mirror warehouse server> \
  --docker-username=<Your username> \
  --docker-password=<Your password> \
  --docker-email=<Your email address>
apiVersion: v1
kind: Pod
metadata:
  name: private-nginx
spec:
  containers:
  - name: private-nginx
    image: leifengyang/guignginx:v1.0
  imagePullSecrets: # Specify the stored secret
  - name: leifengyang-docker