01 Overview
Helm is a package management tool for kubernetes. It can install, manage and uninstall kubernetes applications conveniently and quickly. It is similar to the function of yum or apt-get software in Linux operating system. Its main design purposes are:
Create a new chart package
Packaging and compressing charts package files
Integrate with the chart repository to obtain charts files
Install and uninstall charts to kubernetes cluster
Manage charts applications installed through helm
02. Concept introduction
chart: A Helm package that contains the image, dependency, and resource definitions needed to run an application, as well as service definitions in the Kubernetes cluster.
Release: An instance of Chart running on the Kubernetes cluster. On the same cluster, a Chart can be installed many times, and each installation creates a new release.
Repository: A repository for publishing and storing Charts. Helm clients access Chart's index files and compressed packages in the repository through HTTP protocol.
03. Components
helm: The client program provided to the user can communicate with the server-tiller in the form of command line.
tiller: Server-side software that interacts with the helm client and with the kubernetes api server component.
The structure is as follows:
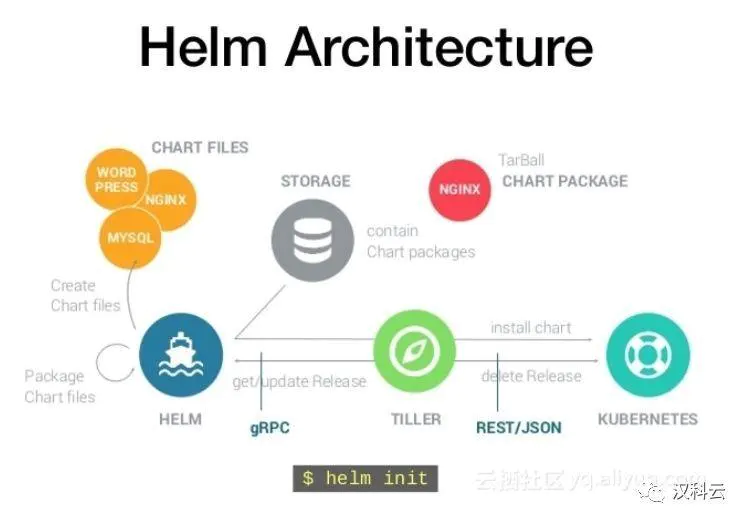
Pictures from Yunqi Community
04. Installation and deployment
1. Installation and deployment of Helm
Version Download, Version List github.com/helm/helm/r...
Decompression, tar-zxvf helm-v2.0.0-linux-amd64.tgz
Put the decompressed binary file in the executable directory MV linux-amd64/helm/usr/local/bin/helm, and then execute helm--help to view the help document
2. Installation and deployment of tiller
The console executes the > helm init command, which downloads the charts package from the charts repository and deploys it to the kubernetes cluster according to its configuration.
The default charts repository is https://kubernetes-charts.storage.googleapis.com/index.yaml
The default tiller image is gcr.io/kubernetes-helm/tiller:v2.13.1
Due to the lack of direct access to the wall in China, we need to handle alternative warehouses and mirror versions by ourselves, and install and deploy the helm server through the following commands:
> helm init --tiller-image registry.cn-hangzhou.aliyuncs.com/google_containers/tiller:v2.13.1--stable-repo-url https://kubernetes.oss-cn-hangzhou.aliyuncs.com/charts

Creating /root/.helm/repository/repositories.yaml
Adding stable repowithURL: https://kubernetes.oss-cn-hangzhou.aliyuncs.com/charts
Adding local repowithURL: http://127.0.0.1:8879/charts
$HELM_HOME has been configured at /root/.helm.

Tiller (the Helm server-side component) has been installed into your Kubernetes Cluster.

Please note: bydefault, Tiller is deployedwithan insecure'allow unauthenticated users'policy.
To preventthis, run`helm init`withthe --tiller-tls-verify flag.
For more information on securing your installation see: https://docs.helm.sh/using_helm/#securing-your-helm-installation
Happy Helming!
Wait a moment and then execute the following command. You can see the following output to show that the installation was successful:
>helmversion
Client: &version.Version{SemVer:"v2.13.1", GitCommit:"618447cbf203d147601b4b9bd7f8c37a5d39fbb4", GitTreeState:"clean"}
Server: &version.Version{SemVer:"v2.13.1", GitCommit:"618447cbf203d147601b4b9bd7f8c37a5d39fbb4", GitTreeState:"clean"}
Common commands can be seen by executing helm --help, as follows:
search in helm Warehouse
fetch downloads chart packages from the warehouse to local locations
List the release list of deployments in the k8s cluster
status displays release details
Install install charts
inspect describes charts information
delete deletes deployed release s
create a charts
Packaging compresses a charts
repo displays, adds, and removes charts repositories
05. Access authorization
In the above step, we deployed the resources required by tiller to the kubernetes cluster, but because Deployment tiller-deploy did not define authorized ServiceAccount, access to apiserver was refused, and the following command was executed to authorize tiller-deploy:
> kubectl create serviceaccount --namespace kube-system tiller
> kubectl create clusterrolebinding tiller-cluster-rule --clusterrole=cluster-admin --serviceaccount=kube-system:tiller
> kubectl patch deploy --namespace kube-system tiller-deploy -p '{"spec":{"template":{"spec":{"serviceAccount":"tiller"}}}}'
06. Deploy WordPress through helm
Enter the following command to create a WordPress blog site through helm
> helm install --name wordpress-test --set"persistence.enabled=false,mariadb.persistence.enabled=false"stable/wordpress
Get login information by following commands:
> kubectlgetsvc -o wide
> kubectlgetsecret --namespacedefaultwordpress-test-wordpress -o jsonpath="{.data.wordpress-password}"| base64 --decode
Open the page in the browser and enter the username and password to see the built WordPress blog site.
07 Upgrade
When a new chart package is released, or when you want to change the configuration of an existing release, you can use the helm upgrade command, for example:
> helm upgrade wordpress-test \
> --set"persistence.enabled=true,mariadb.persistence.enabled=true"\
> stable/wordpress
Reference documents: