3.3.1 Delayed initialization beans
Delayed initialization, also known as lazy initialization, refers to not initializing beans in advance, but creating and initializing beans only when they are actually in use.
Configuration is very simple, just specify "lazy-init" attribute value "true" on the < Bean > tag to delay initialization of beans.
Spring containers initialize "singleton" scoped beans in advance when creating containers. Singleton is a singleton, meaning that there is only one instance per Bean in the entire container, which will be described in detail later. Spring container pre-initialization beans usually help us find configuration errors ahead of time, so if nothing happens, it is recommended to open them unless a Bean may need to load a large amount of resources, and it is likely that it will not be used throughout the application life cycle, and it can be set to delayed initialization.
Delayed initialization beans are usually initialized the first time they are used; or when injected as dependent objects by non-delayed initialization beans, they are initialized with the initialization of the beans, because delayed initialization beans are used at this time.
Container Management Initialization Bean eliminates programming for delayed initialization and is completely controlled by the container. It only needs to be configured on the Bean definition that requires delayed initialization, which is simpler than programming and has no intrusive code.
The specific configuration is as follows:
- <bean id="helloApi"
- class="cn.javass.spring.chapter2.helloworld.HelloImpl"
- lazy-init="true"/>
3.3.2 Use dependent-on
Dependency-on refers to the order in which beans are initialized and destroyed. Bean s specified with dependent-on attribute need to be initialized before the current beans are initialized. Since only "singleton" beans can be destroyed by Spring management, beans specified with dependent-on attribute should be destroyed after the specified beans when all the beans are "singleton".
- Note: The order in which beans are destroyed is stated in the document: Dependent beans that define a dependent-on relationship with a given bean are destroyed first, prior to the given bean itself being destroyed.
- Meaning: Dependent Beans defined in dependent-on attributes are destroyed before Beans of that attribute are defined.
- But it's actually wrong. Bean s that define dependent-on attributes are destroyed first, and then the beans specified by dependent-on are destroyed. You can try it out.
The configuration is as follows:
- <bean id="helloApi" class="cn.javass.spring.chapter2.helloworld.HelloImpl"/>
- <bean id="decorator"
- class="cn.javass.spring.chapter3.bean.HelloApiDecorator"
- depends-on="helloApi">
- <property name="helloApi"><ref bean="helloApi"/></property>
- </bean>
The "decorator" specifies that the "dependent-on" attribute is "hello Api", so the "hello Api" should be initialized before the "decorator" beans are initialized, and the "decorator" should be destroyed before the "hello Api" is destroyed. You should pay attention to the order of destruction, which is not consistent with the document.
The depend-on attribute can specify multiple beans, and if you specify multiple beans, you can use ";",""and space segmentation.
What are the benefits of depend-on? Give a clear order of initialization and destruction, for example, to initialize the "decorator" to ensure that the "hello Api" Bean's resources are ready, otherwise the "decorator" will not see the prepared resources; while in the destruction of the "decorator" Bean, the reference to the "hello Api" resources must be released before the "hello Api" resources can be destroyed, otherwise the "hello Api" may be destroyed. ” Sometimes "decorator" still keeps resource access, resulting in resources can not be released or release errors.
Let's take an example. In normal development, we may need to access the file system, and the opening and closing of files must be paired, so that other programs can't access the file. Let's look at the configuration.
1) Preparing test classes:
ResourceBean opens the specified file from the configuration file location, then defines the initialization method init, and then obtains the file stream; finally defines the destroy method to call the method to close the file stream when the application closes.
ResourceBean is injected into DependentBean, and file stream writing content is obtained from ResourceBean; initialization method init is defined to define some initialization operations and output file header information to the file; and finally destruction method is defined to output file tail information when the application is closed.
The code is as follows:
- package cn.javass.spring.chapter3.bean;
- import java.io.File;
- import java.io.FileNotFoundException;
- import java.io.FileOutputStream;
- import java.io.IOException;
- public class ResourceBean {
- private FileOutputStream fos;
- private File file;
- //Initialization method
- public void init() {
- System.out.println("ResourceBean:========Initialization");
- //Loading resources, here is just a demonstration
- System.out.println("ResourceBean:========Load resources and perform some pre-operations");
- try {
- this.fos = new FileOutputStream(file);
- } catch (FileNotFoundException e) {
- e.printStackTrace();
- }
- }
- //Method of Destroying Resources
- public void destroy() {
- System.out.println("ResourceBean:========Destruction");
- //Release resources
- System.out.println("ResourceBean:========Release resources and perform some cleanup operations");
- try {
- fos.close();
- } catch (IOException e) {
- e.printStackTrace();
- }
- }
- public FileOutputStream getFos() {
- return fos;
- }
- public void setFile(File file) {
- this.file = file;
- }
- }
- package cn.javass.spring.chapter3.bean;
- import java.io.IOException;
- public class DependentBean {
- ResourceBean resourceBean;
- public void write(String ss) throws IOException {
- System.out.println("DependentBean:=======Writing resources");
- resourceBean.getFos().write(ss.getBytes());
- }
- //Initialization method
- public void init() throws IOException {
- System.out.println("DependentBean:=======Initialization");
- resourceBean.getFos().write("DependentBean:=======Initialization=====".getBytes());
- }
- //destroy-method
- public void destroy() throws IOException {
- System.out.println("DependentBean:=======Destruction");
- //Write the destruction content in the document before destruction.
- resourceBean.getFos().write("DependentBean:=======Destruction=====".getBytes());
- }
- public void setResourceBean(ResourceBean resourceBean) {
- this.resourceBean = resourceBean;
- }
- }
2) Classes are defined. Let's define beans. The configuration file is as follows:
- <bean id="resourceBean"
- class="cn.javass.spring.chapter3.bean.ResourceBean"
- init-method="init" destroy-method="destroy">
- <property name="file" value="D:/test.txt"/>
- </bean>
- <bean id="dependentBean"
- class="cn.javass.spring.chapter3.bean.DependentBean"
- init-method="init" destroy-method="destroy" depends-on="resourceBean">
- <property name="resourceBean" ref="resourceBean"/>
- </bean>
Property name= "file" value= "D:/test.txt"/> configuration: Spring container can automatically convert strings to java.io.File.
init-method="init": Specifies the initialization method, which is executed after the constructor injection and setter injection are completed.
destroy-method="destroy": Destroy the specified method, only the "singleton" scope can destroy, "prototype" scope must not, other scopes may not; I will introduce later.
In this configuration, the dependentBean initialization is initialized before the resourceBean, and the resourceBean destruction is performed after the dependentBean is destroyed.
3) Configuration is complete, test it:
- package cn.javass.spring.chapter3;
- import java.io.IOException;
- import org.junit.Test;
- import org.springframework.context.support.ClassPathXmlApplicationContext;
- import cn.javass.spring.chapter3.bean.DependentBean;
- public class MoreDependencyInjectTest {
- @Test
- public void testDependOn() throws IOException {
- ClassPathXmlApplicationContext context =
- new ClassPathXmlApplicationContext("chapter3/depends-on.xml");
- //One point is to register the destruction callback, otherwise the destruction method we defined will not be implemented.
- context.registerShutdownHook();
- DependentBean dependentBean =
- context.getBean("dependentBean", DependentBean.class);
- dependentBean.write("aaa");
- }
- }
Tests are exactly the same as other tests, but here we must register the destroy method callback, otherwise the destroy method will not be executed.
If the configuration is fine, the following output will be generated:
- ResourceBean:================ initialization
- ResourceBean:================== Load resources and perform some pre-operations.
- DependentBean:==================== initialization
- DependentBean:====================== Write Resources
- DependentBean:==================== Destroyed
- ResourceBean:================= Destroyed
- ResourceBean:================= Release resources and perform some cleanup operations.
3.3.3 Automatic Assembly
Automated assembly refers to the automatic injection of dependent objects by Spring without manual involvement.
Spring 3.0 currently supports "no", "byName", "byType", "constructor". By default, "no" means that automatic assembly is not supported. Spring 3.0 does not recommend the use of previous versions of "autodetect" automatic assembly, recommending the use of Java 5 + supported (@Autowired) annotations instead; if you want to support "autodetect" automatic assembly. Change the schema to "spring-beans-2.5.xsd" or remove it.
The advantage of automatic assembly is to reduce constructor injection and setter injection configurations and reduce the length of configuration files. Automatic assembly changes the automatic assembly mode by configuring the "autowire" attribute of the < bean > tag. Next let's look closely at what configuration means.
Default: Default automatic assembly is used. Default automatic assembly needs to be specified by default-autowire attribute in <beans> tag. It supports four kinds of automatic assembly: no, byName, byType and constructor. If you need to override default automatic assembly, please continue to look down.
Second, no: This means that automatic assembly is not supported and dependencies must be specified explicitly.
3. byName: Define the attribute autowire="byName" by setting the Bean, which means automatic assembly by name and can only be used for setter injection. For example, if we have the method "setHello Api", then the Spring container in "byName" mode will look for a Bean named Hello Api and inject it. If the specified Bean is not found, nothing will be injected.
For example, the following Bean Definition Configuration:
- <bean id="helloApi" class="cn.javass.spring.chapter2.helloworld.HelloImpl"/>
- <bean id="bean" class="cn.javass.spring.chapter3.bean.HelloApiDecorator"
- autowire="byName"/>
The test code is as follows:
- package cn.javass.spring.chapter3;
- import java.io.IOException;
- import org.junit.Test;
- import org.springframework.context.support.ClassPathXmlApplicationContext;
- import cn.javass.spring.chapter2.helloworld.HelloApi;
- public class AutowireBeanTest {
- @Test
- public void testAutowireByName() throws IOException {
- ClassPathXmlApplicationContext context =
- new ClassPathXmlApplicationContext("chapter3/autowire-byName.xml");
- HelloApi helloApi = context.getBean("bean", HelloApi.class);
- helloApi.sayHello();
- }
- }
Don't configure <property> anymore. If a bean has many setter injections, can you reduce <property> configuration by "byName". Note here that when injecting by name, the current bean itself will be excluded: for example, if the "hello" bean class defines the "setHello" method, then Hello cannot be injected into "setHello".
Fourth, "byType": Define the property autowire="byType" by setting the bean, which means injecting according to the type for setter injection. For example, if the automatic assembly method is specified as "byType", and the "setHelloApi" method needs to inject HelloApi type data, the Spring container will look for HelloApi type data, and if one is found, inject the Bean, if not found. Nothing is injected. If multiple beans are found, they are preferred to inject beans with the < bean > label "primary" attribute true, otherwise an exception is thrown to indicate that multiple beans have been found but do not know which one to use. Let's use examples to illustrate these situations.
1) Only one bean is found according to type. Note here that when injecting according to type, the current bean itself will be excluded. That is to say, Hello Api and beans are all implementations of Hello Api interface in the following configuration, while "beans" are excluded when injecting Hello Api type data through type. The configuration is as follows (for specific testing, refer to AutowireBeanTest.testA). UtowireByType1 method:
- <bean class="cn.javass.spring.chapter2.helloworld.HelloImpl"/>
- <bean id="bean" class="cn.javass.spring.chapter3.bean.HelloApiDecorator"
- autowire="byType"/>
2) When multiple beans are found according to the type, all matching candidates will be injected into the collection type (such as List, Set), while in other types, this may require using the "autowire-candidate" attribute as false to make the specified beans abandon as candidates for automatic assembly, or using the "primary" attribute as true to specify a Bean as the preferred Bean:
2.1) Remove automatically assembled candidates after specifying beans by setting the "autowire-candidate" attribute defined by beans to false:
- <bean class="cn.javass.spring.chapter2.helloworld.HelloImpl"/>
- <!-- Removing candidates from automatic assembly -->
- <bean class="cn.javass.spring.chapter2.helloworld.HelloImpl"
- autowire-candidate="false"/>
- <bean id="bean1" class="cn.javass.spring.chapter3.bean.HelloApiDecorator"
- autowire="byType"/>
2.2) Set the "primary" attribute defined by the Bean to false to select the preferred Bean for the specified automatic assembly time:
- <bean class="cn.javass.spring.chapter2.helloworld.HelloImpl"/>
- <!-- Preferred candidates for automatic assembly Bean-->
- <bean class="cn.javass.spring.chapter2.helloworld.HelloImpl" primary="true"/>
- <bean id="bean" class="cn.javass.spring.chapter3.bean.HelloApiDecorator"
- autowire="byType"/>
For specific tests, refer to the testAutowireByType *** method of the AutowireBeanTest class.
5. "Constructor": By setting the Bean definition attribute autowire="constructor", the function is the same as "byType", injecting constructor parameters according to type, just for the injecting method of constructor. Look at the example directly.
- <bean class="cn.javass.spring.chapter2.helloworld.HelloImpl"/>
- <!-- Preferred candidates for automatic assembly Bean-->
- <bean class="cn.javass.spring.chapter2.helloworld.HelloImpl" primary="true"/>
- <bean id="bean"
- class="cn.javass.spring.chapter3.bean.HelloApiDecorator"
- autowire="constructor"/>
The test code is as follows:
- @Test
- public void testAutowireByConstructor() throws IOException {
- ClassPathXmlApplicationContext context =
- new ClassPathXmlApplicationContext("chapter3/autowire-byConstructor.xml");
- HelloApi helloApi = context.getBean("bean", HelloApi.class);
- helloApi.sayHello();
- }
6. autodetect: It is not recommended to use "constructor" or "byType" automatic assembly mode for automatic detection. If the Bean has an empty constructor, the "byType" auto-assembly mode will be used, otherwise the "constructor" auto-assembly mode will be used. Replace the 3.0 XSD with the 2.5 xsd, or you will get an error.
- <?xml version="1.0" encoding="UTF-8"?>
- <beans xmlns="http://www.springframework.org/schema/beans"
- xmlns:xsi="http://www.w3.org/2001/XMLSchema-instance"
- xmlns:context="http://www.springframework.org/schema/context"
- xsi:schemaLocation="
- http://www.springframework.org/schema/beans
- http://www.springframework.org/schema/beans/spring-beans-2.5.xsd
- http://www.springframework.org/schema/context
- http://www.springframework.org/schema/context/spring-context-2.5.xsd">
- <bean class="cn.javass.spring.chapter2.helloworld.HelloImpl"/>
- <!-- Preferred candidates for automatic assembly Bean-->
- <bean class="cn.javass.spring.chapter2.helloworld.HelloImpl" primary="true"/>
- <bean id="bean"
- class="cn.javass.spring.chapter3.bean.HelloApiDecorator"
- autowire="autodetect"/>
- </beans>
Global automatic assembly can be specified by default-autowire property in the <beans> tag, that is, if default-autowire="byName", all beans will be automatically assembled by name.
Not all types can be assembled automatically:
- Data types that cannot be automatically assembled: Object, basic data types (Date, CharSequence, Number, URI, URL, Class, int), etc.
- Through the matching pattern specified by default-autowire-candidates attribute of <beans> tag, mismatched beans can not be used as candidates for automatic assembly, such as specifying * Service, * Dao. Bean s matching these patterns will only be used as candidates, but those not matched will not be used as candidates.
- By setting the autowire-candidate attribute of the < Bean > tag to false, the Bean will not be a candidate for dependency injection.
Array, collection, dictionary type auto-assembly according to type is different from ordinary type auto-assembly:
- Array Type, Collection (Set, Collection, List) Interface Type: All matching candidates will be obtained according to generics and injected into the array or collection. For example, "List < HelloApi > list" will select all HelloApi type beans and inject them into the list. For the specific type of the collection, only one candidate will be selected. "For example, ArrayList < HelloApi > list" will select one type as ArrayList < HelloApi > list. Bean injection of rayList instead of selecting all Hello Api type beans for injection;
- Dictionary (Map) Interface Type: Similarly, according to generic information injection, the key must be the Bean name of String type, and the value will be acquired according to generic information. For example, "Map < String, Hello Api > map", all Hello Api type beans will be selected and injected into map. For specific dictionary types such as "HashMap < String, Hello Api > map", only HashMap type beans will be selected, not HashMap type beans. All Hello Api type beans are injected.
We have finished the introduction of automatic assembly. What benefits can automatic assembly bring us? First, automatic assembly does reduce the amount of configuration files; secondly, "byType" automatic assembly can update automatically when the corresponding Bean changes the field type, that is, modifying the Bean class does not need to modify the configuration, it is really simple.
Automatic assembly also has its drawbacks. The most important drawback is that there is no configuration. It is very troublesome to find injection errors, and for example, the basic type can not complete automatic assembly, so there may often be some inexplicable errors. Here I recommend that you do not use this method, preferably specify a specific injection method, or use the latest Java 5 + annotations. Injection mode. So when we use automatic assembly, we should consider the complexity of the project we are responsible for to measure whether we choose the automatic assembly method.
Can automatic assembly injection work with configuration injection? Of course, you just need to remember that the data injected by configuration will cover the data injected by automatic assembly.
Did you notice that if you don't find the right beans to do anything with automatic assembly, there will always be some null pointer exceptions in the program, which can only be found during the running of the program. Is there any way to detect these errors in advance? Next let me look at dependency checks.
3.3.4 Dependence checks
The automatic assembly described in the previous section is likely to occur without matching beans for automatic assembly. If this happens, only when the null pointer exception occurs during the running of the program can errors be found. If it can be found in advance, that is the role of dependency checking.
Dependency checking: Attributes defined by beans are injected into the data, either automatically assembled or configurationally injected. If there is no injected data, errors will be reported, so that injection errors can be detected in advance, and only the attributes with setter method will be checked.
Spring 3 + also does not recommend configuration dependency checking. Java 5+@Required annotation is recommended. When testing, please reduce the XML schema to version 2.5, just like xsd in autodetect configuration in automatic assembly.
- <?xml version="1.0" encoding="UTF-8"?>
- <beans xmlns="http://www.springframework.org/schema/beans"
- xmlns:xsi="http://www.w3.org/2001/XMLSchema-instance"
- xsi:schemaLocation="
- http://www.springframework.org/schema/beans
- http://www.springframework.org/schema/beans/spring-beans-2.5.xsd
- </beans>
There are four ways of dependency checking: none, simple, object and all. Let's go into detail next.
1. none: default means no checking;
Objects: Check dependency-check="objects" in addition to basic types. Here we add a String type attribute "message" to Hello ApiDecorator to test that if the attribute of a simple data type is null, it will not report an error.
- <bean id="helloApi" class="cn.javass.spring.chapter2.helloworld.HelloImpl"/>
- <!-- Note that we did not inject helloApi,So the test will report errors. -->
- <bean id="bean"
- class="cn.javass.spring.chapter3.bean.HelloApiDecorator"
- dependency-check="objects">
- <property name="message" value="Haha"/>
- </bean>
Note that since we do not have the dependency "hello Api" needed to inject bean s, we should throw an exception UnsatisfiedDependency Exception to indicate that no satisfied dependency has been found:
- package cn.javass.spring.chapter3;
- import java.io.IOException;
- import org.junit.Test;
- import org.springframework.beans.factory.UnsatisfiedDependencyException;
- import org.springframework.context.support.ClassPathXmlApplicationContext;
- public class DependencyCheckTest {
- @Test(expected = UnsatisfiedDependencyException.class)
- public void testDependencyCheckByObject() throws IOException {
- //Will throw an exception
- new ClassPathXmlApplicationContext("chapter3/dependency-check-object.xml");
- }
- }
3. Simple: Dependency checking for basic types, including array types, other dependencies do not report errors; dependency-check="simple" is configured in such a way that no message attribute is injected into the following configuration, so an exception will be thrown:
- <bean id="helloApi" class="cn.javass.spring.chapter2.helloworld.HelloImpl"/>
- <!-- Note that we did not inject message Property, so the test will report errors -->
- <bean id="bean"
- class="cn.javass.spring.chapter3.bean.HelloApiDecorator"
- dependency-check="simple">
- <property name="helloApi" ref="helloApi"/>
- </bean>
Fourth, all: Dependency checking for all types is done in the following configuration: dependency-check="all". If one of the two attributes is not configured in the following configuration, the error will be reported.
- <bean id="helloApi" class="cn.javass.spring.chapter2.helloworld.HelloImpl"/>
- <bean id="bean"
- class="cn.javass.spring.chapter3.bean.HelloApiDecorator"
- dependency-check="all">
- <property name="helloApi" ref="helloApi"/>
- <property name="message" value="Haha"/>
- </bean>
Dependency checking can also specify the global dependency checking configuration by default-dependency-check attribute in the <beans> tag.
3.3.5 Method injection
The so-called method injection is actually to override or intercept specified methods through configuration, usually through proxy mode. Spring provides two methods of injection: lookup method injection and method replacement injection.
Because Spring is implemented by CGLIB dynamic proxy, that is, by dynamically modifying the bytecode of the class. The essence of Spring is to generate a subclass of the class that needs method injection.
Before testing, we need to make sure that "com. spring source. cn. sf. cglib - 2.2.0. jar" is put into lib and added to Libararies in "Java Build Path". Otherwise, the exception contains "nested exception is java.lang.NoClassDefFoundError: cn/sf/cglib/proxy/CallbackFilter".
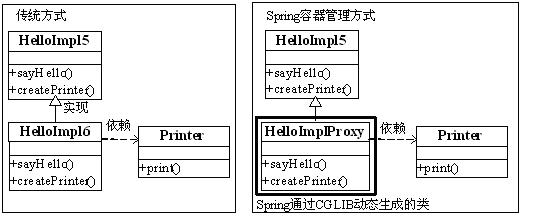
The only difference between traditional and Spring container management is that we do not need to manually generate subclasses, but through configuration; where the return value of the createPrinter() method is replaced by the lookup method injection; and if we want to completely replace the sayHello() method body, we use the method replacement injection. Next let's look at the implementation.
Finding method injection: also known as Lookup method injection, is used to inject method to return results, that is to say, the method can be replaced by configuration to return results. Use < lookup-method name= "method name" bean="bean name"/> configuration; where the name attribute specifies the method name and the bean attribute specifies the bean to be returned by the method.
Method Definition Format: Access level must be public or protected, ensure that it can be overloaded by subclasses, can be abstract methods, must have a return value, must be parametric methods, the class of methods to find and overloaded methods must be non-final:
<public|protected> [abstract] <return-type> theMethodName(no-arguments);
Because "singleton" Bean has only one instance in the container, and "prototype" Bean returns a new instance every time the container is fetched, so if "singleton" Bean uses the "prototype" Bean case, then "prototype" Bean is a field attribute of "singleton" Bean, so the "prototype" Bean acquired and the "singl" Bean it is in. The Eton Bean has the same life cycle, so it's not the result we expect. So the lookup method injection is used to solve this problem.
1) Define the class we need first. The Printer class is a stateful class. The counter field records the number of visits:
- package cn.javass.spring.chapter3.bean;
- public class Printer {
- private int counter = 0;
- public void print(String type) {
- System.out.println(type + " printer: " + counter++);
- }
- }
HelloImpl5 is used to print welcome messages, including setter injection and method injection. It is particularly important to note that this class is abstract, which fully illustrates the need for container subclassing. An Abstract method, createPrototype Printer, is also defined to create "prototype" beans, and the createSingletonPrinter method is used to create "singleton" beans. Notice here that the method will be intercepted by Spring and will not execute method body code:
- package cn.javass.spring.chapter3;
- import cn.javass.spring.chapter2.helloworld.HelloApi;
- import cn.javass.spring.chapter3.bean.Printer;
- public abstract class HelloImpl5 implements HelloApi {
- private Printer printer;
- public void sayHello() {
- printer.print("setter");
- createPrototypePrinter().print("prototype");
- }
- public abstract Printer createPrototypePrinter();
- public Printer createSingletonPrinter() {
- System.out.println("This method will not be executed if the output is wrong");
- return new Printer();
- }
- public void setPrinter(Printer printer) {
- this.printer = printer;
- }
- }
2) The configuration file is in (resources/chapter3/lookupMethodInject.xml), where "prototype Printer" is "prototype" Printer, "singleton Printer" is "singleton" Printer, "hello Api1" is "singleton" Bean, and "hello Api2" injects "prototype" Bean:
- <bean id="prototypePrinter"
- class="cn.javass.spring.chapter3.bean.Printer" scope="prototype"/>
- <bean id="singletonPrinter"
- class="cn.javass.spring.chapter3.bean.Printer" scope="singleton"/>
- <bean id="helloApi1" class="cn.javass.spring.chapter3.HelloImpl5" scope="singleton">
- <property name="printer" ref="prototypePrinter"/>
- <lookup-method name="createPrototypePrinter" bean="prototypePrinter"/>
- <lookup-method name="createSingletonPrinter" bean="singletonPrinter"/>
- </bean>
- <bean id="helloApi2" class="cn.javass.spring.chapter3.HelloImpl5" scope="prototype">
- <property name="printer" ref="prototypePrinter"/>
- <lookup-method name="createPrototypePrinter" bean="prototypePrinter"/>
- <lookup-method name="createSingletonPrinter" bean="singletonPrinter"/>
- </bean>
3) The test code is as follows:
- package cn.javass.spring.chapter3;
- import org.junit.Test;
- import org.springframework.context.support.ClassPathXmlApplicationContext;
- import cn.javass.spring.chapter2.helloworld.HelloApi;
- public class MethodInjectTest {
- @Test
- public void testLookup() {
- ClassPathXmlApplicationContext context =
- new ClassPathXmlApplicationContext("chapter3/lookupMethodInject.xml");
- System.out.println("=======singleton sayHello======");
- HelloApi helloApi1 = context.getBean("helloApi1", HelloApi.class);
- helloApi1.sayHello();
- helloApi1 = context.getBean("helloApi1", HelloApi.class);
- helloApi1.sayHello();
- System.out.println("=======prototype sayHello======");
- HelloApi helloApi2 = context.getBean("helloApi2", HelloApi.class);
- helloApi2.sayHello();
- helloApi2 = context.getBean("helloApi2", HelloApi.class);
- helloApi2.sayHello();
- }}
In the Hello Api1 test, the output results are as follows:
- =======singleton sayHello======
- setter printer: 0
- prototype printer: 0
- singleton printer: 0
- setter printer: 1
- prototype printer: 0
- singleton printer: 1
First, "hello Api1" is "singleton", and "printer" injected through setter is "prototype Printer", so it should output "setter printer:0" and "setter printer:1"; while "createPrototype Printer" method injects "prototype Printer", so it should output "prototype printer:0" twice; and "createSingleton Printer" injection. "Singleton Printer" should be output printer:0"and"singleton printer:1".
In the "hello Api2" test, the output is as follows:
- =======prototype sayHello======
- setter printer: 0
- prototype printer: 0
- singleton printer: 2
- setter printer: 0
- prototype printer: 0
- singleton printer: 3
First, "hello Api2" is "prototype", and "printer" injected through setter is "prototype Printer", so it should output "setter printer:0" twice; and "createPrototype Printer" method injected "prototype Printer", so it should output "prototype printer:0" twice; and "createSingleton Printer" injected "singleton Printer". Er", so you should output"singleton printer:2"and"singleton" printer:3".
Did you notice that the "createSingletonPrinter" method should output "This method will not be executed, if the output is wrong", but it is actually not output, which indicates that Spring intercepts the method and replaces the returned result with the injected Bean?
Method injection is mainly used to deal with "singleton" scoped beans that need other scoped beans. Spring lookup method can be used to inject beans that need other scoped beans without modifying any code.
Substitution method injection: also known as "Method Replacer" injection, and unlike the lookup injection method, it is mainly used to replace the method body. By first defining a MethodReplacer interface, and then configuring it as follows:
- <replaced-method name="Method name" replacer="MethodReplacer Realization">
- <arg-type>Parameter type</arg-type>
- </replaced-method>"
(1) First, the method Replacer implementation is defined to completely replace the method body and return value of the replaced method, in which the reimplement method redefines the method function, the parameter obj is the object of the replaced method, the method is the replaced method, and the args is the method parameter; the most important thing to note is that the method. invoke (obj, String []{"hehe"}) reflection form can no longer be used; Call the original method, which generates a circular call; if the return value type is Void, return null in the implementation:
- package cn.javass.spring.chapter3.bean;
- import java.lang.reflect.Method;
- import org.springframework.beans.factory.support.MethodReplacer;
- public class PrinterReplacer implements MethodReplacer {
- @Override
- public Object reimplement(Object obj, Method method, Object[] args) throws Throwable {
- System.out.println("Print Replacer");
- //Note that no more reflection calls can be made here, otherwise circular calls will occur and memory overflow will be known.
- //method.invoke(obj, new String[]{"hehe"});
- return null;
- }
- }
(2) Configuration is as follows: First, define the Method Replacer implementation, use the < replaced-method > tag to specify the method to be replaced, attribute name to specify the name of the method to be replaced, replacer to specify the re-implementer of the method, and sub-tag < arg-type > to specify the type of the original method parameters, otherwise the original method cannot be found:
- <bean id="replacer" class="cn.javass.spring.chapter3.bean.PrinterReplacer"/>
- <bean id="printer" class="cn.javass.spring.chapter3.bean.Printer">
- <replaced-method name="print" replacer="replacer">
- <arg-type>java.lang.String</arg-type>
- </replaced-method>
- </bean>
3) The test code will output "Print Replacer", indicating that the method body has indeed been replaced:
- @Test
- public void testMethodReplacer() {
- ClassPathXmlApplicationContext context = new ClassPathXmlApplicationContext("chapter3/methodReplacerInject.xml");
- Printer printer = context.getBean("printer", Printer.class);
- printer.print("I will be replaced.");
- }
The original content should be changed to the original content. Please indicate the origin.[ http://sishuok.com/forum/blogPost/list/0/2453.html]