1. introduction
In " Chapter IV Four Application Components of Android > In this paper, the members, attributes and life cycle of the four components are briefly introduced. This is mainly about the broadcasting mechanism in Android. Activity is the most frequently used of the four components. The use of the other three components is relatively low, but since they are called four components, it shows that they are indispensable.
Do you remember the loudspeaker when you were a child at school? Sometimes the listening test is also used. The school's broadcasting room transmits the radio to the small speakers in each classroom. Every time it opens, it's really fatal. Similar to the working mechanism of the speaker, it will be widely used in the field of computer nowadays. In order to facilitate system-level message notification, Android also introduced a broadcast message mechanism. Of course, Android's broadcasting mechanism is more flexible than that big speaker example.
2. introduction
Why is Android's broadcasting mechanism flexible? We know that there are many applications on our mobile phones, and sometimes we receive messages from different applications, but since it's a loudspeaker, the messages sent are not acceptable? Here's a brief introduction to its flexibility. Every application in Android can register broadcasts of interest to itself, so that the program can only receive broadcasts of interest to itself. The content of these broadcasts can come from the system or from other applications.
The mobile phone we use is either a radio receiver or a radio transmitter. Android broadcasting is divided into two aspects: the broadcasting sender and the broadcasting receiver. BroadCast Receiver refers to the broadcasting receiver. The use scenarios of broadcasting in some systems: low-power window, boot-up, lock screen, etc. Common broadcasting scenarios include the following:
1. Message communication within the same component within the same app (between one or more threads)
2. Message communication (single process) between different components within the same app;
3. Message communication between different components of the same app with multiple processes;
4. Message communication between components of different app s;
5. Message communication between Android system and App under specific circumstances.
The reason why it is called broadcasting is that it only "speaks" but "does not listen", that's all. Another feature of broadcasting is that it can be received by more than one program or by no program. The biggest characteristic of broadcasting mechanism is that the sender does not care whether the receiver receives the data or not, nor how the receiver processes the data.
Android broadcasts a wide variety of events generated in the operating system. For example, an event that receives a short message will result in an event that receives a short message. Once these events are generated internally, the Android operating system broadcasts them to all broadcast receiver objects.
3.BroadCast Receiver Broadcast Receiver Receiver
3.1 Types of Broadcasting
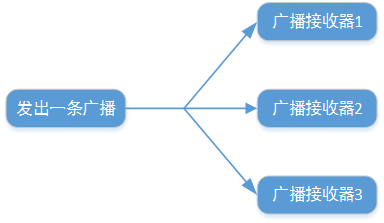
1. Standard Broadcasting
A completely step-by-step broadcast when the standard is turned off, assuming that there are many broadcast receivers, when the broadcast is sent, all receivers receive the broadcast message at the same time. There is no order between receivers. The high frequency of such broadcasting also means that it cannot be truncated. The workflow of standard broadcasting is shown in the following figure:
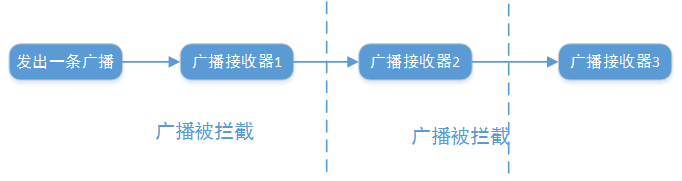
2. Orderly broadcasting
This is a synchronous broadcasting. There are different broadcasting receivers. At the same time, only one receiver can receive broadcasting. Moreover, when the receiver with higher priority does not receive broadcasting, the receiver with lower priority can not receive broadcasting. And high priority broadcasts can also truncate broadcasts. The workflow of orderly broadcasting is shown in the following figure:
3.2 Registration of Broadcasting Receivers
1. Static registration
_Static registration is to define receivers and set the action s to be received in the application of Android Manifest. xml. If the broadcast receiver is configured in the manifest configuration file, the program automatically registers the broadcast receiver after installation.
Static registration features: regardless of whether the application is active or not, it will be monitored. The program can receive broadcasts even if it is not enabled.
Steps to achieve static registration:
1. Create a class BootBroadCastReceiver that inherits the BroadcastReceiver class. Create it through Android Studio. Create a broadcast receiver through a shortcut like File - > New - > Other - > Broadcast Receiver. The Android Manifest. XML file is automatically registered. There is a < receiver > tag pair. The method in onReceiver() is simple, just one Toast.
public class BootBroadCastReceiver extends BroadcastReceiver {

    private static final String TAG = "BootBroadCastReceiver";
    @Override
    public void onReceive(Context context, Intent intent) {
        Toast.makeText(context, "start-up Broadcast", Toast.LENGTH_SHORT).show();
    }
}
2. Because we need to receive broadcast information, we need permission RECEIVE_BOOT_COMPLETED. Because Android will issue a broadcast with the value of android.intent.action.BOOT_COMPLETED when it starts, add the corresponding activity to the < receiver > tag.
<manifest xmlns:android="http://schemas.android.com/apk/res/android"
    package="com.demo.broadcastreceiverdemo">

    <uses-permission android:name="android.permission.RECEIVE_BOOT_COMPLETED"/>
     <uses-permission android:name="android.permission.ACCESS_NETWORK_STATE"/>

    <application
        android:allowBackup="true"
        android:icon="@mipmap/ic_launcher"
        android:label="@string/app_name"
        android:roundIcon="@mipmap/ic_launcher_round"
        android:supportsRtl="true"
        android:theme="@style/AppTheme">
        <activity android:name=".MainActivity">
            <intent-filter>
                <action android:name="android.intent.action.MAIN" />

                <category android:name="android.intent.category.LAUNCHER" />
            </intent-filter>
        </activity>

        <receiver
            android:name=".BootBroadCastReceiver"
            android:enabled="true"
            android:exported="true">
            <intent-filter>
                <action android:name="android.intent.action.BOOT_COMPLETED"/>
            </intent-filter>
        </receiver>
    </application>

</manifest>
3. Restart the simulator, and the program can receive the boot broadcast.
2. Dynamic registration
Dynamic registration, also known as code registration, does not require registration in Android Manifest. xml. Instead, it calls the registerReceiver() method of the context object to register in activity. It's similar to static content. One parameter is the receiver object, and the other is the IntentFilter object. The parameter of the IntentFilter constructor is the action to be received.
Dynamic registration features: After registration in the code, when the application shuts down, it will no longer listen.
Steps to achieve dynamic registration and monitor network status:
1. Create a class MyReceiver that inherits the BroadCast Receiver class and overrides the onReceiver() method of the parent class, so that when the network changes, the onReceiver method will be executed.
  class MyReceiver extends BroadcastReceiver{
        @Override
        public void onReceive(Context context, Intent intent) {
            Toast.makeText(context, "Changes in network connection status", Toast.LENGTH_SHORT).show();
        }
    }
2. Create an instance of MyReceiver in the onCreate() method, and create a filter of IntentFilter to specify action, because when the network state changes, the system sends broadcasts such as android. net. Conn. CONNECTIVITY_CHANGE. If you want to call another shutdown, you can use the corresponding action. Finally, the registerReceiver() method is invoked to pass in instances of myReceiver and intentFilter, thus completing the registration.
 @Override
    protected void onCreate(Bundle savedInstanceState) {
        super.onCreate(savedInstanceState);
        setContentView(R.layout.activity_main);
        MyReceiver   myReceiver = new MyReceiver();
       //Create filters and develop actions to receive broadcasts with actions
        IntentFilter  intentFilter=new IntentFilter("android.net.conn.CONNECTIVITY_CHANGE");
        //Registered Broadcasting Receiver
        registerReceiver(myReceiver,intentFilter);

    }
       //The second way to create filters
          IntentFilter  intentFilter=new IntentFilter();
          intentFilter.addAction("android.net.conn.CONNECTIVITY_CHANGE");
3. Finally, unregisterReceiver() is called in onDestory() method to destroy broadcast and release memory.
 @Override
    protected void onDestroy() {
        super.onDestroy();
        unregisterReceiver(myReceiver);
    }
4. Because the Android system protects the privacy of user devices, some sensitive permissions relative to users need to add permission declarations in the configuration Android Manifest. XML file.
<uses-permission android:name="android.permission.ACCESS_NETWORK_STATE"/>
3.3 Send Custom Broadcasting
Because we know that what we are adapting to is not only a broadcasting receiver, but also a broadcasting transmitter. If it can only be answered and not delivered, it is no different from the radio. As mentioned earlier, broadcasting can be divided into two main types: standard broadcasting and orderly broadcasting. Here's how to customize the broadcasting. I'm sure you'll be very excited after you watch it. You can customize your Style.
3.3.1 Transmitting Standard Broadcasting
Before we think about sending broadcasts, we need a receiver so that we can know if something is actually being received. Otherwise, just send, send whether the results do not know, this has done useless work. The way of registration, we choose Static registration, because we are self-defined broadcasting, so when the system starts, it will not send the broadcast directly.
Specific steps:
1. Create a class MyBroadCastReceiver that inherits BroadcastReceiver. Here's the prompt bullet window.
public class MyBroadCastReceiver extends BroadcastReceiver {

    @Override
    public void onReceive(Context context, Intent intent) {
        Toast.makeText(context, "Send it to me, radio.", Toast.LENGTH_SHORT).show();
    }
}
2. In the Androidmanifest.xml file, modify the receiver tag to add the broadcast that needs to be sent.
   <receiver
            android:name=".myStyle.MyBroadCastReceiver"
            android:enabled="true"
            android:exported="true">
            <intent-filter>
                <action android:name="com.demo.broadcastreceiverdemo.MY_BROADCAST" />
            </intent-filter>

        </receiver>
Here we need to explain that we have added a broadcast of com.demo.broadcastreceiverdemo. MY_BROADCAST to the action tag. So when we send the broadcast later, we need to send it. Then receive the same broadcast tag in receiver. Specifically, the format is full package name + custom. Otherwise it will make a mistake. You can try.
3. Modify the activity_main2.xml file
<?xml version="1.0" encoding="utf-8"?>
<LinearLayout xmlns:android="http://schemas.android.com/apk/res/android"
    android:layout_width="match_parent"
    android:layout_height="match_parent"
    android:gravity="center"
  >

    <Button
        android:id="@+id/button"
        android:layout_width="150dp"
        android:layout_height="50dp"
        android:text="Transmit broadcast"/>

</LinearLayout>
4. Broadcasting
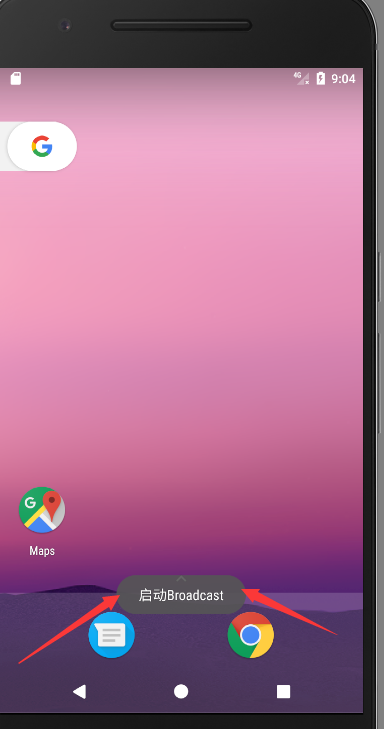
public class Main2Activity extends AppCompatActivity {
    @Override
    protected void onCreate(Bundle savedInstanceState) {
        super.onCreate(savedInstanceState);
        setContentView(R.layout.activity_main2);
        Button button= (Button) findViewById(R.id.button);
        button.setOnClickListener(new View.OnClickListener() {
            @Override
            public void onClick(View view) {
                Intent  intent=new Intent("com.demo.broadcastreceiverdemo.MY_BROADCAST");
                sendBroadcast(intent);
            }
        });
    }
}
We add the click event of the button to send a custom broadcast. First, the Intent object is constructed, then the broadcast to be sent is passed in, and then the sendBroadCast() method of Context is invoked, so that all receivers listening on com.demo.broadcastreceiverdemo. MY_BROADCAST will receive the broadcast information. The operation effect is shown as follows:
This is a simple example. We can send broadcasts by triggering click events in MainActivity, and customize receivers to receive broadcasts.
3.3.2 Send Ordered Broadcasting
In the first part of the broadcasting introduction, we know the principle of orderly broadcasting and its application scenarios. We know that broadcasting can communicate across processes. Therefore, communication between different processes is achievable. In order to test orderly broadcasting, we create a new project, then send the broadcast from the first project, and the second project implements acceptance.
Implementation steps:
1. Create a new project, and then create a new class Second BroadCastReceiver to inherit BroadCastReceiver.
public class SecondBroadCastReceiver extends BroadcastReceiver {
    @Override
    public void onReceive(Context context, Intent intent) {
        Toast.makeText(context, "The second process receives the broadcast", Toast.LENGTH_SHORT).show();
    }
2. In the second Android Mainifest. XML file, modify the receive method to set the broadcast accepted by action as com. demo. broadcast receiver demo. MY_BROADCAST for the first project.
    <receiver
            android:name=".SecondBroadCastReceiver"
            android:enabled="true"
            android:exported="true">
            <intent-filter >
                <action android:name="com.demo.broadcastreceiverdemo.MY_BROADCAST"/>
            </intent-filter>
        </receiver>
We can see that both the first and the first project can receive the same broadcast com.demo.broadcastreceiverdemo. MY_BROADCAST. Then back to the first project interface, the results are shown as follows:
We can see that we received two messages, MyBroadCast Receiver and Econd BroadCast Receiver, so our applications can be communicated.
But so far, all the programs we send out are standard broadcasts. What kind of orderly broadcasts? Back to the first project project.
public class Main2Activity extends AppCompatActivity {
    @Override
    protected void onCreate(Bundle savedInstanceState) {
        super.onCreate(savedInstanceState);
        setContentView(R.layout.activity_main2);
        Button button= (Button) findViewById(R.id.button);
        button.setOnClickListener(new View.OnClickListener() {
            @Override
            public void onClick(View view) {
                Intent  intent=new Intent("com.demo.broadcastreceiverdemo.MY_BROADCAST");
//              sendBroadcast(intent);
                sendOrderedBroadcast(intent,null);
            }
        });
    }
}
Modify the intent sending method, sendOrderedBroadcast(). This method takes two parameters, the first parameter is intent, and the second parameter is a permission-related string. Pass a null value here. Then run the first project again and find that the two applications can still receive broadcasts.
It doesn't seem to make any difference, but we know that ordered broadcasting is serial broadcasting, has priority, and broadcasting can be intercepted.
1. Setting priorities:
        <receiver
            android:name=".myStyle.MyBroadCastReceiver"
            android:enabled="true"
            android:exported="true">
            <intent-filter  android:priority="100">
                <action android:name="com.demo.broadcastreceiverdemo.MY_BROADCAST" />
            </intent-filter>
        </receiver>
Add android:priority="100" in intent-filter, and the number can be set by itself. The bigger the number, the higher the priority. When you set the action value of the second project to be larger than the first, the second pop-up window will be earlier than the first.
2. Interception of broadcasting
public class MyBroadCastReceiver extends BroadcastReceiver {

    @Override
    public void onReceive(Context context, Intent intent) {
        Toast.makeText(context, "Send it to me, radio.", Toast.LENGTH_SHORT).show();
        abortBroadcast();//Interception broadcast
    }
}
The abortBroadcast() method is added to the overridden onReceive() method, thus completing the operation of intercepting broadcasting.
4. Use local broadcasting
The broadcasting we talked about before belongs to the global broadcasting system whether it is transmitted or received. The broadcasting can be received by any application program and also by any application program, so this will cause security problems. The message sent by broadcasting is intercepted by other programs, or other programs send junk broadcasting to you differently, that's all.
So in order to solve the security problem, Android introduced the local broadcast message mechanism, so that the broadcast messages sent can only be transmitted in the application, and the broadcast receiver can only receive messages from the application, so there is no security problem. The code is as follows:
1. In MainActivity, define an internal class integration BroadcCastReceiver
class LocalBroadCastReceiver extends BroadcastReceiver{
        @Override
        public void onReceive(Context context, Intent intent) {
            Toast.makeText(context, "Accept local broadcasts", Toast.LENGTH_SHORT).show();
        }
    }
2. Set up the broadcast to be sent and the broadcast to be received. We need to introduce the Local Broadcast Manager Local Broadcast Management class because we need to use local broadcasting here. Get the instance through getInstance() method, then call sendBroadcast() to send the broadcast through local broadcasting, then set the filter, filter the received broadcast action, and finally instantiate the local broadcasting receiver to register the local broadcasting.
    private LocalBroadcastManager localBroadcastManager;
    private IntentFilter intentFilter;
    private LocalBroadCastReceiver localBroadCastReceiver;

    @Override
    protected void onCreate(Bundle savedInstanceState) {
        super.onCreate(savedInstanceState);
        setContentView(R.layout.activity_main3);
        //Get examples
        localBroadcastManager = LocalBroadcastManager.getInstance(this);
        Button button= (Button) findViewById(R.id.button3);
        button.setOnClickListener(new View.OnClickListener() {
            @Override
            public void onClick(View view) {
                Intent intent=new Intent("com.demo.broadcastreceiverdemo.MY_LOCAL_BROADCAST");
                localBroadcastManager.sendBroadcast(intent);
            }
        });
        intentFilter = new IntentFilter();
        intentFilter.addAction("com.demo.broadcastreceiverdemo.MY_LOCAL_BROADCAST");
        localBroadCastReceiver = new LocalBroadCastReceiver();
        localBroadcastManager.registerReceiver(localBroadCastReceiver,intentFilter);//Register Local Broadcasting Monitor
    }
3. Remember that the code registers the broadcast and destroys it.
 @Override
    protected void onDestroy() {
        super.onDestroy();
      localBroadcastManager.unregisterReceiver(localBroadCastReceiver);
    }
The complete code is as follows:
public class Main3Activity extends AppCompatActivity {

    private LocalBroadcastManager localBroadcastManager;
    private IntentFilter intentFilter;
    private LocalBroadCastReceiver localBroadCastReceiver;

    @Override
    protected void onCreate(Bundle savedInstanceState) {
        super.onCreate(savedInstanceState);
        setContentView(R.layout.activity_main3);
        //Get examples
        localBroadcastManager = LocalBroadcastManager.getInstance(this);
        Button button= (Button) findViewById(R.id.button3);
        button.setOnClickListener(new View.OnClickListener() {
            @Override
            public void onClick(View view) {
                Intent intent=new Intent("com.demo.broadcastreceiverdemo.MY_LOCAL_BROADCAST");
                localBroadcastManager.sendBroadcast(intent);
            }
        });
        intentFilter = new IntentFilter();
        intentFilter.addAction("com.demo.broadcastreceiverdemo.MY_LOCAL_BROADCAST");
        localBroadCastReceiver = new LocalBroadCastReceiver();
        localBroadcastManager.registerReceiver(localBroadCastReceiver,intentFilter);//Register Local Broadcasting Monitor
    }

    @Override
    protected void onDestroy() {
        super.onDestroy();
      localBroadcastManager.unregisterReceiver(localBroadCastReceiver);
    }

    class LocalBroadCastReceiver extends BroadcastReceiver{

        @Override
        public void onReceive(Context context, Intent intent) {
            Toast.makeText(context, "Accept local broadcasts", Toast.LENGTH_SHORT).show();
        }
    }
}
The effect is as follows:
Finally, github address: https://github.com/wangxin3119/BroadCastDemo