Tools used, xftp (file transfer), xshell (remote connection)
The port opened by the aliyun server firewall. 80,22 (ssh), 3306 (mysql), 8000,9090
Deployment projects:
1. Install nginx
1>http://nginx.org/en/download.html
2 > Download: wget http://nginx.org/download/nginx-1.17.0.tar.gz
3 > decompression package tar xf nginx-1.17.0.tar.gz
4 > Installation Dependence on yum-y install pcre-devel zlib-devel
5 > Install nginx:. / configure --prefix=/usr/local/nginx into the decompressed file
6 > make and make install
7 > Start nginx/usr/local/nginx/sbin/nginx to see the welcome page through browser access to server public network ip
2. Install mysql database
Installation dependencies: yum-y install ncurses-devel gcc-* bzip-* yum-y install gcc-*
Install cmake:

wget https://github.com/Kitware/CMake/releases/download/v3.14.4/cmake-3.14.4.tar.gz
   Unzip cmake
   Enter the cmake folder and run the configure command. / configure
   No error instructions for successful installation and then cmake compiles make-j4 make install
  Check the cmake version to confirm that the cmake --version was installed successfully
Install boost version 1.59
Download: https://www.boost.org/users/history/version_1_59_0.html
Unzip boost, because boost is a green version, just decompress it directly.
Cut the boost folder MV boost_1_59_0/usr/local/boost
Install mysql
   Download the community version of MySQL 5.7 from the official website
Unzip and enter the unzipped folder to execute the following commands:

cmake . -DCMAKE_INSTALL_PREFIX=/usr/local/mysql \
-DMYSQL_DATADIR=/usr/local/mysql/data/ \
-DMYSQL_UNIX_ADDR=/usr/local/mysql/mysql.sock \
-DWITH_INNOBASE_STORAGE_ENGINE=1 \
-DWITH_MYISAM_STORAGE_ENGINE=1 \
-DENABLED_LOCAL_INFILE=1 \
-DEXTRA_CHARSETS=all -DDEFAULT_CHARSET=utf8 -DDEFAULT_COLLATION=utf8_general_ci \
-DWITH_DEBUG=0 \
-DWITH_EMBEDDED_SERVER=1 \
-DDOWNLOAD_BOOST=1 -DENABLE_DOWNLOADS=1 -DWITH_BOOST=/usr/local/boost
The meanings of the representatives are as follows:
Specify installation path
Specify a data catalog
Specify sock file path
Install Innodb Storage Engine
Install Myisam Storage Engine
Allow data to be imported locally using the Load data command
Install all strings, default string utf8, check characters
Close debug
Generate a libmysqld.a library that integrates both mysql services and client API s
Allow boost to download boost library files
Compile without error: make-j4 make install
If an error occurs at compile time or after make install, make-j4 and make install can be recompiled
Some packages were not downloaded because of possible network speed problems, so make -j4 and make install again
Just fine
cp /usr/local/mysql/support-files/mysql.server /etc/init.d/mysql
ll /usr/local/mysql/
User who adds mysql, whose user name is mysql, and uses chown to change the owner of the specified file to the specified user MySQL user
useradd -s /sbin/nologin -r mysql
chown mysql.mysql /usr/local/mysql/ -R
ll /usr/local/mysql/
Establishing Soft Connection
ln -sf /usr/local/mysql/bin/* /usr/bin/
ln -sf /usr/local/mysql/lib/* /usr/lib/
ln -sf /usr/local/mysql/libexec/* /usr/local/libexec
ln -sf /usr/local/mysql/share/man/man1/* /usr/share/man/man1
ln -sf /usr/local/mysql/share/man/man8/* /usr/share/man/man8
# Editing configuration files
vim /etc/my.cnf
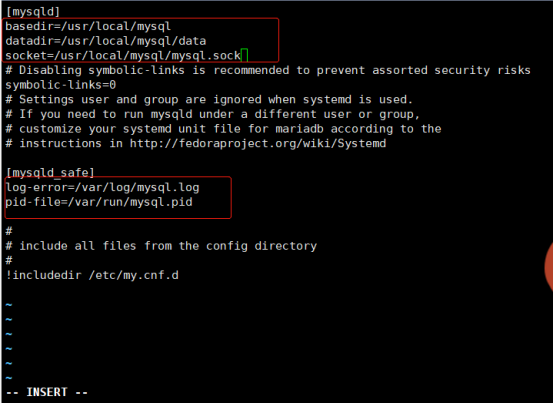
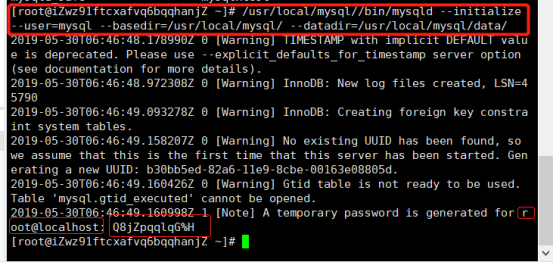
/usr/local/mysql//bin/mysqld --initialize --user=mysql --basedir=/usr/local/mysql/ --datadir=/usr/local/mysql/data/
Q8jZpqlqG%H This is the mysql password, I must remember to record it.
Start mysql
/etc/init.d/mysql start
yum -y install lsof
lsof -i :3306
Setting mysql
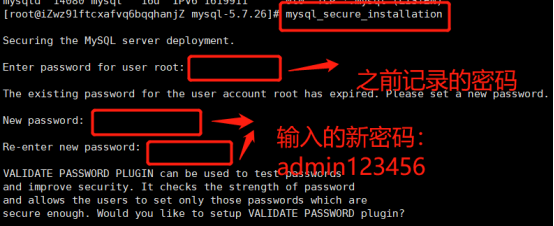
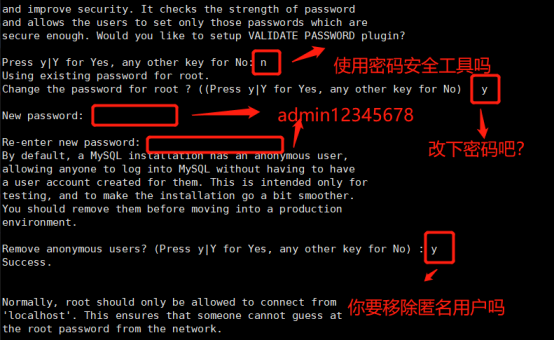
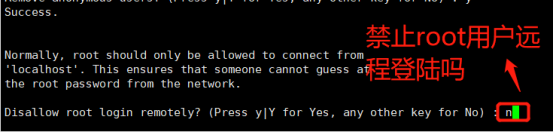
mysql_secure_installation


Ctr+d Exit
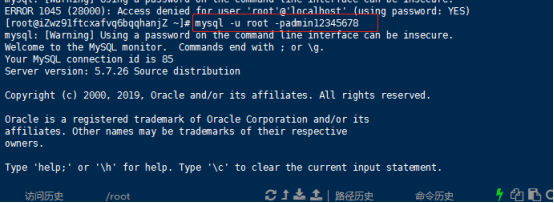
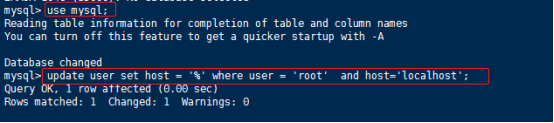

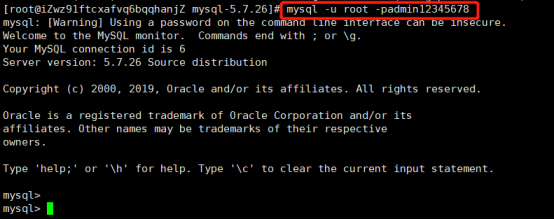
In this way, you can use Navicat to connect to the database.
3. Deployment of python
Download the python file wget https://www.python.org/ftp/python/3.7.1/Python-3.7.1.tar.xz
Unzip and enter the python folder
yum -y install gcc-* openssl-* libffi-devel sqlite-devel
./configure --enable-optimizations --with-openssl=/usr/bin/openssl
make -j8       make install
Default installation path: / usr / local / lib / Python 3.7

Upgrade PIP PIP3 install -- upgrade pip
Installation of virtual environment, because it is possible to online multiple projects, each project requires different tools, so create a virtual environment, a project one environment, no impact on each other: PIP3 install virtual alenv
Create a virtual environment virtualenv-p python3 Web
Make virtual environments work: source web/bin/activate
Then install Django: PIP3 install django==2.1.8 in the web virtual environment
Create a Django project: django-admin.py start project myweb
django-admin.py
Modify configuration files
vim myweb/settings.py
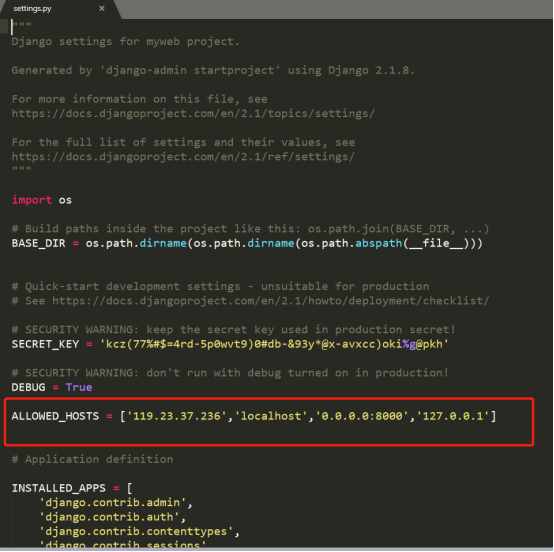
Specify the port and start the Django project: Python 3 management.py runserver 0.0.0.0:8000
Access the server's official network ip + port number through browser to view page information 119.23.204.209:8000
Server mysql version: 5.7 Django version: 2.1 Python version: 3.7
4. Publishing websites
install uwsgi : pip install uwsgi   pip3 install uwsgi
mkdir /etc/uwsgi
vim /etc/uwsgi/uwsgi.ini      Write the following
[uwsgi]
uid=root      //Who Starts uwgi
gid=root      //Who is the group?
socket = 127.0.0.1:9090    //Monitored ip What's the address and port?
master = true        //Start the main process
vhost = true         //Multi-site mode, which can publish multiple websites
no-site = true       //No entry modules and files are set in multi-station mode
workers = 2        //Number of subprocesses
reload-mercy = 10   //Smooth restart
vacuum = true      //Clean up files on exit and restart
max-requests = 1000  //After opening 10,000 processes, start respawn lower
limit-as = 512   //Control the total memory of the process at 512 M
buffer-size = 30000  //buffer Size
pidfile = /var/run/uwsgi9090.pid  //pid File for the following script to start and stop the process
daemonize = /var/log/uwsgi9090.log
pythonpath=/root/web/lib/python3.7/site-packages
Start uwsgi: uwsgi -- ini/etc/uwsgi/uwsgi.ini
View the enabled port information: netstat -ntpl
//Turn off uwsgi:
cat /var/run/uwsgi9090.pid     kill -9 11830
vim /etc/init.d/uwsgi     Write the following
#! /bin/sh
DESC="uwsgi daemon"
NAME=uwsgi
DAEMON=/usr/local/bin/uwsgi
CONFIGFILE=/etc/uwsgi/$NAME.ini
PIDFILE=/var/run/${NAME}9090.pid
SCRIPTNAME=/etc/init.d/$NAME
FIFOFILE=/tmp/uwsgififo
set -e
[ -x "$DAEMON" ] || exit 0

do_start() {
if [ ! -f $PIDFILE ];then
    $DAEMON $CONFIGFILE || echo -n "uwsgi running"
else
    echo "The PID is exit..."
fi
}

do_stop() {
if [ -f $PIDFILE ];then
    $DAEMON --stop $PIDFILE || echo -n "uwsgi not running"
    rm -f $PIDFILE
    echo "$DAEMON STOPED."
else
    echo "The $PIDFILE dosen't found"
fi
}

do_reload() {
if [ -p $PIDFILE ];then
    echo w > $FIFOFILE
else
    $DAEMON --touch--workers--reload $PIDFILE || echo -n "uwsgi can't reload"
fi
}

do_status() {
    ps aux|grep $DAEMON
}

case "$1" in
 status)
    echo -en "Status $NAME: \n"
    do_status
 ;;
 start)
    echo -en "Starting $NAME: \n"
    do_start
 ;;
 stop)
    echo -en "Stopping $NAME: \n"
    do_stop
 ;;
 reload|graceful)
    echo -en "Reloading $NAME: \n"
    do_reload
 ;;
 *)
    echo "Usage: $SCRIPTNAME {start|stop|reload}" >&2
    exit 3
 ;;
esac
exit 0
# Setting permissions
chmod 755  /etc/init.d/uwsgi
//Start uwsgi       /etc/init.d/uwsgi start
vim /usr/local/nginx/conf/nginx.conf
Write the following:
Note: If the domain name has been resolved, server_name localhost should be changed to server_name www.terroristhouse.com.
server {
        listen       80;
        server_name  localhost;

        location / {
            include uwsgi_params;
            uwsgi_pass 127.0.0.1:9090;
            uwsgi_param UWSGI_SCRIPT myweb.wsgi;
            uwsgi_param UWSGI_CHDIR /usr/local/nginx/html/myweb;
            index  index.html index.htm;
            client_max_body_size 35m;
            #uwsgi_cache_valid 1m;
            #uwsgi_temp_file_write_size 64k;
            #uwsgi_busy_buffers_size 64k;
            #uwsgi_buffers 8 64k;
            #uwsgi_buffer_size 64k;
            #uwsgi_read_timeout 300;
            #uwsgi_send_timeout 300;
            #uwsgi_connect_timeout 300;
        }
    }
#Move items to specified folders
mv myweb /usr/local/nginx/html/
Static file configuration

/usr/local/nginx/conf/nginx.conf File settings
server {
       listen       80;
       server_name  www.terroristhouse.com;
location /static/ {
        #autoindex on;
        alias /usr/local/nginx/html/mysite7/static/;
   break;
   #alias /usr/local/nginx/html/collectedstatic;
}
location /media/ {
   alias /usr/local/nginx/html/mysite7/media/;
   break;
   #autoindex on;
   #alias /usr/local/nginx/html/collectedstatic;
}
Collect local project installations under the library project directory
Export library: PIP3 freeze > requirements.txt

Installing libraries in server virtual projects
Import library: PIP3 install-r requirements.txt
Restart uwsgi and nginx to access domain names with browsers to view pages

/ etc/init.d/uwsgi stop stops running uwsgi
/ etc/init.d/uwsgi start opens and runs uwsgi
Kill all-9 nginx to close the process of nginx
/ usr/local/nginx/sbin/nginx to start and view nginx services
done.